Closed Captions Transcription manual
Introduction
This manual is intended for people using Clevercast to create closed captions through manual transcription. These captions will either be:
- shown in the video player directly
- sent to the Correction Room
- auto-translated into other languages
The interface for this is called a Transcription Room. If you're creating real-time captions for multiple languages, each language will have its own Transcription Room.
The room can be used to watch the incoming video stream and listen to the floor audio. In live streams with simultaneous audio translation, captioners can also use interpreter relay. The text chat on the bottom of the page allows for communication with event managers and other users.
The person using the room should receive a secure link from the event manager.
Important: make sure to read the requirements and best practices before you start using the transcription room.
The Transcription Room interface
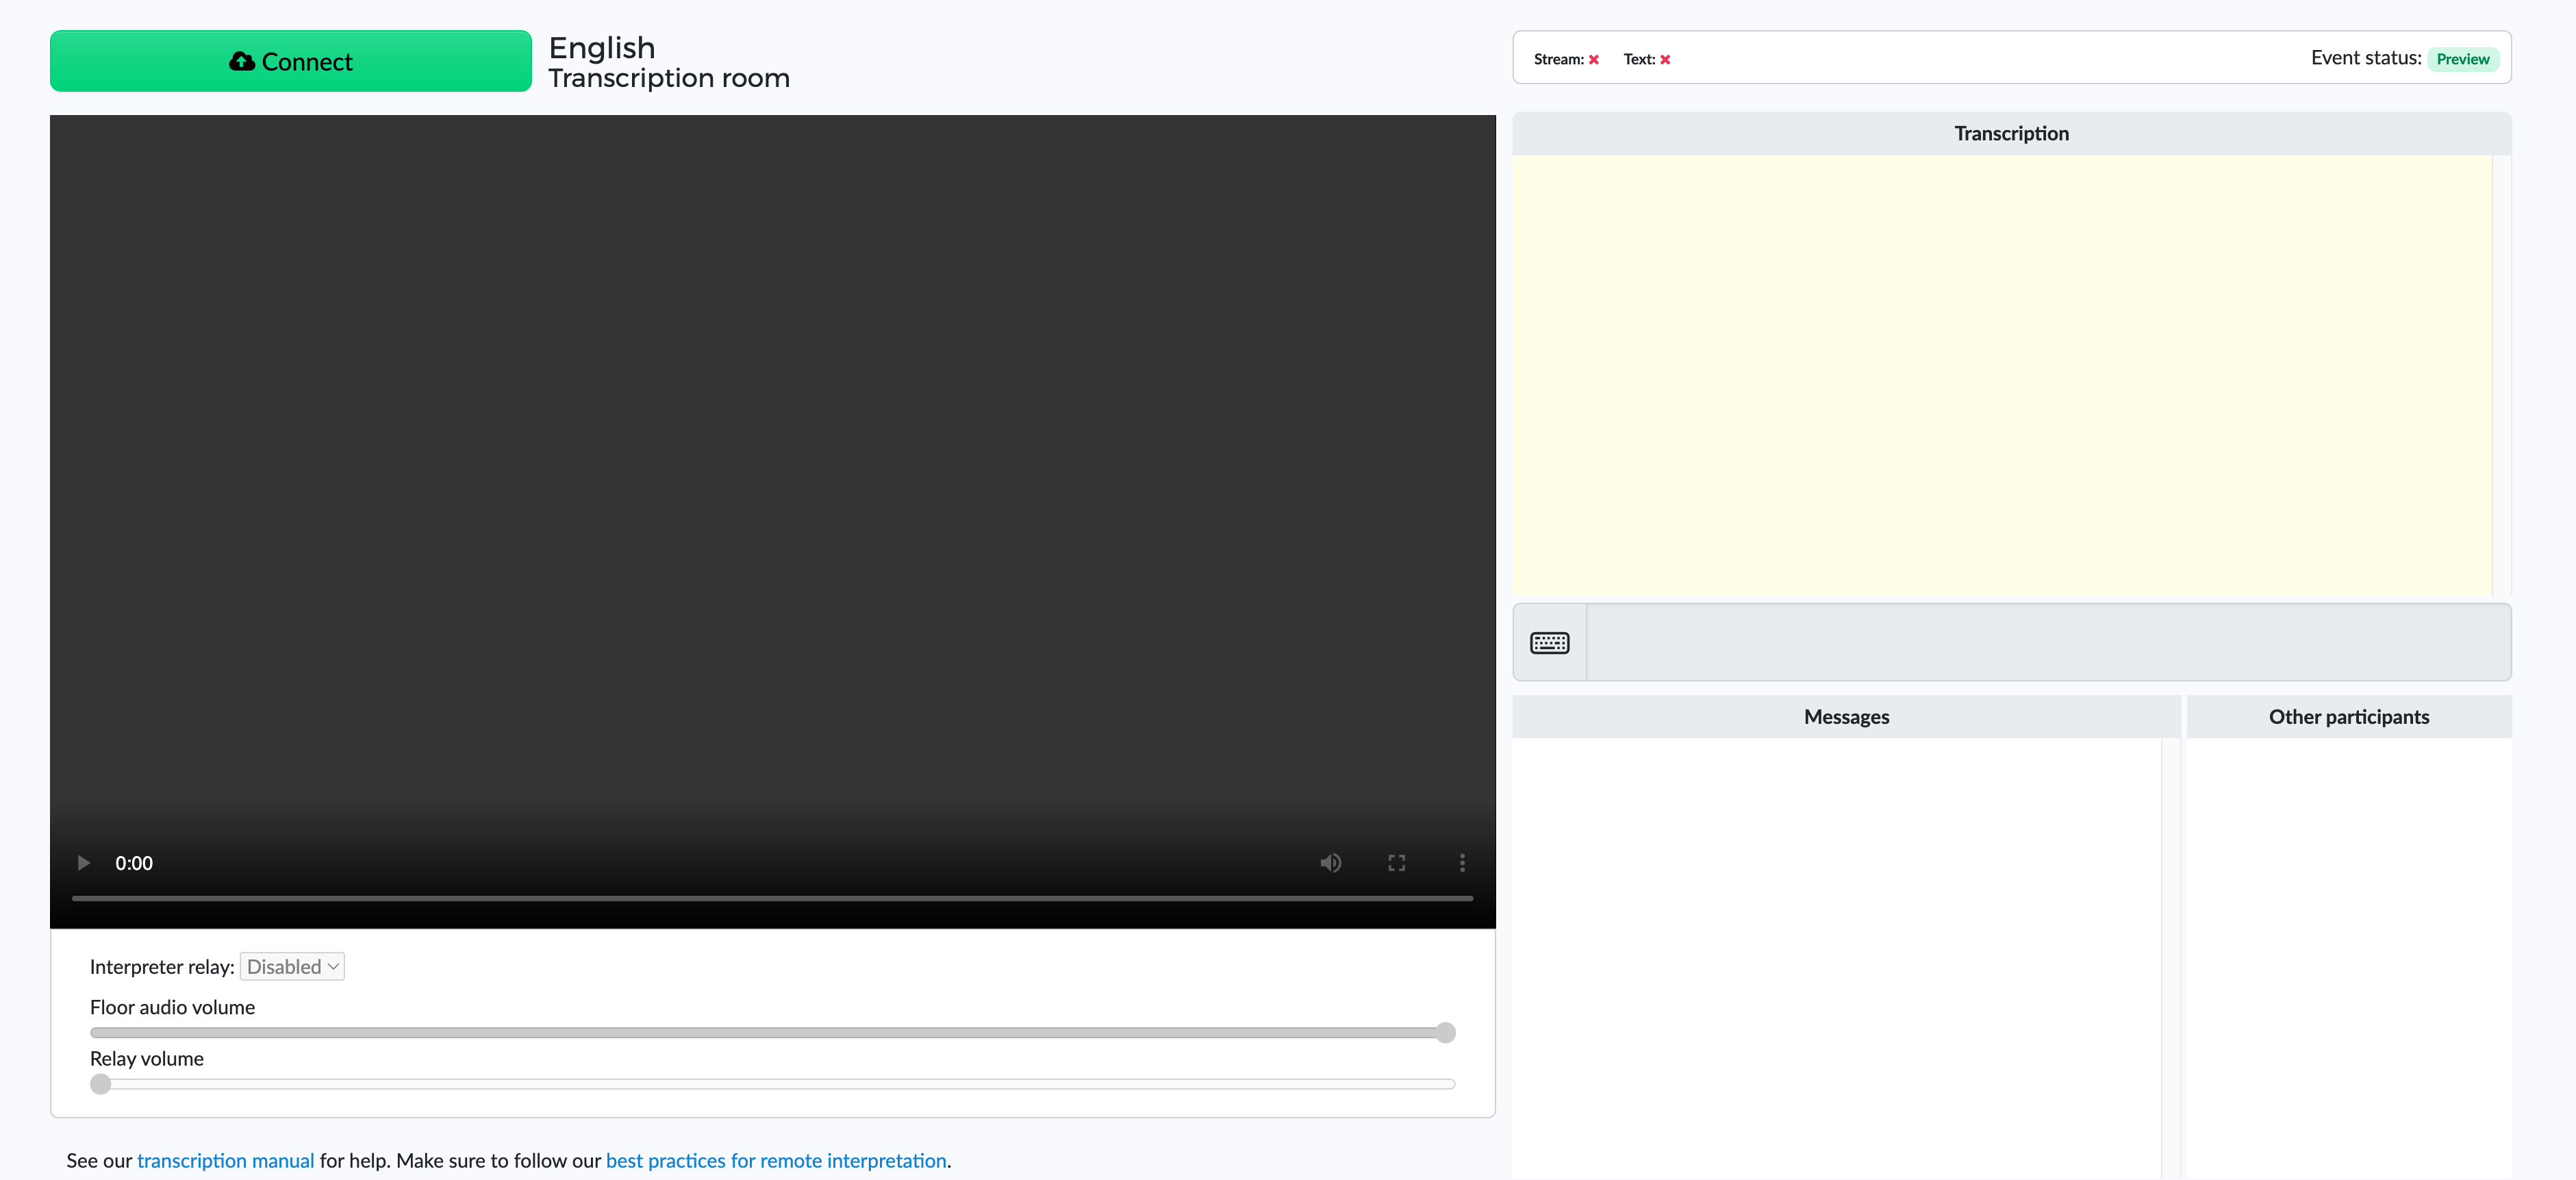
This is the interface for manual transcription. If you are the one creating the captions, you will receive a secure link to your language’s Transcription Room from the event’s manager. By using this link in Firefox (or any other browser), you automatically get access to the room.
![]()
The interface consists of the following elements:
- Connect/Disconnect button: before a user can start working, they have to connect to the transcription room (in order to receive the incoming stream and send outgoing text).
- Player: plays the video and floor audio as soon as it is being broadcast.
- Connection status: displays the status of the incoming Stream and the outgoing Text.
- Event status: the live event status. In order to make the room available for use, it is set to
Preview(for testing in advance, viewers can not see or hear the live stream),Started(live) orPaused(viewers can not see or hear the live stream). If set toInactiveorEnded, the room is not available. - Submitted text: displays already submitted transcription text. The window scrolls up, so the most recently added translations are at the bottom of the window.
- Transcription edit box: allows you to add new captions.
- Messages window: allows a user to communicate with other transcribers for the same language and with their event managers. It also contains system messages (e.g. when someone joins or leaves the room).
- Participants window: names of the other transcribers for the same language.
- Interpreter relay selection: if audio translation(s) are also done via T@H, this allows the user to listen to the translated audio stream(s).
- Volume slider: lets you adjust both the floor and the relay volume inside your proper Transcription Room.
Using the Transcription Room
After receiving the link to the room, a user should follow these steps:
1) Copy the link to your browser (preferably Firefox) to go to your transcription room (see image below).
2) Press the Connect button: Clevercast will ask you to fill in your name for the text chat. Other users and event managers will see your name in the ‘Other Participants’ dialog.

3) After filling out your name, you are connected. If the video stream is running, you should see green check marks for both Stream and Text. When the video broadcast is started, your video will automatically start playing.
The text chat can be used to communicate with other users for the same language or the managers of your event. On the right side, you can see other users of your Transcription Room.
Input methods for creating captions
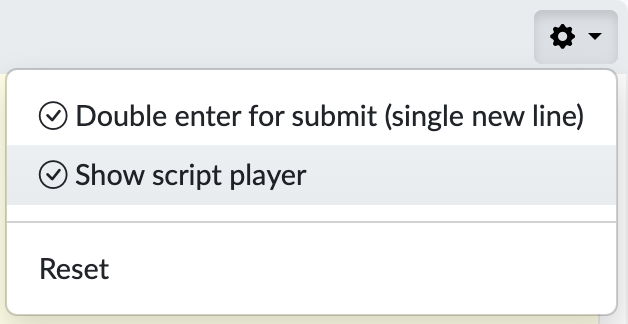
Overall, two input methods are used for the creation of closed captions on the Clevercast platform: respeaking and the use of specialised keyboards. The software we recommend for respeaking is called Dragon, while the recommended specialised keyboards is the Velotype keyboard.
Depending on your input method, you can use the settings cog to opt for subimission after hitting enter once or twice. By default, text in the edit box is submitted after hitting enter once. If you turn on submission after hitting enter twice, the first enter will simply start a new line inside the edit box. For keyboard users, this is a more common use.
![]()
In addition to Velotype and respeaking as input method, a scripted solution can be used as well. After connecting to the room, click the settings cog and click on Show script player.
The script player appears instead of the Messages and Other Participants list. They are moved below the player.
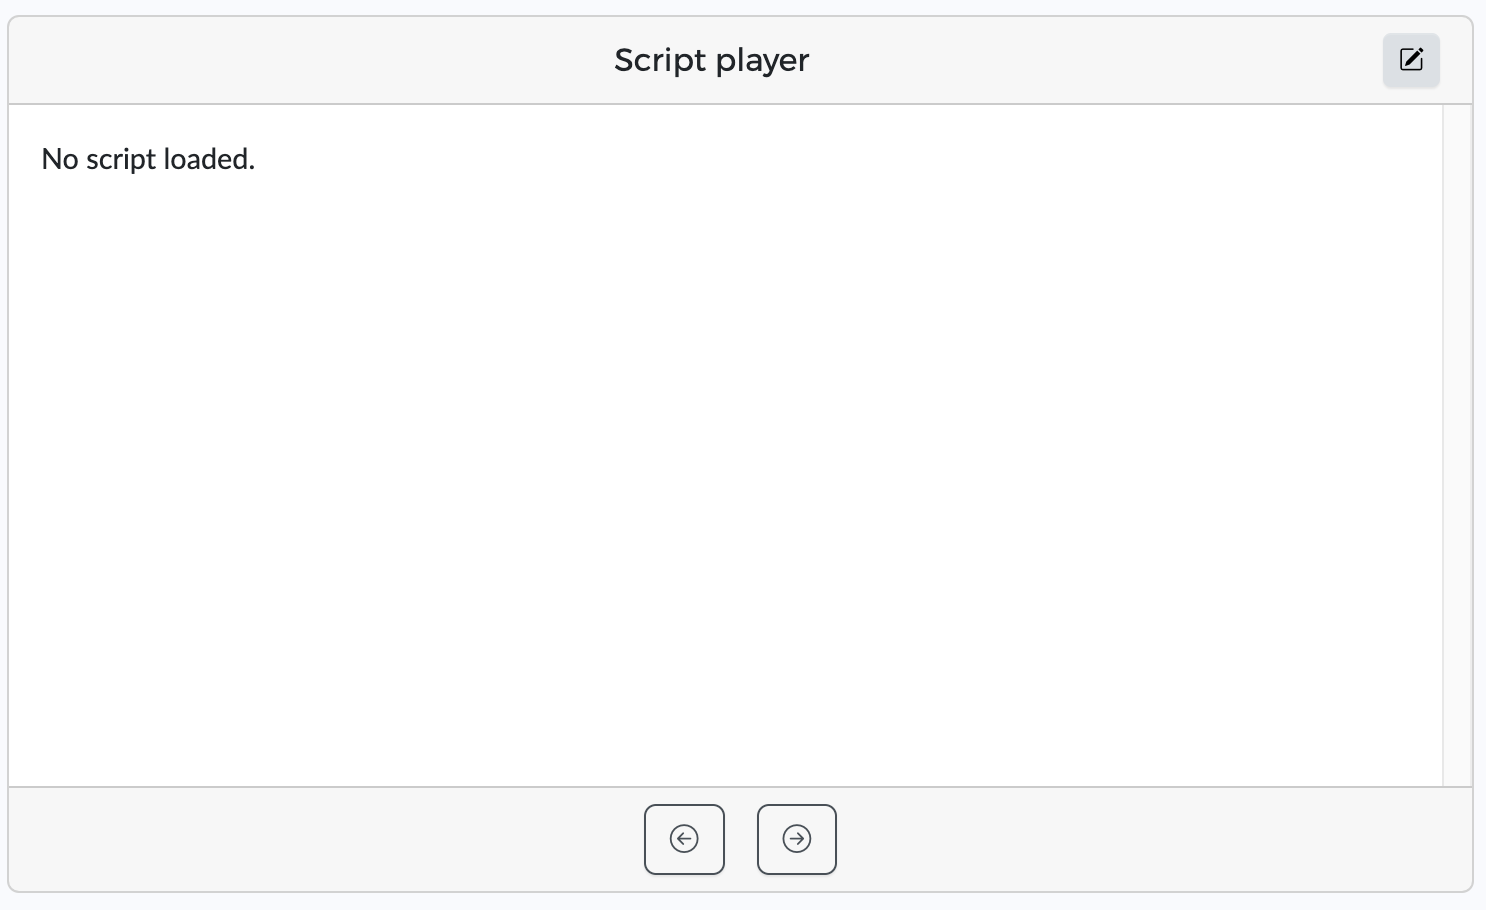
Click on the edit icon in the top-right corner. Click Choose file in the new window in the bottom-left corner and select the script (preferable a vtt file). After clicking close, the script should have appeared in the script player window.
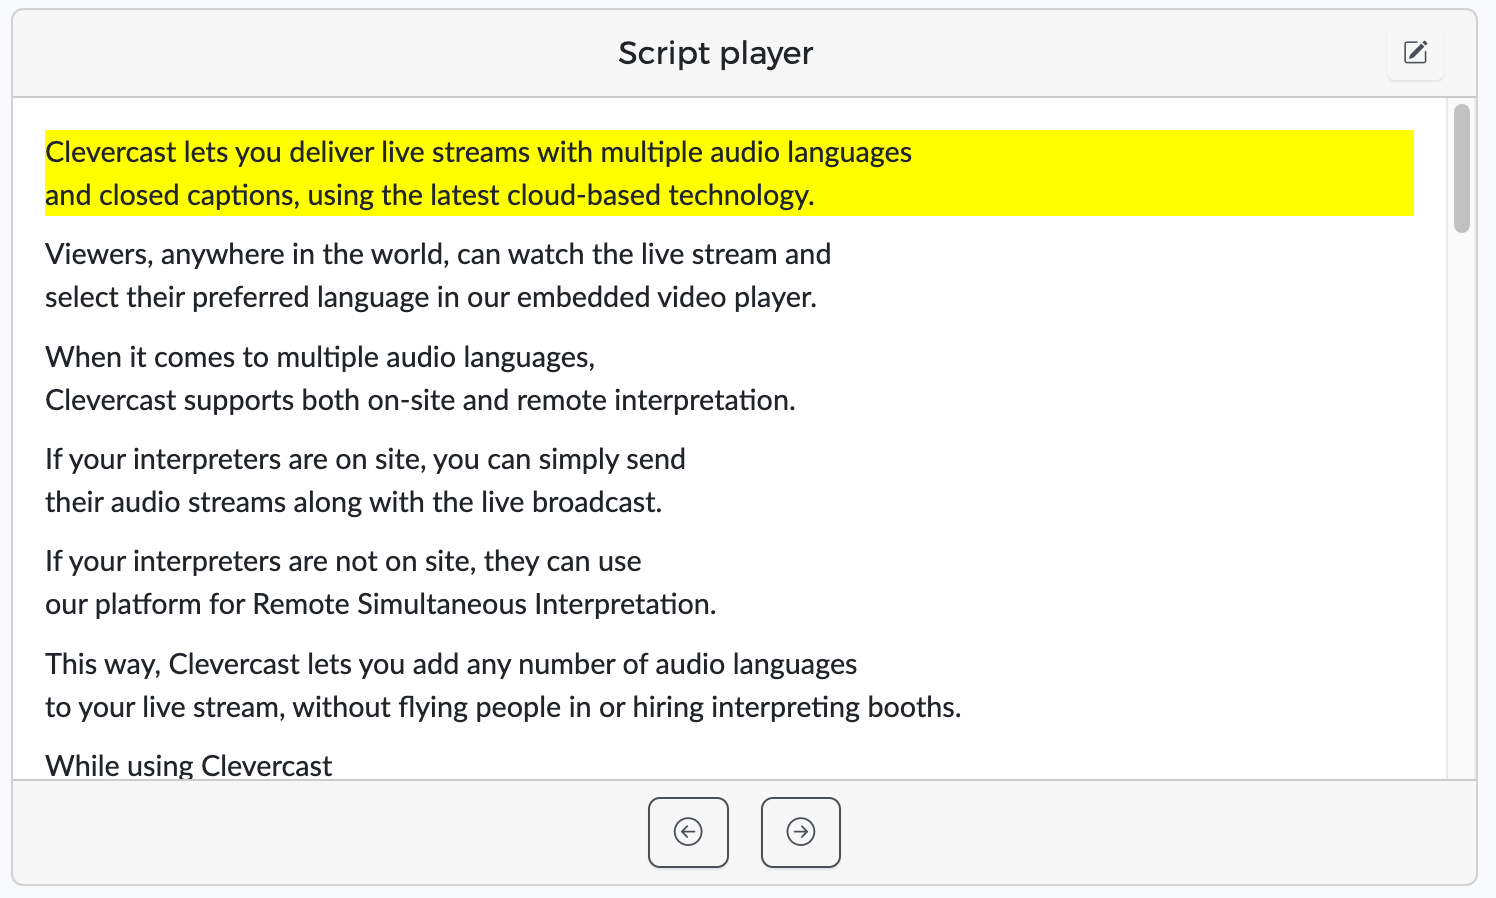
The script player is now ready to be used. Use the arrows to output the scripted text line by line.
The transcription process
To begin transcribing, start typing or respeaking in the Transcription edit box (next to the keyboard icon). Text is automatically added to the closed captions, in the following ways:
- Characters are sent automatically after three seconds without typing. You can go back and correct typos without viewers seeing them first. If you use copy paste, the number of characters will be taken into account to increase the automatic submit timeout.
- When you press enter (once or twice, see above), all remaining input is immediately sent.
- When over 80 characters are generated without a three-second pause and without enter being pressed, the characters are sent the next time the spacebar is hit (so the captions can appear in a timely manner)
As long as you haven't pressed enter, the complete sentence remains in your edit box and you can still make corrections to it.
When you press enter, the text is transferred from the edit box to the window above it. In the player, the entire text is displayed. It is no longer possible to correct it.
The correction process
Optionally, the captions can be sent to the corrector room. The corrector will see the captions appear and time will be allowed for correcting them before they are sent to the viewer. See the Correction manual for more information.
Requirements
Computer
We recommend a recent computer, preferably high-end or at least mid-range with a fast processor and sufficient memory (e.g. Intel i7 with 16GB RAM) and a dedicated sound card and graphic card.
Browser
The operating system doesn’t matter. It should only be able to run a recent version of the Mozilla Firefox browser (make sure to install the latest update).
We recommend using Firefox. Other browsers with WebRTC support, like Google Chrome, should also work, but we recommend using Firefox for a number of reasons:
- We use Firefox ourselves for testing.
- Google Chrome is more commonly used for everyday browsing. There is a higher chance of add-ons being installed that could affect performance.
If for some reason a translator can’t use Firefox, you could try using Google Chrome instead.
Headset
To listen to the incoming audio, we recommend using a professional headset.
Fast and stable connection to Clevercast servers
A wired internet connection is required for audio translation. A good wireless connection could suffice for transcription. But we still recommend using an ethernet connection if possible, since it will ensure that the connection will remain fast and stable during the entire event.
Users need a fast and stable internet connection to the Clevercast streaming servers located in the Netherlands.
To test this, you should receive a link to the Translate@Home Connection Test page from your project manager. This way, you can test the quality of your connection in advance.
After receiving the link, open your browser (close all unnecessary other applications) and paste the test link in the address bar. The test page will ask you to enter your name, email and location and press the Start button. The browser will establish a connection with Clevercast and start sending data packets for about 30 seconds.
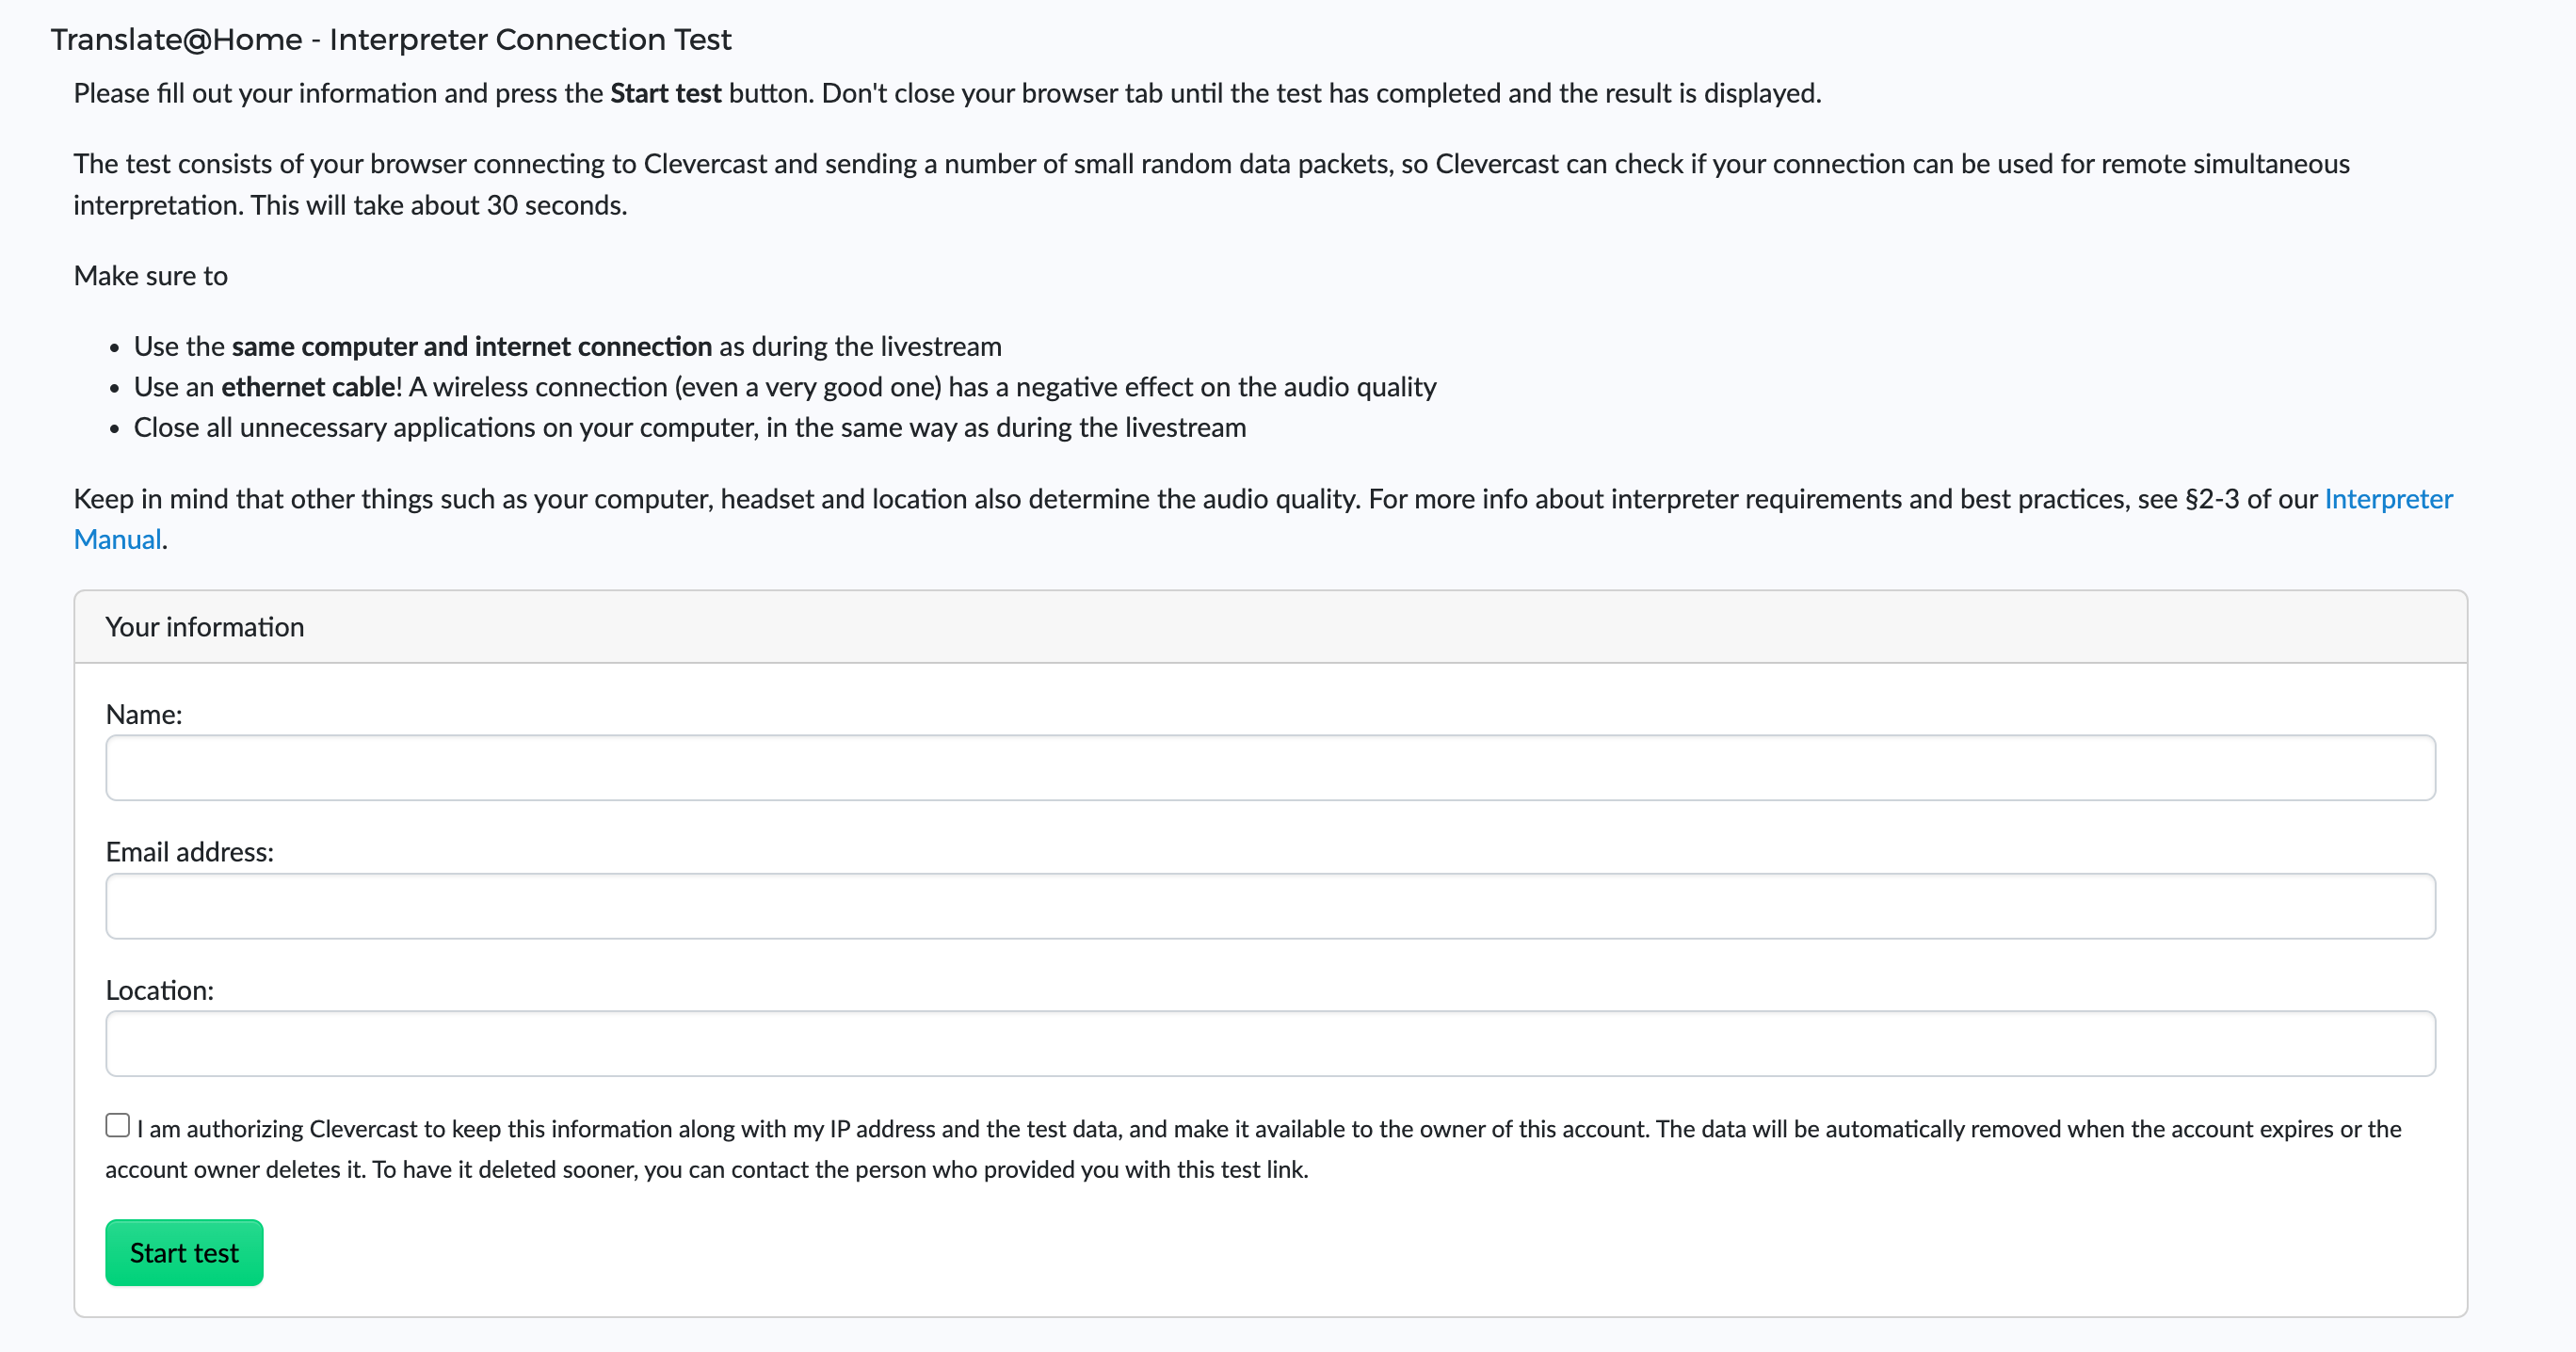
After 30 seconds, the test ends and you will see a popup with the result. The details of your test will also be made available to your project manager.
Sufficient bandwidth
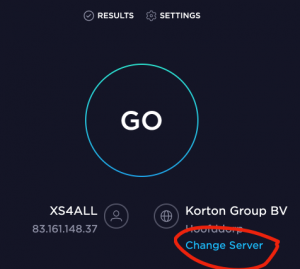
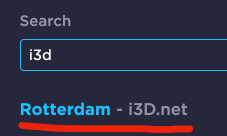
Users should have a bandwidth of at least 5 Mbps down. If you're not sure, make sure to test beforehand or check your available bandwidth by going to https://www.speedtest.net/. Click on the Change Server link and type ‘I3D’ in the popup dialog and select ‘Rotterdam – I3D.net’. Finally, press the GO button and wait until all tests are completed.
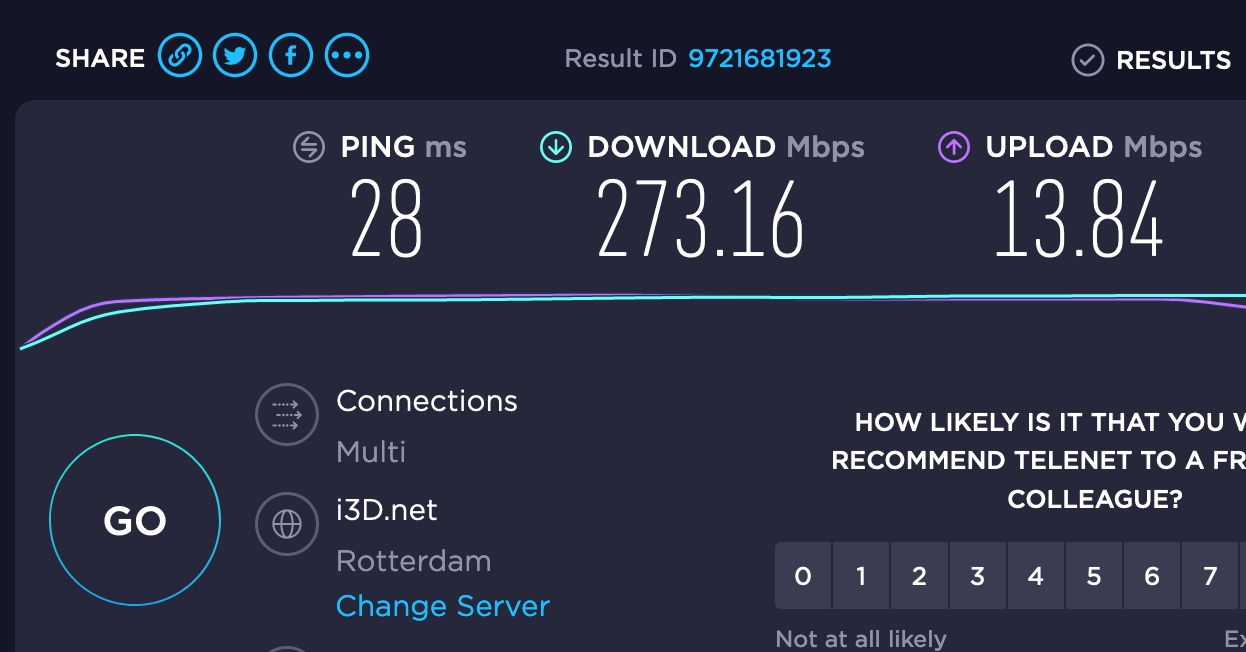
The Download Mbps value should be higher than 5 Mbps, otherwise you may experience difficulties in watching the original video + audio stream.
The PING and Upload Mbps value are less important (the Translate@Home Connection Test provides sufficient info).
Best practices
Make sure the latest Firefox version is installed
Do this before you start testing. Then go to the translator room and check if you can connect to video, audio and chat.
Notes:
- The OpenH264 video codec (offered by Cisco Systems, Inc) should be enabled in the Firefox plug-ins. This is the case by default. If you can’t see the video in Firefox (black screen) this plug-in is probably not enabled. Try enabling it or do a fresh install of Firefox.
- If you are unable to use Firefox and you have a high-end computer, you can also use Google Chrome (after testing).
Restart your computer and close all other applications
To make sure your computer is stable, restart it before translating. When you’re ready to start, close all unnecessary applications to prevent them from using your processor, memory or internet connection. Make sure the Operating System is not allowed to start or download automatic upgrades.
Don't use multiple browser tabs
Avoid opening rooms in multiple tabs. This can result in problems with your connections or audio quality.
Test extensively
Make sure to test beforehand with a stream that has comparable audio settings. While you’re testing, the event manager should listen and help you to set the volume of your microphone.
Reconnect if a connection problem persists
If a problem (e.g. local network issue) occurs during the event, the audio of your translation will restore itself in most cases. If it doesn’t, you should quickly reconnect (press the disconnect button and then connect again).