Simulive Streaming
Introduction
Simulive streaming works by streaming pre-recorded videos as if they were ‘real’ live streams at a scheduled time. If you have the opportunity to pre-record your event, there are many reasons to opt for a simulive stream.
Simulive streaming makes your life as a live stream producer a lot easier. Instead of managing a complex live production, all you have to do is upload a video file and schedule the time of your live stream. The data traffic costs will also be lower because of the higher degree of compression that comes with two-pass encoding.
Multiple live stream sessions can be started simultaneously and live streams can have many audio translation and closed captions. Clevercast’s multilingual video player allows your viewers to switch to their preferred language while watching the video, while providing the best possible experience on any device and platform.
Viewers are unable to notice any difference. The only difference with a ‘real’ live stream is that Clevercast takes care of the broadcast instead of you. Live streaming is done using the HTTP Live Streaming (HLS) protocol, in exactly the same way as a ‘real’ live stream. This also means that a source file must contain an intro and an outro, just like a ‘real’ live stream has to take HLS latency into account.
Note that the number of simulive streams that can be run simultaneously depends on your plan. By default, one simultaneous live stream is allowed.
Simulive source videos
Uploading source videos to Clevercast
Once your source video is ready, you can upload it to Clevercast (using HTTP or FTP) and turn it into a Video on-Demand (VoD) item. See the Enterprise Platform manual for general info about VoD items.
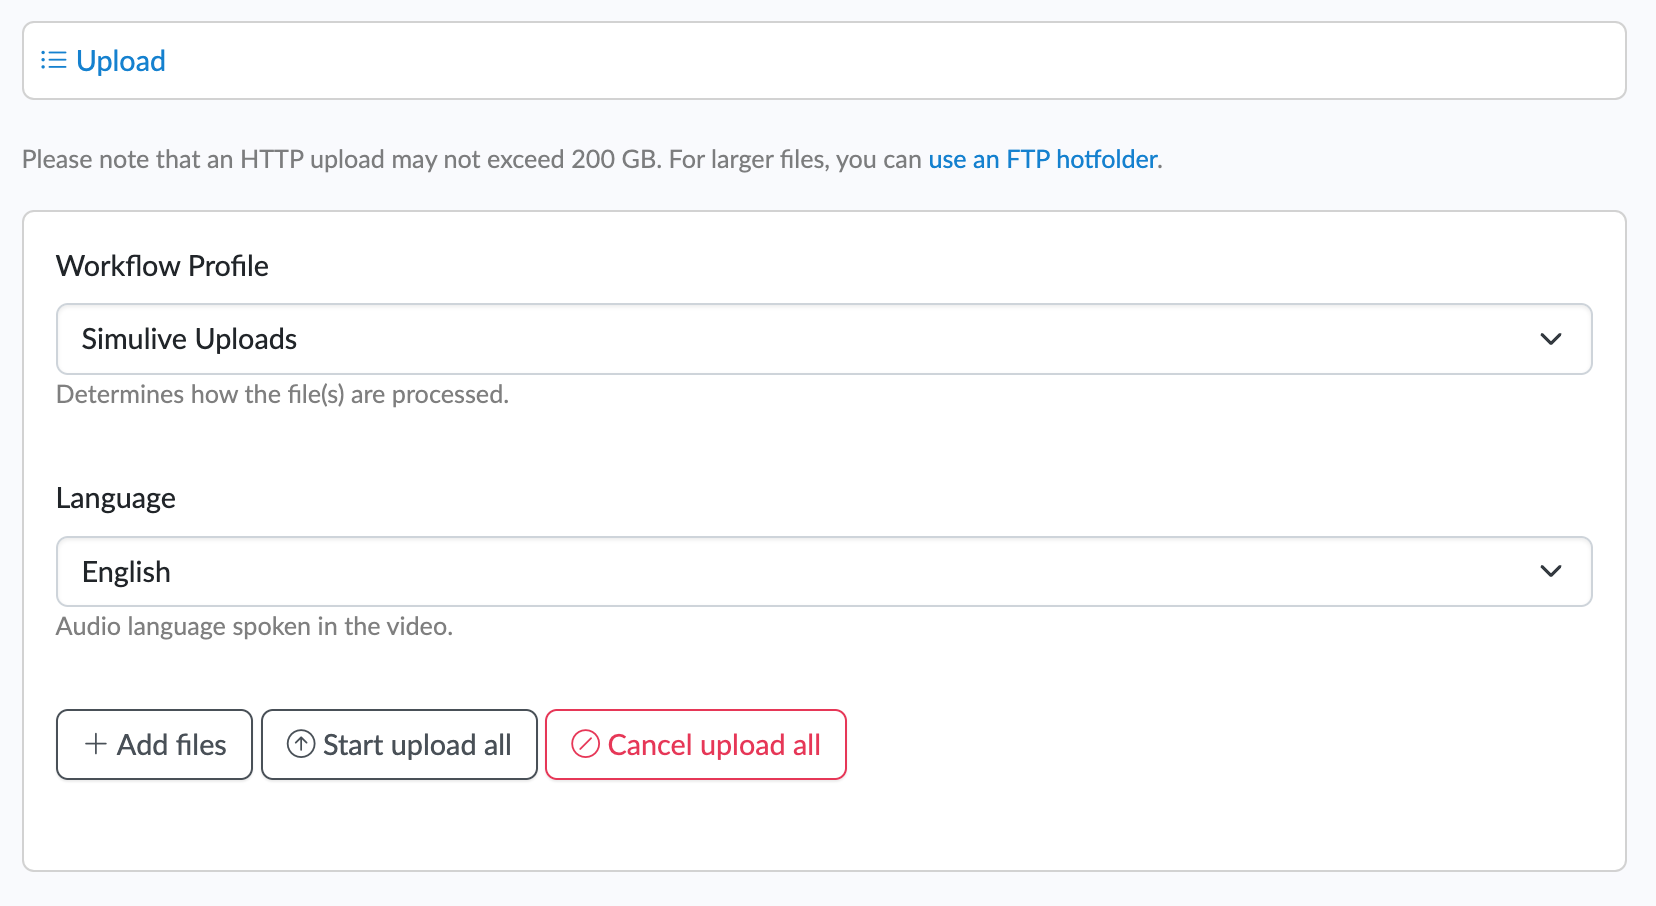
To use HTTP, go to the Upload menu in Clevercast. Make sure to select the ‘Simulive Uploads’ workflow profile. Select the audio language of your video. If multiple languages are spoken in the video, you can select Original as its language.
To use FTP, go to the Account > Settings menu and create a Hotfolder with the ‘simulive Source’ workflow profile. Use the hotfolder’s FTP credentials to upload the video file to Clevercast. Once uploaded, Clevercast will automatically start to transcode the uploaded video. In this case, you should set the item's default language after the video has been uploaded.
Clevercast will transcode your source file to a format ideally suited for adaptive live streaming and transfer the different resolutions to our streaming servers. This may take some time, depending on the duration of your source video, so make sure to upload it long enough in advance.
Source videos need an intro and outro of at least 2 minutes
An intro and outro of at least two minutes long is required to ensure that all viewers will see the actual video in full under all circumstances.
This is necessary because of the following reasons:
- First of all, there is a certain latency associated with HTTP Live Streaming, which may differ depending on device and internet connection of the viewer. To ensure smooth streaming for all viewers, Clevercast player will buffer a number of seconds of the live stream, before starting to play the video (hence the intro).
- Clevercast player automatically shows a custom image or message before and after the live stream. This ensures that viewers do not see a spinner. It may take a couple of seconds before the player detects that the live stream status has changed.
- On most browsers and devices, there will be a latency of 15-30 seconds. But the HLS implementation on iOS devices allows a player to buffer up to two minutes of video. If you don't provide an outro of two minutes (after the actual content has finished) this can lead to the Ended image/message being shown while the actual live stream is still playing.
Note: because of this requirement you shouldn’t use source videos with a total duration of less than 4 minutes, even for testing.
Adding extra audio languages and/or closed captions
If your simulive stream should have multiple audio languages and/or closed captions, wait until your source file has been transcoded and turned into an item by Clevercast. Go to the item’s detail page and follow the instructions in our Enterprise manual to create an item with multiple audio languages and/or closed captions (if you need both, first add the audio languages).
Note: a cloud recording in Clevercast which contains multiple audio languages and/or closed captions can also be used as simulive source item. Just make sure that the ‘Simulive Uploads’ workflow profile is used when publishing the recording as VoD item.
Note: if you want the closed captions to show a message during your intro, you should repeat it (e.g. every half minute). The reason is that closed captions behave differently in a live stream: viewers who only start watching after the start time of a caption (cf. the start of the cue in the .vtt file) will have to wait until the next caption. Take, for example, these two .vtt files:
In a VoD item, this caption will be displayed for 10 minutes. But as part of a live stream, this caption will only be visible to people who are already watching at the beginning of the live stream.
WEBVTT

1
00:00:00.000 --> 00:00:30.000
You selected the English subtitles

2
00:00:30.001 --> 00:01:00.000
You selected the English subtitles
By repeating the message, it will also be visible to viewers who begin watching the intro at a later time.
Simulive events
Create a simulive event
To schedule a simulive stream in an embedded player, you first need to create a Simulive Event in Clevercast. Note: if you are using Clevercast Webinar, read the next chapter instead.

Go to the Live > Events page. The menu on the left lets you create a simulive event. When creating the event, make sure to select the correct broadcast protocol:
- Simulive streaming with single audio: broadcast will be done by Clevercast, based on a VoD item with a single audio language. Note that this protocol doesn't allow you to select a multilingual VoD item as source file.
- Simulive streaming with multilingual audio: broadcast will be done by Clevercast, based on a VoD item with multiple audio languages. Note that this protocol doesn't allow you to select a single language VoD item as source file.
Closed captions are compatible with both protocols. When an item contains closed captions, they will automatically be part of the simulive stream.
Give the event a name and press the Create button. You will be redirected to the event detail page.
Schedule a simulive stream
On the Management tab of the event page, go to the Set Simulive Stream panel to schedule the live stream. When you schedule a simulive stream, you must fill in the following:
- Broadcast Start Time: the time at which Clevercast will start the broadcast of your video.
- Select Item to use: the item to be used as the source of the broadcast.
- Show Countdown in Player: if checked, Clevercast player will show a countdown timer to the start of your live event.
- Intro Seconds: the duration of your intro, used to determine the end point of the countdown timer.

For example, if you set ‘Broadcast Start Time to 6:00 PM, Clevercast will start broadcasting at 6:00 PM.
The Intro Seconds are only used to determine the end point of the countdown timer (if used). In the previous example, if ‘Intro Seconds is set to 120, Clevercast Player will count down to 6:02 PM (= the start of the event, after the intro has ended). Note that this is different for webinars (see next chapter).
Viewers will be able to see the live stream shortly after the broadcast starts. Note that the countdown timer will disappear from the player once the broadcast starts. So if you want to show a countdown until the start of the actual event, the intro of your video should also contain a countdown clock itself.
Simulive event flow
When you schedule a simulive stream, Clevercast sets the event status to Inactive. The embedded player automatically shows the Preview image (or message) that you can set on the Appearance tab of your event. The Streaming panel indicates when the simulive broadcast starts, while the Broadcast panel indicates which video resolutions, audio languages and captions will be streamed.
About 10-20 seconds after the scheduled Broadcast Start Time, Clevercast automatically sets the event status to Started. The embedded player detects this and starts showing the live stream.
When the broadcast ends, Clevercast automatically sets the event status to Ended. The embedded player detects this and shows the Ended image (or message) that you can set on the Appearance tab. Because of the latency that comes with HTTP Live Streaming, this will happen before the outro is completely finished.
Clearing and resetting a simulive stream
A simulive event can be reused. Once finished, you can set a new start time. If you want to correct a previous start time, you can reset it by clicking the Clear Simulive Stream button.
The Run Simulive Stream Now button allows you to start the simulive stream without scheduling it. When you click it, Clevercast immediately starts broadcasting the simulive stream and sets the event status to Started, so the embedded player starts to play the live stream. Note that this may only be done when no simulive stream is scheduled. If a simulive stream is scheduled for the event, you should clear it first.
Simulive webinars
This section explains how to use simulive streaming in a webinar context. For general info on webinars, see the Webinar Platform manual.
Creating a simulive webinar
To start, select the Webinars menu. The menu on the left lets you create a simulive webinar. When you create the webinar, you can choose whether to broadcast multiple audio languages or not (assuming your plan supports it).
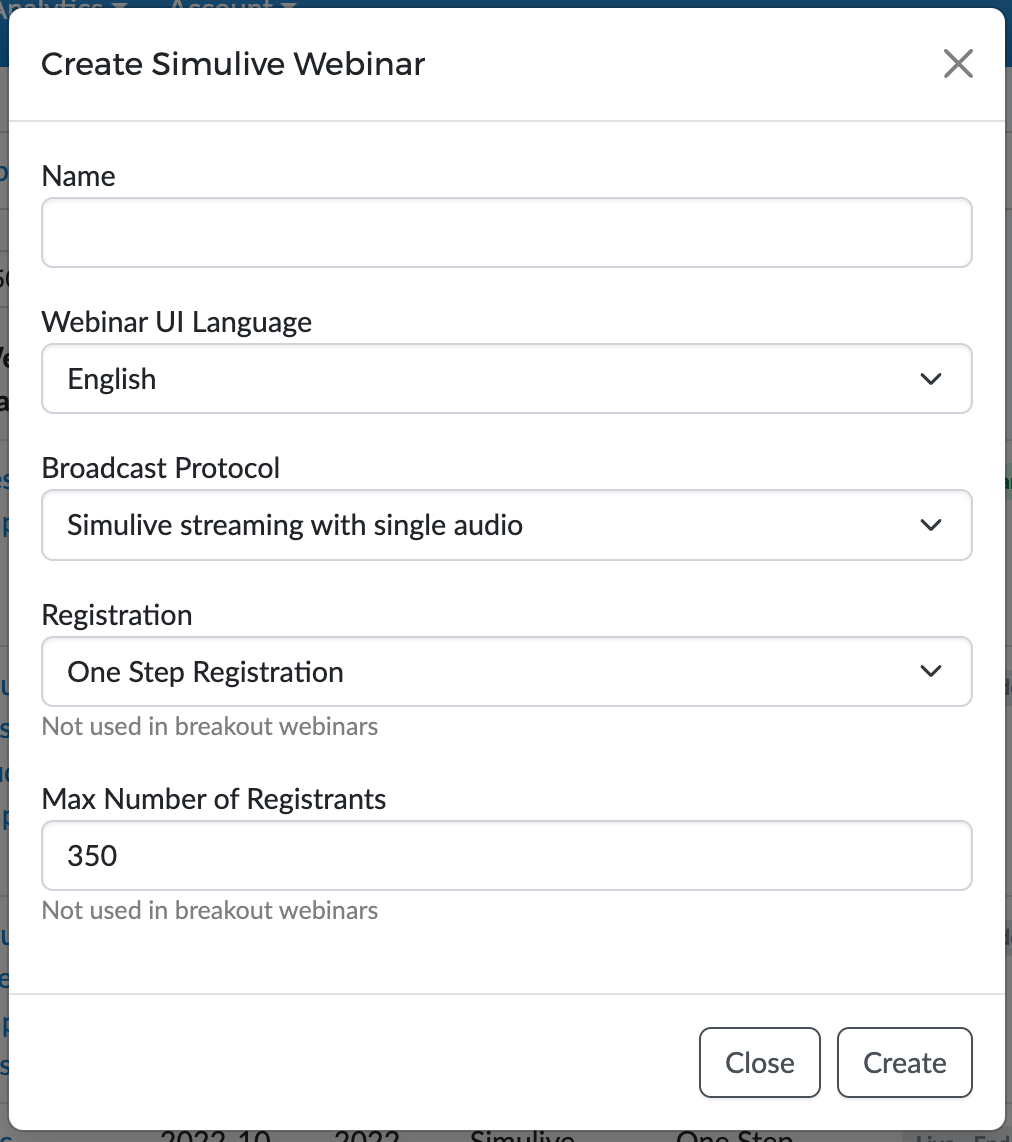
Give the webinar a name and press the Create button. You will be redirected to the webinar page.
Scheduling the webinar start time
To schedule a simulive stream, you must first set the start time of your webinar. Go to the Settings > Scheduling page, select the start and end time of your event and press the Submit button.
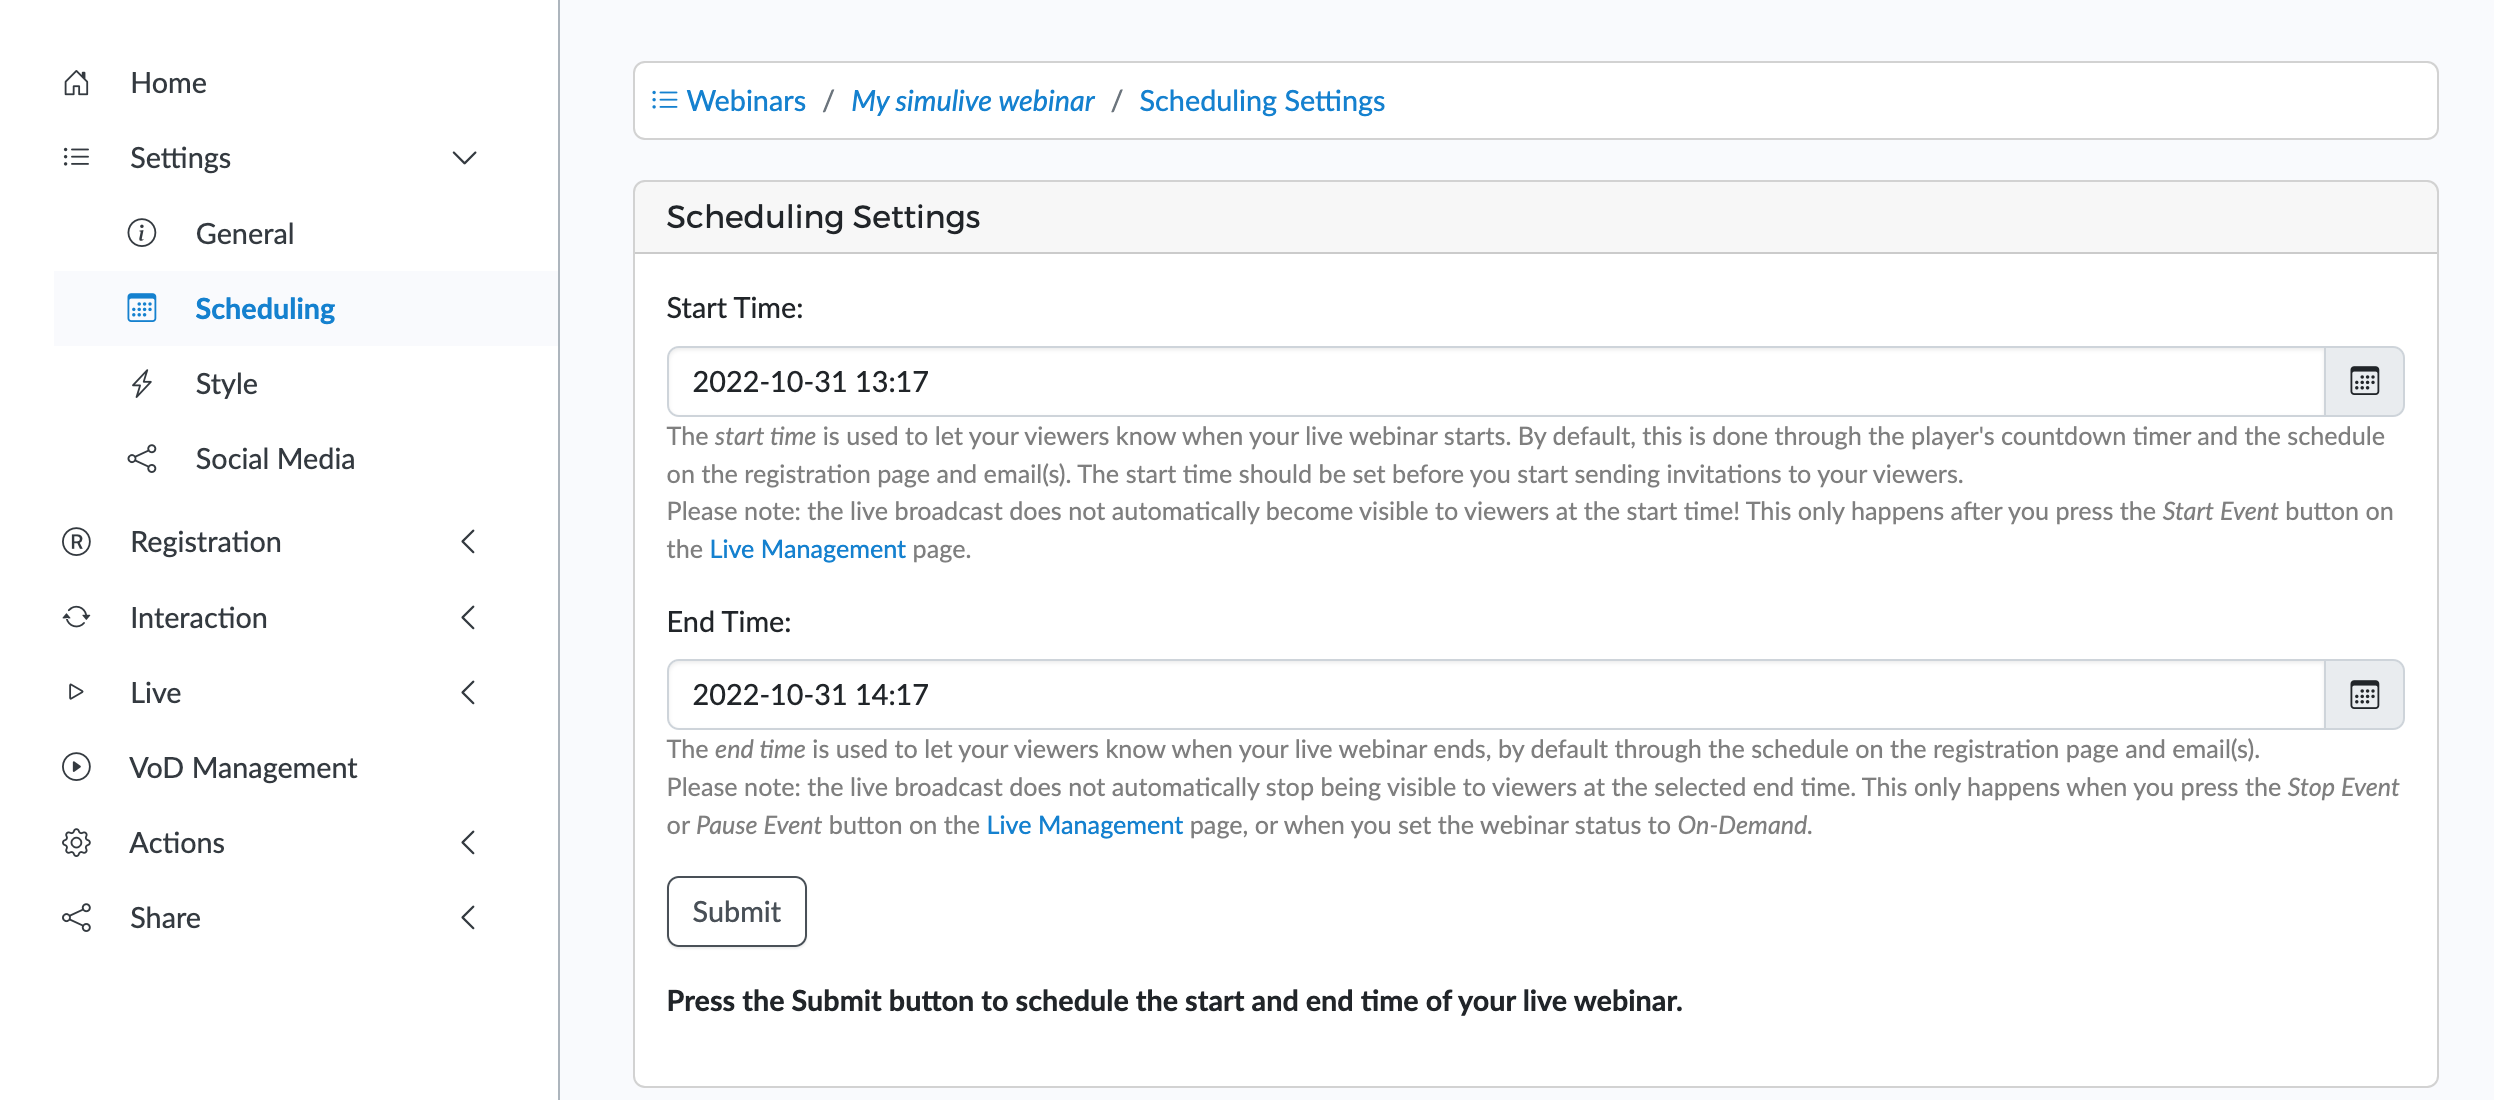
Important: the ‘Start Time is the time your webinar actually starts. This means that Clevercast will already start broadcasting the intro before this start time (see below). It should be a time in the future, otherwise you won’t be able to schedule the simulive stream (you can still use the Run Now button, though). The player on the webinar page will start showing a countdown timer to this point in time.
Note that the countdown timer disappears from the player once Clevercast starts broadcasting the intros. So if you want to show a countdown until the start of the actual event, the intro of your video should also contain its own countdown clock.
You can also set the End Time of your webinar. This is only used to inform webinar participants (e.g. displayed on the registration page or part of the email). It is NOT used to determine when the simulive stream ends. Clevercast will always broadcast the entire duration of the VoD item.
Setting the simulive stream
After you have scheduled the webinar’s start time, go to the Live Management page. On this page, go to the Set Simulive Stream panel to activate the simulive stream.
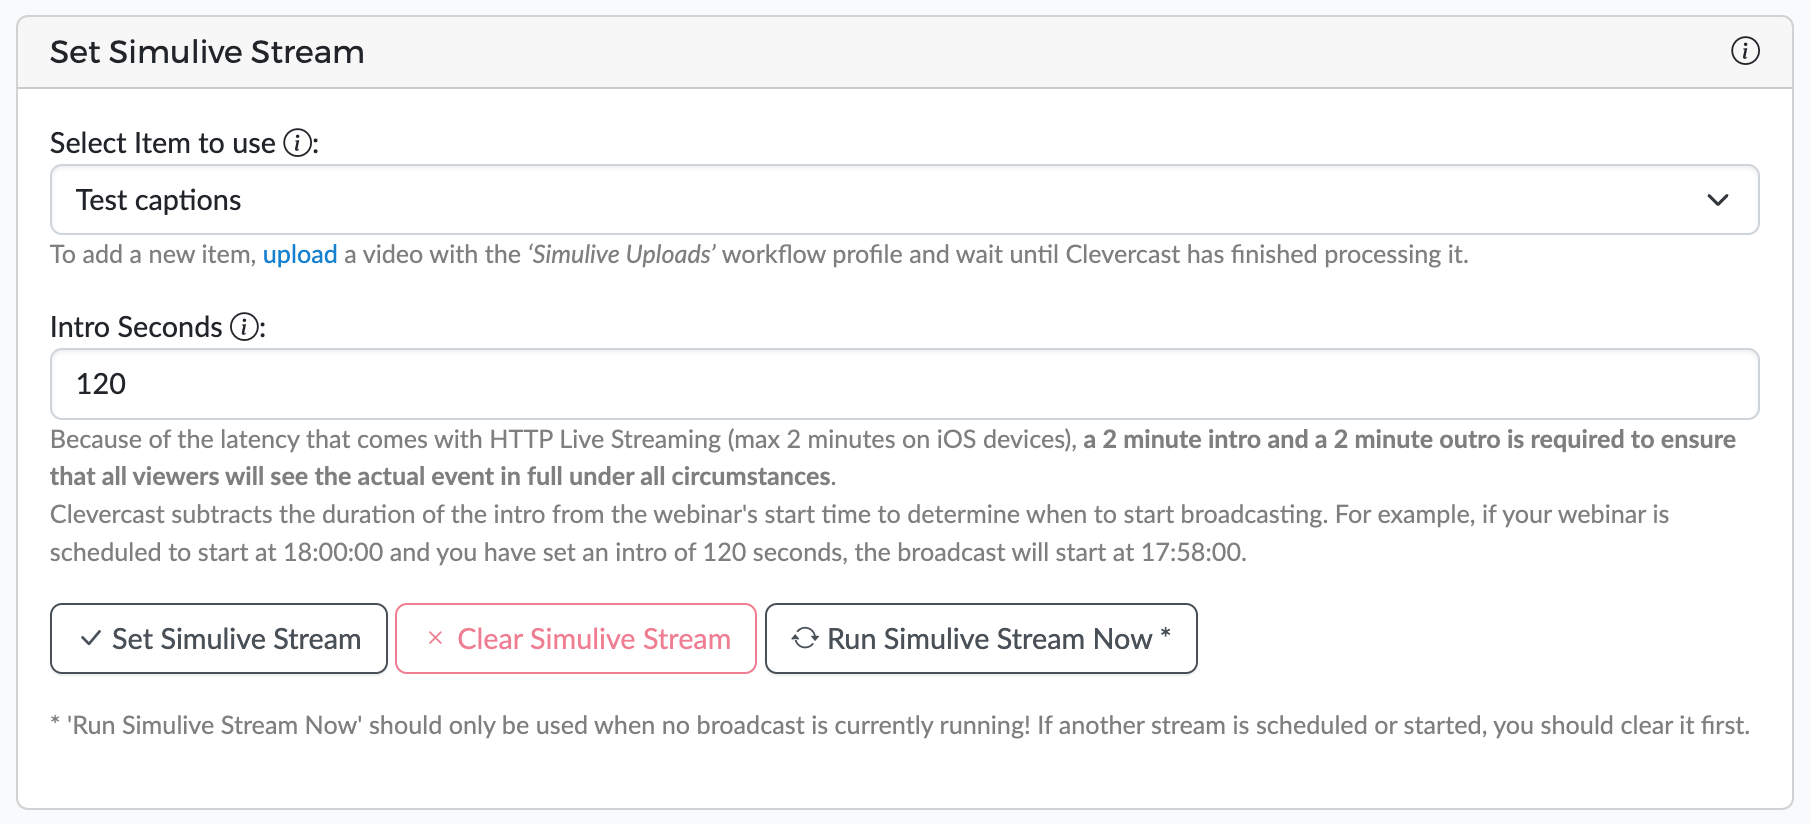
Before pressing the Set Simulive Stream button, you must fill in the following:
- Select Item to use: the VoD item to be used as the source of the broadcast.
- Intro Seconds: the duration of your intro in seconds. Clevercast uses this to determine when to start broadcasting. For example, if your webinar is scheduled at 18:00 PM and your intro is set to 120 seconds, the broadcast will start at 17:58 PM.
When you press the Set Simulive Stream button, Clevercast schedules the simulive stream. The Streaming panel indicates when the simulive broadcast will start, while the Main Broadcast panel indicates which video resolutions, audio languages and captions will be streamed.
Simulive webinar flow
When you schedule a simulive stream, Clevercast sets the live status to Inactive. The webinar player automatically shows the Preview image (or message) that you can set on the Appearance tab of your event. The Streaming panel indicates when the simulive broadcast starts, while the Broadcast panel indicates which video resolutions, audio languages and captions will be streamed.
About 10-20 seconds after the scheduled Broadcast Start Time, Clevercast automatically sets the live status to Started. The webinar player detects this and starts showing the live stream.
When the broadcast ends, Clevercast automatically sets the live status to Ended. The webinar player detects this and shows the Ended image (or message) that you can set on the Appearance tab. Because of the latency that comes with HTTP Live Streaming, this will happen before the outro is completely finished.
Clearing and resetting a simulive stream
If a simulive webinar is set incorrectly, you can clear it by clicking the Clear Simulive Stream button. Once this is done, you can reschedule the webinar start time (if necessary) and reset the simulive stream (e.g. with a different source item or a different number of intro seconds).
The Run Simulive Stream Now button allows you to start the simulive stream without scheduling it. When you click it, Clevercast immediately starts broadcasting the simulive stream and sets the live status to Started, so the webinar player starts to play the live stream. Note that this may only be done when no simulive stream is scheduled. If a simulive stream is scheduled for the webinar, you should clear it first.
Simulive streams with a different video for each language
Clevercast also supports broadcasting a multilingual live stream in which a different source video is used per language. This can be useful in some cases, for example when sign-language is one of the language or when subtitles are burned into the videos. It requires a custom simulive plan, of which the cost will be higher (since this requires that multiple live streams are broadcast simultaneously). If you need such a plan, please contact our support team.
Attaching multilingual item(s) to the source item
You first need to upload the different source videos with the same duration (make sure to select the ‘Simulive Uploads’ workflow profile and the correct language of each video). Clevercast will publish an item for each uploaded video.
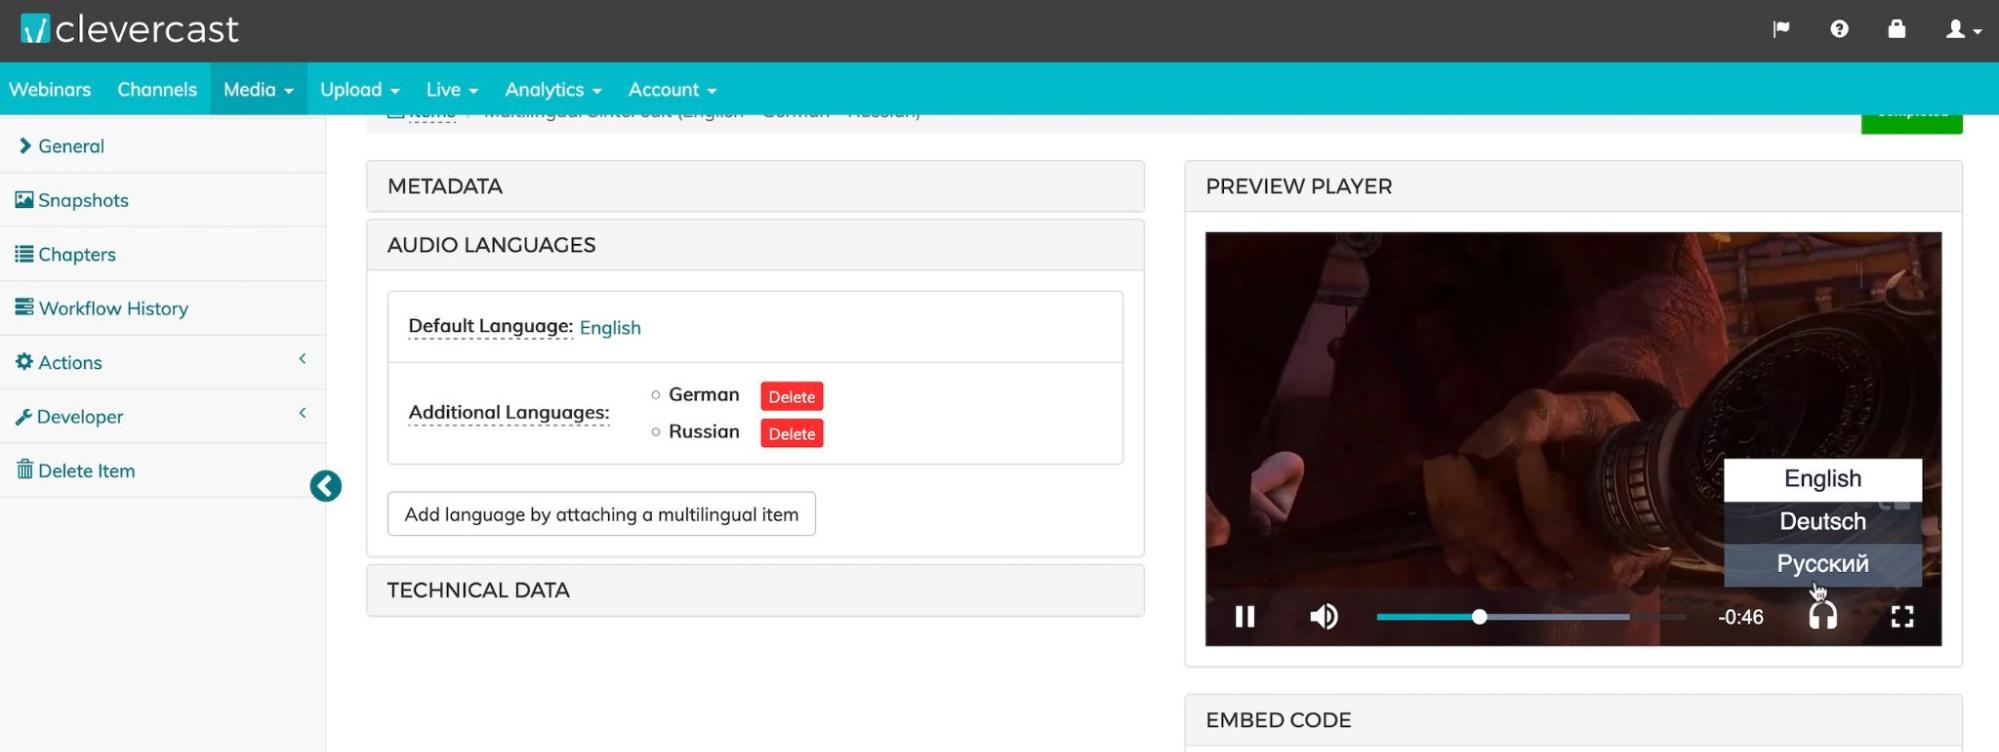
After all items have been processed by Clevercast, go to the detail page of the item that corresponds to the default language of your simulive stream (= the language spoken when the player is initially rendered). You need to convert this item into a multilingual simulive source, by attaching the other items to it. To do this, open the ‘Audio Languages’ panel and press the Add language by attaching another item button.

A popup dialog will appear, allowing you to enter the item ID and language of another item. You can find the Item IDs on the items list page or on the detail page of each item.
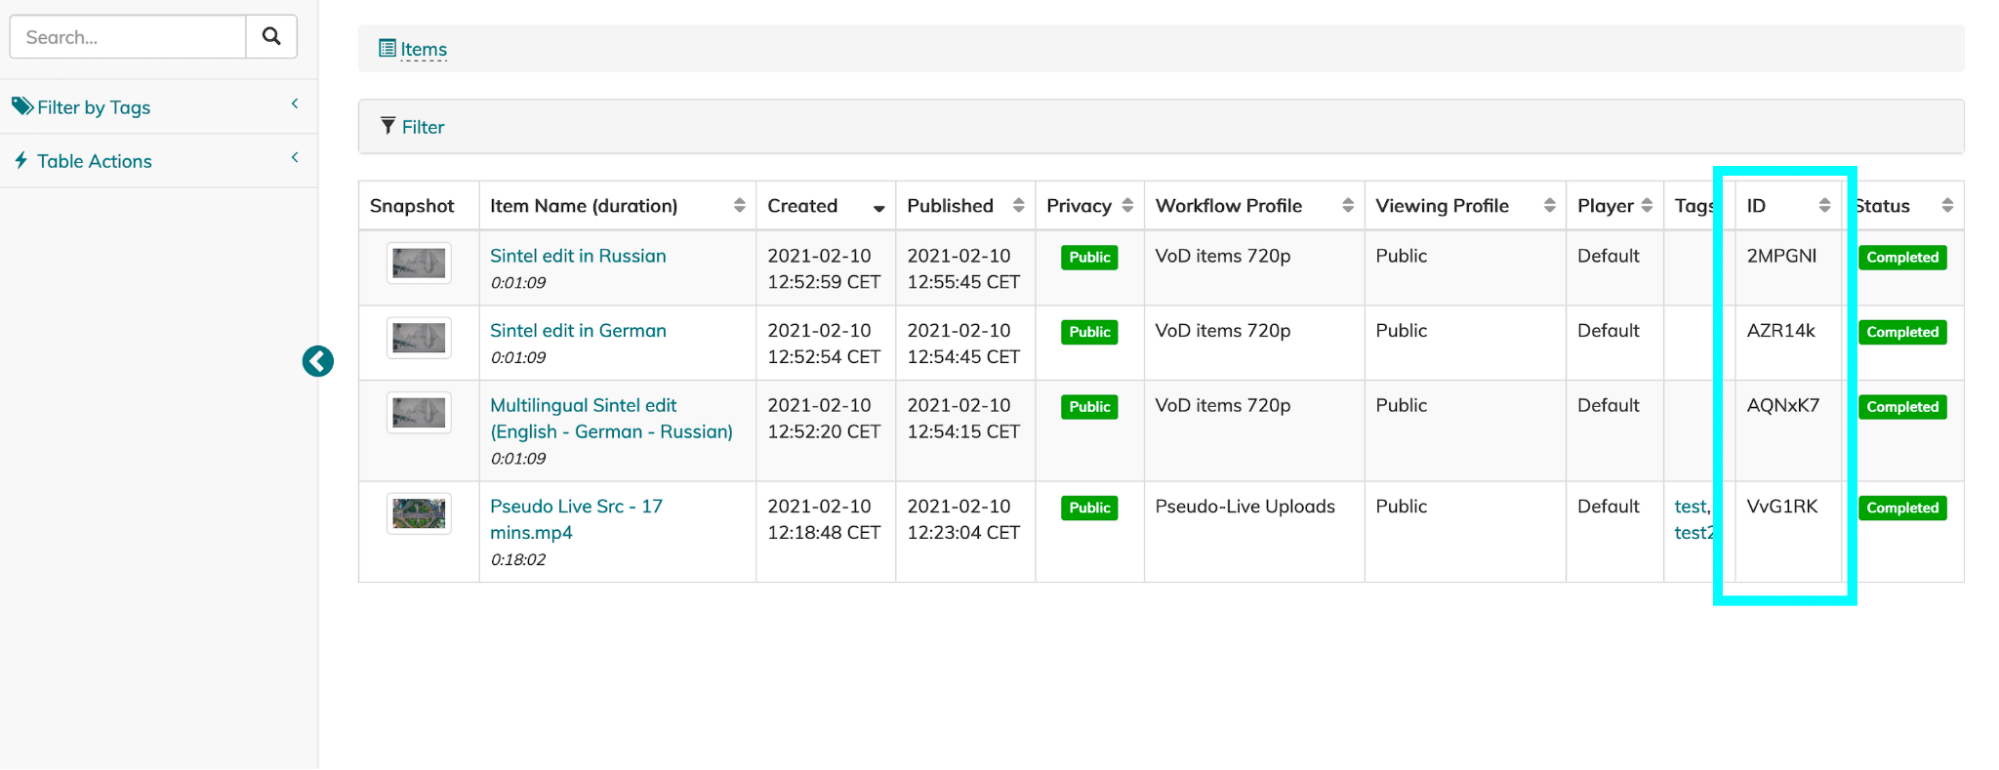
In the popup dialog, enter the Item ID and language and press ‘Submit’.

Keep doing this until all languages have been added. When finished, the ‘Audio Languages’ panel will contain an entry for each of the items. In the VoD player, you can see the headphone icon, which allows you to switch languages (in the same way as in the live stream).
Your item is now ready to be used as the source of a simulive stream.
Note that, when using multiple videos, Clevercast doesn't use any closed captions. Switching the language of the live stream means switching to a different video. Even if you add closed captions to the item (by uploading WebVTT files), they will not be part of the simulive stream.
This way of simulive streaming doesn’t allow you to specify the default language by adding the audio_default property to the player embed code.
Scheduling the simulive stream
The rest of this manual (e.g. intros and outros, latency) also applies to this way of multilingual simulive streaming.
Scheduling the simulive stream is done in the same way as a regular simulive event, with one exception. After creating the event, you should make sure that the maximum resolution of the item and event are the same. To do this, go to the Settings panel on the event's Management tab. If necessary, change the 'Max Resolution' setting to the Item's max resolution.