Translate@Home Interpreter manual
Introduction
Clevercast Translate at Home (T@H) is a solution for multilingual live streams with Remote Simultaneous Interpretation (RSI). Interpreters can carry out the real-time translation at a remote location, by browsing to Clevercast’s Interpreter Room interface.
Each available language has its own interpreter room, which interpreters use to watch the video, listen to the floor audio (or use interpreter relay), provide their translation, and communicate with event managers and other interpreters. An interpreter should receive a secure link to the interpreter room from the event’s manager.
Multiple interpreters can use the same language room and work together using different features:
- Interpreter relay: allows you to listen to an interpreter of a different language and use this as the source of your translation.
- Interpreter handover: allows you to request the other interpreter to take over.
- Bilingual interpreter rooms: allows an interpreter to translate the floor audio into two languages in turn.
Important: make sure to read the requirements and best practices for remote simultaneous interpretation, before you start using Clevercast Translate@Home.
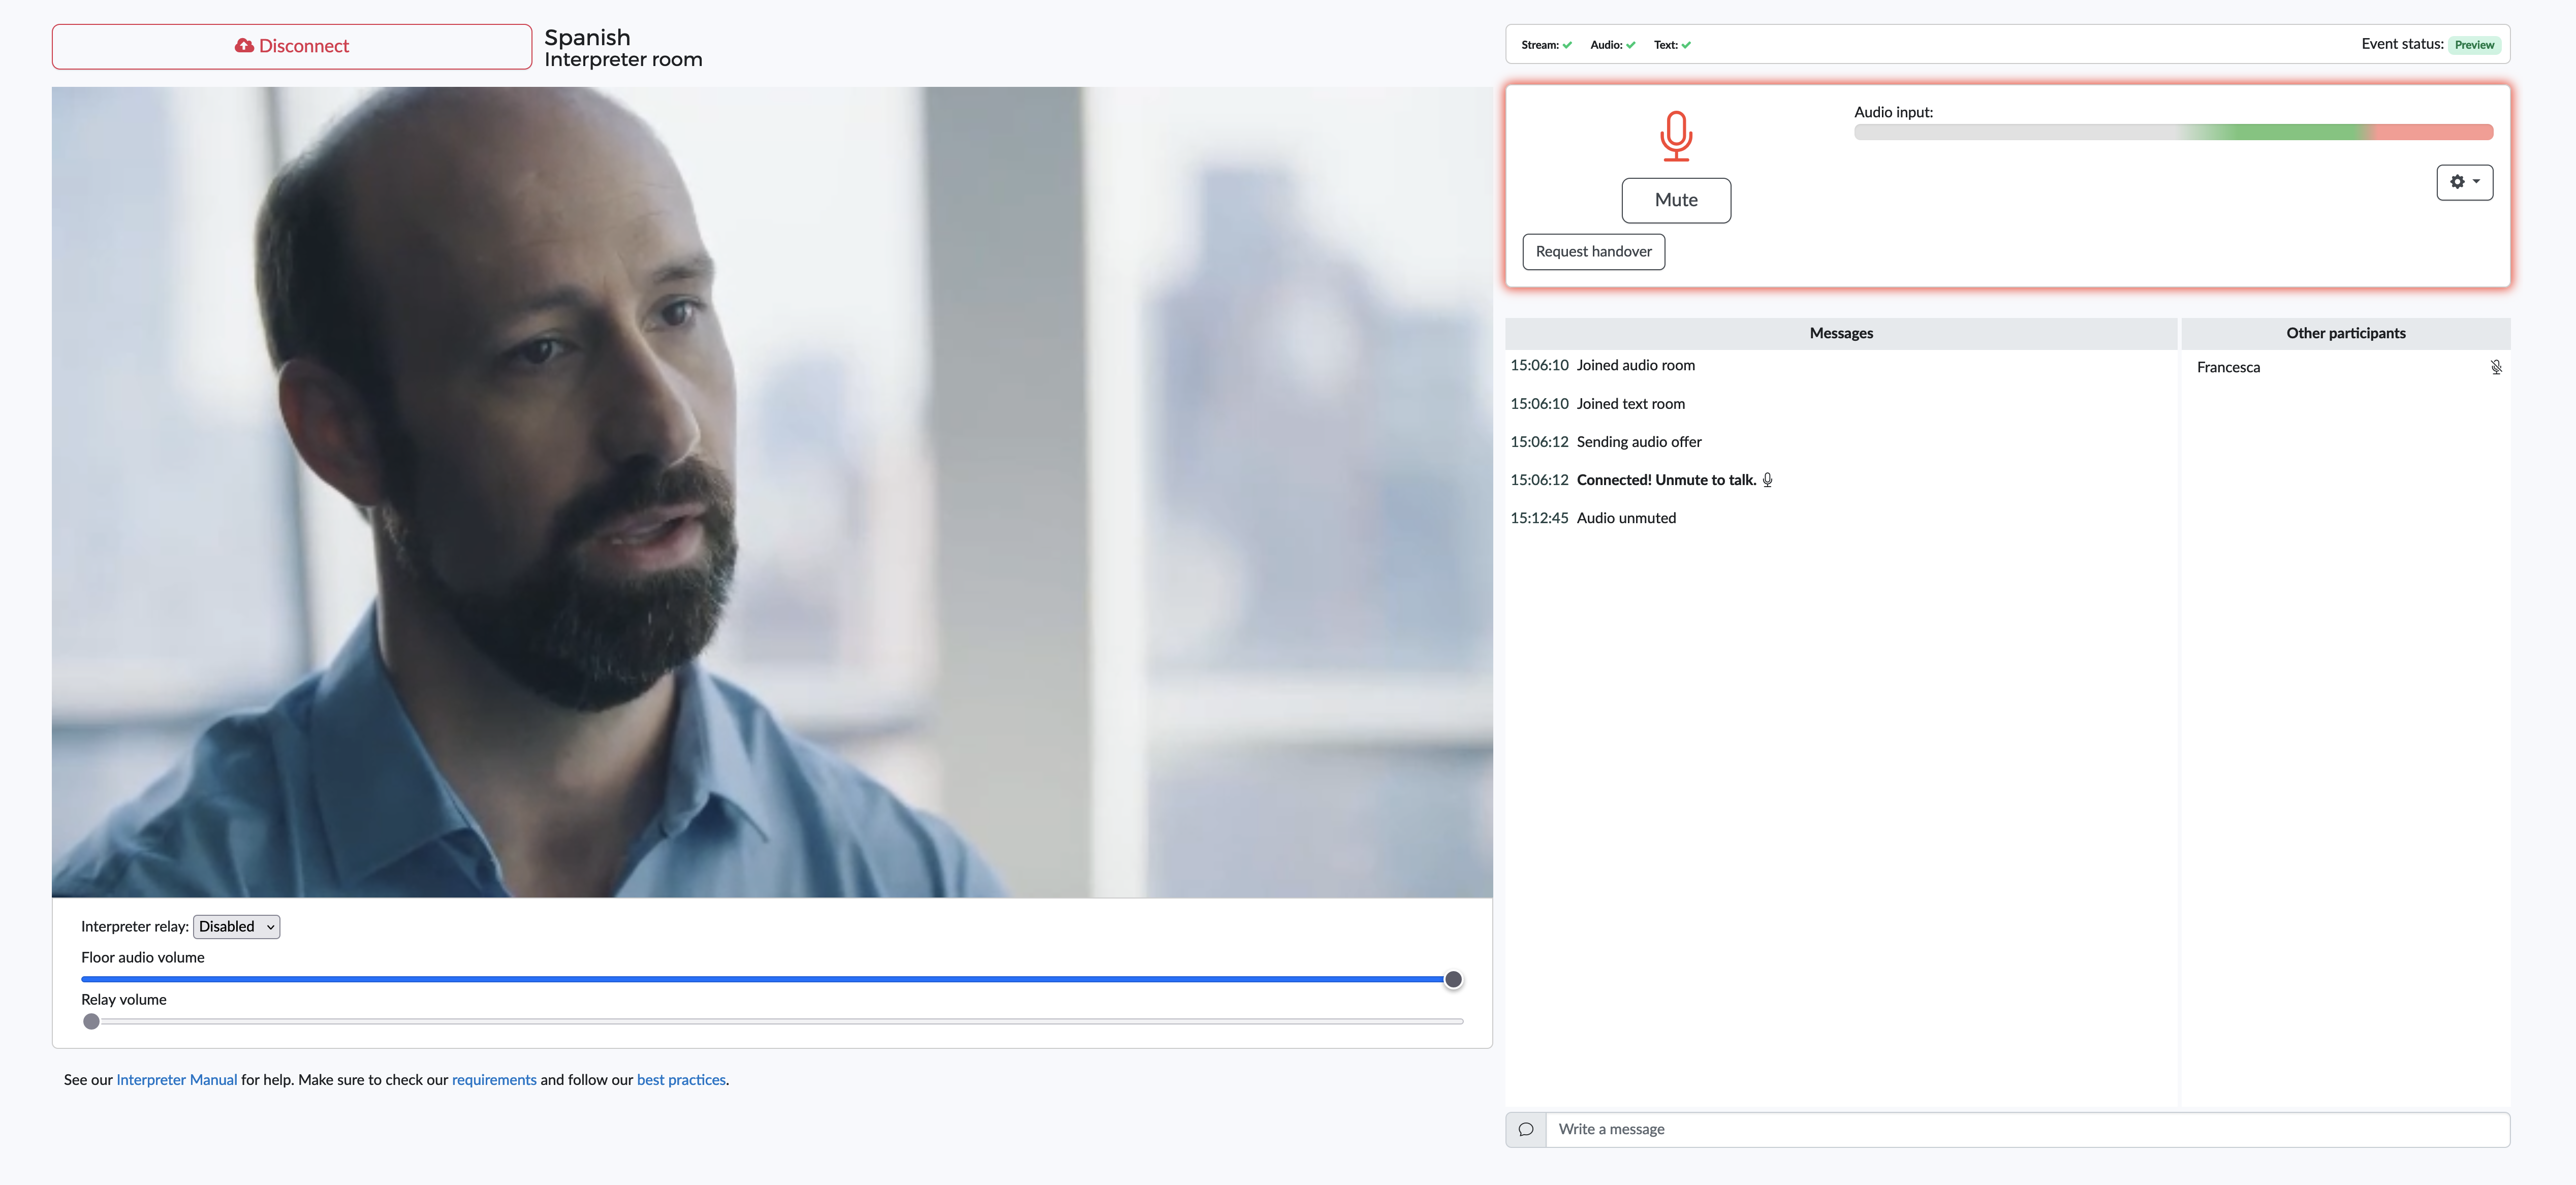
The interpreter room interface
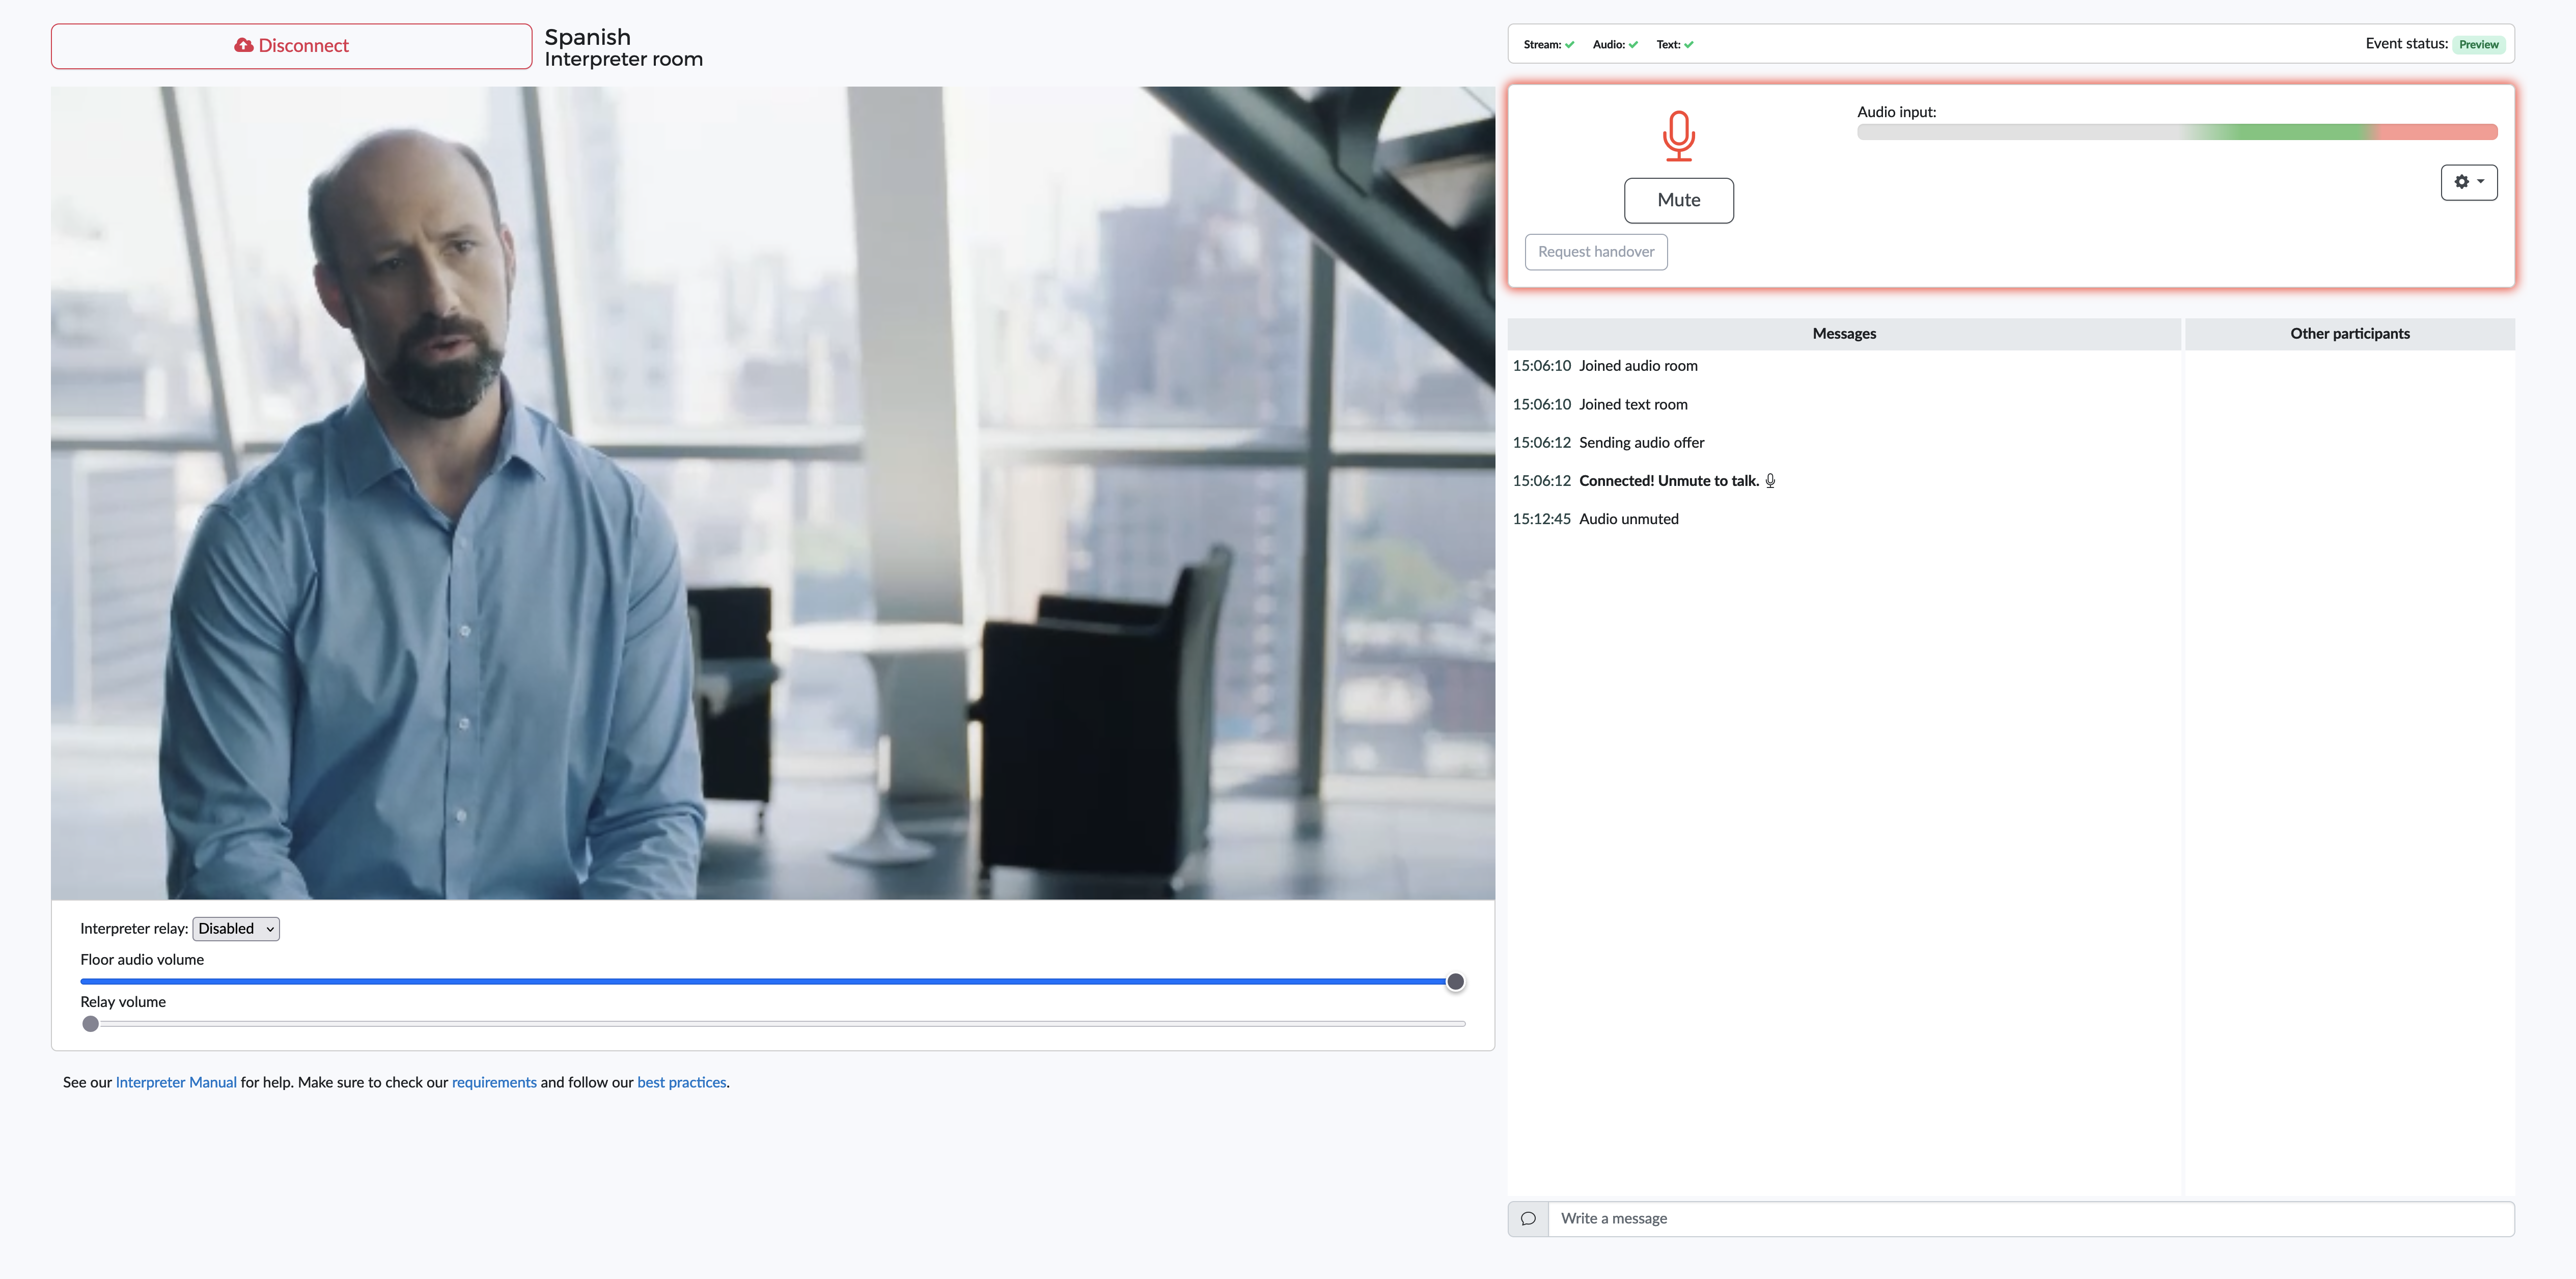
As an interpreter, you should receive a secure link to your interpreter room from the event’s manager. By using this link in Firefox, you automatically get access to your interpreter room. The user interface looks like this:
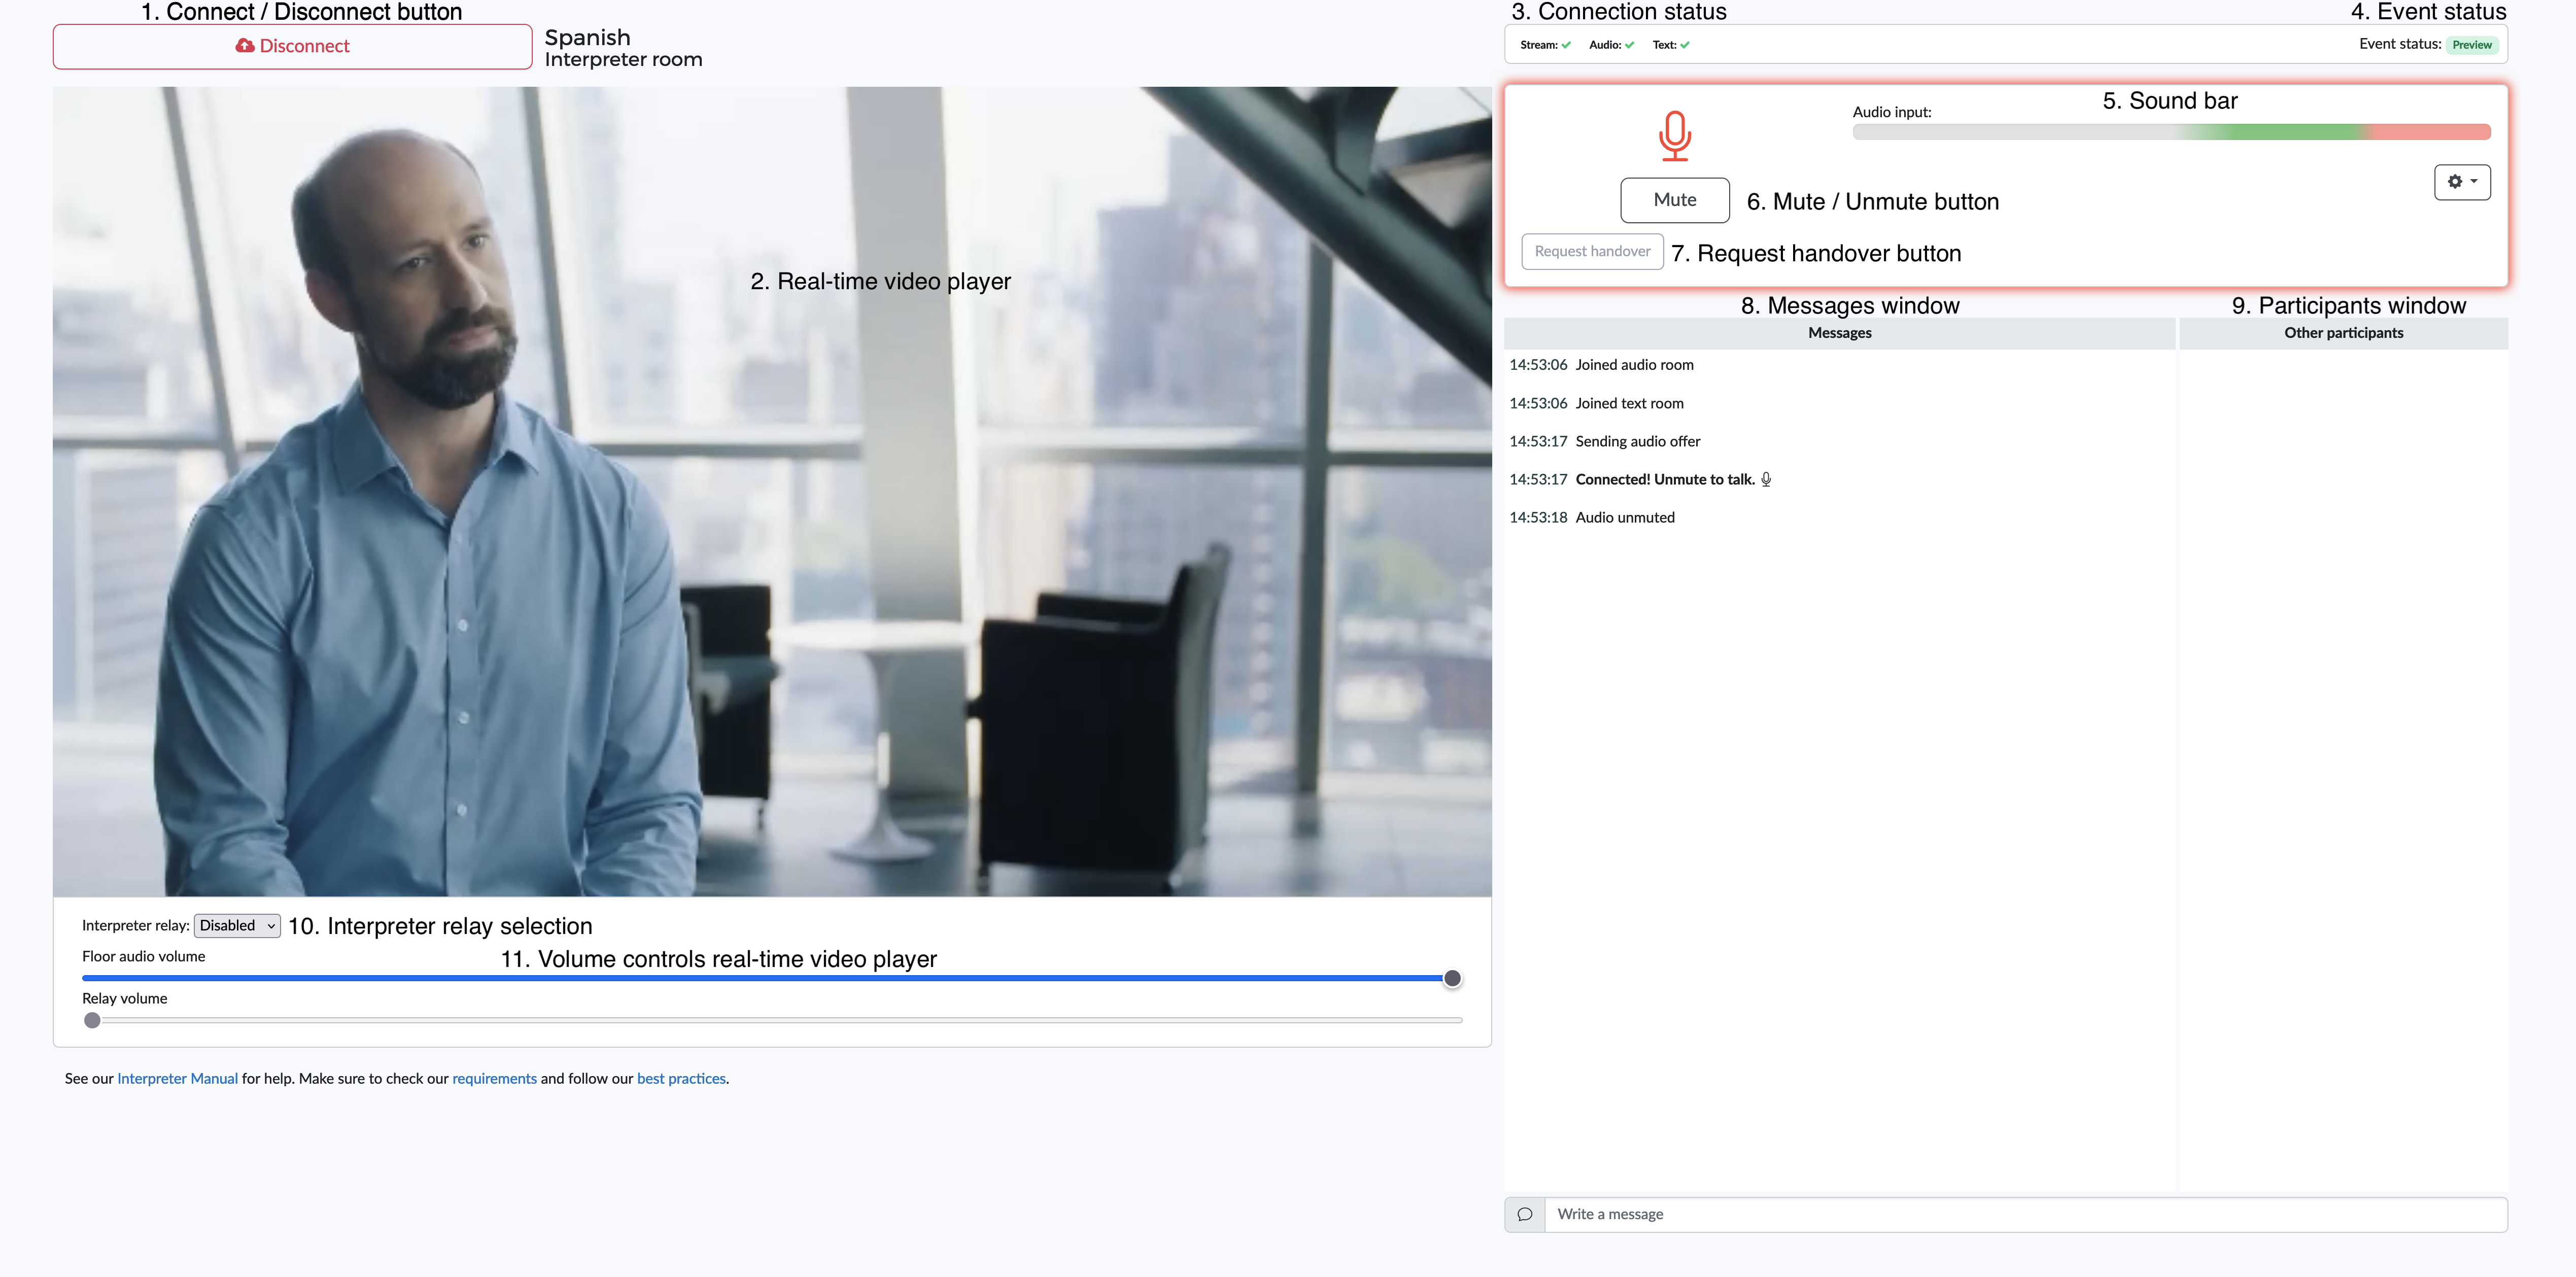
The interface consists of the following elements:
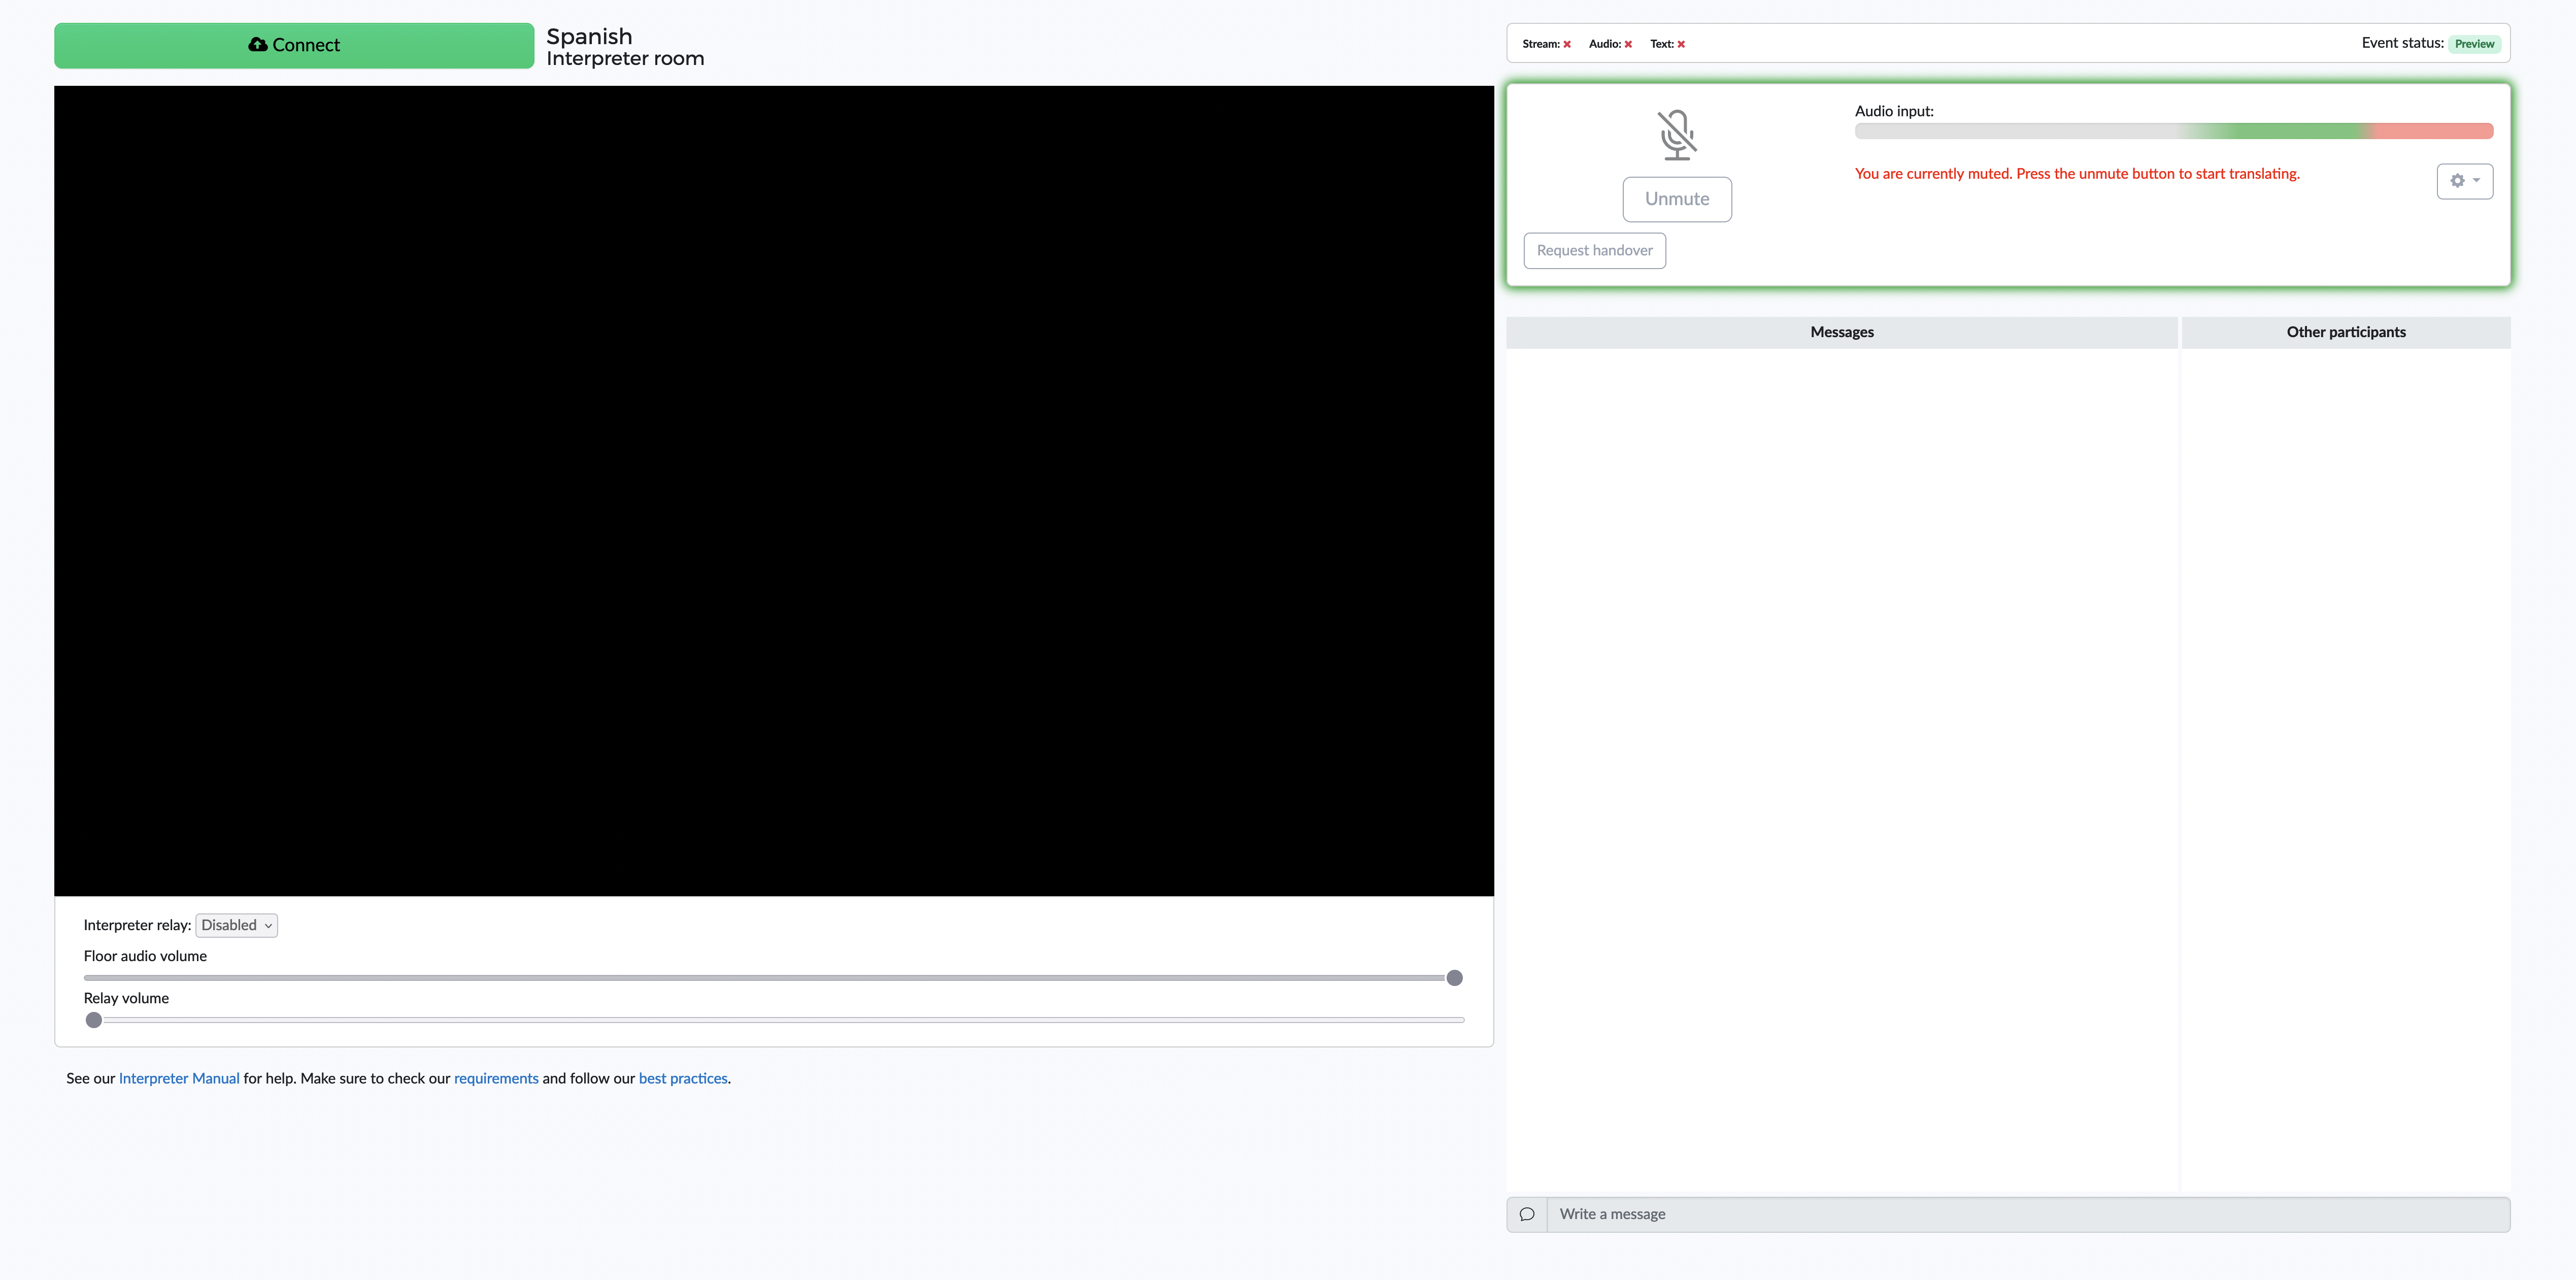
- Connect/Disconnect button: before an interpreter can start working, she has to connect to the interpreter room (in order to send outgoing audio and text messages).
- Real-time video player: plays the video and floor audio in real time, without latency.
- Connection status: Clevercast maintains three connections. Once the interpreter has connected and selected her microphone (see step 2 below), the audio and text connections should be checked.
- Event status: is the live event status. When the interpreter room is available, it is set to either
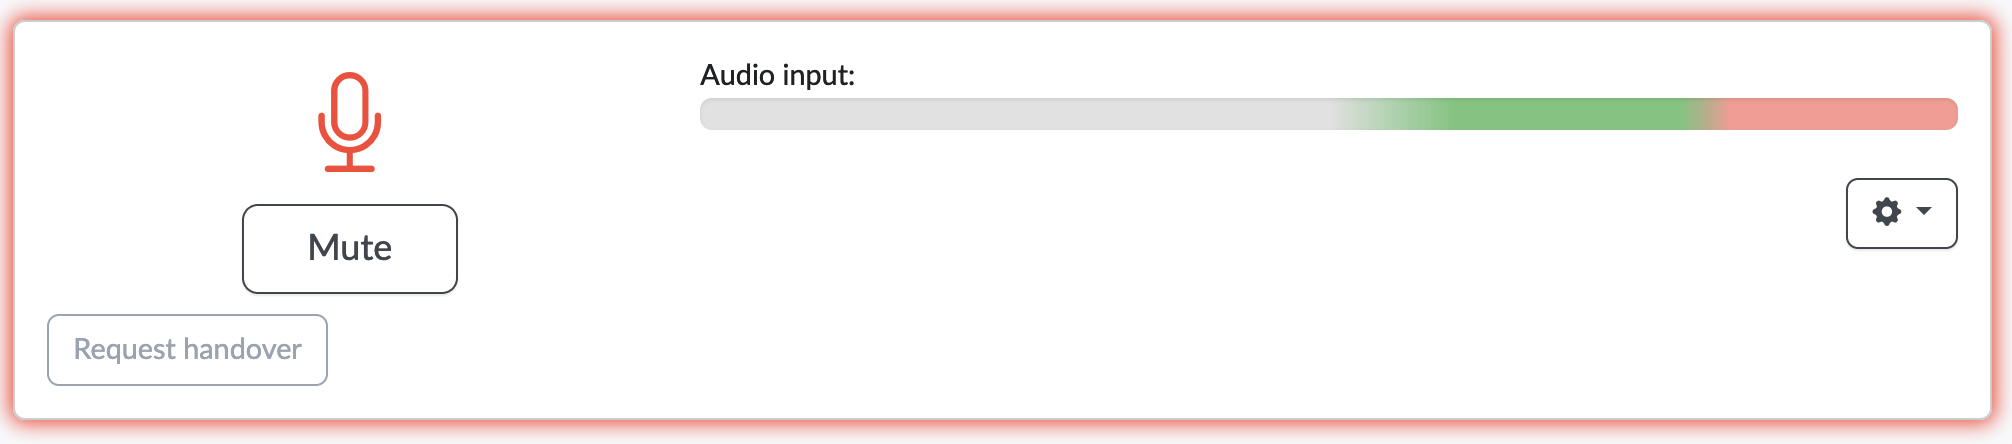
Preview(for testing in advance, viewers can not see and hear the live stream),Started(live) orPaused(viewers can not see and hear the live stream). If the event is set to set toInactiveorEnded, the room is not available. - Sound bar: this is a visual aid to show the interpreter at what volume she is speaking. Note that audio will only be transmitted if the interpreter is unmuted.
- Mute/Unmute button: must be pressed when an interpreter starts or stops translating. It may be that another interpreter is taking over or the floor audio should be heard at full volume. By default, the interpreter is muted.
- Request handover button: if multiple interpreters are in the same interpreter room, this button becomes enabled. It allows the active interpreter to initiate a handover.
- Messages window: allows an interpreter to communicate with other interpreters in the same interpreter room and with their event managers. It also contains system messages (e.g. when an interpreter joins or leaves the room).
- Participants window: names of the other interpreters in the interpreter room, along with their muted/unmuted status.
- Interpreter relay selection: allows the interpreter to listen to the output of another interpreter room (for interpreter relay) or his own interpreter room (for coaching).
- Volume controls for real-time video player: allow you to change the volume of the floor audio and the translation volume (if interpreter relay is selected, otherwise the latter is disabled). Note that this is only for the incoming audio for your room, not the outgoing audio.
Noise suppression and gain control
The latest version of Clevercast also contains settings to determine if you want noise suppression and gain control.
- Noise suppression automatically filters out background noises like humming caused by equipment.
- Gain control automatically adjusts the audio volume for a steadier overall volume, so that quieter speech or noises are louder and vice versa.
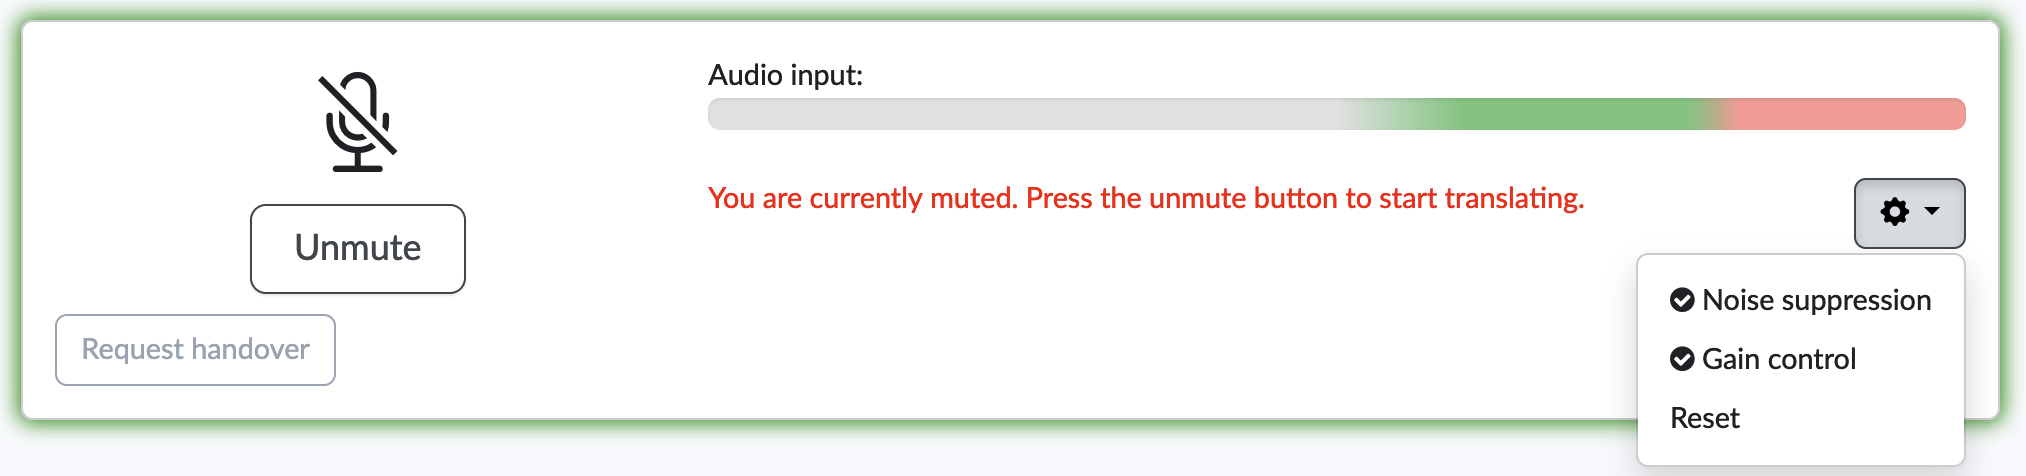
If these are checked (default), there will be noise suppression and gain control on the audio input. This is usually recommended if it isn't built into your headset or other hardware.
If you have professional equipment, it will often already incorporate this and might probably do a better job (e.g. Nvidia noise canceling). In that case, it's best to disable these options in Clevercast, because applying it twice degrades the audio quality.
If you are unsure whether your equipment supports this, we recommend testing with the default settings first (= both options checked). If the audio is not optimal, you could continue to test with these options unchecked (you may want to investigate whether your headset has a driver that supports this).
Using the interpreter room
After receiving the link to your interpreter room, an interpreter should follow these steps:
1) Copy the link to your browser (preferably Firefox) to go to your interpreter room page (see image below).
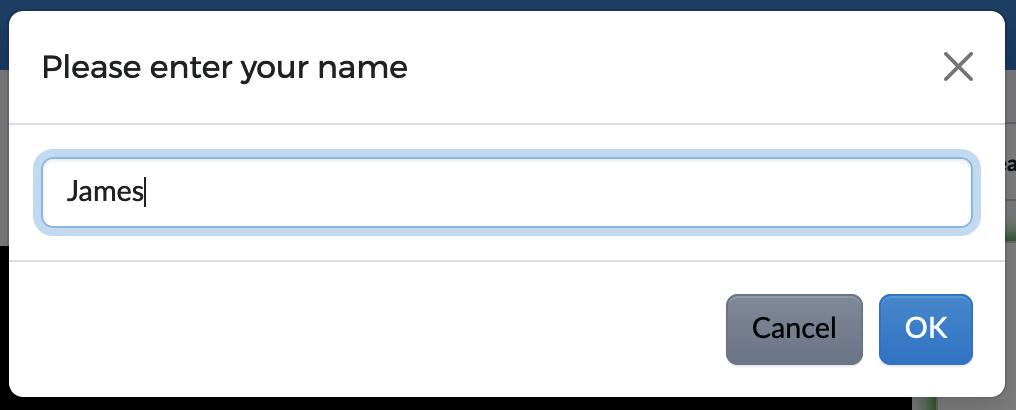
2) Press the Connect button: Clevercast will ask you to fill in your name for the text chat. Other interpreters and event managers will see your name in the ‘Other Participants’ dialog.
3) After filling in your name, Firefox will ask you to select your microphone and use it to connect to the interpreter room’s audio output.
Note: if you use Google Chrome - which we don’t recommend - you won’t be asked which microphone to use. The microphone selected at OS level will be used instead.
4) You should now be connected to video input, audio output and chat (you should see the 3 green check marks). If this is not the case, try reconnecting.
- If a video is being broadcast to Clevercast, it will automatically start playing and let you see and hear the incoming video stream.
- The audio output sends your translation back to Clevercast, so it can be selected and heard in the video player. Make sure the incoming audio doens't run on your computer or laptop's speakers, otherwise there will be an echo of the floor audio.
- The text chat can be used to communicate with other interpreters in the same interpreter room or the managers of your event. On the right side, you can see other participants in your interpreter room.
5) When you first connect, you are initially muted. To start translating, press the unmute button and start speaking into your headset.
If you want to stop translating -to allow another interpreter to continue or because a speaker in the video doesn’t need translating- press the mute button. You stay connected while you’re muted, so you can continue to translate at any time by pressing the unmute button again.
Note that if your connection is too slow, you will see a bad connection warning on top of your screen with the number of packets being dropped per second. If you see this message repeatedly, we strongly recommend to use another connection or to report this to your event manager (who should also see that there are issues with your connection).
The next chapters further explain how to use interpreter relay to listen to other interpreters, complete a handover procedure and use bilingual interpreter rooms.
Interpreter Relay
Translate@Home supports interpreter relay and interpreter coaching. The interpreter relay dropdown (below the real-time player) allows you to listen to an interpreter of a different language and use this as the source of your translation. Alternatively, you can listen to the active interpreter in your own interpreter room, in order to coach her.
When you first connect to an interpreter room, the interpreter relay is disabled. You only hear the floor audio, of which you can adjust the volume using the first slider. The translation volume slider won’t work until you select a language in the interpreter relay dropdown.
When you select a different language in the interpreter relay drop-down menu, the real-time player lets you listen to both the floor audio and the incoming translation. You can use both sliders (below the player) to change the relative volume of the translation and the floor audio.

Interpreter Handover
If interpreters are working together in the same interpreter room, they can use Clevercast’s handover procedure. This makes the transition from one interpreter to another a lot easier.
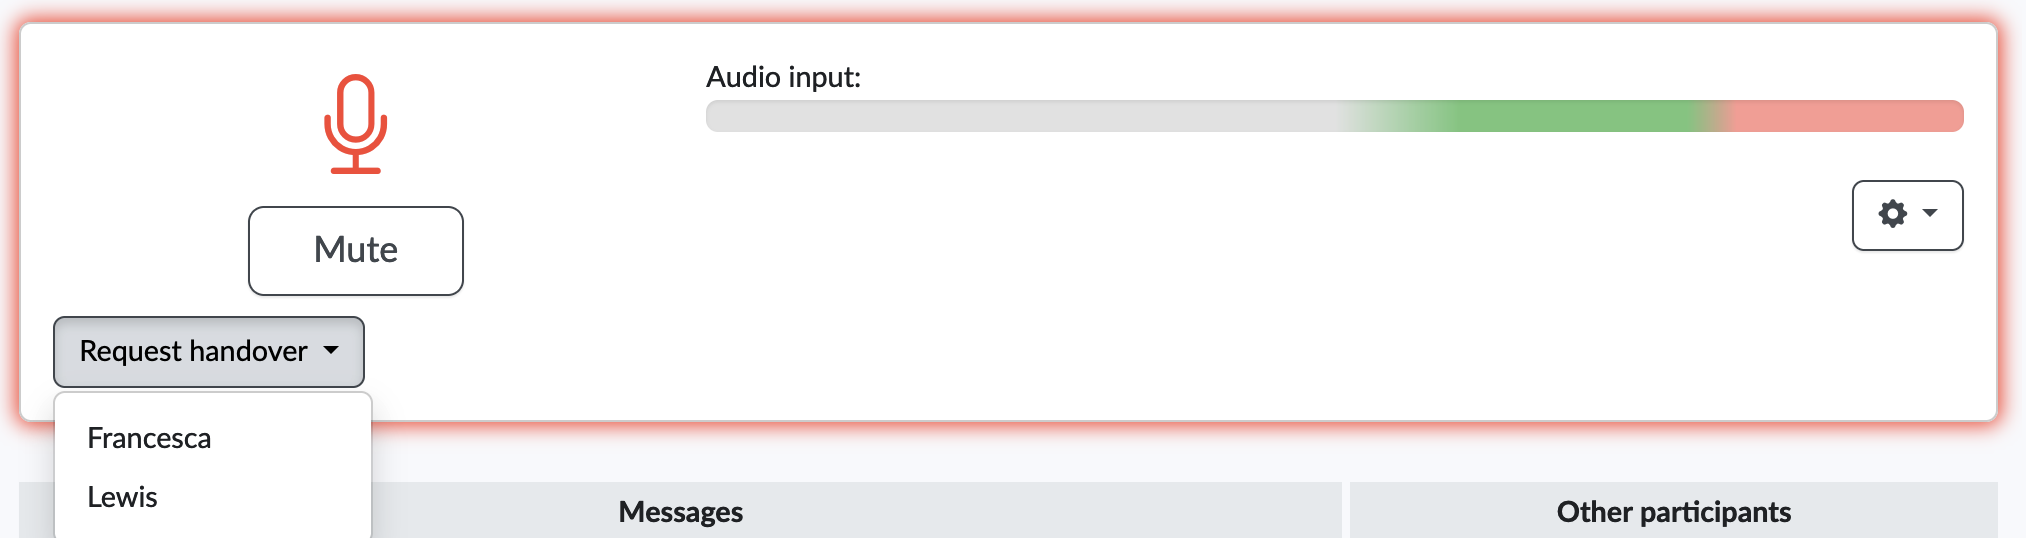
The handover feature becomes available when there are at least two interpreters in the same room. Both interpreters will see a 'Request handover' button, which becomes enabled as soon as an interpreter unmutes himself.
The procedure works like this:
- The interpreter who is translating submits a request for handover. This means that he asks the inactive (muted) interpreter to take over the translation.
- After the request is made, the inactive interpreter has 60 seconds to take over the translation. The moment he does, the inactive interpreter becomes the active one and is automatically unmuted. The first interpreter receives a message that the handover is complete, so she can mute herself after finishing her sentence.
Note: if more than two interpreters are in the interpreter room, the active interpreter must choose which colleague to hand over to.
Once a handover request is submitted, the audio that the inactive interpreter hears changes. He automatically starts hearing the translation in the foreground and the floor audio in the background. This makes it easier to take over at the end of a sentence or during a short pause in the translation.
When the second interpreter takes over, he is unmuted and hears the floor audio again at full volume. He can start translating immediately after pressing the button.
A handover procedure may be cancelled, either because it is cancelled by the first interpreter or because the second interpreter doesn’t take over in time. In that case, everything remains the same as before the handover procedure. The first interpreter keeps on translating, and the second interpreter remains muted. The first interpreter can start a new handover procedure at any time.
Note: interpreters do not have to use the handover procedure. They can also use the mute and unmute buttons to start and stop translating. The handover procedure only serves to facilitate switching when time is short.
Below, you can find more information on handover in detail.
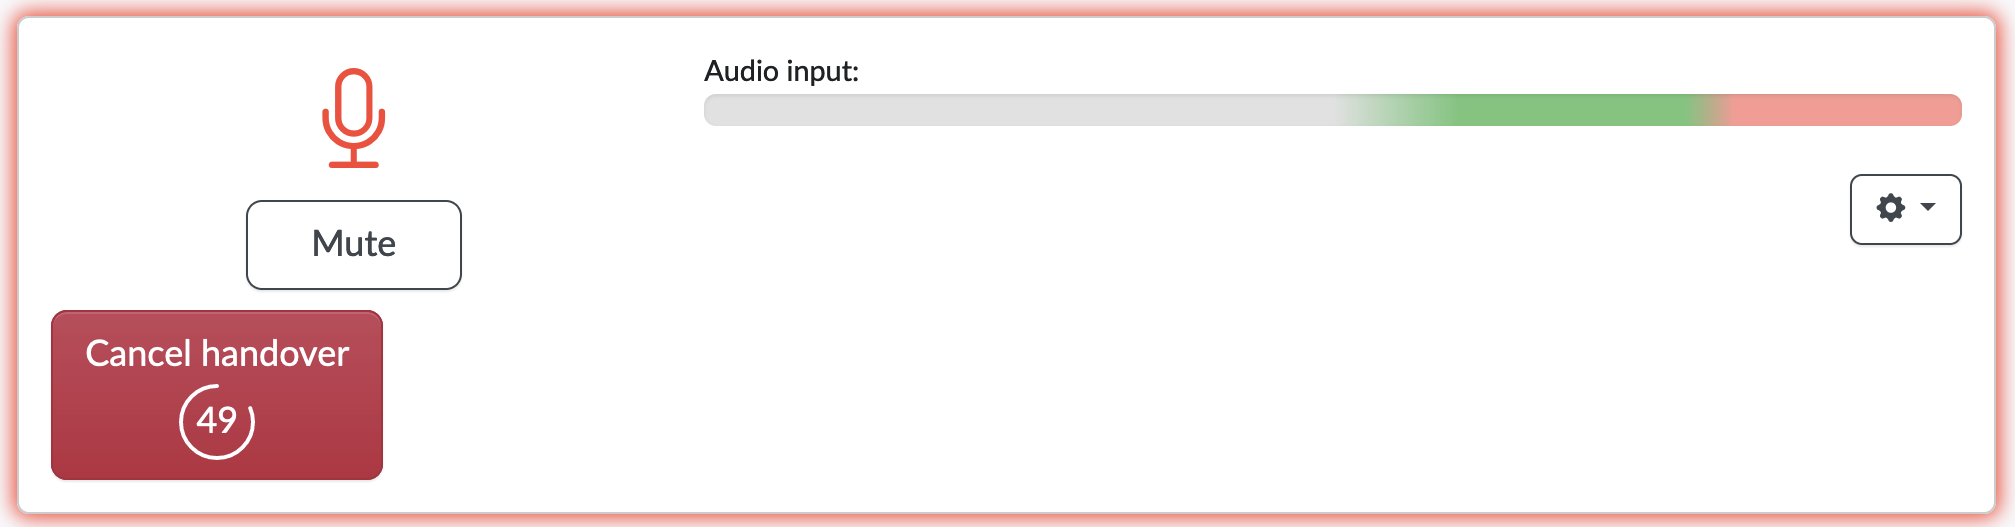
1 Initiating the handover
When two interpreters are connected in the same interpreter room and one of them is unmuted, the 'Request handover' button will automatically appear for this interpreter (below the 'Mute' button, see screenshot below).
After an interpreter presses the 'Request handover' button, the procedure is started. The interpreter now sees a new 'Cancel handover' button with a 60 second countdown. At any time, he may decide to stop the procedure by pressing this button.
2 Completing the handover
When the first interpreter makes a handover request, a 'Take over' button appears for the other (muted) interpreter in the same interpreter room. This button also has a 60 second countdown.
At the same time, the audio for the second interpreter changes: he now hears the first interpreter’s translation in the foreground with the floor audio in the background.
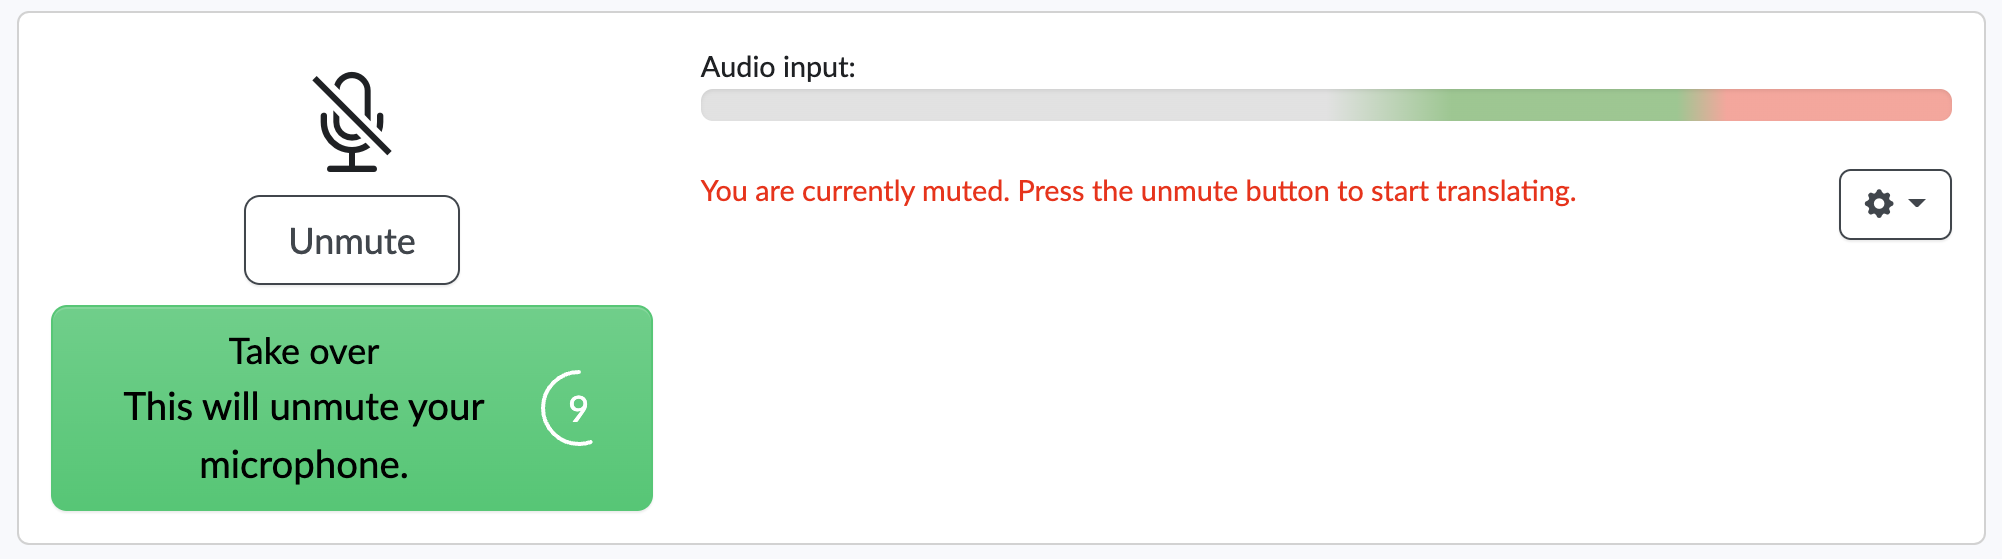
The moment the inactive interpreter wants to take over the translation, he simply has to press the 'Take over' button and start speaking.
Pressing the ‘Take over’ button ensures that:
- The second interpreter is unmuted. He no longer sees the ‘Take over’ button. His microphone is no longer crossed out and he sees a ‘Mute’ button.
- The second interpreter hears the floor audio at full volume. The voice of the first interpreter has disappeared from his audio mix.
The first interpreter no longer sees the ‘Cancel handover’ button. Instead, he sees a message that the handover is complete, so he can mute himself after finishing his sentence.
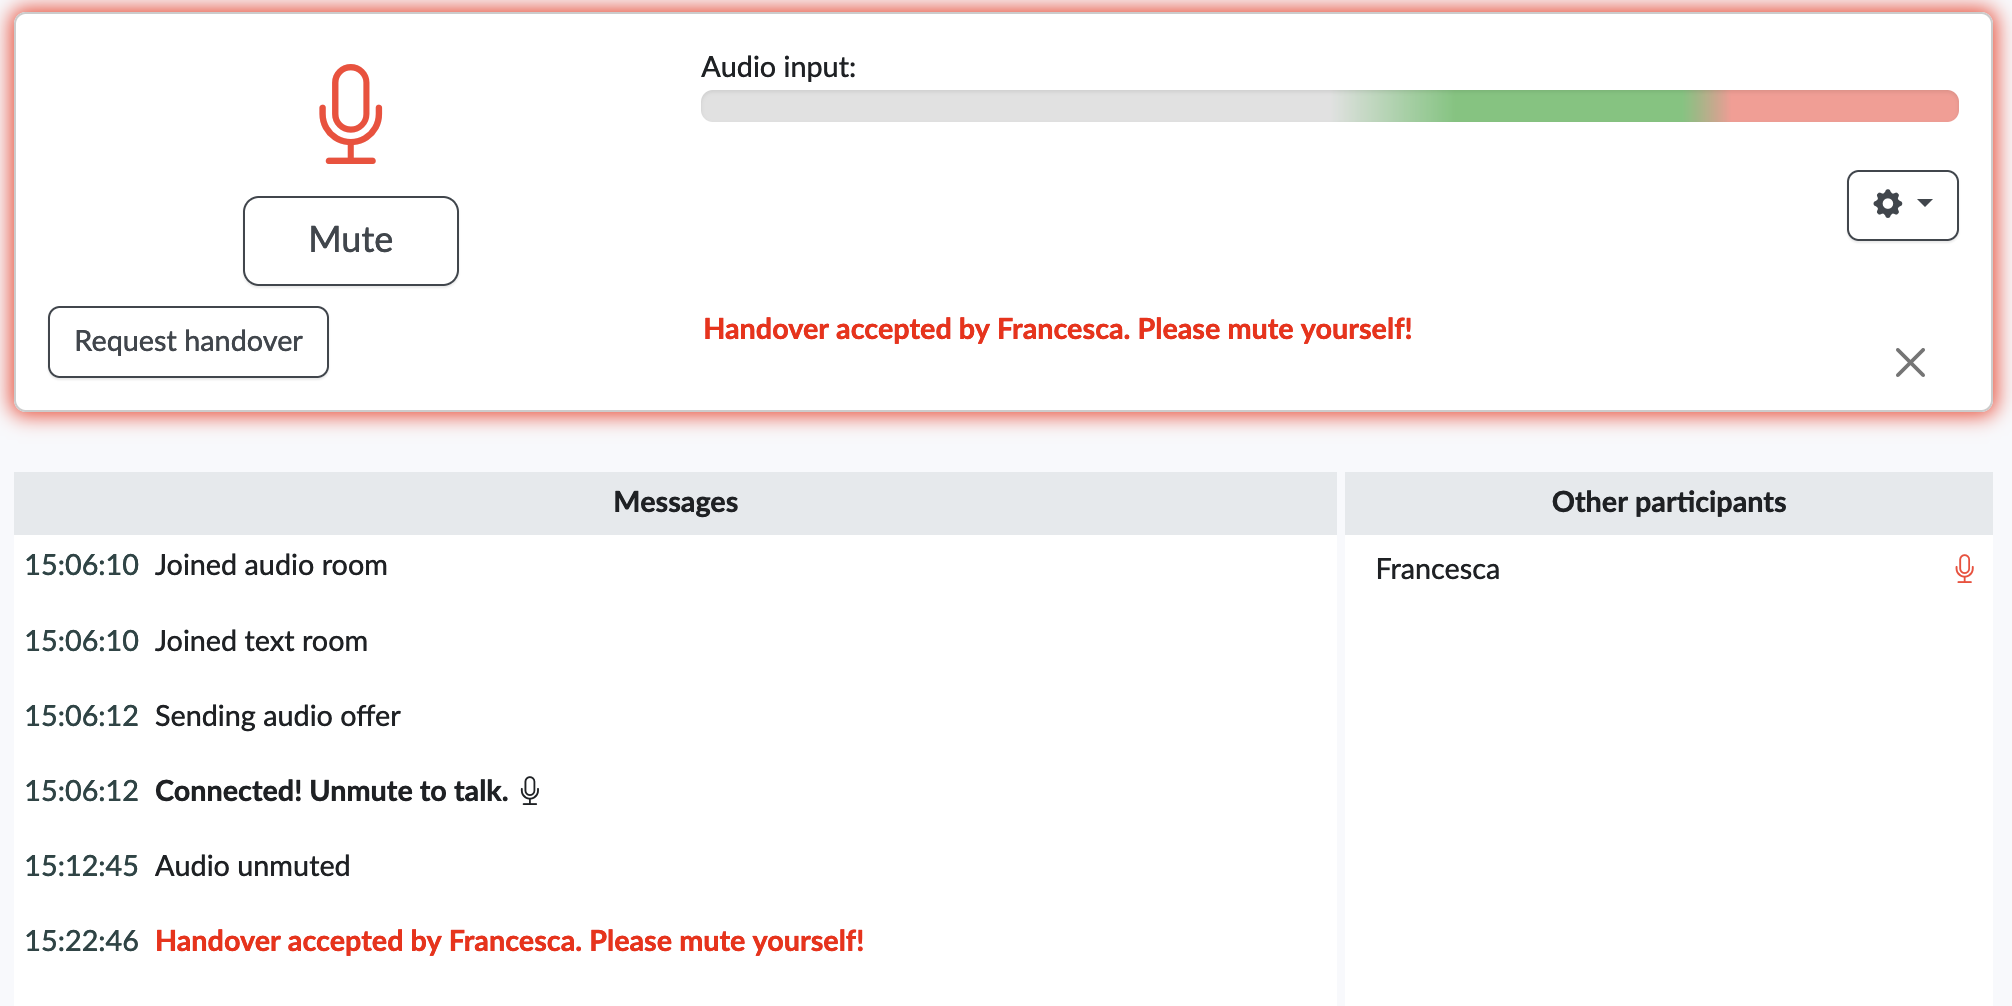
The second interpreter now sees a ‘Request handover’ button, allowing him to initiate a handover procedure.

3 Cancelled handover
There are two ways that an initiated handover procedure can remain incomplete:
a) The first interpreter presses the ‘Cancel handover’ button after initiating the procedure
b) The second interpreter doesn’t press the 'Take over' button within 60 seconds
In that case, the second interpreter will see a message saying that the handover was cancelled. The first interpreter keeps on translating, and the second interpreter remains muted. The first interpreter can start a new handover procedure at any time.
Bilingual interpreter rooms
A bilingual interpreter room allows an interpreter to translate the floor audio into two languages in turn. A bilingual room’s name contains both languages (Spanish and French in the image below) and two buttons below the microphone to select either of the languages (French is selected in the image below). That is the only difference from a regular interpreter room.
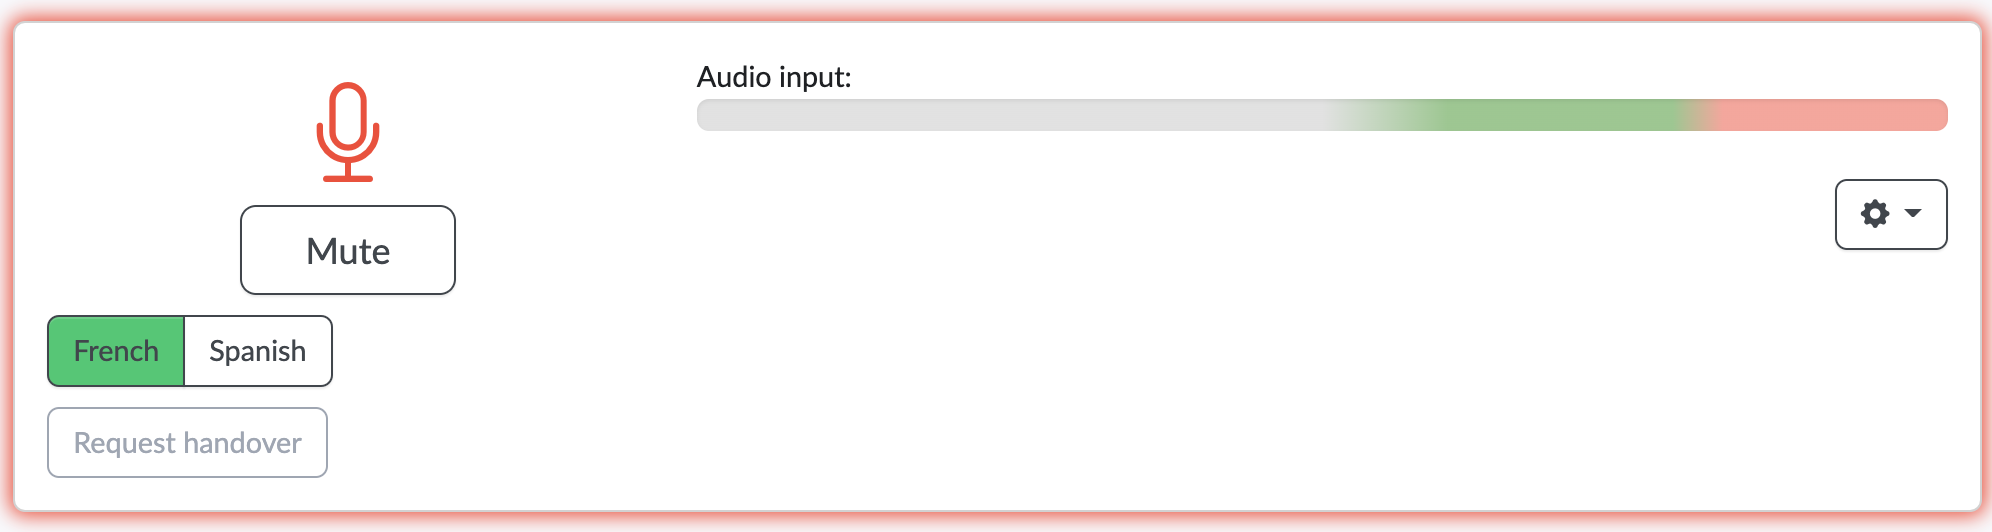
In the image above, the interpreter can choose to translate the floor audio to French or Spanish. When she speaks, her translation is sent to the selected interpreter room, in this case French. By pressing the Spanish button her input is automatically sent to the other interpreter room.
The mute/unmute functionality and everything else works in the same way as in a single interpreter room.
Note: in a bilingual interpreter room, the handover procedure is only possible while both interpreters have selected the same language (until the handover is completed).
Requirements
Computer
We recommend a recent computer with a fast processor and sufficient memory (for example, an Intel Core i7 with 16 GB RAM) and a dedicated sound card and graphics card. Insufficient CPU or memory may result in audio distortions and packet loss. Sometimes, this will be heard immediately. On other computers, it may cause the audio quality to gradually deteriorate.
Browser
The operating system doesn’t matter. It should only be able to run a recent version of the Mozilla Firefox browser (make sure to install the latest update).
We strongly recommend using Firefox. Even though Google Chrome fully supports WebRTC and should also work, we recommend using Firefox for a number of reasons:
- Using Chrome may sometimes result in poor audio quality and may cause audio quality to deteriorate over time (especially on budget computers).
- We use Firefox ourselves for testing, not Chrome.
- Firefox lets interpreters select their microphone when connecting to an interpreter room. Chrome doesn’t, which may result in connecting with the wrong microphone.
- Google Chrome is more commonly used for everyday browsing. There is a higher risk of installed add-ons that could affect performance.
Only if for some reason a translator can’t use Firefox, you could try using Google Chrome instead.
Headset
We strongly recommend using a professional, high-end headset. The quality of the headset has a major influence on the audio quality. Cheap headsets are often the cause of audio distortions.
Always make sure you have a second headset on hand, just in case there are any issues.
Location
The room in which you are translating should be as quiet as possible and acoustically suitable. For example, when you talk or clap there shouldn’t be an echo or a reverberation. Ideally, you should find a small room with a low ceiling, a thick carpet on the floor, no windows and sound-absorbing panels (you can get the same effect by covering the walls with thick curtains, blankets or carpets).
Wired Ethernet connection
Very important: interpreters should have a wired ethernet connection! A good quality cable (Cat 6 recommended) and connector are also important.
WiFi (and other forms of wireless data transfer) are very strongly discouraged and can lead to very poor audio quality, regardless of the distance to the access point. It is impossible to fix the audio distortion caused by WiFi usage.
Fast and stable internet connection to Clevercast
Interpreters need a fast and stable internet connection to the Clevercast streaming servers located in the Netherlands.
To test this, you should receive a link to the Translate@Home Connection Test page from your project manager. This way, you can test the quality of your connection in advance.
After receiving the link, make sure that you have a wired internet connection, then open Firefox (close all unnecessary other applications) and paste the test link in the browser’s address bar. The test page will ask you to enter your name, email and location and press the Start button. The browser will establish a connection with Clevercast and start sending data packets for about 30 seconds.
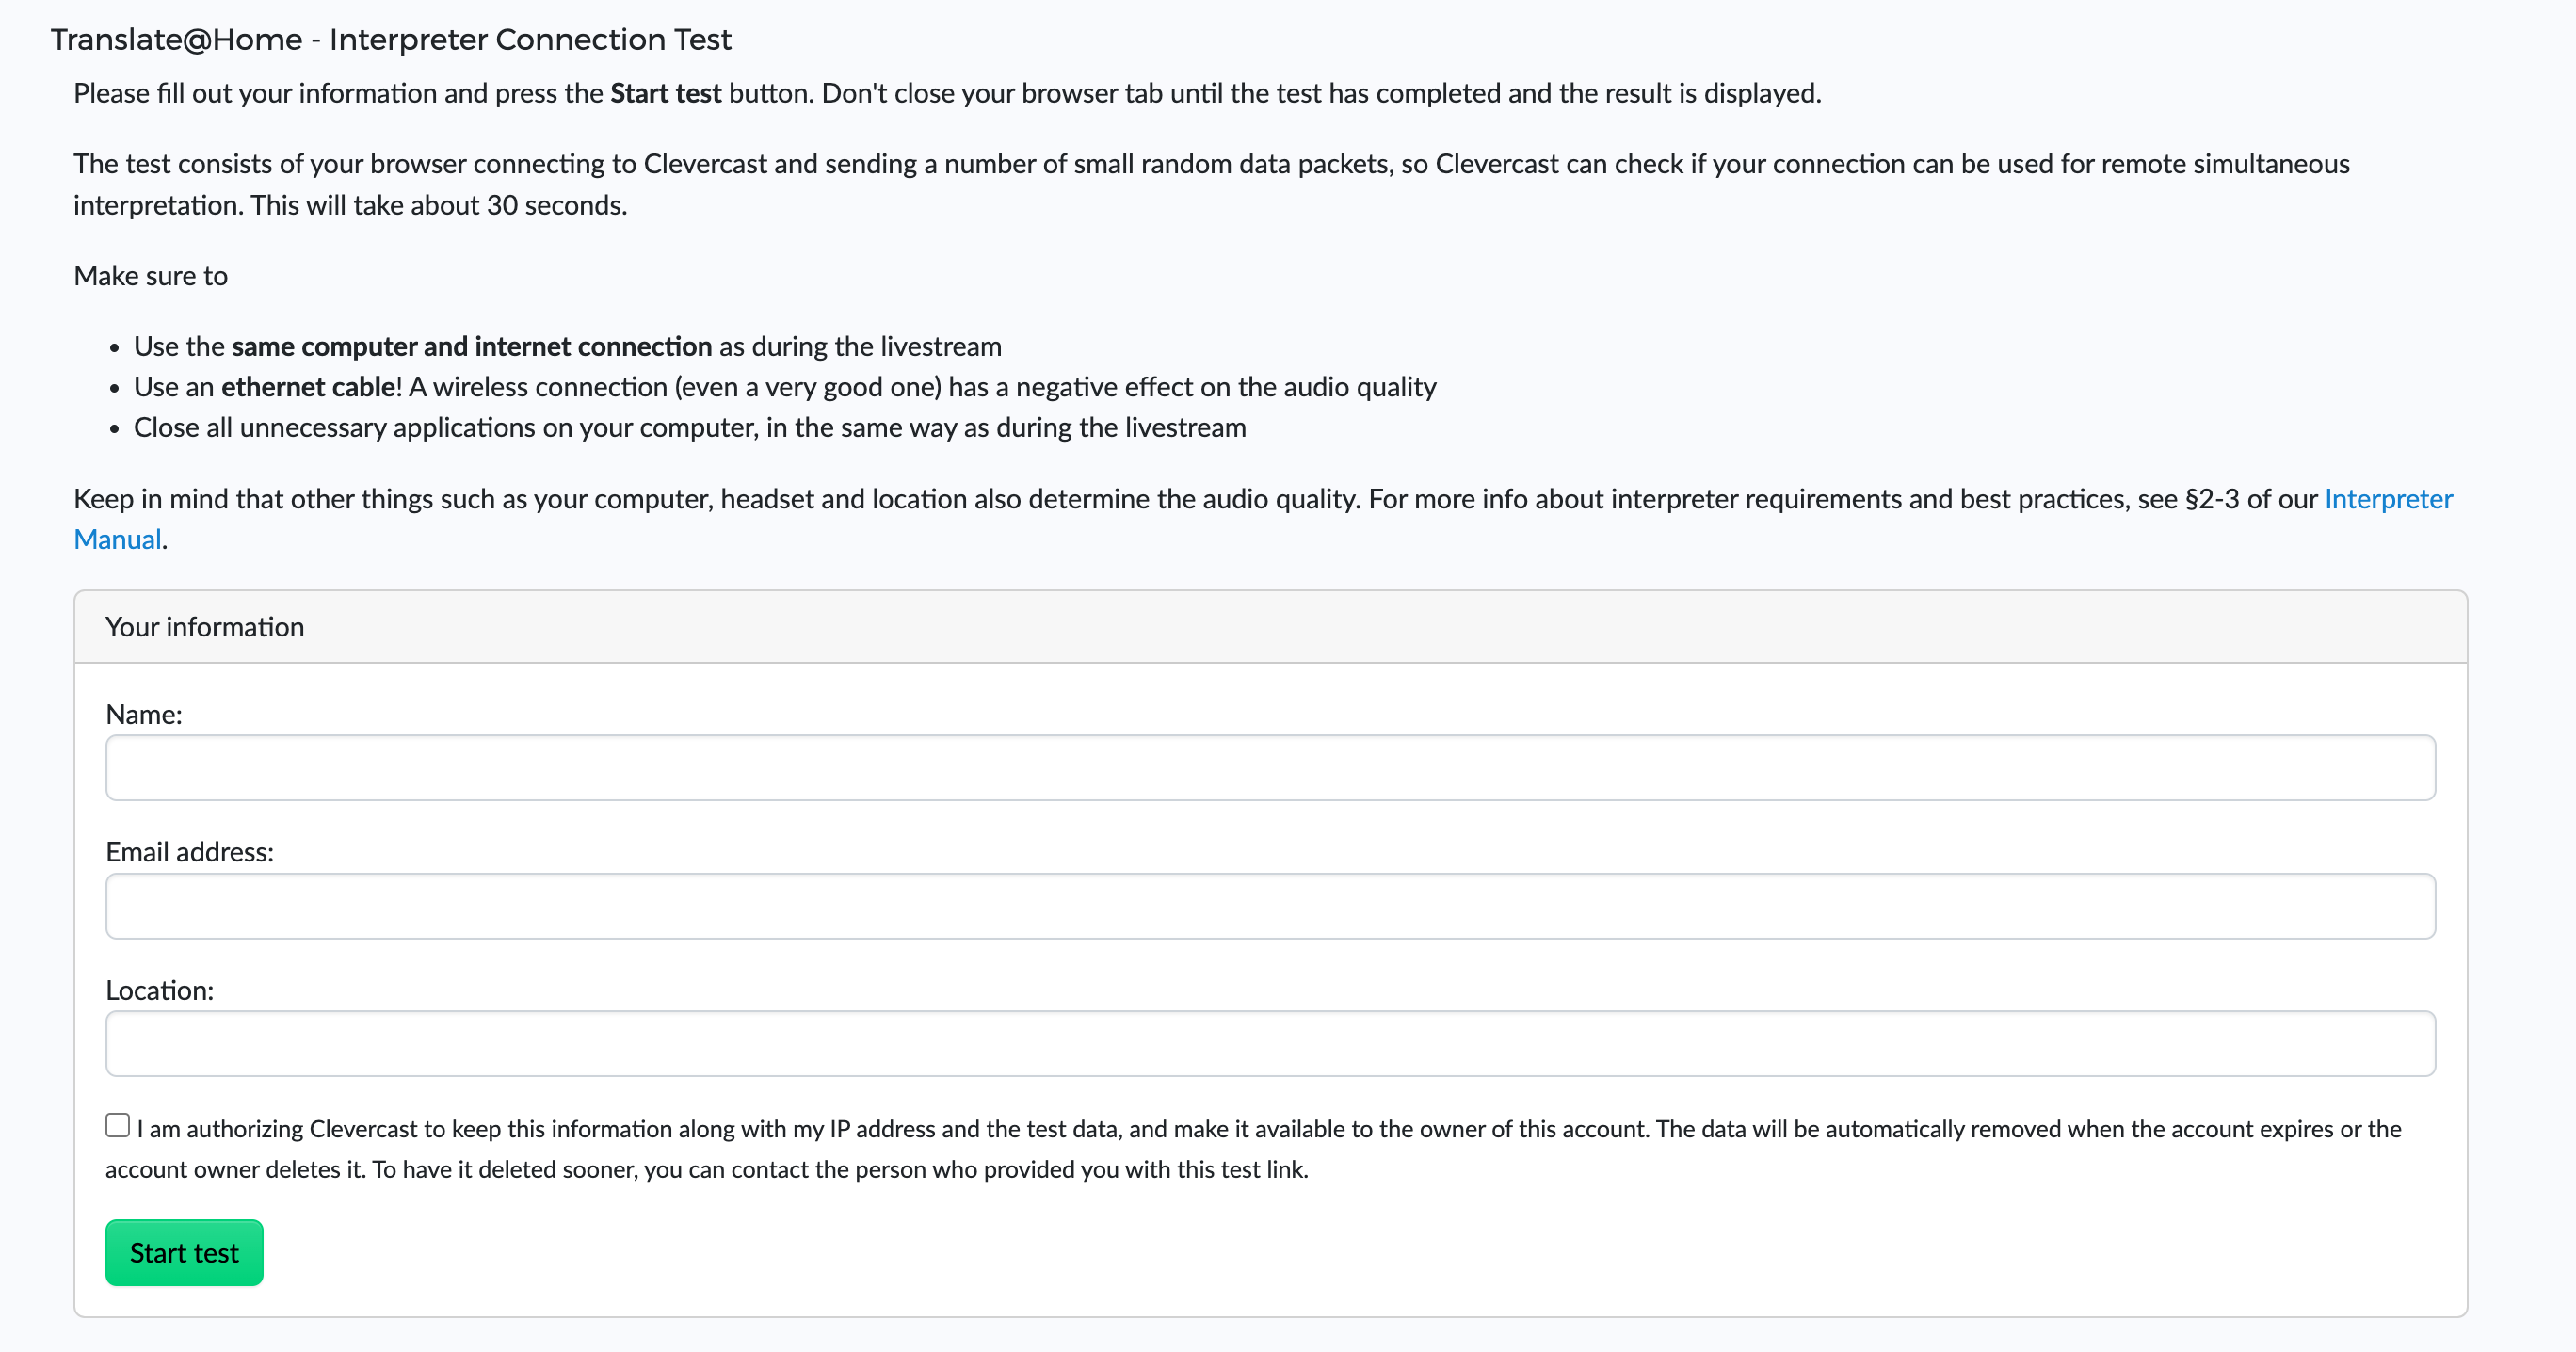
After 30 seconds, the test ends and you will see a popup with the result. The details of your test will also be made available to your project manager.
Sufficient bandwidth
Interpreters should have a bandwidth of at least 5 Mbps up and 5 Mbps down.
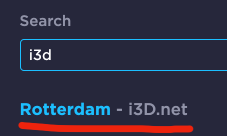
You can test this by going to https://www.speedtest.net/ and click on the Change Server link. Next, type ‘I3D’ in the popup dialog and select ‘Rotterdam – I3D.net’. Finally, press the GO button and wait until all tests are completed.
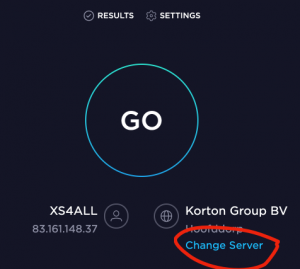
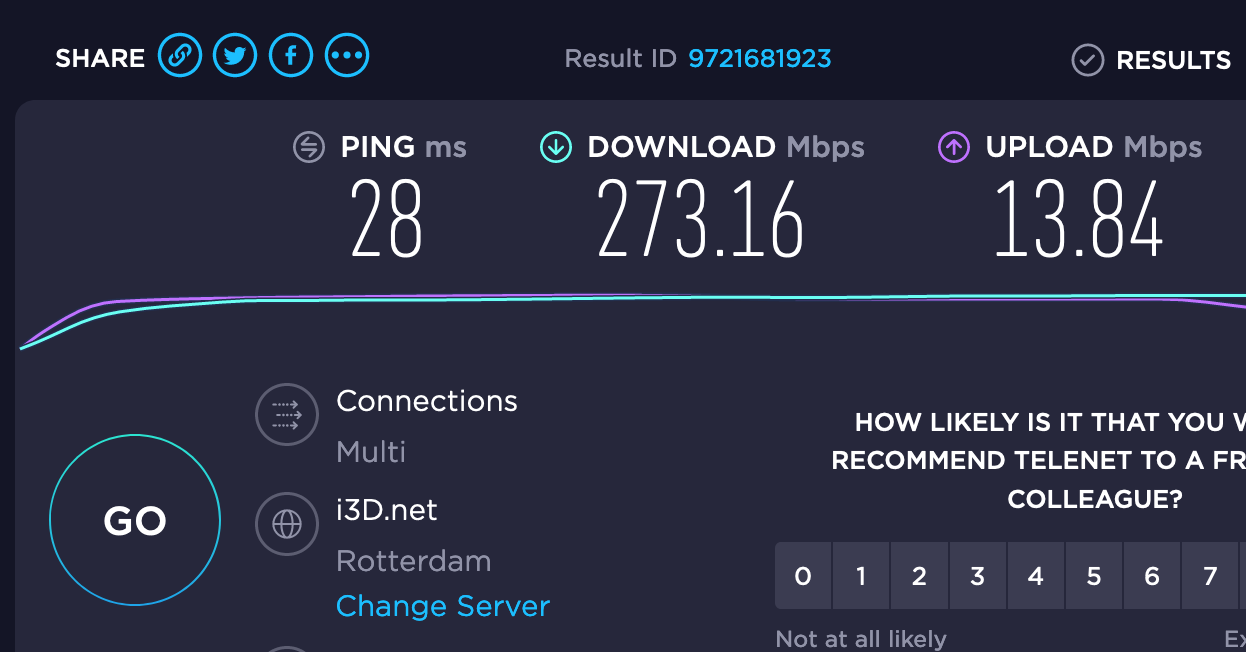
- The PING value contains the time for packets to travel to our server.
- The Download Mbps value should be higher than 5 Mbps, otherwise you may experience difficulties in watching the original video+audio stream.
- The Upload Mbps value should be more than 5 Mbps, otherwise some of your audio packets may be dropped.
Best practices
These best practices must be followed by interpreters for a successful translation.
Make sure the latest Firefox version is installed
Do this before you start testing. Then go to the translator room and check if you can connect to video, audio and chat.
Notes:
- The OpenH264 video codec (offered by Cisco Systems, Inc) should be enabled in the Firefox plug-ins. This is the case by default. If you can’t see the video in Firefox (black screen) this plug-in is probably not enabled. Try enabling it or do a fresh install of Firefox.
- If you are unable to use Firefox and you have a high-end computer, you can try to use Google Chrome (after thorough testing).
Restart your computer and close all other applications
To make sure your computer is stable, restart it before translating. When you’re ready to start, close all unnecessary applications to prevent them from using your processor, memory or internet connection. Make sure the Operating System is not allowed to start or download automatic upgrades.
Use an ethernet cable to connect to the internet
WiFi frequently leads to audio distortion, no matter how good your wireless connection is. Note that your OS may still continue to use WiFi after you’ve plugged in your ethernet cable. To make sure this isn’t the case, turn off WiFI in your OS settings.
Ensure that output AND input sound goes through your headset
Make sure your headset is set as your computer’s audio input and output device. If the sound of the video stream is played through your speakers, it will cause an audio loop and lead to interference.
Make sure your microphone and speech have sufficient volume
Configure your microphone correctly, so it produces enough volume. Make sure to speak loud enough. If you speak quietly, the audio codec has a harder time distinguishing your speech from anomalies. This will cause your speech to be erroneously corrected.
Mute your sound when another interpreter is speaking
If multiple interpreters alternate, we recommend pressing the mute button while another interpreter is speaking. Even if you make little or no sound, your microphone may still transmit ambient sounds or cause jitter. This results in audio glitches.
Don't use multiple browser tabs
Avoid opening interpreter rooms in multiple tabs. This can result in problems with your connections or audio quality.
Test extensively
Make sure to test beforehand with a stream that has comparable audio settings. While you’re testing, the event manager should listen and help you to set the volume of your microphone.
Reconnect if a connection problem persists
If a problem (e.g. local network issue) occurs during the event, the audio of your translation will restore itself in most cases. If it doesn’t, you should quickly reconnect (press the disconnect button and then connect again).
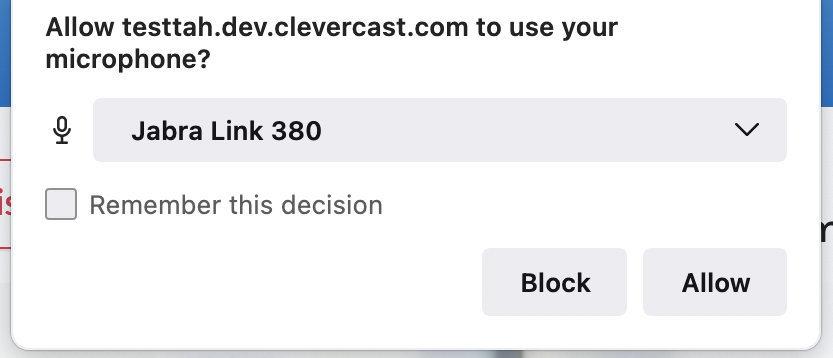
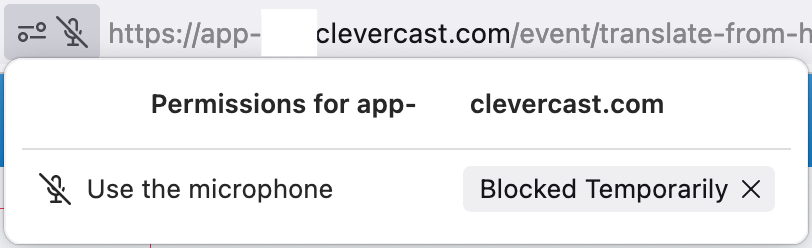
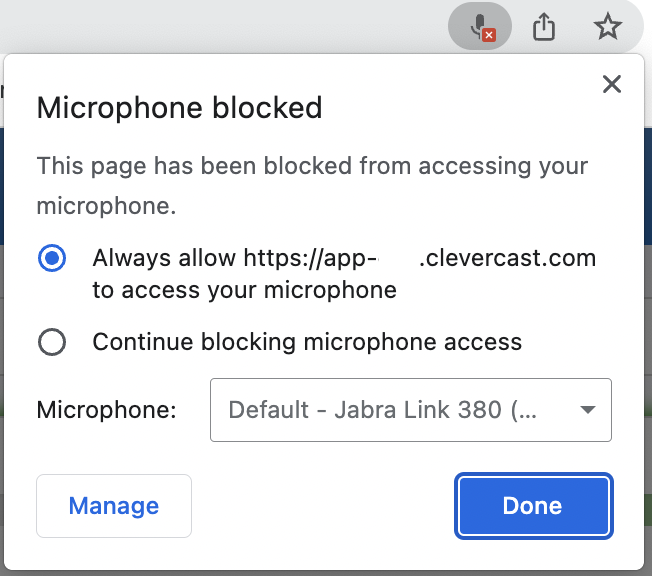
Microphone permissions
When your micropohone settings are set to blocked, you need to enable access in order to use the Interpreter Room.
In Firefox, you can find the permission settings in the left part of your URL bar. Click Blocked temporarily to grant access.
In Chrome, you can find the permission settings to the far right inside your URL bar. Change the settings to Always allow and then click Done.
To set your microphone volume, see this tutorial.