Webinar Platform manual
Introduction
Clevercast Webinar allows you to create fully branded interactive webinars containing live and on-demand streaming video. Thanks to its fully customizable user interface and behavior you can use Clevercast Webinar for various purposes like seminars, lectures, e-learning sessions, product demos, press conferences, ...
Our interfaces provide an optimal user experience on every device and platform without any software installation or plugins. Clevercast is built to combine HD video with custom styling and participant interaction. It can be extended to third-party solutions, for example by embedding iFrames.
A Clevercast Webinar application consists of a frontend (the webinar itself and its registration pages, accessible to participants) and a backend (for administrators, moderators, registration managers). When you create a webinar, you can select the frontend user interface language. The backend interface is only available in English.
Clevercast supports several workflows for participant registration and invitation. You can configure your webinars to automatically send registration emails, reminder emails and emails to participants after the live webinar. Its analytics let you see and download the time participants spent watching a live and/or VoD webinar.
The available widgets for participant interaction include Q&A, private and public chat, audience voting and surveys. All interactive data from a webinar can be downloaded.
The default webinar flow starts with a live stream, which is recorded in the cloud and can be made available as a Video on-Demand (VoD) afterwards. It is also possible to organize live-only, VoD-only, or simulive webinars. Each webinar has a status that determines what participants are seeing at a given time (live stream, VoD video, image or message). This way, you can test the webinar flow and reset the status afterwards.
A number of advanced features depend on your webinar plan:
- Multilingual Webinars allow your participants to select multiple audio languages and/or close captions in the video player, so they can switch to their preferred language while watching the video.
- Simulive Webinars let you stream uploaded videos as if they were live streams. Viewers will not see any difference between a simulive stream and a 'real' live stream. Multilingual simulive webinars are also possible.
- API integration: Clevercast Webinar has an API that allows you to create and retrieve participants.
Application frontend
You can fully brand your webinar frontend by selecting a logo or banner, color scheme, custom font or poster images to be shown in the player before/after the live webinar, social media icons, share buttons... If you need more customization, you can create your own custom CSS file and upload it to Clevercast.
You can also determine the tabs/panels available on the webinar page in addition to the video player. They depend on the options you activate in the backend concerning participant info (summary, agenda, handouts), interaction (private/public chat, audience polling, survey, embedded widgets), related webinar videos (breakout webinars) and embedded third-party solutions (social media wall, communication tools).
This section shows how the frontend pages are constructed and can be customized. Details about the features available through the tabs/panels are explained in other sections of this manual.
The webinar page
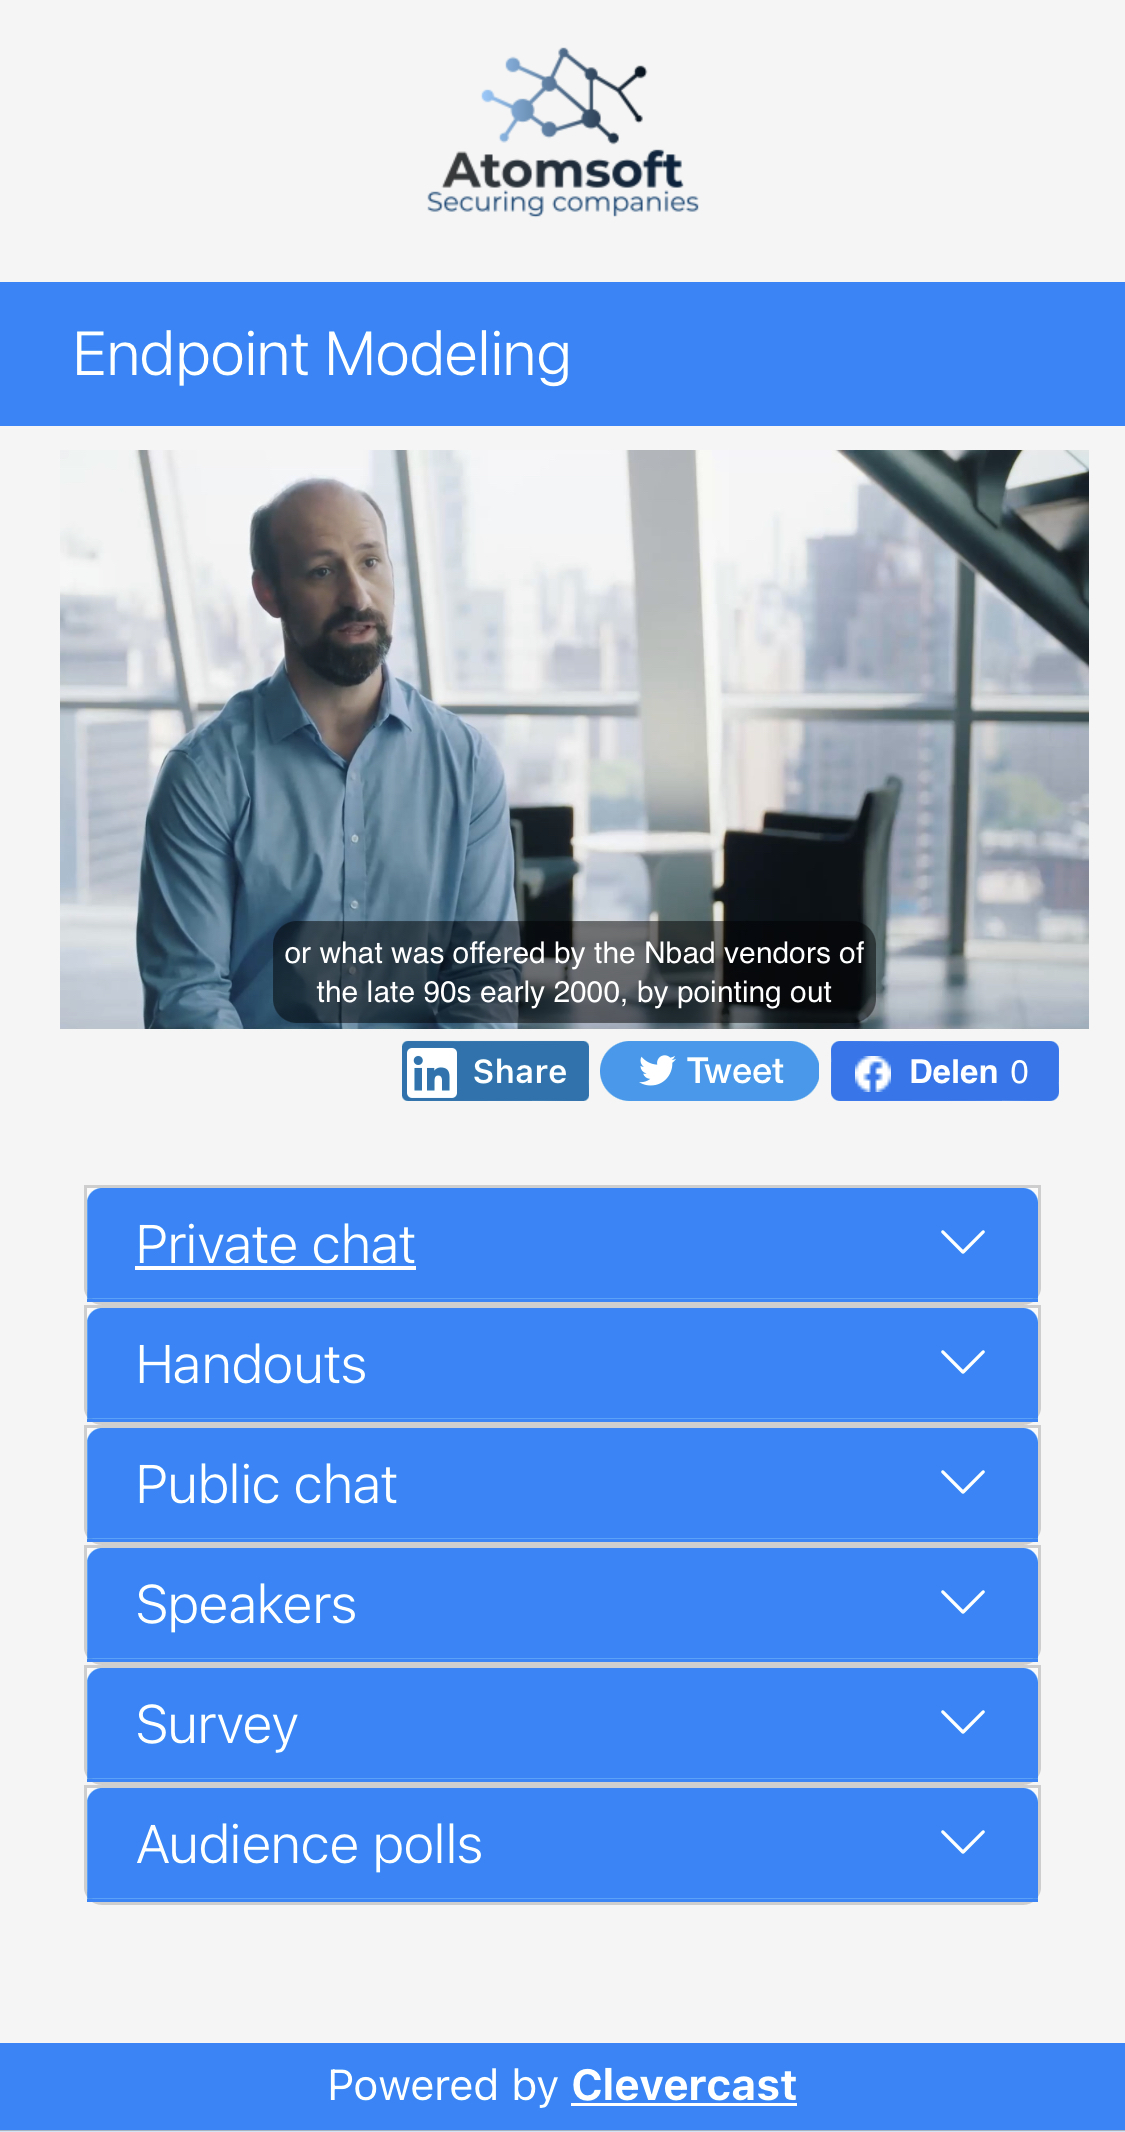
After registration is completed (or if you have a webinar without registration) a participant will land on the webinar page. The webinar page has a responsive design: the way it is displayed depends on the viewer’s screen size.
On large and medium sized screens, webinar functionality is available in side-by-side tabs on the right of the player. On small screens, the tabs are replaced by sliding panels that appear below each other.
In both cases, the page consists of the same elements:
- If you set a logo or banner image in the backend, it appears on top of the screen. By default it is centered above the player, but it can also be shown on the left or stretched over the entire page width.
- The webinar title is displayed below the logo (you can hide it or change the way it is displayed with custom CSS).
- The video player. Before the webinar starts, the player is automatically replaced by a poster image (or a text message). The player has a 16:9 aspect ratio and tries to take the number of pixels of the highest available video resolution (= responsive, depending on the width of the screen). If the screen is wider than the highest resolution, the selected background color will be displayed on both sides of the player.
- The tabs or panels section for which you can set the background and text color of the tabs/panels and the background color of the forms/widgets inside the tabs (= white by default).
- The footer, for which you can also set the text and background color.
The registration page
If registration is required, participants will automatically land on the registration page before they get access to the webinar page. By default, the registration page uses the same logo/banner and color scheme as the webinar. But its look and feel can be fully customized, as well as the text and form elements on the page.
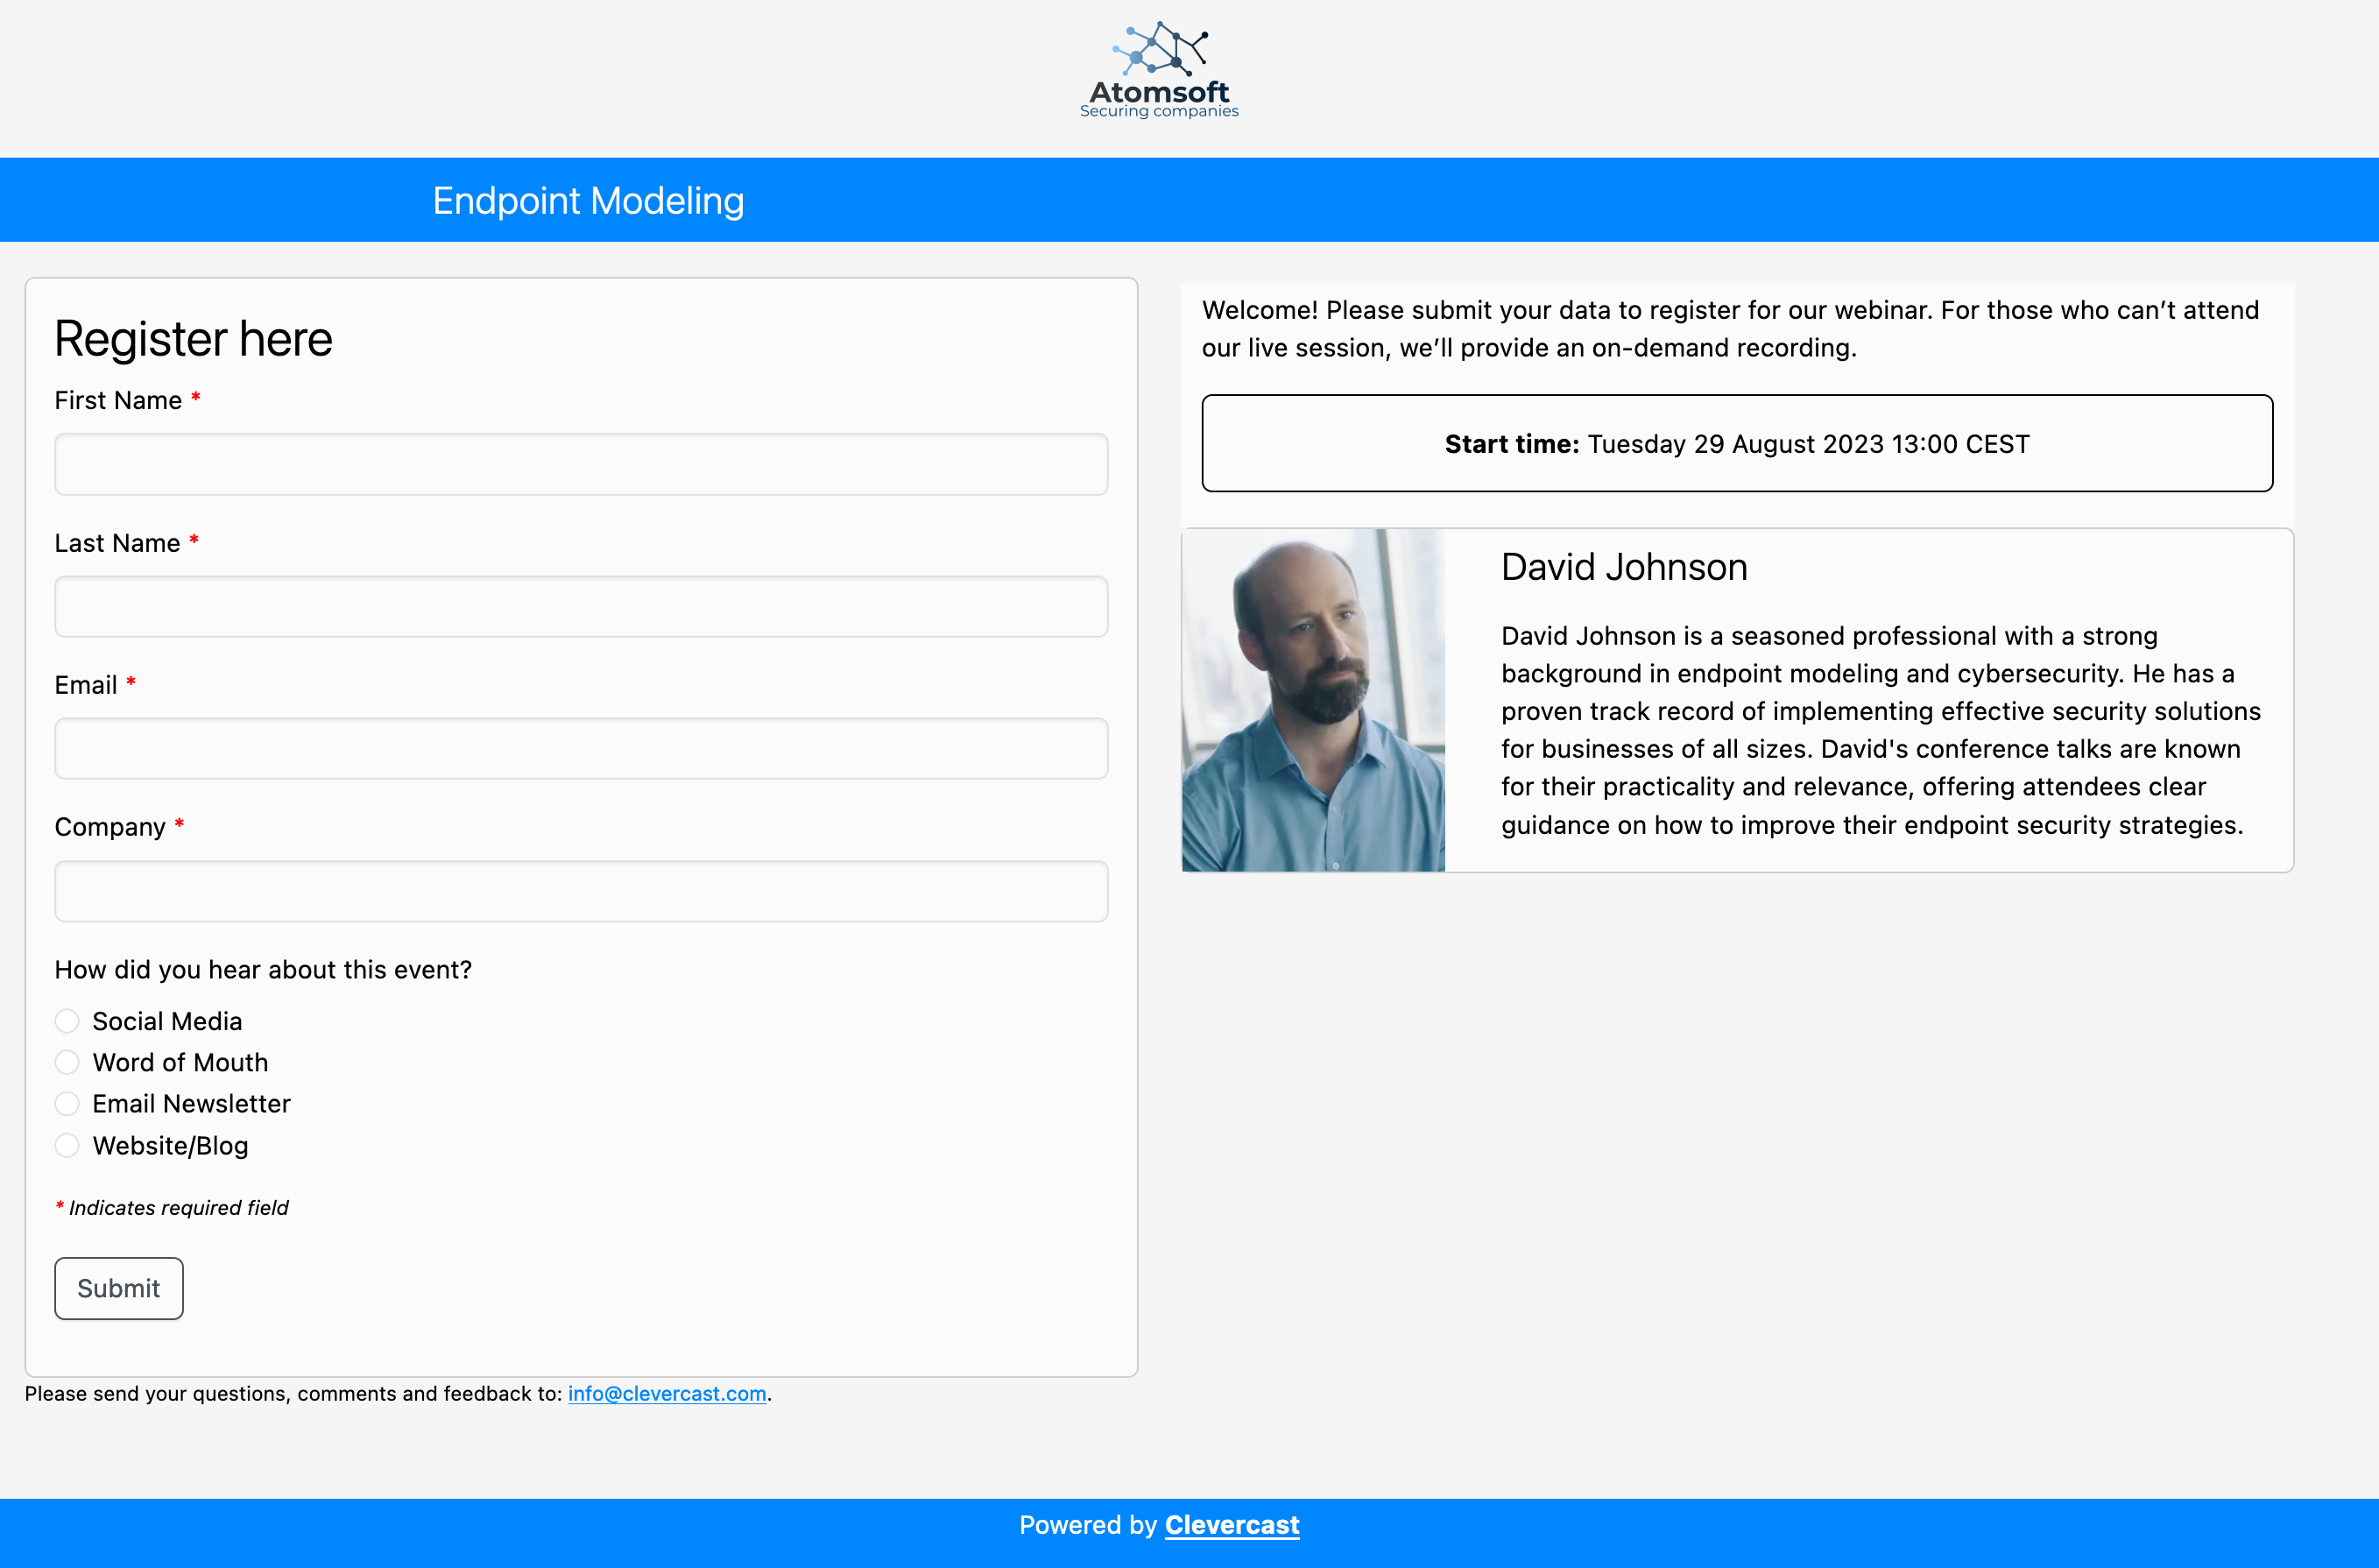
The registration page consists of these elements:
- If you set a logo or banner image in the backend, it appears on top of the screen. In the same way as for the webinar page, it can also be shown on the left or stretched over the entire page width. It can be omitted through the registration settings.
- The webinar title is displayed below the logo. It can also be omitted through the registration settings.
- The registration form is shown on the left of the page. You can select and customize different form fields in the backend. All text can be adjusted in the settings.
- On the right side of the page, you'll find:
- A custom introduction text (to explain the registration process or provide additional info).
- The scheduled start time (and end time, if set)
- Speaker info
- The footer, which is the same as the webinar footer.
The registration email
Registration or invitation for a webinar usually requires Clevercast to send a custom email to participants. Clevercast also allows you to send reminder emails to registered participants and follow-up emails after the live webinar. All emails are based on a common template and by default use the same logo/banner and color scheme as the webinar. Visuals and text of these emails can be fully customized.
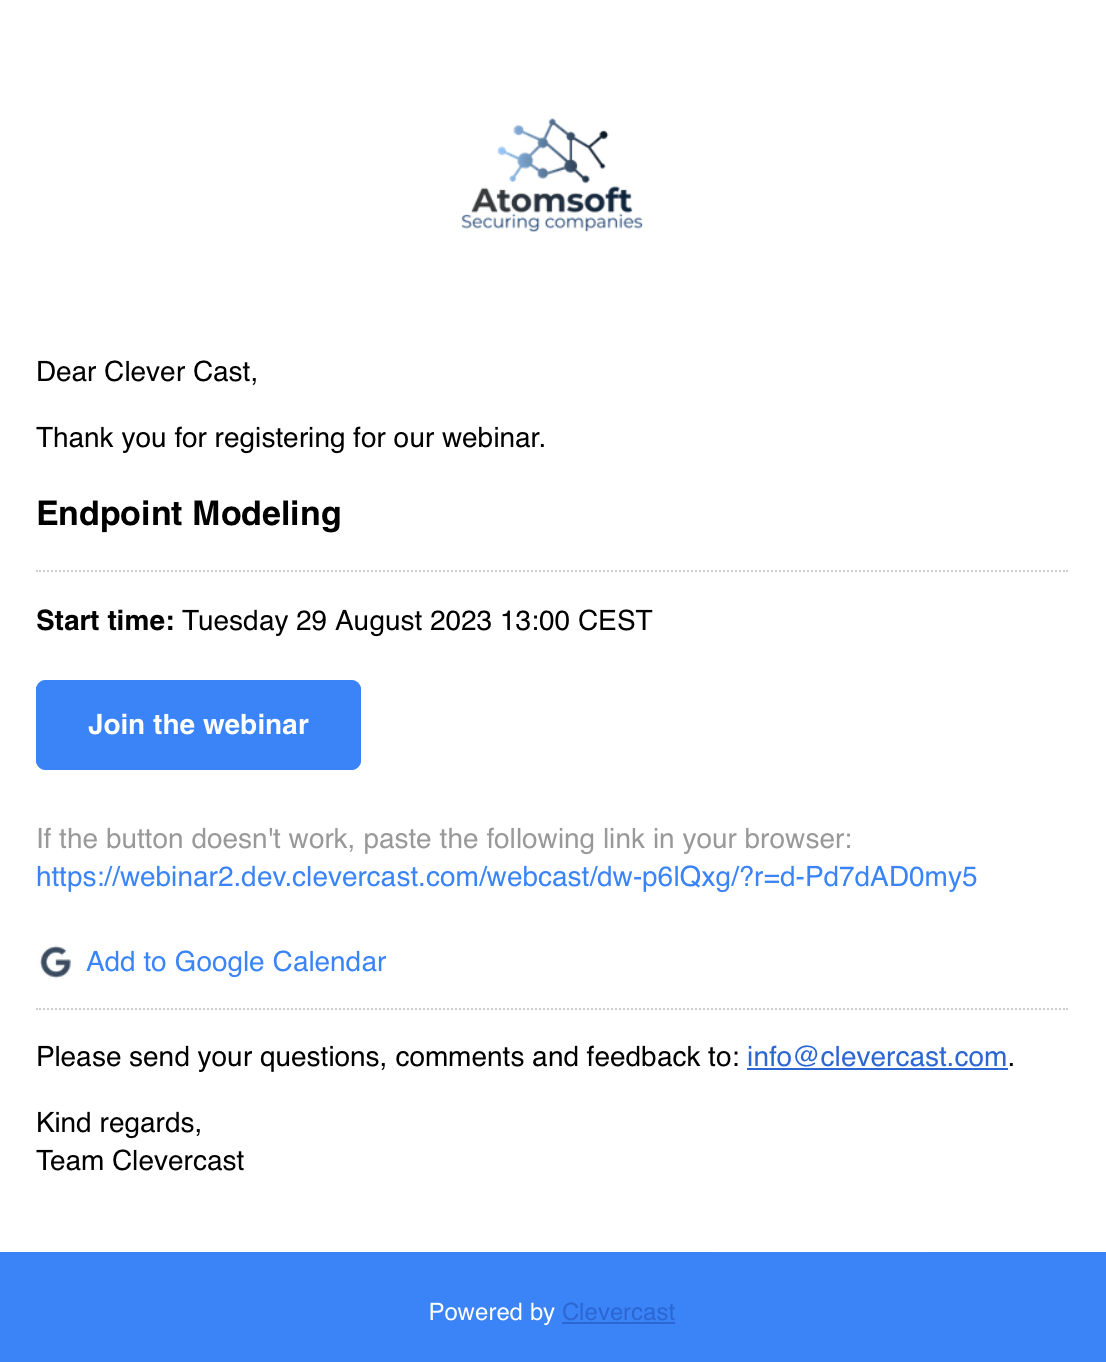
A registration email consists of these elements (all elements can be omitted, except for the button and link to join the webinar):
- The logo or banner image.
- The first section, which may consist of:
- The salutation of the participant, which can be customized
- An introduction text, which can be customized
- The name of the webinar
- The middle section, which may consist of:
- The scheduled start time (and end time, if set)
- The webinar summary
- The button to go to the webinar and a copy of the link (in case the button doesn’t work). The text on the button and for the link can be customized.
- An Add to Google Calendar link
- The last section, which may consist of:
- A custom instructions text
- A custom signature of the organizer
- The footer, which can be customized separately from the footer on the webinar page.
Helper pages
Clevercast also has a number of helper pages. For example, for when someone tries to go to a webinar to which he doesn’t have access or which is no longer available. These contain standard information and have the same look and feel as the webinar and registration page.
The most common helper page is the ‘Thank you for registering’ page for two-step registration. In this case, a participant needs to use the unique link in his email to access the webinar. After he has filled in the registration form, he is redirected to this page.
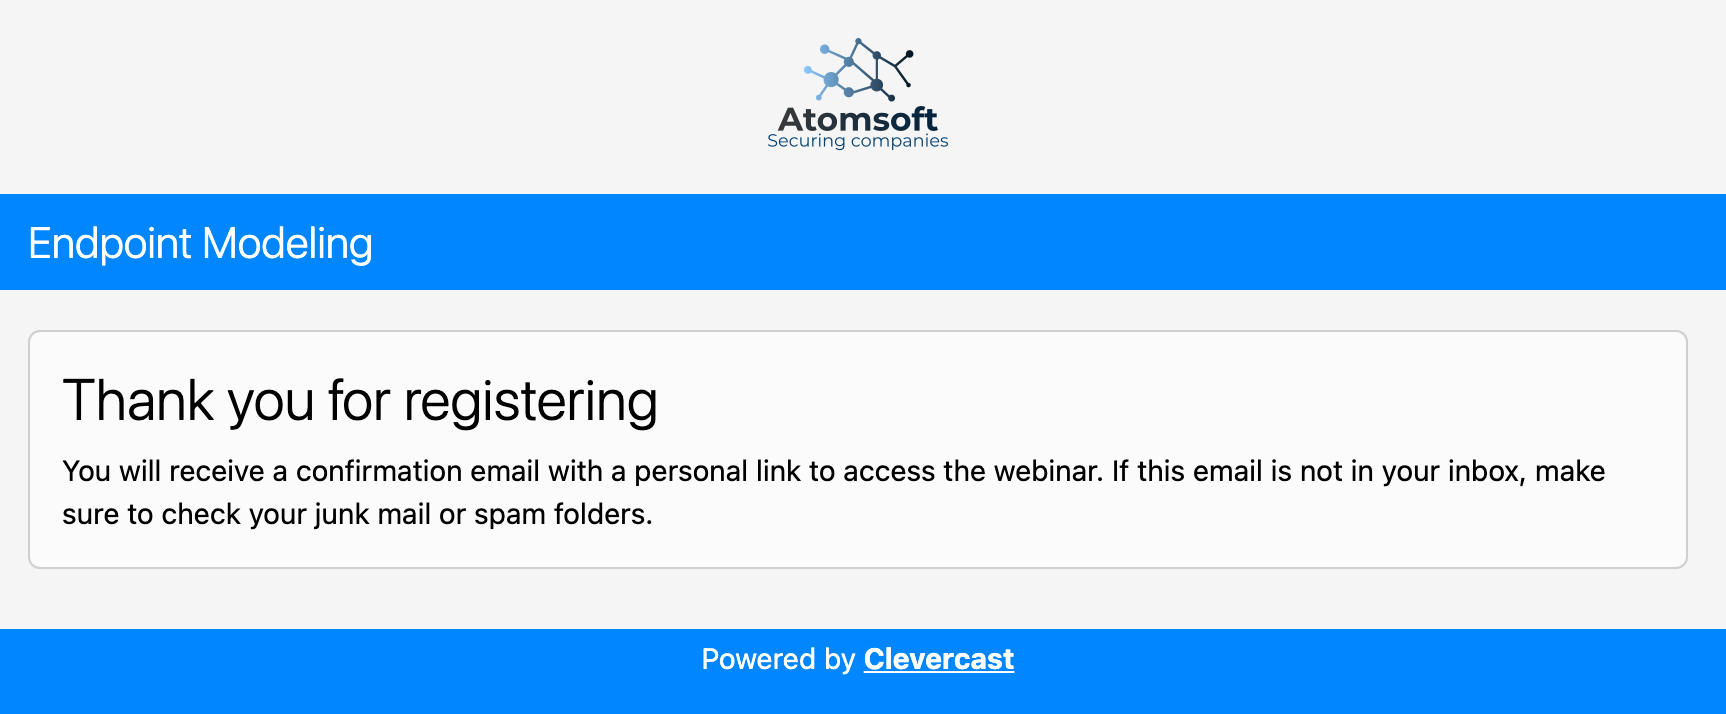
You can set the message on this page along with the registration page elements (see Page Elements).
All helper pages can also be customized through Custom CSS.
Application backend
The application backend is only accessible to administrators. After logging into the backend, they will be directed to the dashboard of their account. The available menus depend on the role and permissions of the logged in user.
Only users with the 'admin' role have access to everything, including the account settings and the ability to manage users and roles.
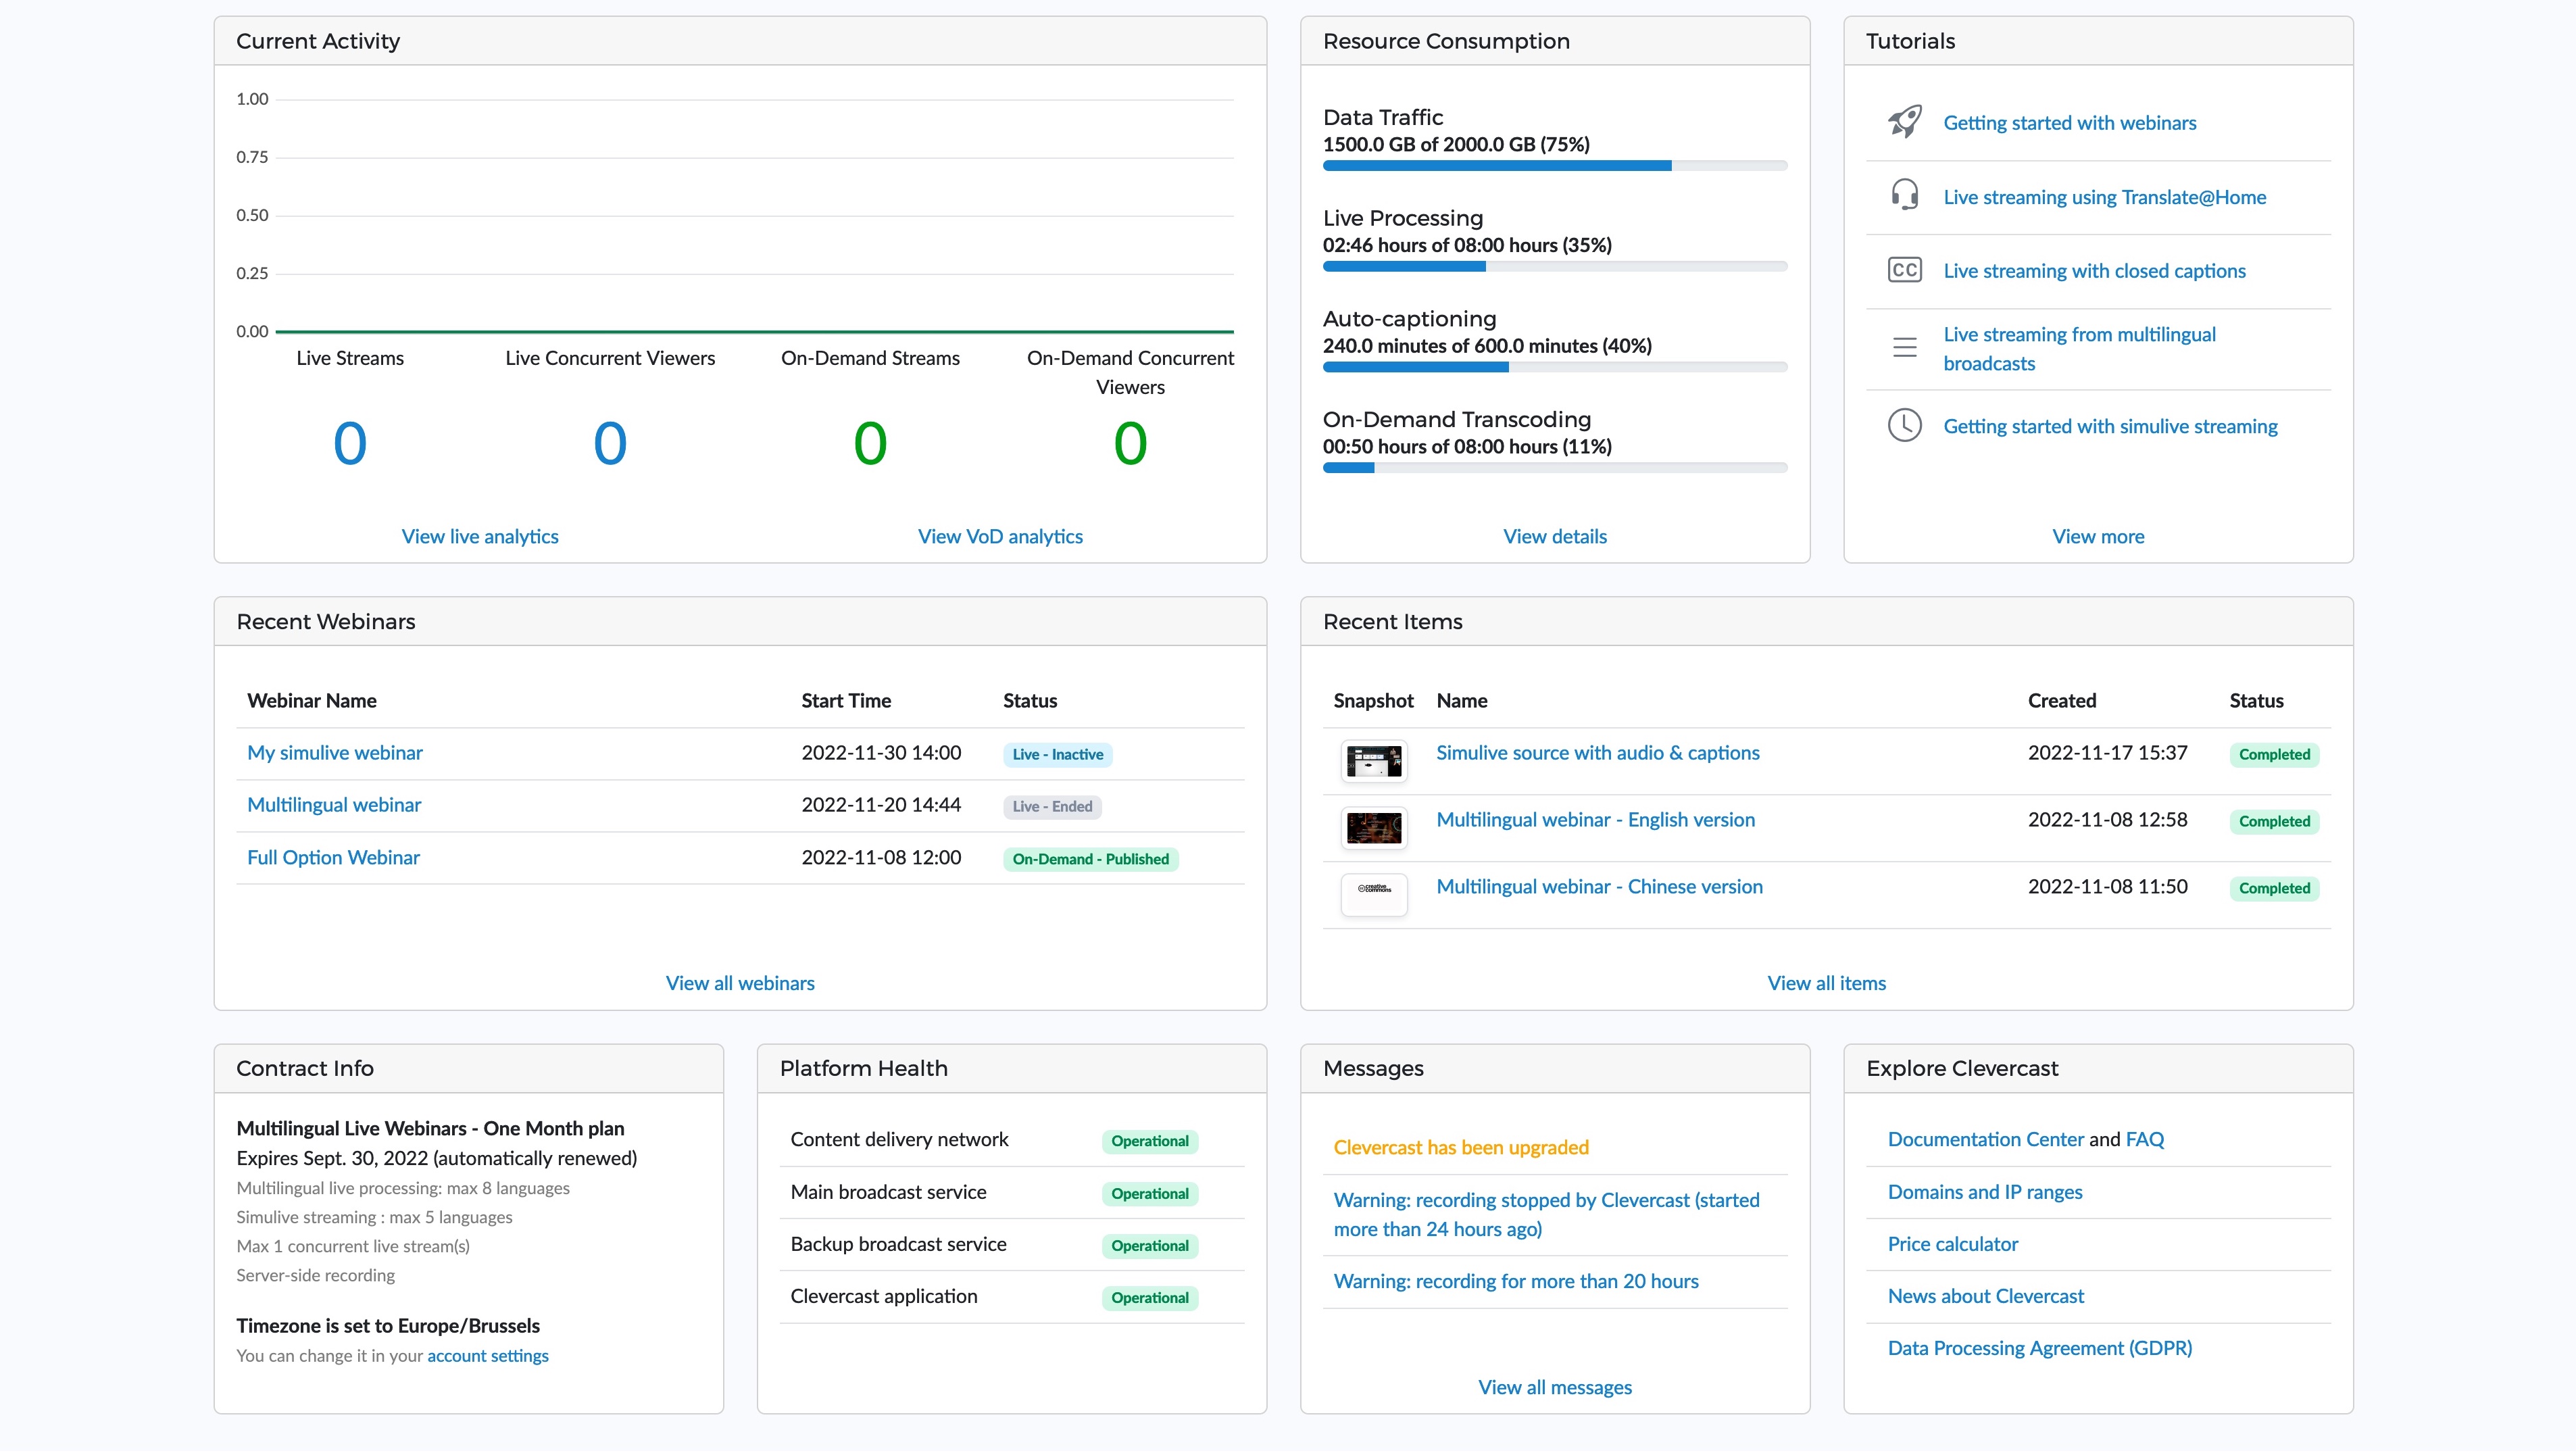
The dashboard provides an overview of the most recent webinars. By clicking on the ‘Webinars’ menu, you can go to your webinars list.
Creating a webinar
After logging into the Clevercast backend as administrator, you will be directed to your account's dashboard.
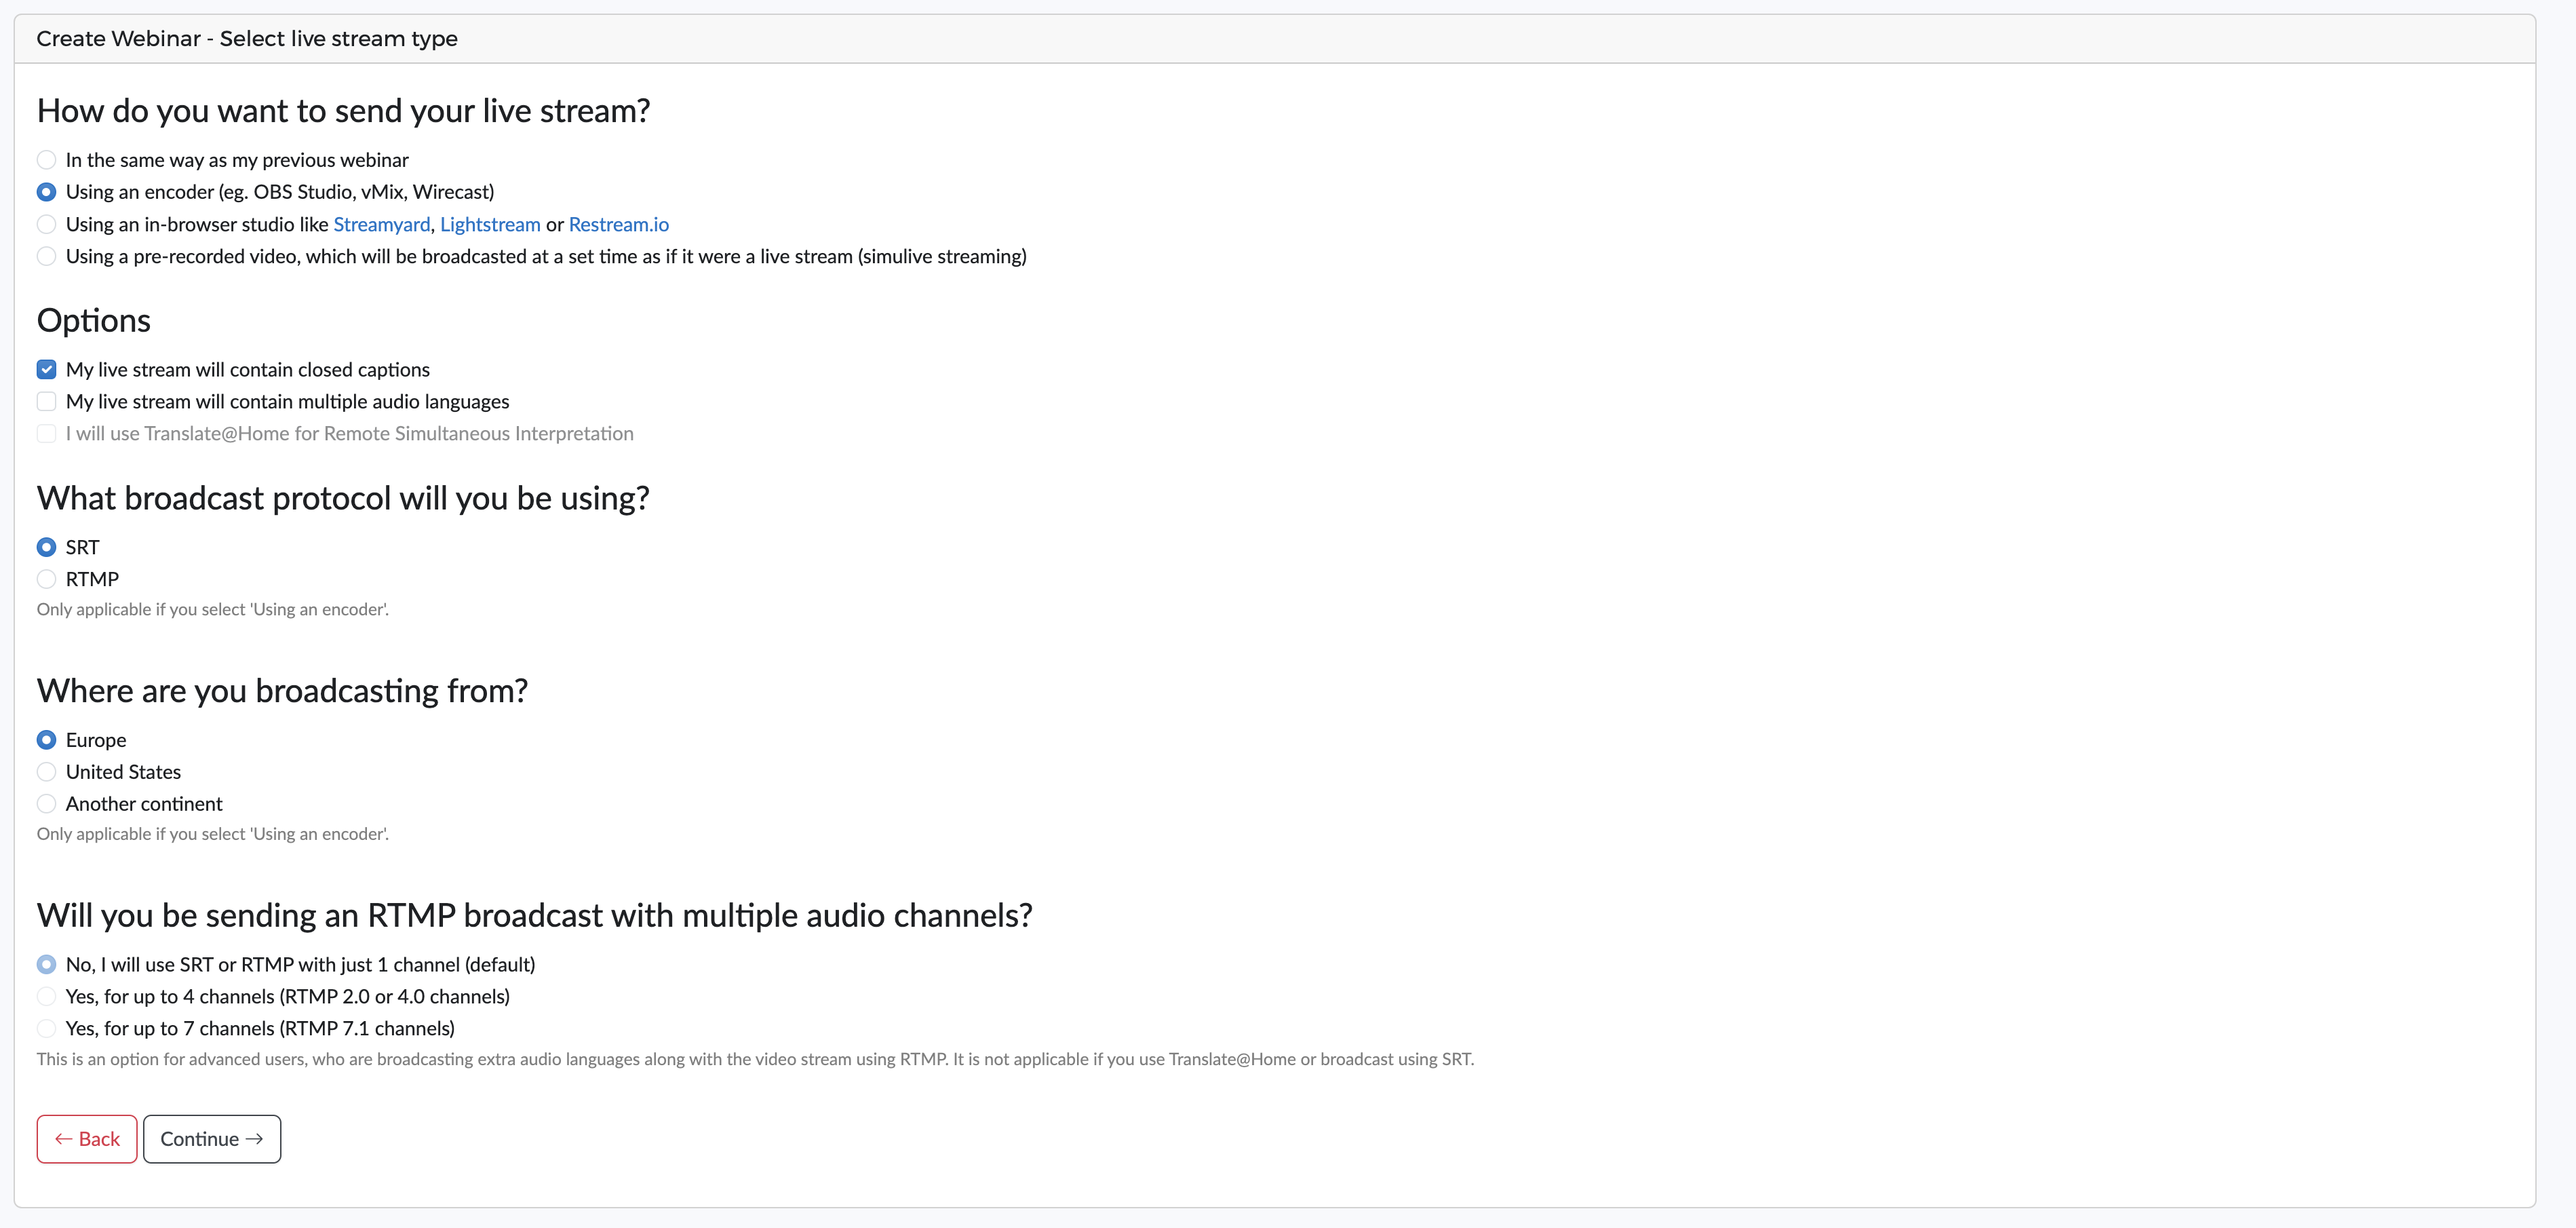
Go to the Webinars menu. Click on ‘Create Webinar’ in the sidebar to create a new webinar. A wizard lets you determine the global look and feel and configuration of your webinar.
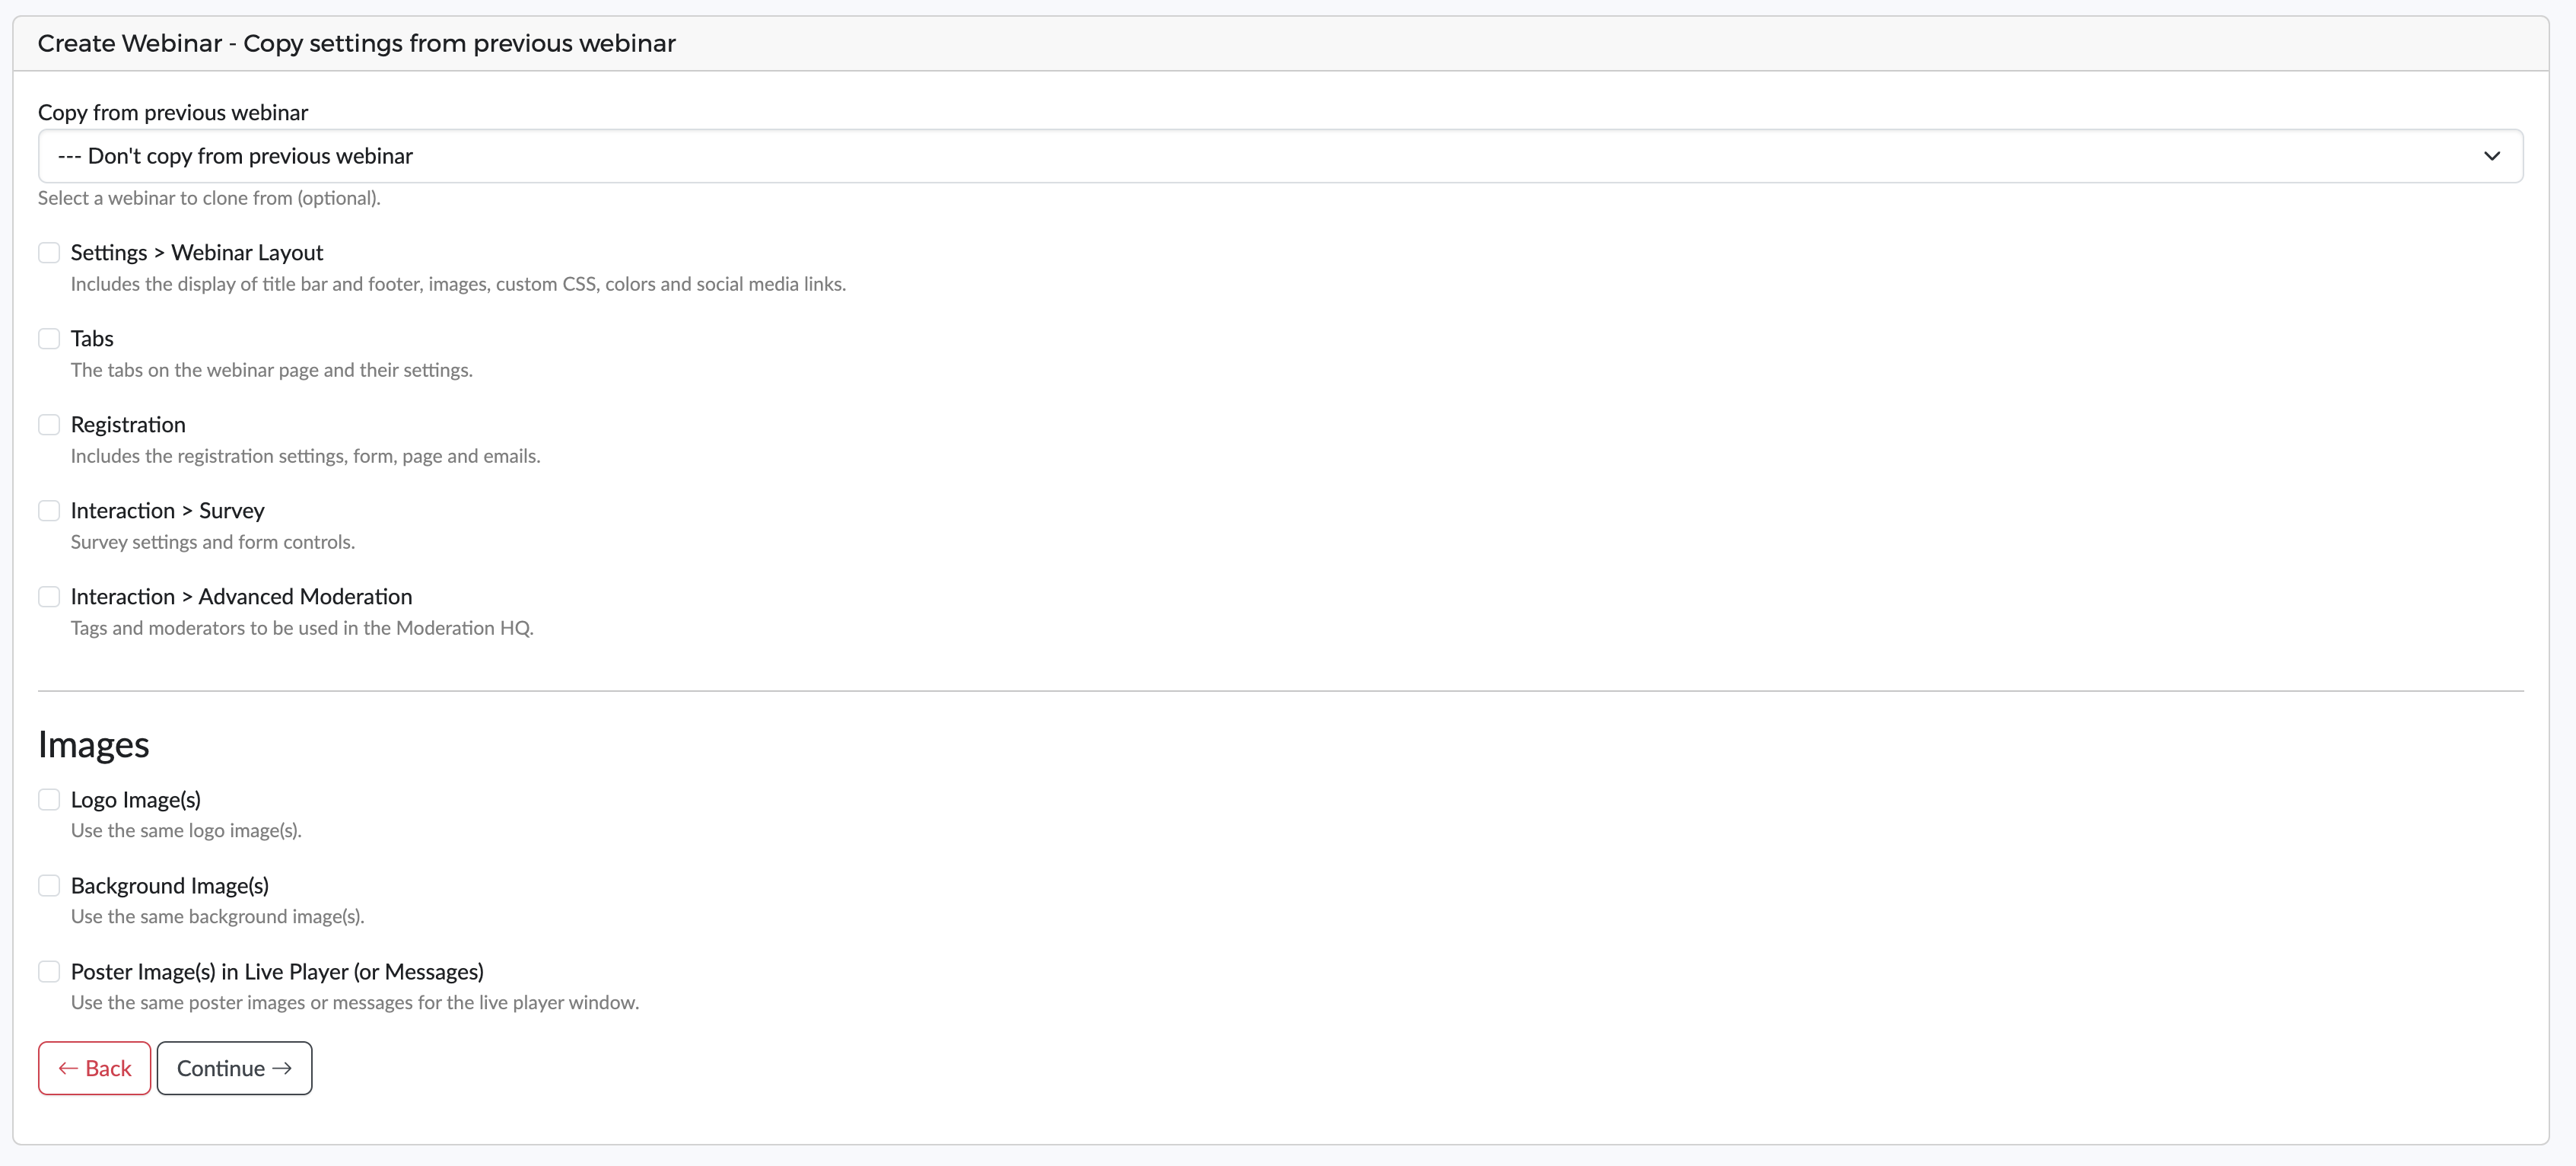
Important: when creating a new webinar, Clevercast lets you copy the configuration of an existing webinar. If you have multiple webinars that have a similar look and feel and/or behaviour, we recommend starting with the first one and fully configuring it. You can then replicate this when creating the other webinars.
The first screen of the wizard lets you determine how your live stream will be sent. If you have a multilingual account, you must also indicate whether you the webinar uses additional audio languages and/or closed captions.
When you press Continue, you'll move on to the next wizard screen. Here, you can copy settings from a previous webinar. If you don't want to copy any settings, select 'Don't copy from previous webinar'.
On the final wizard screen, you can customize the behaviour and look & feel of your webinar. Here are some of the configuration options (the actual ones depend on your choices in the previous steps):
- Name: the name of your webinar will be used for various purposes (e.g. display on webinar and registration page, and in emails)
- Webinar UI Language: the user interface language in the frontend of the webinar, and in the emails
- Start Time: start time of the webinar, which must be set in the future (this can easily be adjusted later)
- Logo image: upload the logo of your brand or webinar (optional). If set, it is shown on the webinar and registration pages and in registration emails (by default).
- Brand colors: used for headers, background colors, and links. Note that the 'Webinar Layout' menu and 'Registration Page' allow you to further customize the colors on the webinar and registration page (see below).
- Type of registration: select the registration type
- Max Number of Registrants: the maximum number of participants that are allowed to register for this webinar. By default, this equals the maximum number of registrants of your plan.
- Default video language: the default language that is being spoken in the live stream. If multiple languages are spoken, you can select 'Original'. Note: this is only relevant for webinars with extra audio languages and/or closed captions.
- Resolutions: the resolutions that are used for adaptive streaming. Clevercast does cloud transcoding of your incoming stream, allowing the player to switch automatically to the best possible resolutions.
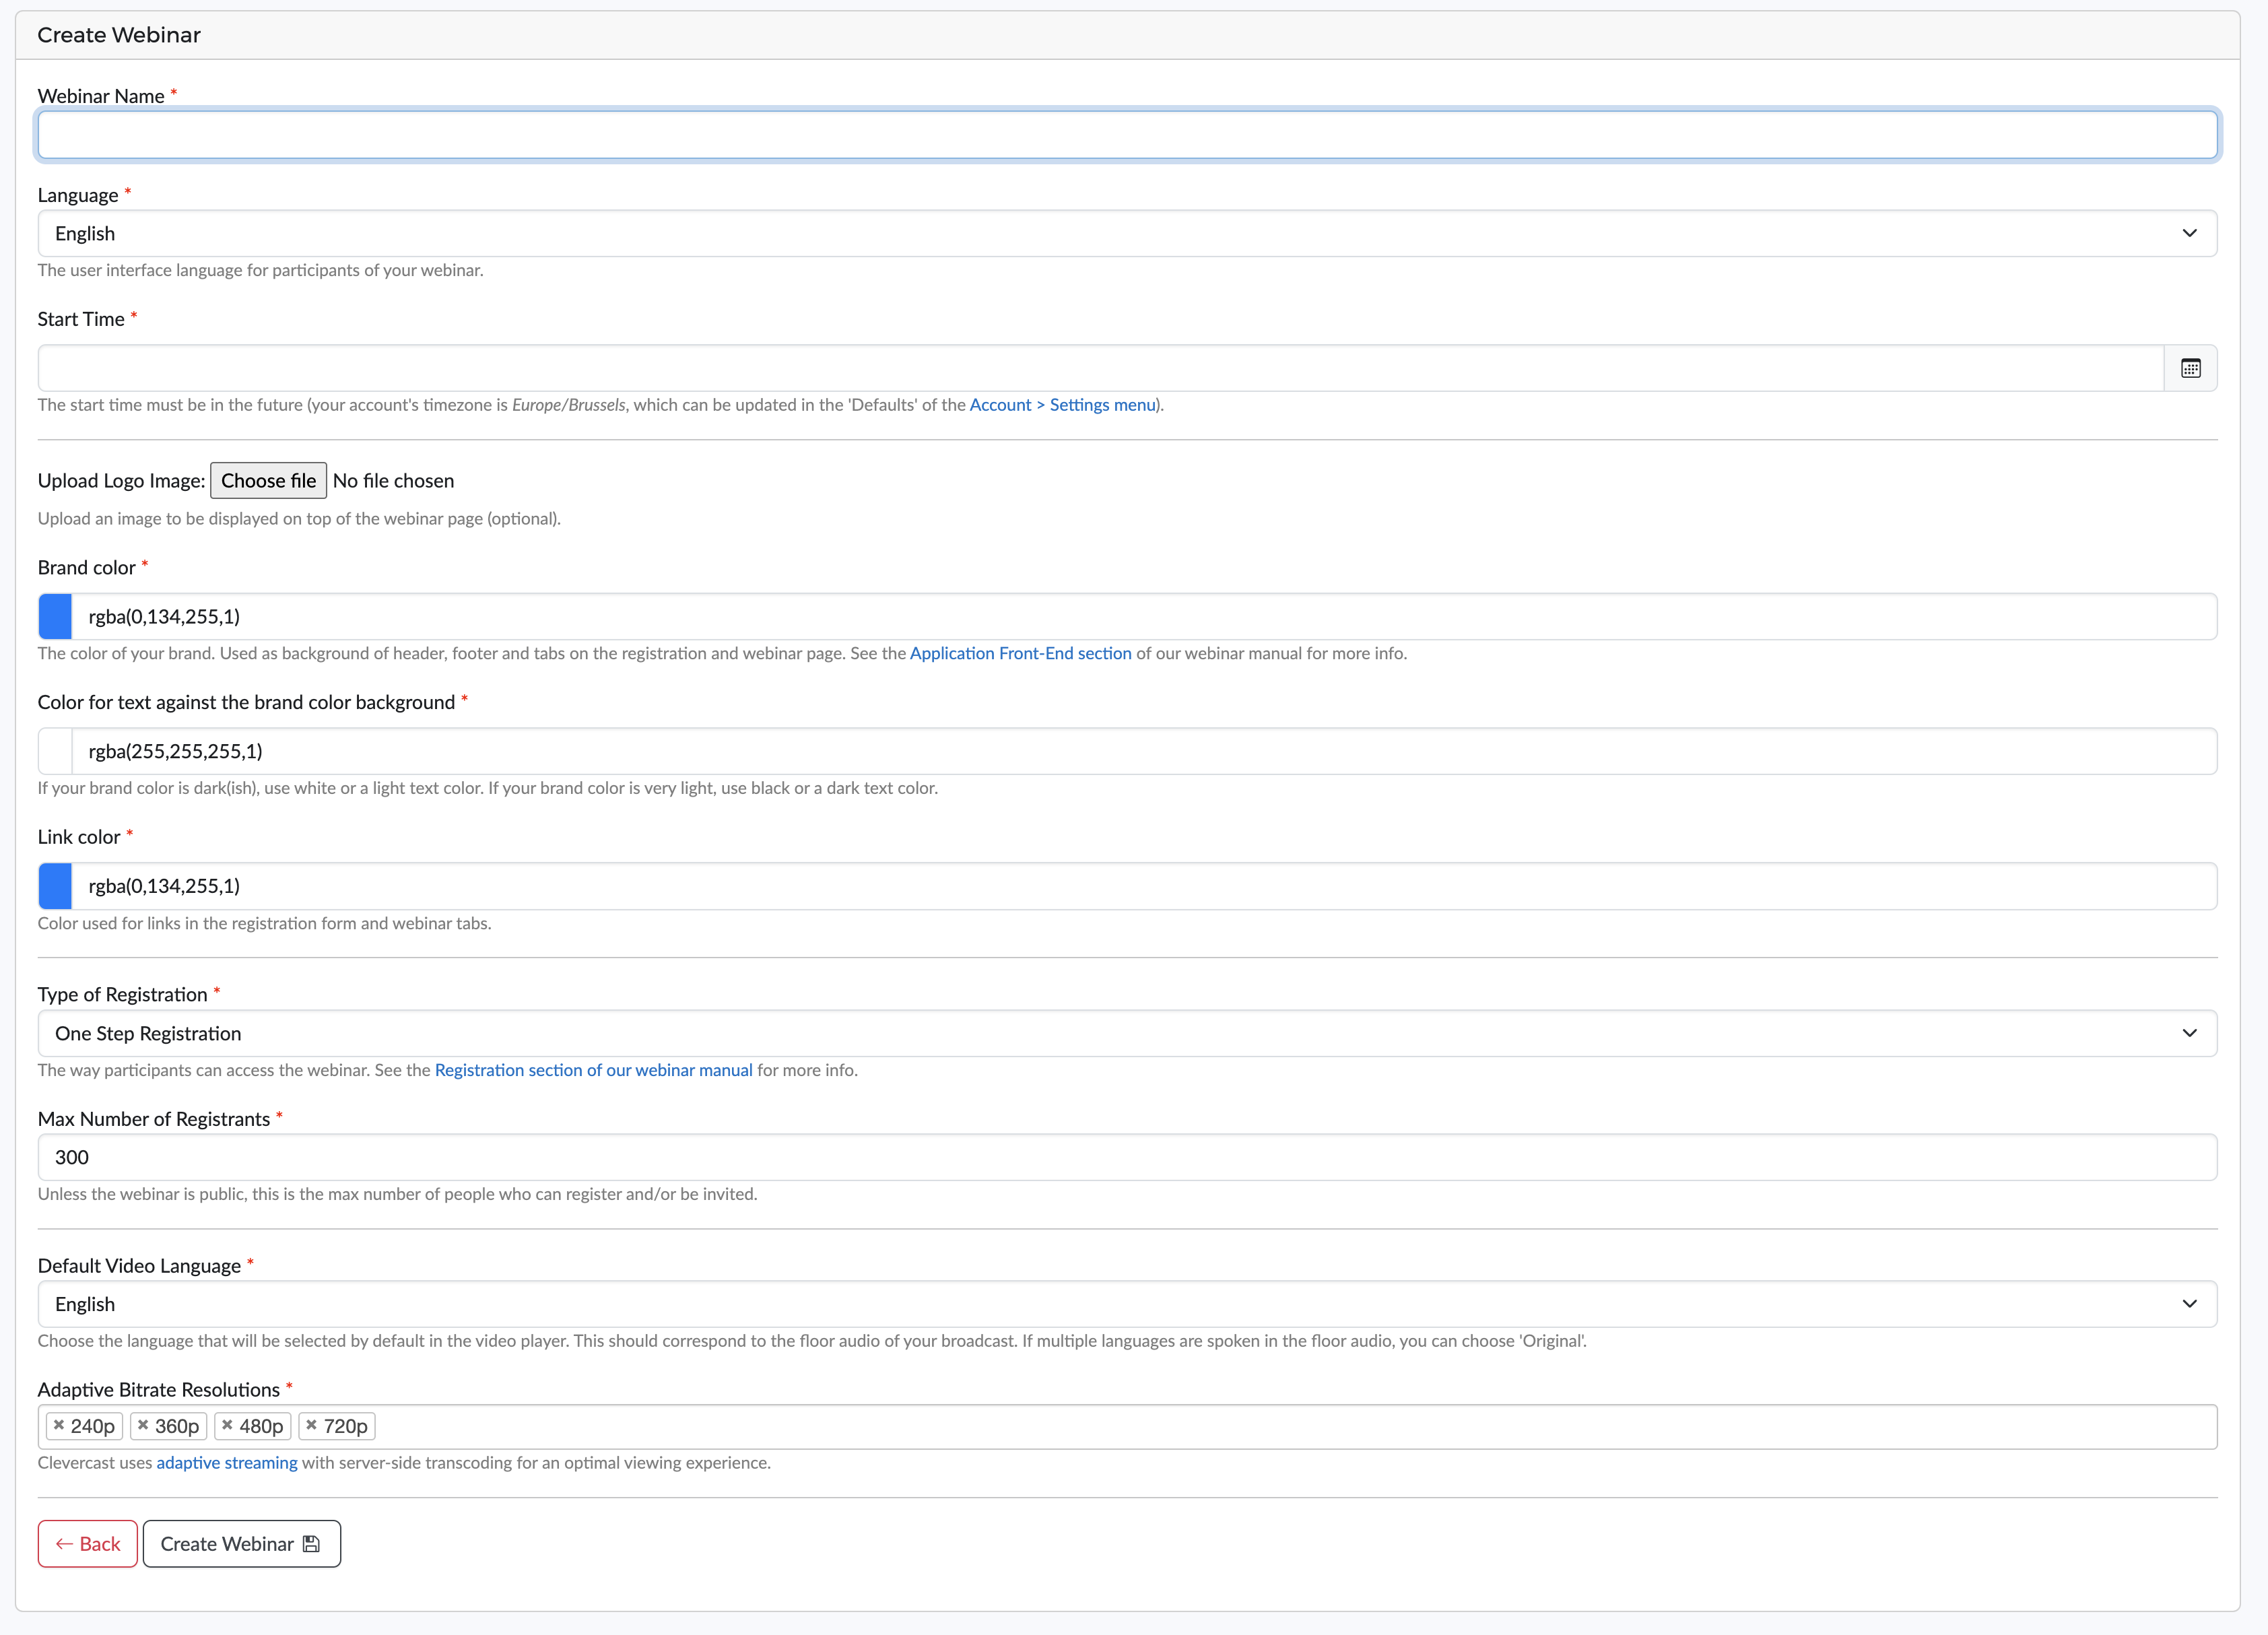
Note: you can still change the entire webinar configuration after the webinar has been created.
Click Create Webinar to complete the wizard. Clevercast will set up the webinar and redirect you to its home page (this may take some time).
Webinar home page
The webinar home page shows you the main settings and current status (see below) of your webinar.
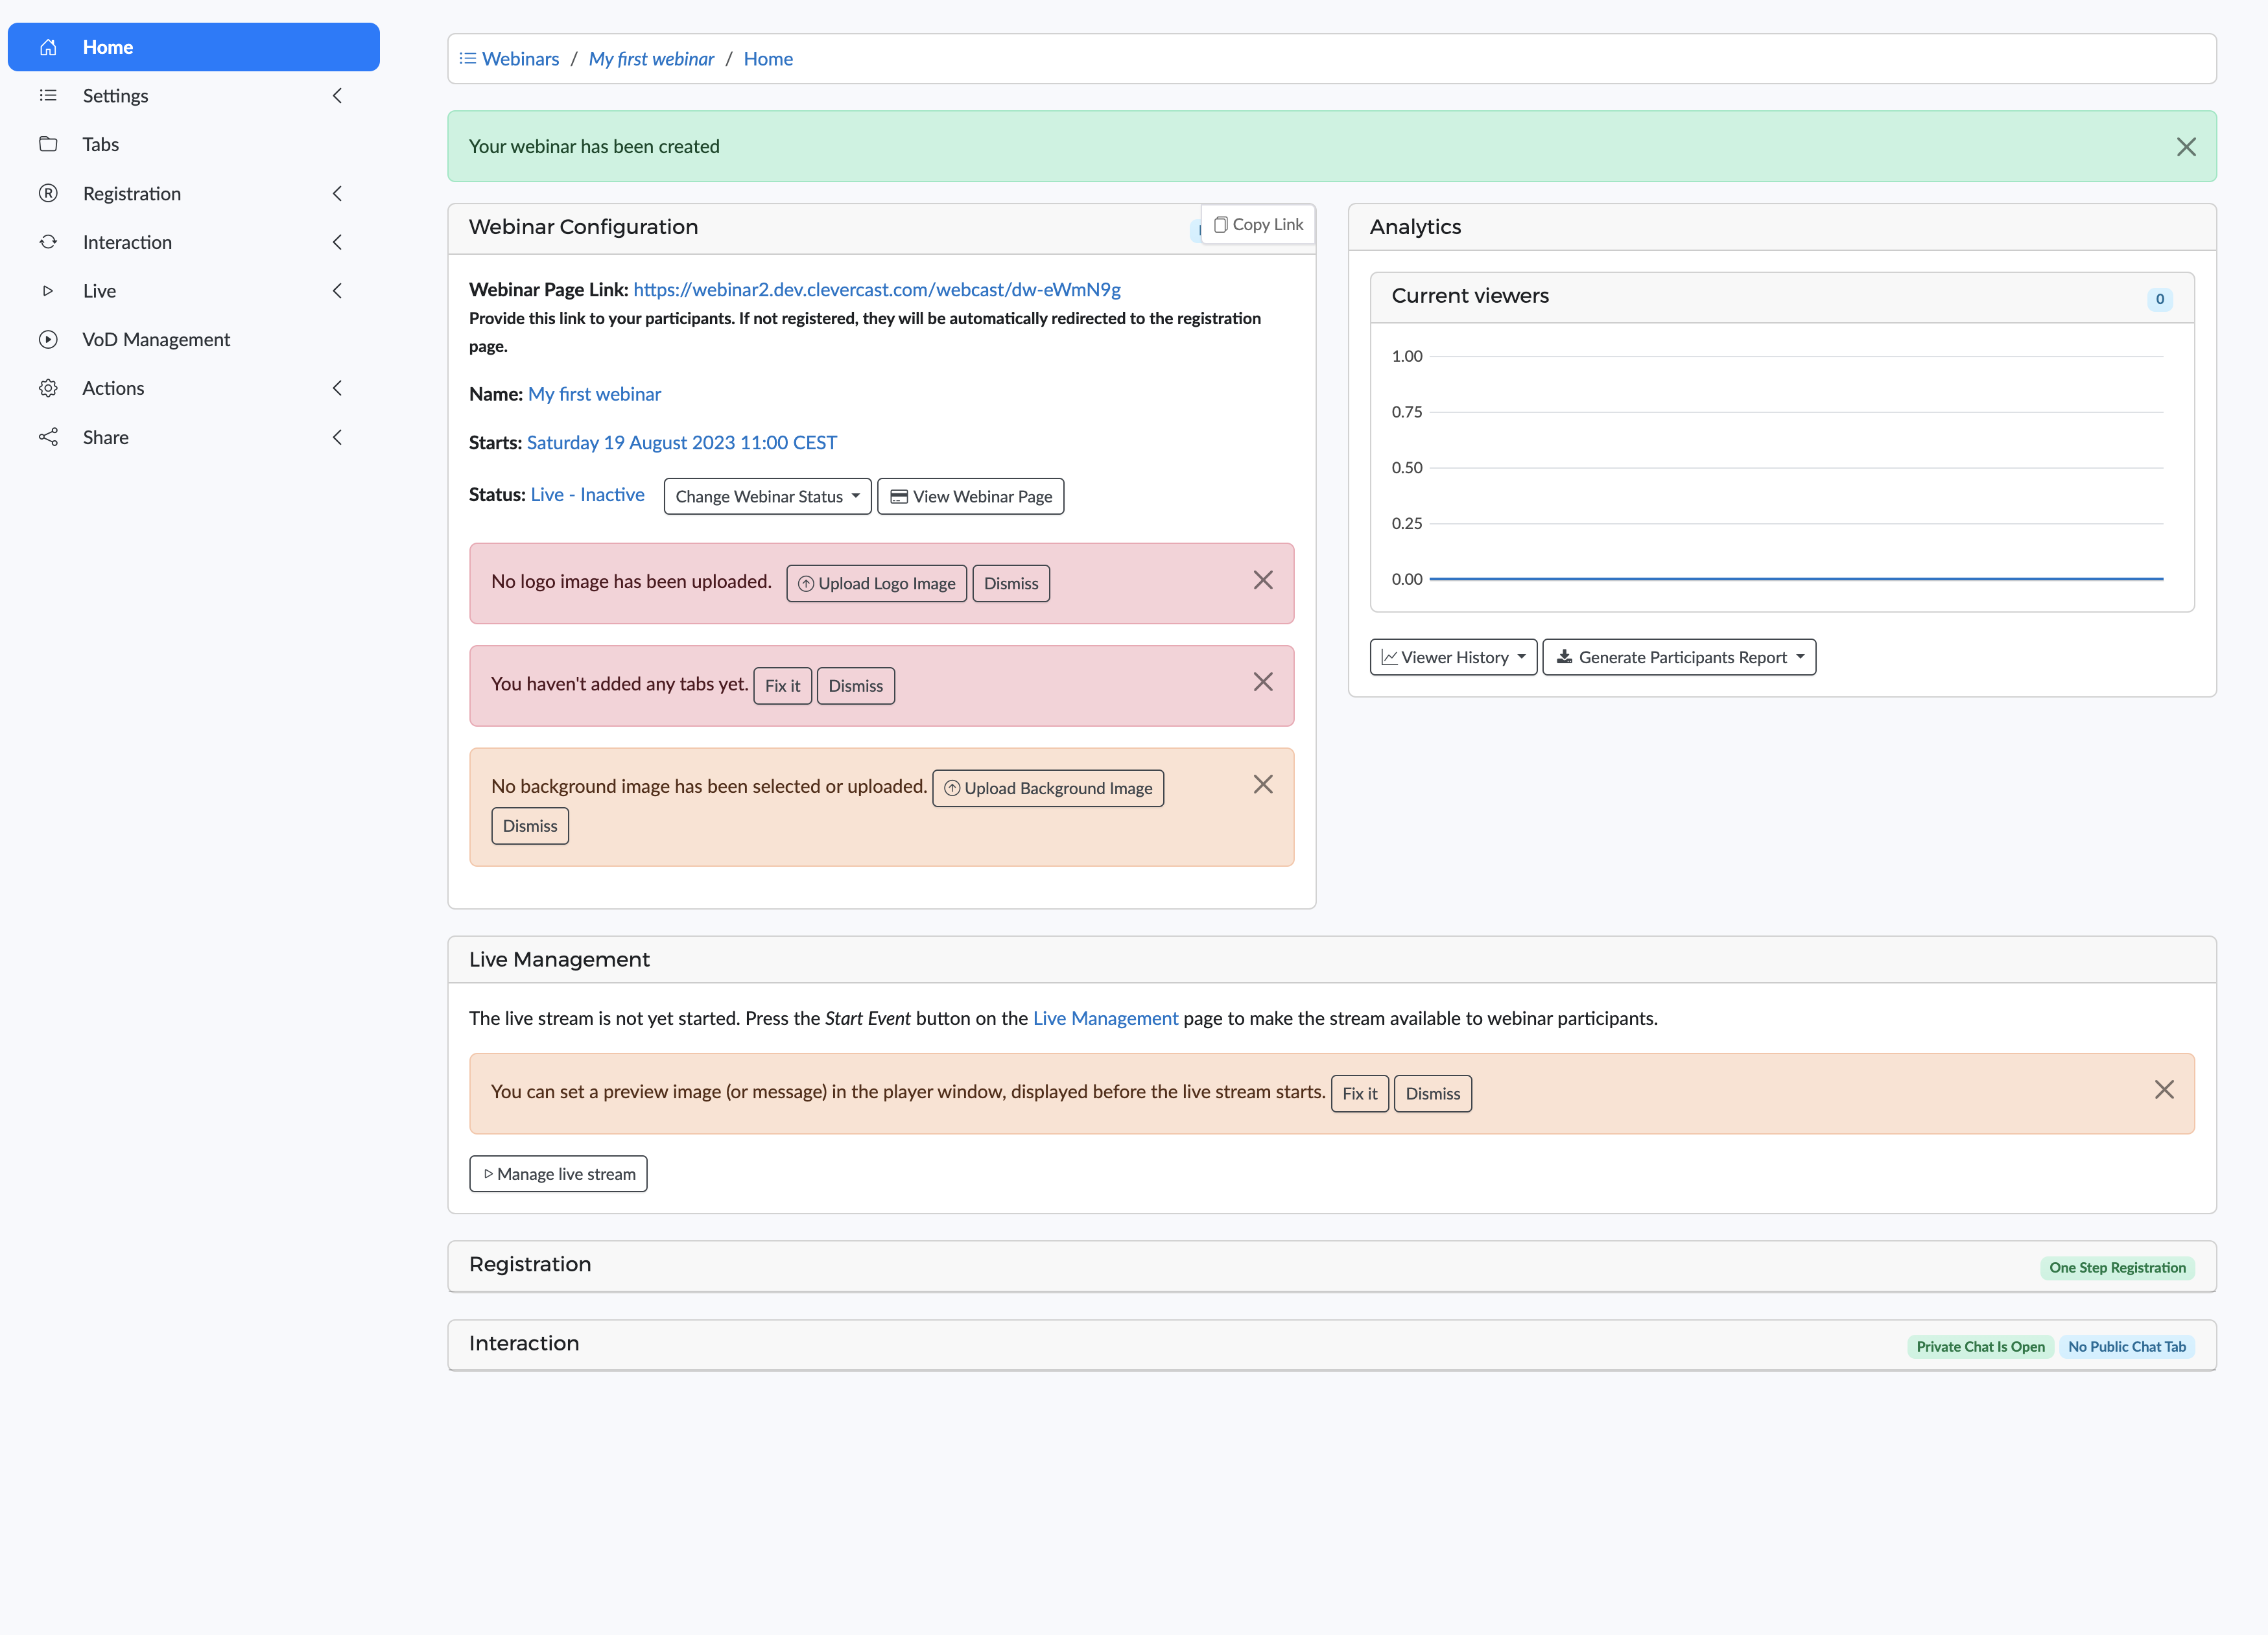
The home page may contain notifications in orange or red. Notifications in orange are hints that alert you to certain ways to enhance the look of your webinar. Notifications in red indicate settings that are usually part of a webinar's configuration. To stop a notification from being displayed, click the dismiss button behind it.
Webinar status
A webinar always has a status that determines what the participants will see in the frontend. It is always visible in the top right corner of your screen. There are four main statuses:
- Live: the frontend displays the live stream player.
- On-Demand: the frontend displays the Video on-Demand (VoD) player. This allows participants to see a recorded or uploaded video, which allows pausing and seeking.
- Canceled: the frontend displays a helper page with the message that the webinar has been canceled.
- Not-Available: the frontend displays a helper page with the message that the webinar is no longer available.
A newly created webinar automatically has the Live status. As administrator, you can change the status through the ‘Change Webinar Status’ dropdown button on the home page.
When the main webinar status is live, its behaviour also depends on the live event status (which is changed on the webinar’s Live section). The live event status can be:
- Inactive: the live stream hasn’t started yet. The Preview image or message is shown in the player window.
- Preview: for most broadcast protocols, this status is necessary to broadcast and see the stream in the backend's Preview player (as admin) while the frontend still shows the Preview image or message.
- Started: the live stream has started. The Preview image or message is automatically replaced by the live stream.
- Paused: the live stream has Paused. The Paused image or message is shown in the player window.
- Ended: the live stream has ended. The Ended image or message is shown in the player window.
The live event status also influences your broadcast, the cloud recording and the connection of interpreters and subtitlers. If you are new to Clevercast, we recommend that you first read our guide about the event status and when to update it .
backend menus
The sidebar contains the menus available to manage the webinar (depending on your user permissions). For a user with admin permissions, the following menus will be available:
- Home: a shortcut to the webinar’s homepage.
- Settings: determine the webinar’s look & feel and its features. See the ‘Webinar Settings’ section below.
- Registration: determine the registration behavior. If registration is used, you can detemine behaviour and look & feel of the registration page and emails. It also allows you to manage registered participants. See the ‘Registration’ section below for more info.
- Tabs: add customizable tabs like speakers, tabs, survey, public & private chat, audience polls, breakout webinars, and more.
- Interaction: allows you to configure and manage the webinar’s interactive features. See the ‘Interaction’ section below.
- Moderate Chat: link to the 'Moderate Chat' page (see the ‘Interaction’ section below)
- Live: lets you manage the live stream and the images (or messages) to be shown before and after the live stream. See the ‘Live Management’ section below.
- VoD Management: lets you upload, publish and manage the Video on-Demand (VoD). See the ‘VoD Management’ section below.
- Actions: contains shortcuts to specific webinar pages and allows you to take certain actions on the webinar.
- View Webinar Page: link to the actual webinar page
- View Registration Page: link to the registration page (if registration is set for the webinar)
- Delete Webinar: delete the webinar. Important: this also deletes info regarding your registrants and their interaction. It can’t be undone!
- Share: the sub-menus let you copy the webinar link to your clipboard and share it on social media
‘View Webinar page’ makes it easy to configure a webinar. After you update the configuration of a webinar, you can use it to see the changes in the frontend. The same goes for updates to the registration page and the ‘View Registration Page’ action.
However, if you want to test the actual registration and interaction flow, you should first log out as Clevercast administrator first (or use a different browser). Otherwise Clevercast will use your administrator credentials, even if you register with another email address. This can lead to issues while testing due to the browser session not matching the registration or interactive data.
Colors and images
Clevercast lets you fully customize the branding of the webinar page, registration page and emails.
By default, after creating a webinar, the webinar and registration page (and emails) will use:
- the 3 brand colors selected in the wizard (note that you can also set their transparency)
- the logo image uploaded in the wizard (if any)
You can further customize the webinar's branding after it is created. While doing this, you can choose whether or not to use the same settings for the webinar and registration page.
- Via 'Settings > Webinar Layout', you can customize colors and images of the webinar page. By default, any changes made here will also apply to the registration page.
- Via 'Registration > Page', you can choose different images for the registration page. You can also use a separate color scheme to customize the registration page. Once you do this, changes made to the webinar page will no longer apply to the registration page.
- Via 'Registration > Emails', you can choose a different logo image and different colors for emails. By default, a smaller version of the webinar logo and the webinar color scheme is used. Once you use custom colors, changing the webinar page colors will no longer apply.
Notes:
- the webinar and registration page let you use a basic color scheme with three brand colors, or an advanced color scheme where you can select a different color for every element on the page.
- the webinar and registration page let you set a background image. If set, this will be used instead of the background color. When you upload a background image, the transparency of all background colors will automatically be set to 0.75.
Webinar Settings
The ‘Settings’ submenus of a webinar determine its look & feel and general settings and features.
General
The ‘General Settings’ let you (re)set the webinar title, summary, organizer and start time. It also contains a ‘Configuration’ panel, that lets you change the choices you made when creating the webinar.
The 'start time' is mainly used for registration purposes: it can be part of the registration page and emails (both textual and as calendar links). It is also used to display a countdown timer in the live stream player window. Note that this doesn’t mean that the live stream starts when the countdown ends. The actual start of the live stream is determined manually on the ‘Live Management’ page (see the Live section), except for ‘simulive’ webinars which will automatically start at the scheduled start time (see the Advanced section).
The general settings also allow you to set breakout webinars, which are multiple webinars with a single registration page (see Breakout webinars for more info).
Webinar Layout
The Webinar Layout menu allows you to configure the look & feel of the webinar page.
- Text: hide or show the title bar and the footer, or adjust the text. By default, the webinar's title is displayed in the title bar.
- Images: set the logo, background images and/or custom css.
- Colors & font: select the color scheme and adjuast the colors.
- Socials: set links to your own social media pages, or links for sharing the webinar.
See the 'Colors and images' section for more info about images and colors.
For all parts of the webinar and registration page, you can set the color. The color picker not only lets you choose the RGB values, but it also allows you to set the transparency to a value between 0 and 100%. To do this, drag the horizontal transparency slider to the left or right (or manually change the last value of the rgba selection in the control).
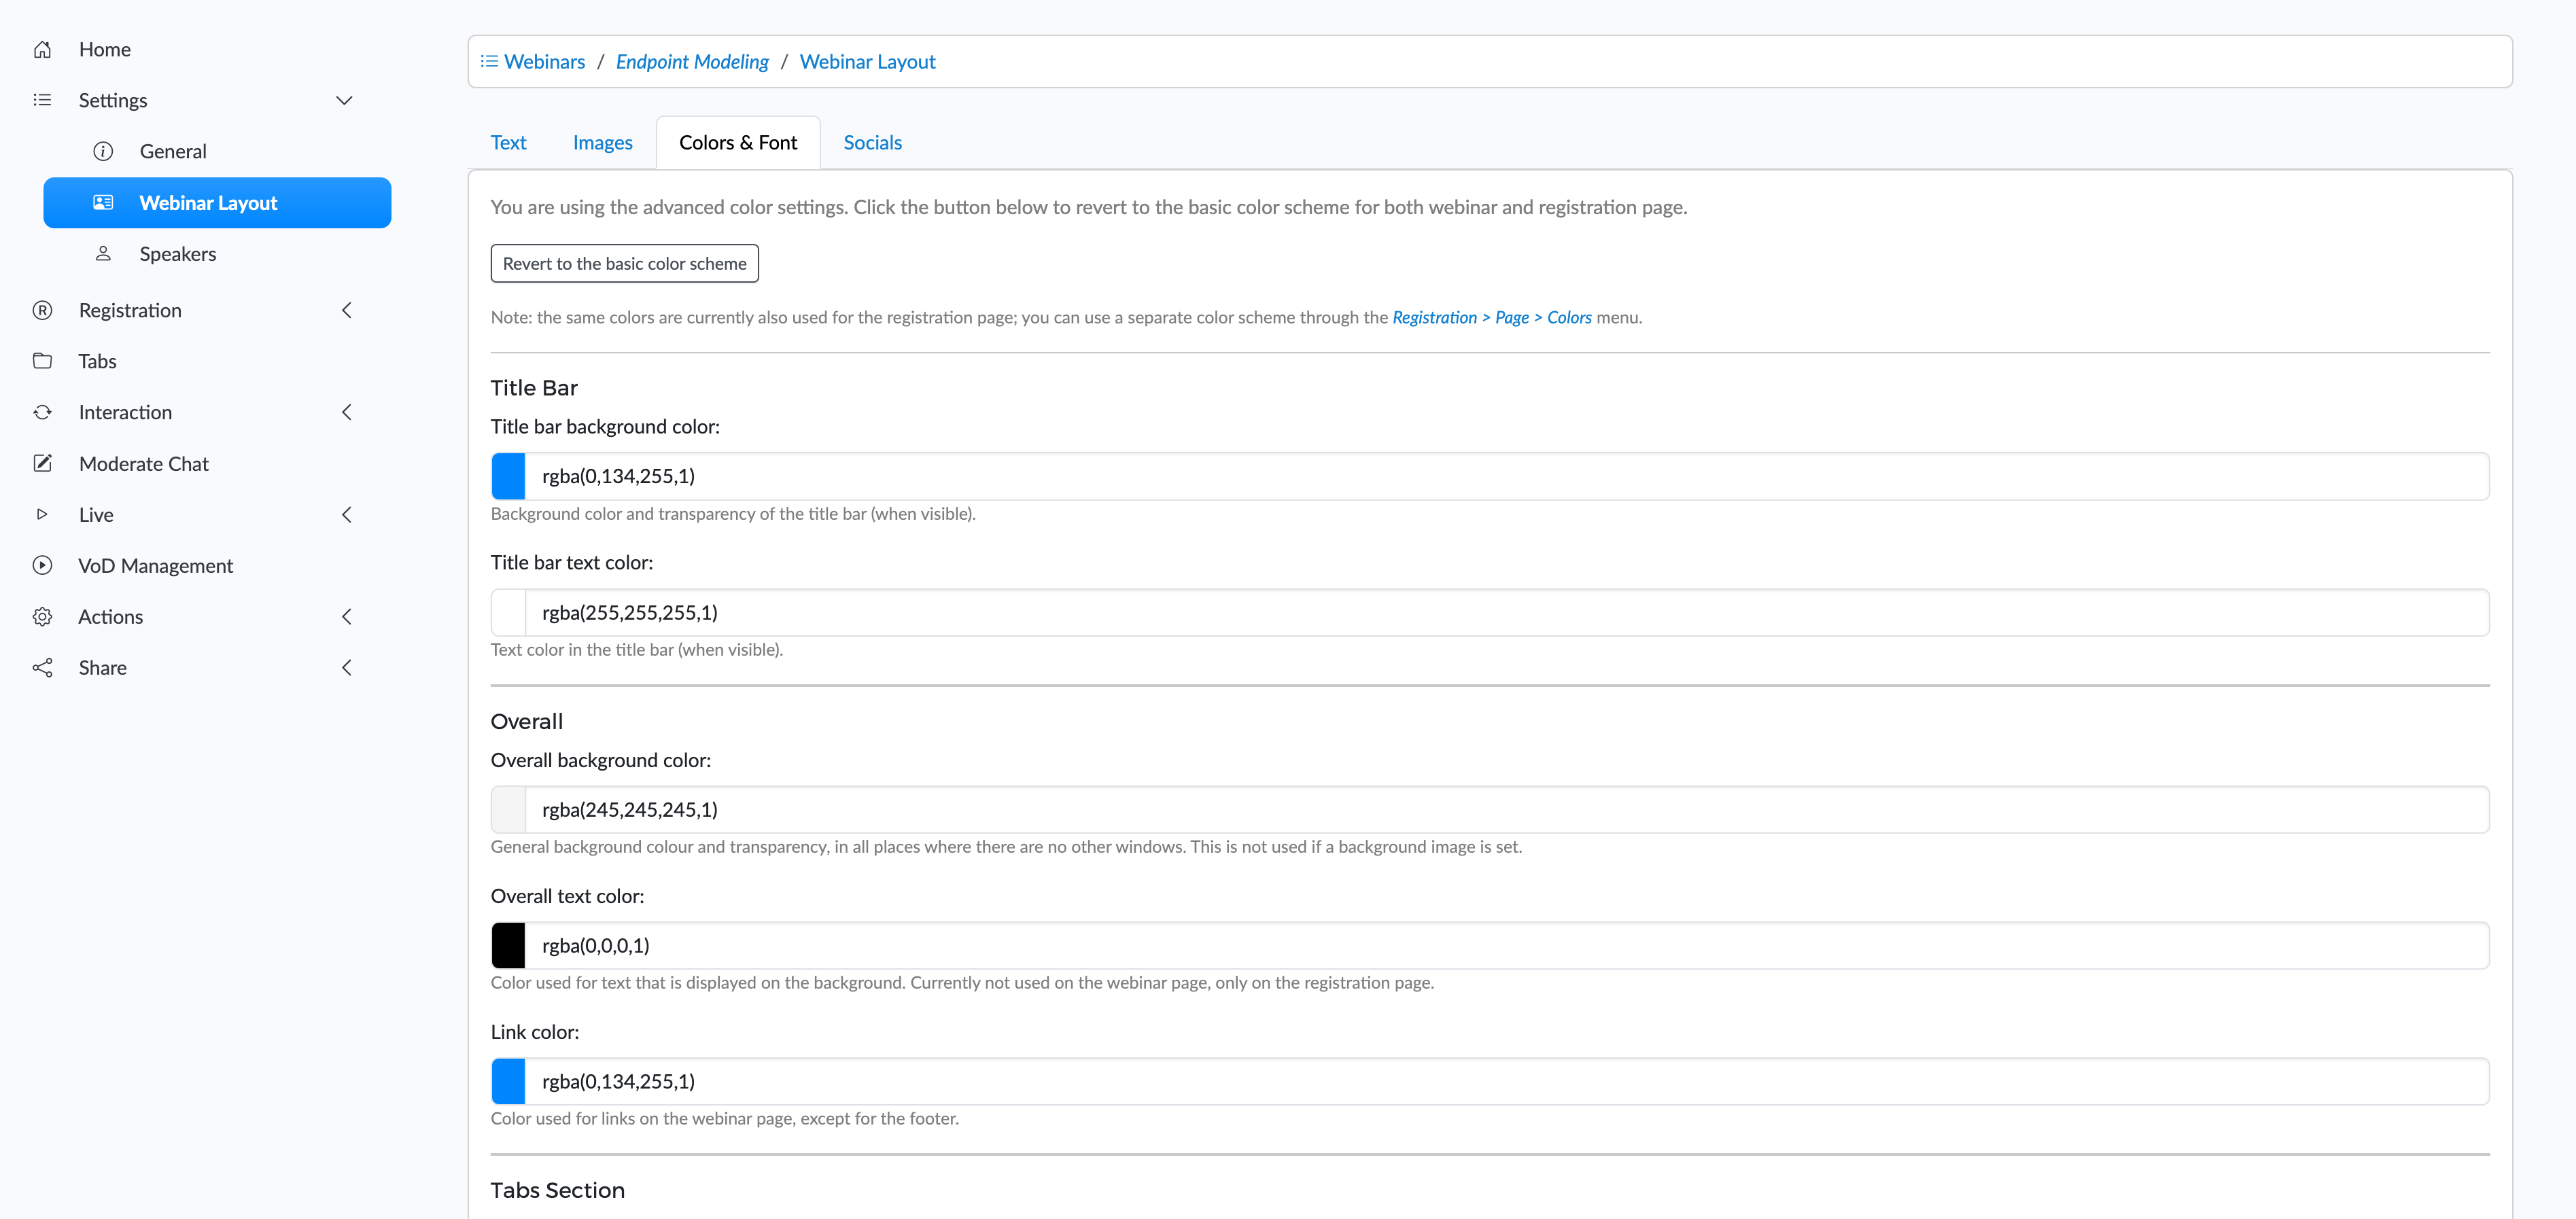
The transparency is important when you use background images. You can upload a separate background image for the webinar and registration page. When you upload a background image, the transparency of all background colors will automatically be set to 0.75. You can change this value afterwards.
If you need more control over the look and feel of the webinar pages, you can upload a custom CSS file. See our Custom CSS Guide for more info.
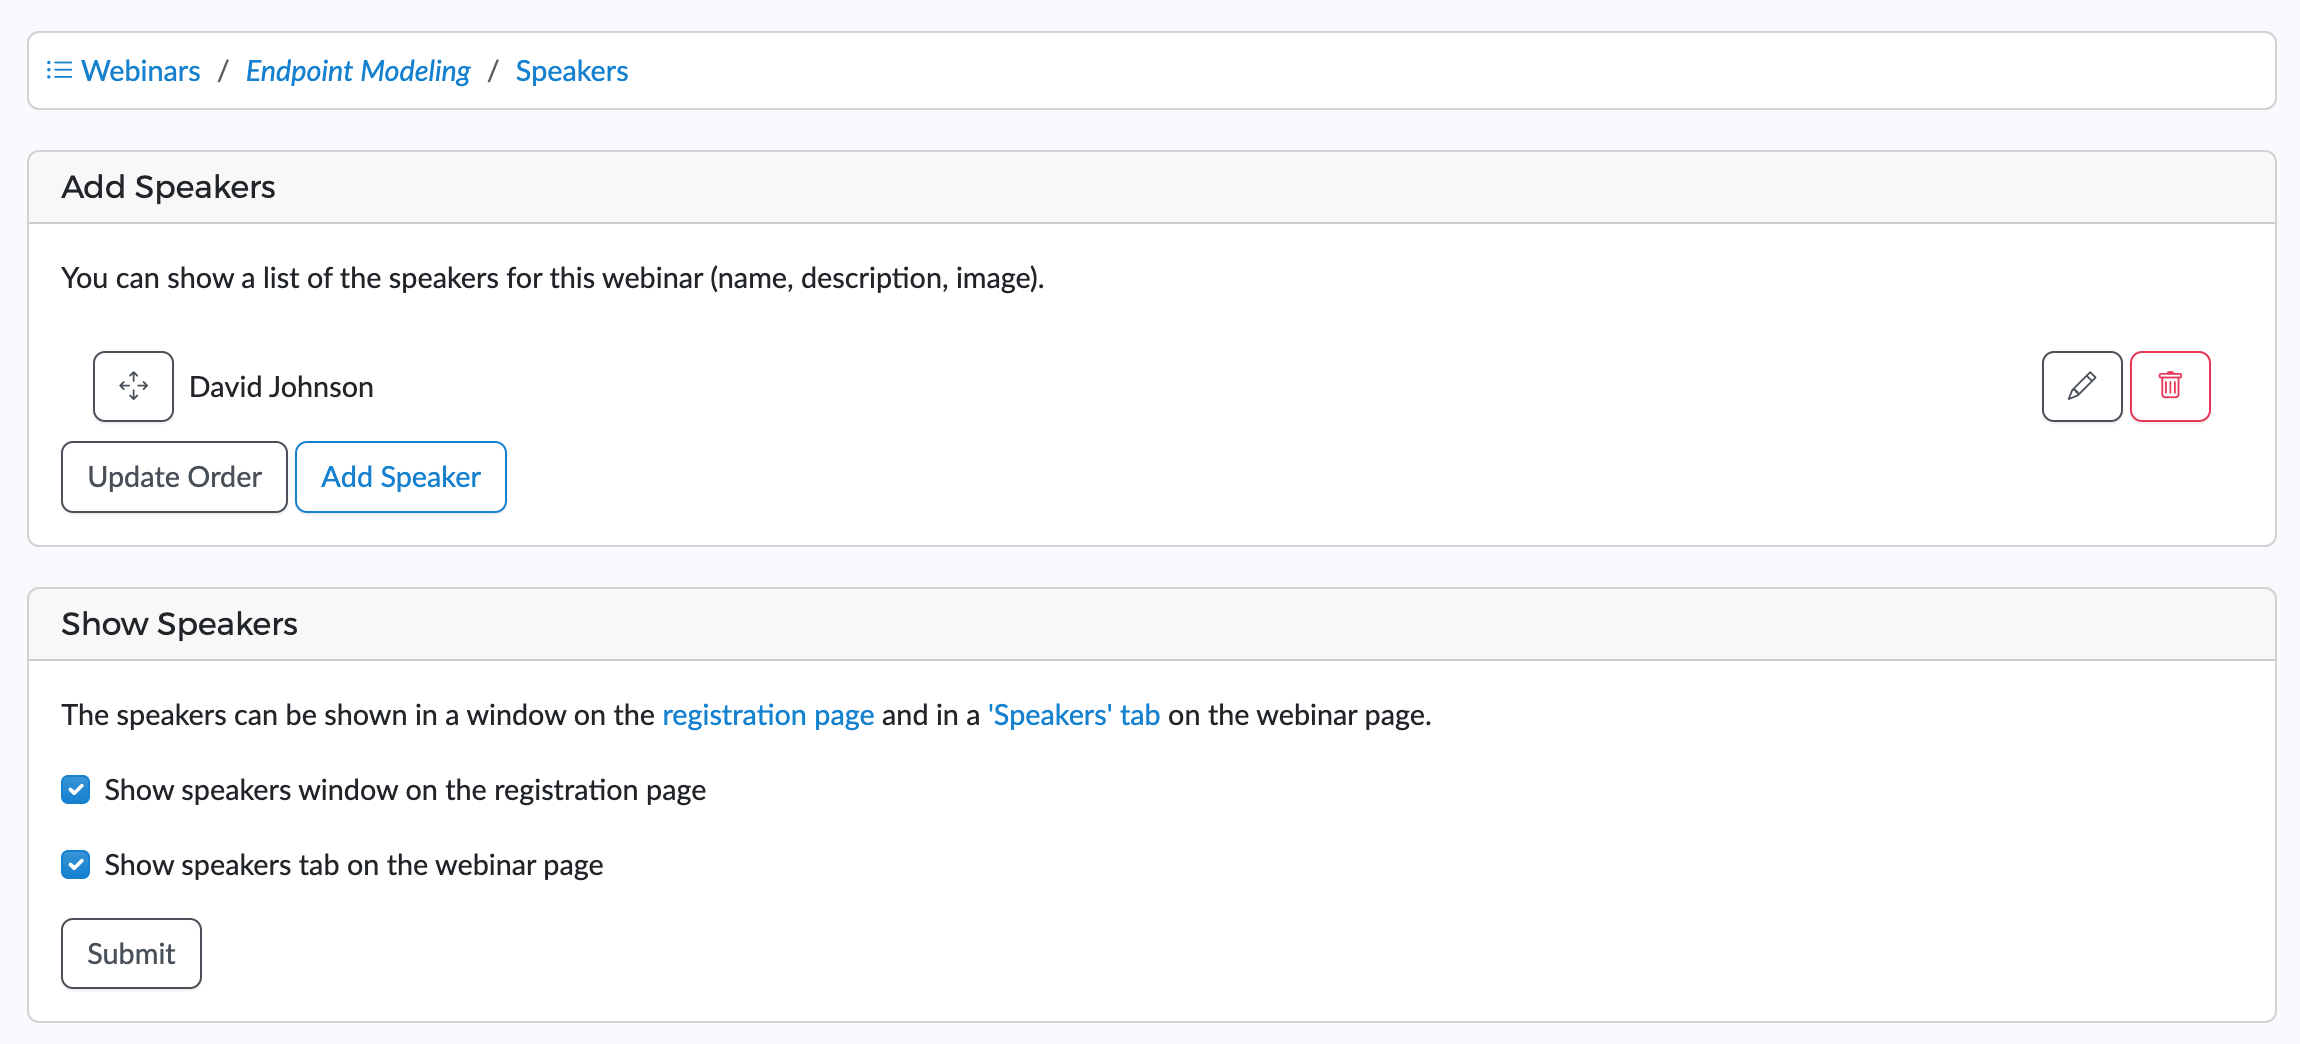
Speakers
You can add speakrers to the webinar page, the registration page, or both. You fill out the name, a description and optional image of the speaker and add it to the webinar.
Registration
Settings
Clevercast supports 6 types of webinars:
- No Registration: the webinar is publicly accessible. All participants get access to the webinar page. Since participants are unknown, public/private chats and voting are not available.
- One Step Registration: when someone tries to access a webinar for the first time, he is redirected to the registration page. After submitting the registration form, the participant is immediately redirected to the webinar.
- Two Step Registration: when someone tries to access a webinar for the first time, he is redirected to the registration page. After submitting the registration form, the participant receives an email with a unique link for access to the webinar.
- Invitation-only: the participants are added by an administrator (or via the API). They can only access the webinar if they subsequently receive an email with a unique link. There is no registration page.
- Username & password login: the participants are typically added by importing their usernames and passwords from a Comma Separated Values (CSV) file. They can access the webinar through the registration page, which acts as a login page. After entering their username and password, participants are immediately directed to the webinar page. No emails are sent to participants.
- Email & password login: same as the 'Username & password login', except that participants log in with their email address.
You select the type of registration via the dropdown button on the Settings Page, before starting to configure your registration settings. The available settings and options depend on the registration type.
Note that the email address of a registered participant (= registrant) has to be unique. If someone registers with an email address that has already been used, no new registrant is created. Instead, the existing registrant's data is updated.
The ‘Settings’ page also contains general settings for the registration process.
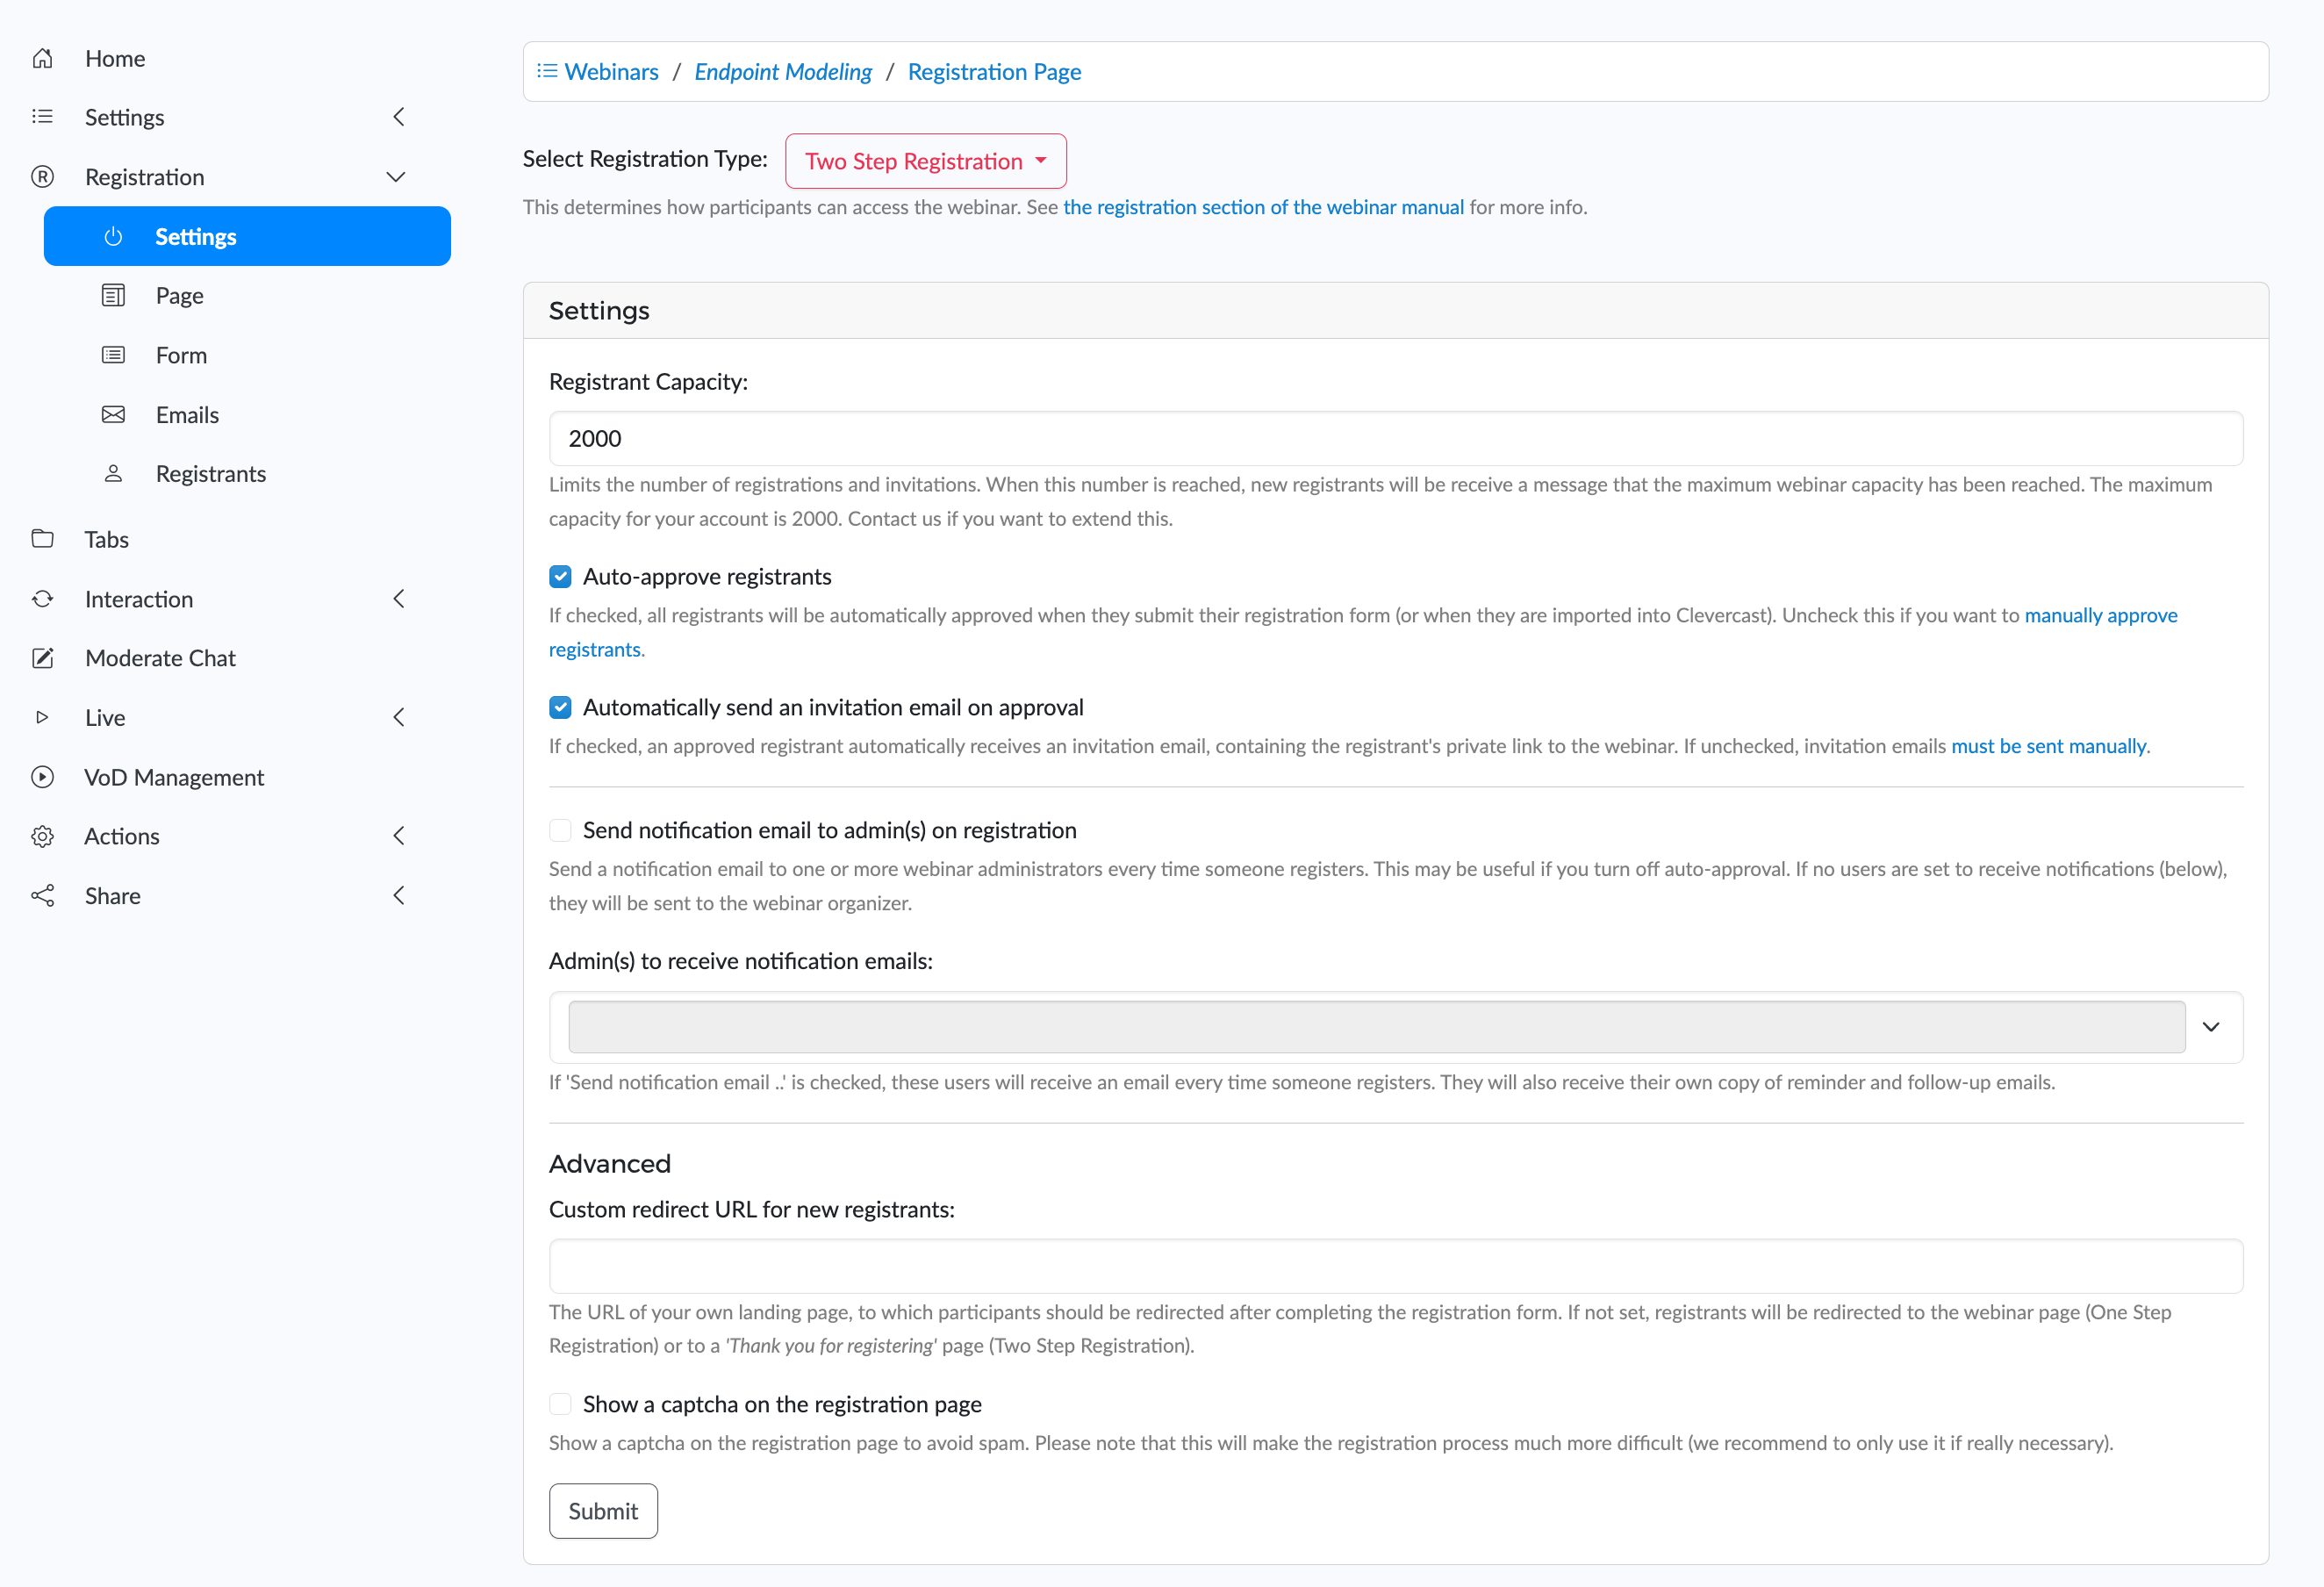
In case of ‘Two Step Registration’ or 'Invitation-only' webinars, the ‘Auto-Approve Registrations’ checkbox lets you decide whether someone who submits the registration form is automatically approved (given access to the webinar).
You also decide whether new registrants automatically receive an invitation email, containing an unique link to the webinar. If registrants are automatically approved, we recommend that you leave this checked.
You can set the maximum number of registrants. Once that number has been reached, Clevercast no longer allows new registrations. If an unregistered viewer tries to go to the webinar page, he is redirected to a page telling them that the maximum number of seats has been reached. Note that the maximum capacity also depends on your plan (contact us if you want to extend your account's capacity).
You can let Clevercast send a notification email to admin users when someone tries to register (in case you need to do manual approval of participants).
Note: for webinars with a 'username/email and password login', some of these settings are disabled. All (imported) participants are automatically approved and never receive an invitation email, nor any other email, from Clevercast.
Page
The ‘Registration > Page’ menu lets you determine the look and feel of the registration page. Each tab on this page lets you configure specific elements:
- Text: lets you customize all text on the registration page, aside from the form controls
- Images: lets you customize the images on the registration page and how they should be displayed.
- Colors & Font: lets you customize the colors and font on the registration page and how they should be displayed.
- Speakers: add a window with the webinar speakers to the registration page.
- 'Thank you' page: in case of two-step registration, participants will be redirected to a 'thank you for registering' page after submitting their registration form. You can set a custom title and message for this page.
- Template variables: overview of template variables that can be used in the text fields on the registration page. Clevercast will replace them with your settings.
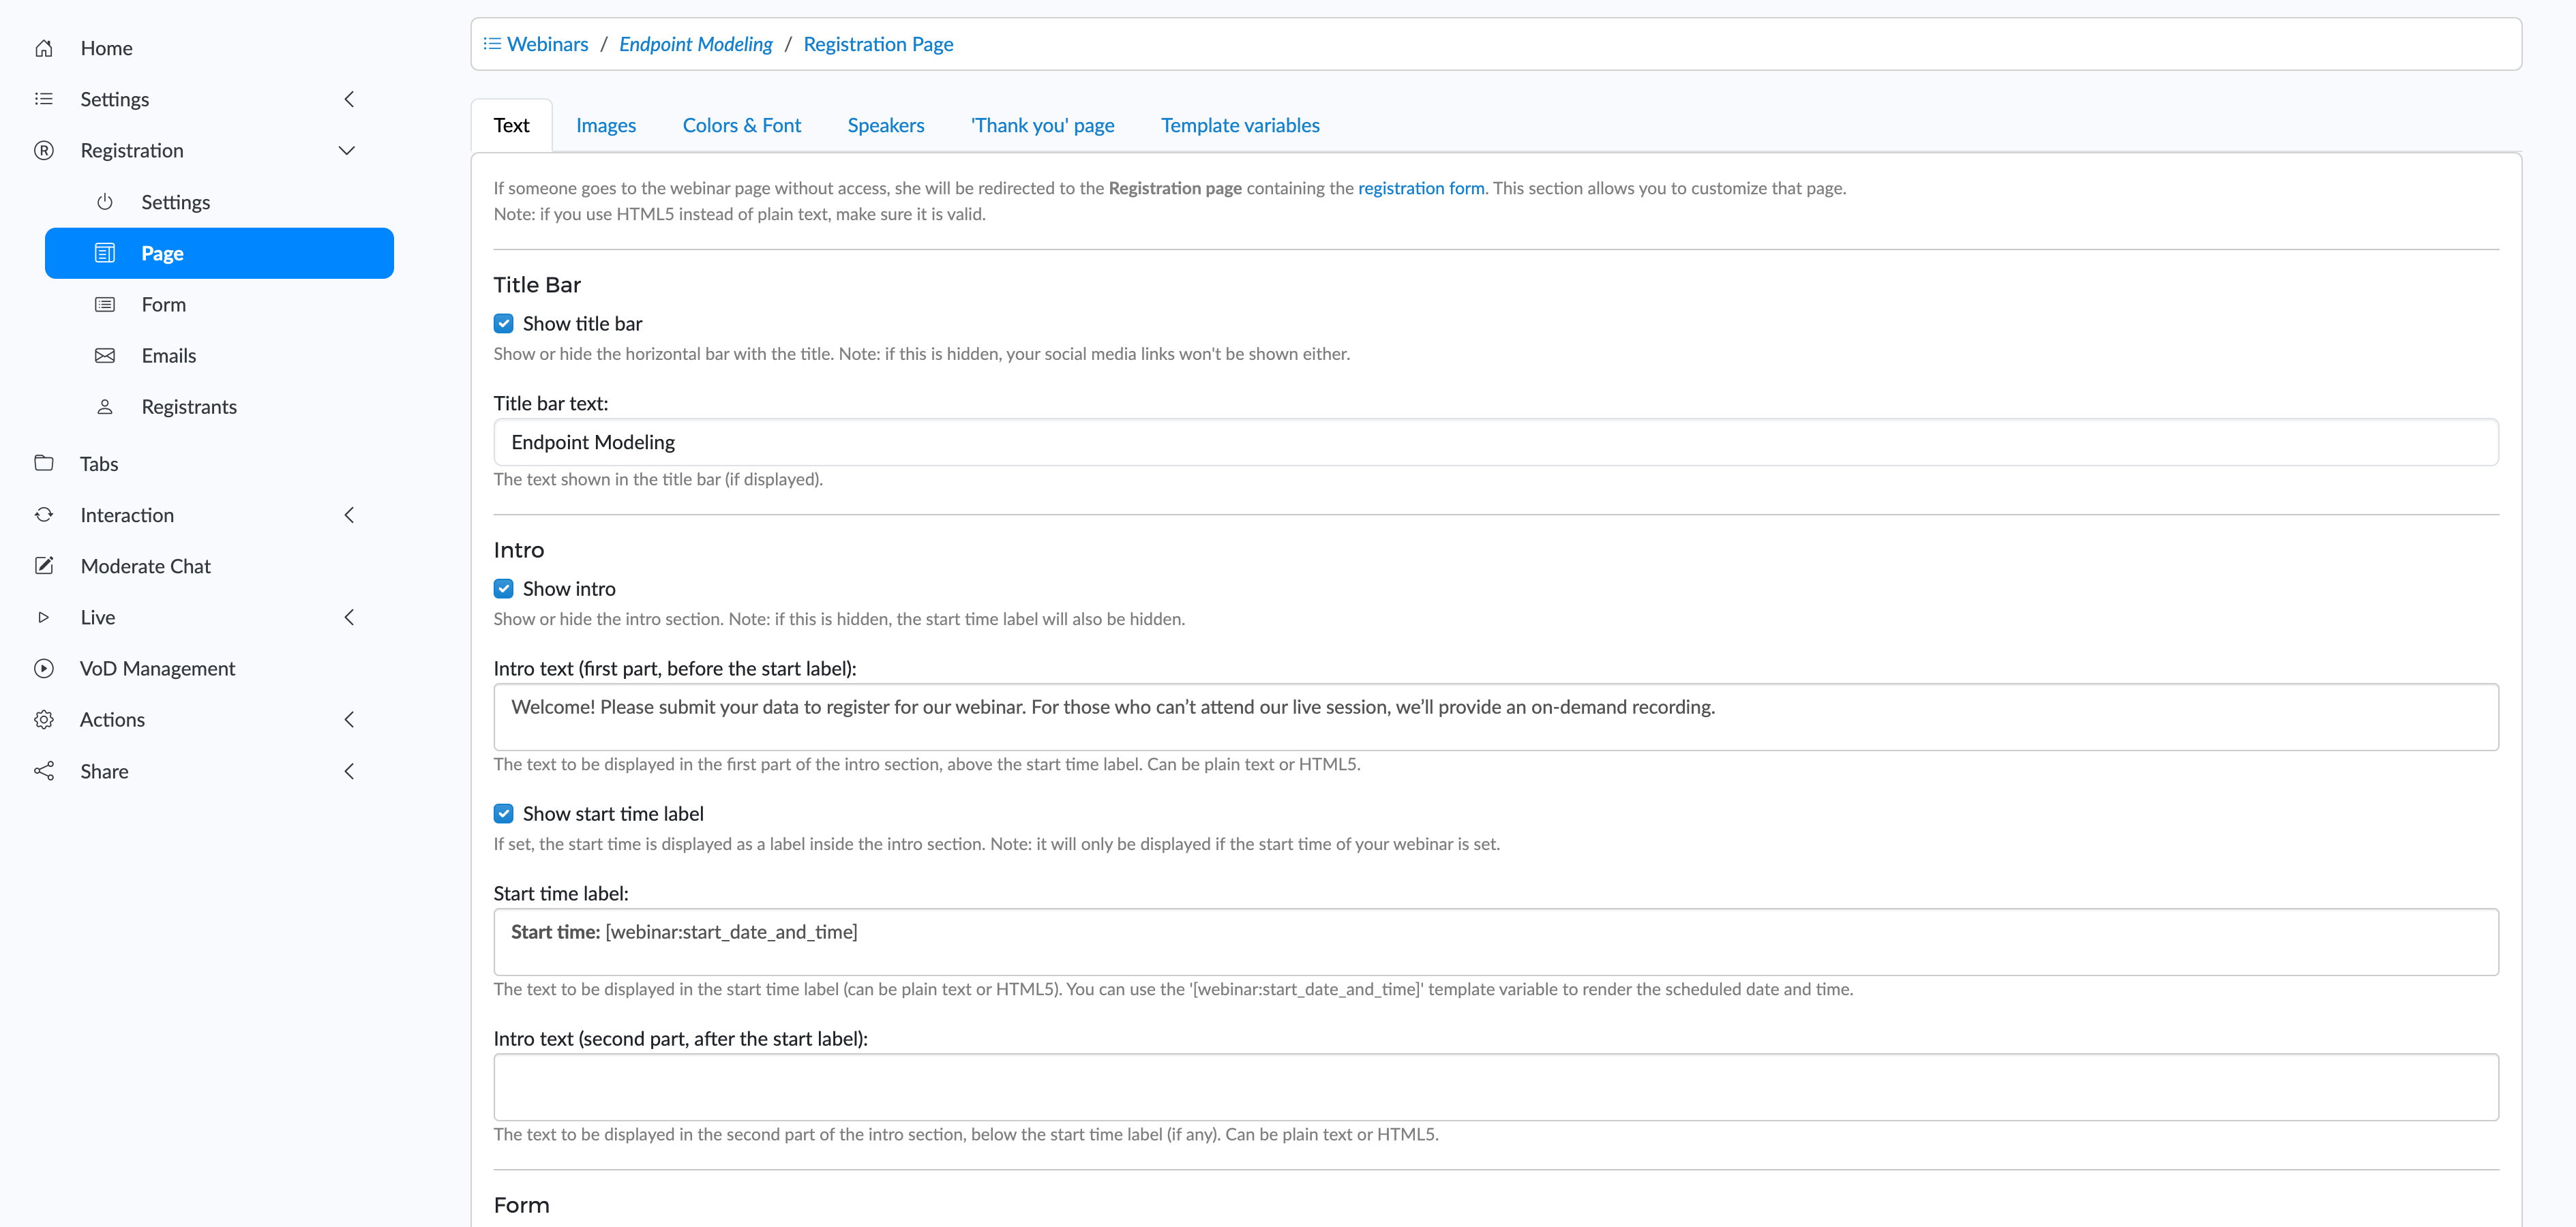
See the 'Colors and images' section for more info about images and colors.
Form
Form controls for first name, last name and email are always displayed on the registration page. The 'Form' menu lets you add extra form controls and determine their order.
Different controls are available: edit boxes, checkboxes, radio buttons, a checkbox for terms and conditions... You can configure them and set them as required or not.
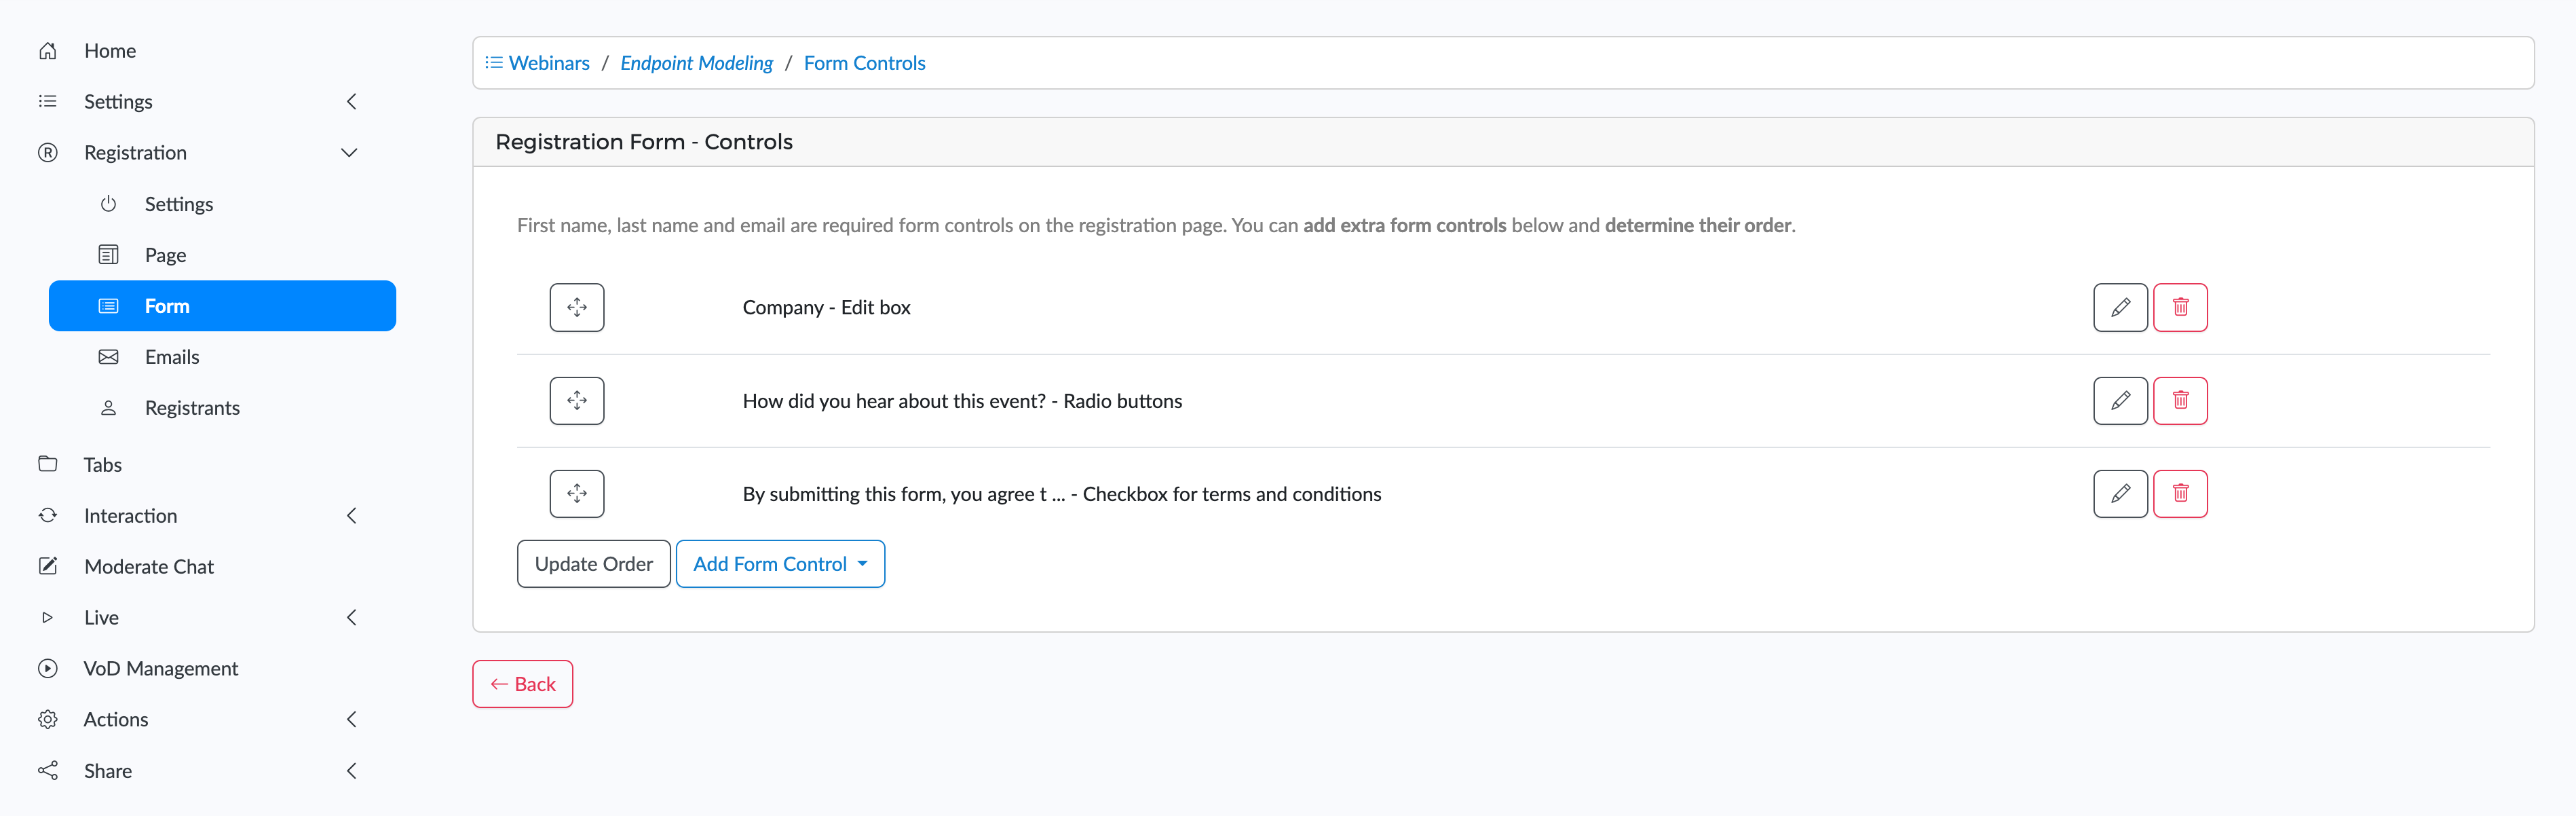
Make sure to fully configure your form before making your webinar publicly available. The 'Registrants' menu (see below) lets you download the filled in form data.
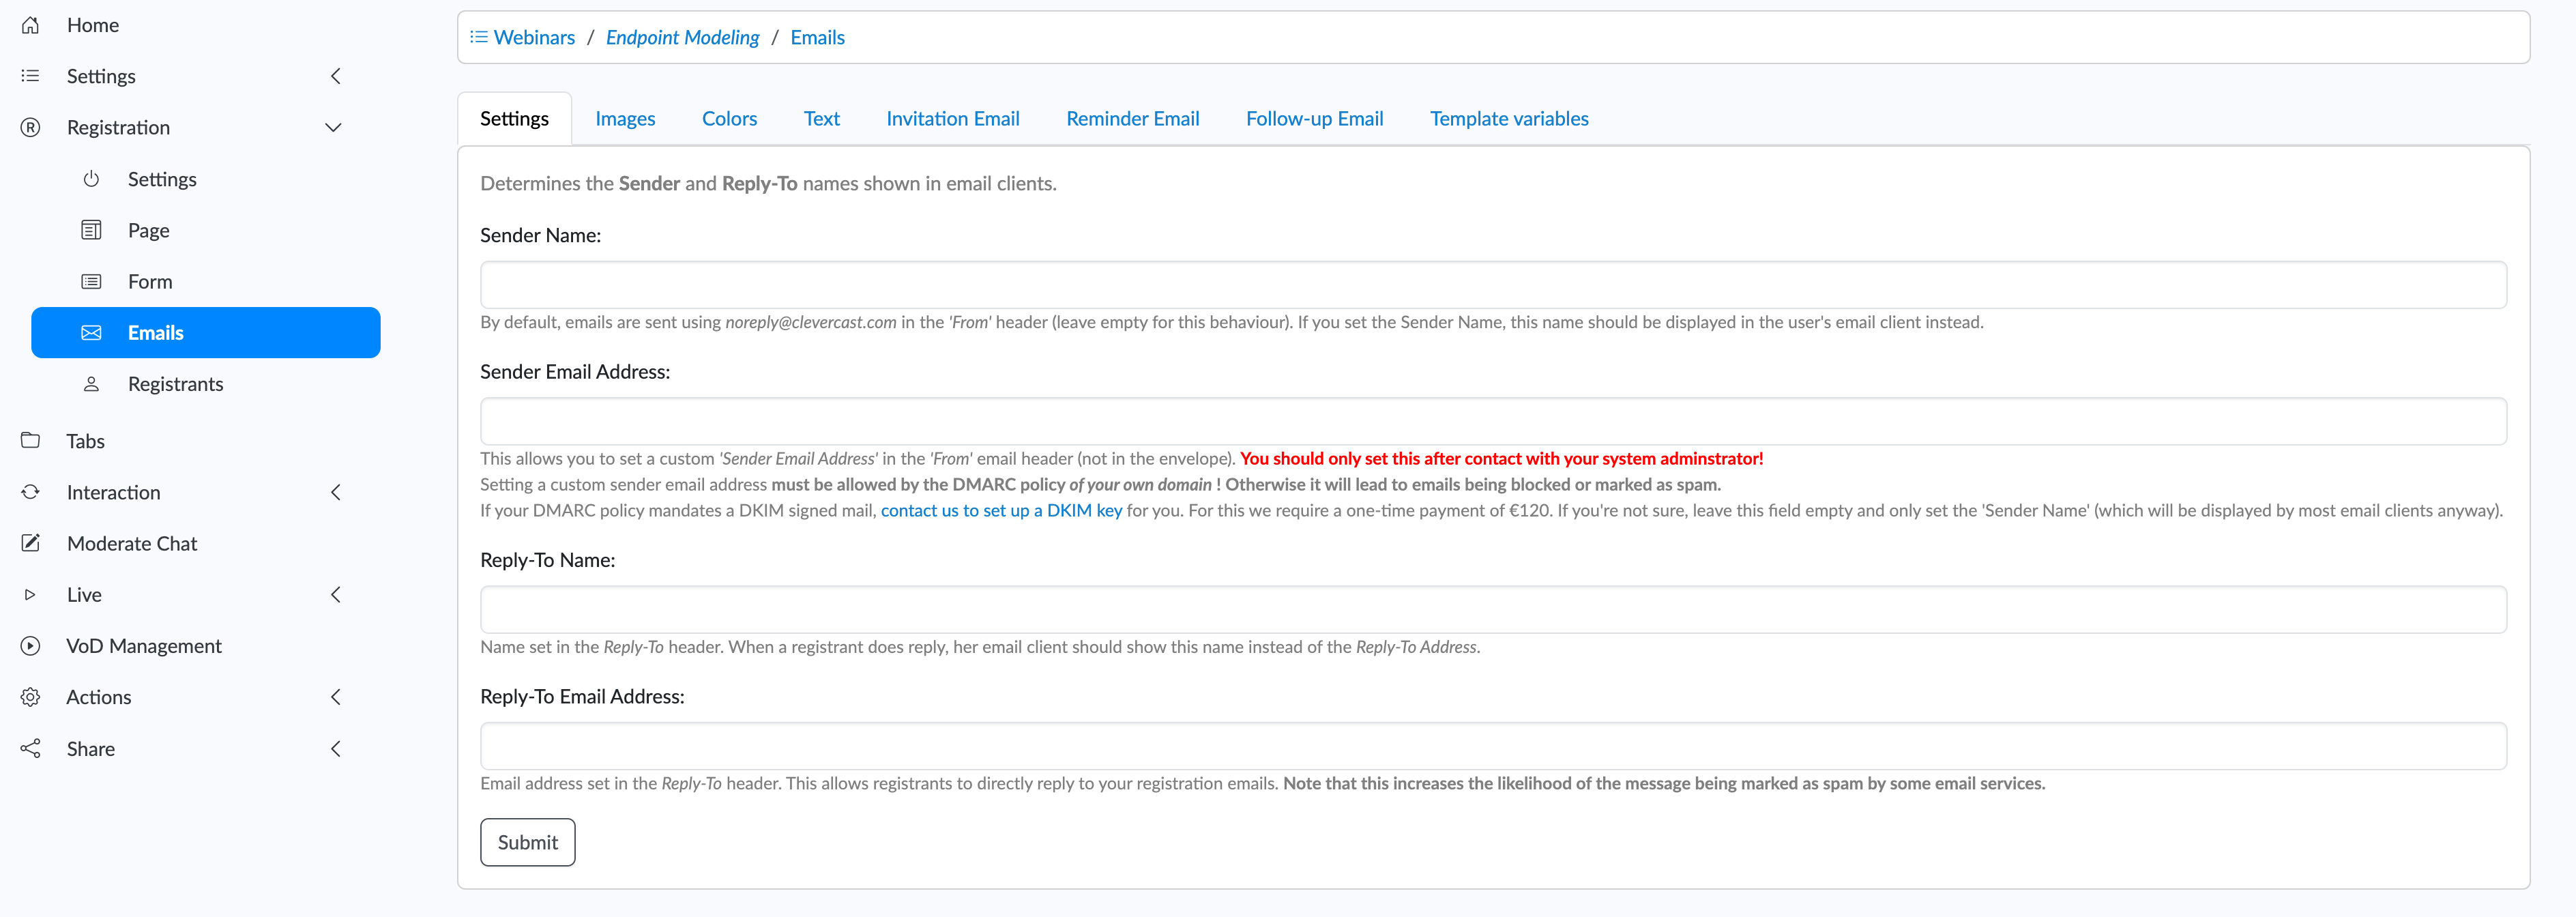
Emails
When using registration or invitation-only, an invitation email will automatically sent to approved registrants (unless you turn this off). In addition, you can configure 'Reminder emails', which will be sent at a specific time before the webinar starts, and 'Follow-up emails', to be sent after the webinar ends.
Note: instead of letting Clevercast send reminder and follow-up emails automatically, you can also manually send them at a specific time via the 'Registrants' menu (see below).
The tabs on the emails page allow you to customize the look and feel of these emails:
- Settings: you can set the Sender Name, the Reply-To Name and Reply-To Address for all emails. Important: the Sender Email Address should only be set after consultation with the administrator of your own email server, otherwise it will result in emails being blocked or marked as spam.
- Images: by default, Clevercast reduces the size your webinar logo (if necessary) for it to be used in emails. This tab allows you to use a different image instead (or none).
- Colors: lets you customize the colors used in the emails. See the 'Colors and images' section for more info.
The other tabs let you customize the text of the emails, and configure when reminder and follow-up emails are sent:
- Text: lets you set the text sections that are common to all 3 types of emails.
- Invitation email: customize the invitiation email by adding additional text and/or override the common text sections
- Reminder email: schedule when reminder emails are sent, and customize their content by adding additional text and/or override the common text sections
- Follow-up email: schedule when follow-up emails are sent, and customize their content by adding additional text and/or override the common text sections
- Template variables: overview of template variables that can be used in the text fields on the registration emails. Clevercast will replace them with your settings.
Adding HTML to emails
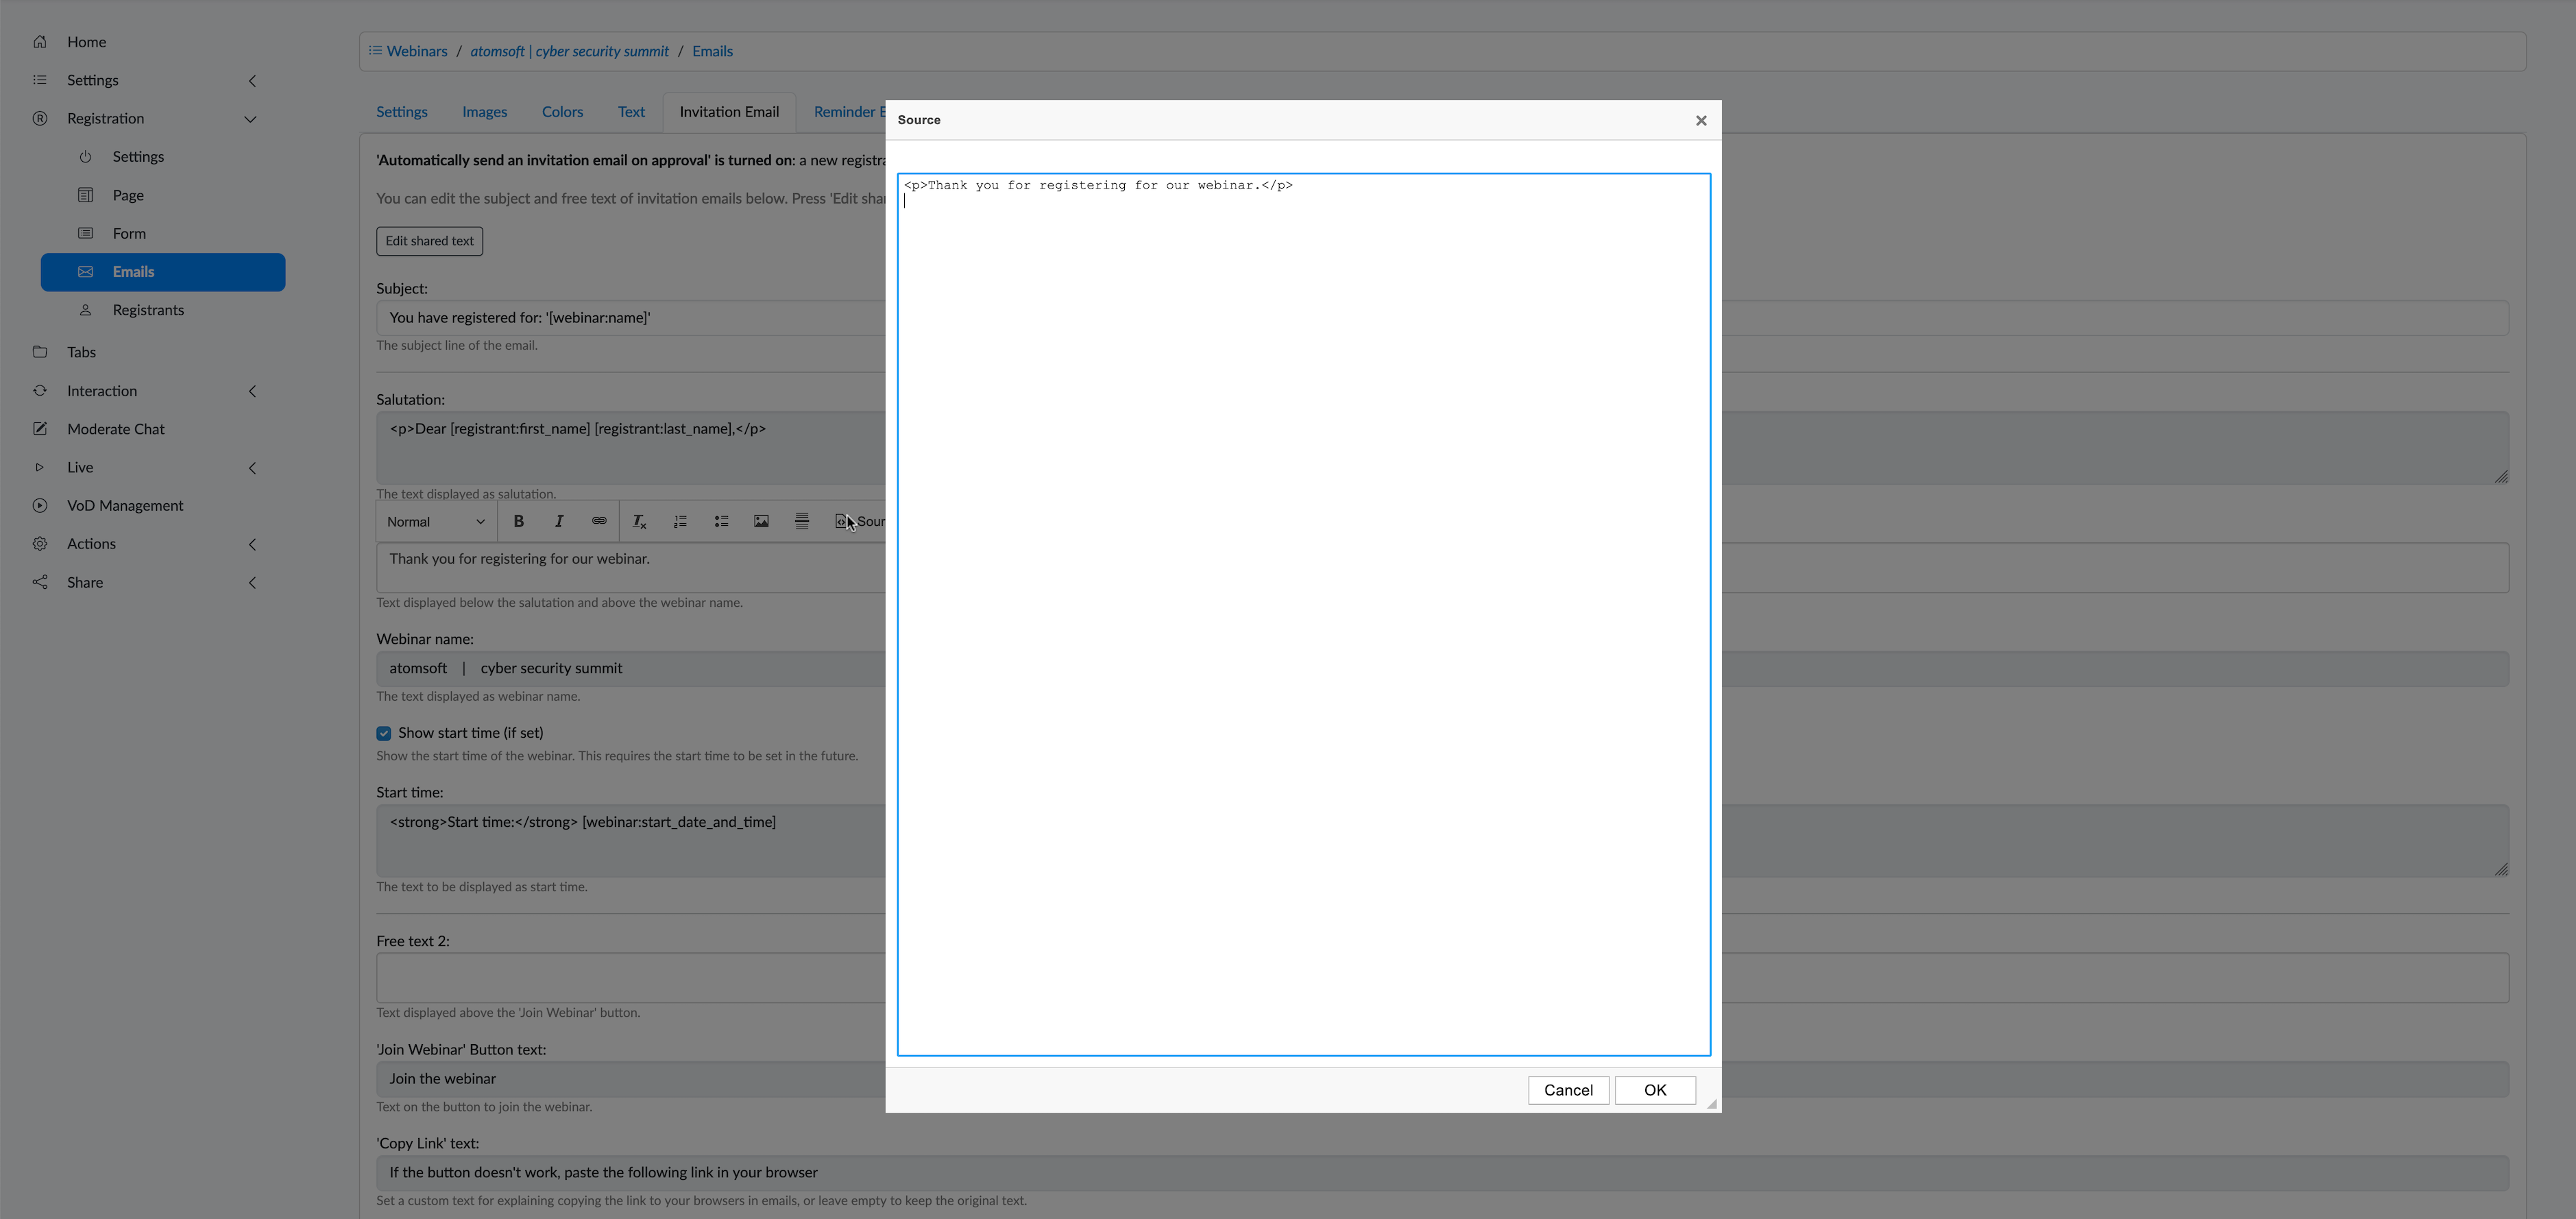
Some of the text fields allow you to add HTML. To do this, click in the field that you want to edit. A menu for customizing the text will appear.
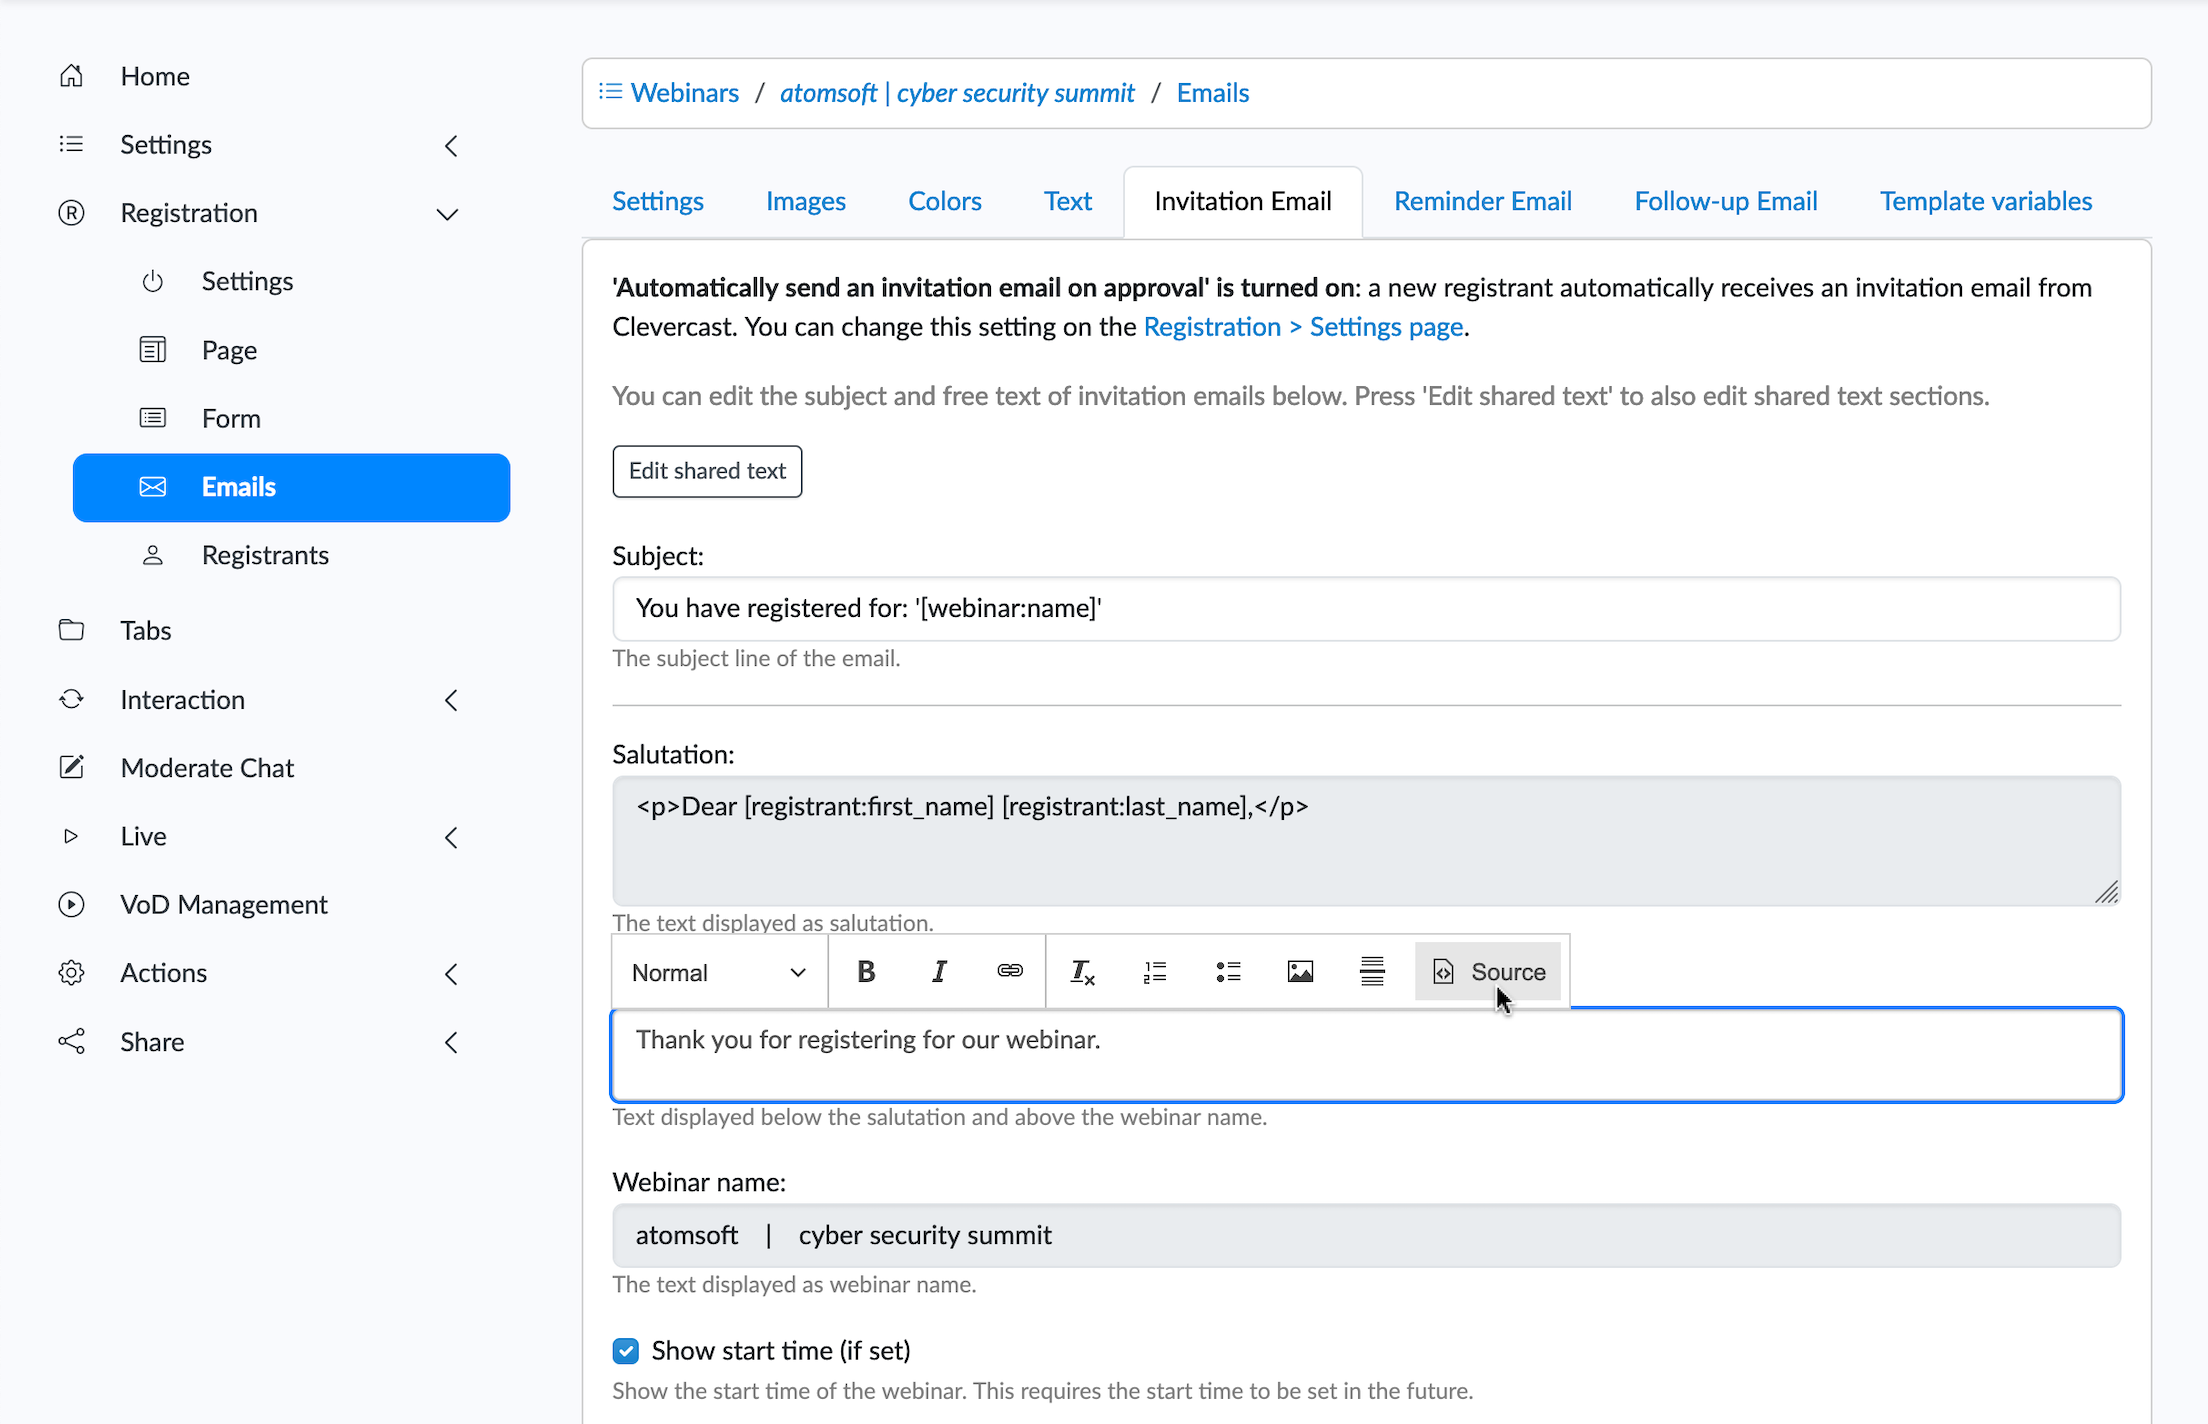
When you press the 'Source' button, a popup dialog will appear that lets you edit HTML.
In addition to the common text fields, there are also three free text fields for each type of email that support HTML (displayed at the top, middle and bottom of the email). This way, you can extensively customize the emails.
You can use the 'Preview' button to see how and where the text sections are displayed in the email.
Important: keep in mind that there are limitations to the HTML you can use in emails, due to the rendering engines and capabilities of various email clients. Some email clients may render HTML in a different way. If you use (complex) HTML, we recommend testing your email in various clients to ensure that it is rendered correctly.
Registrants
The Registrants page lets you manage registered participants and see the minutes of live and VoD video that have been watched by each registrant.
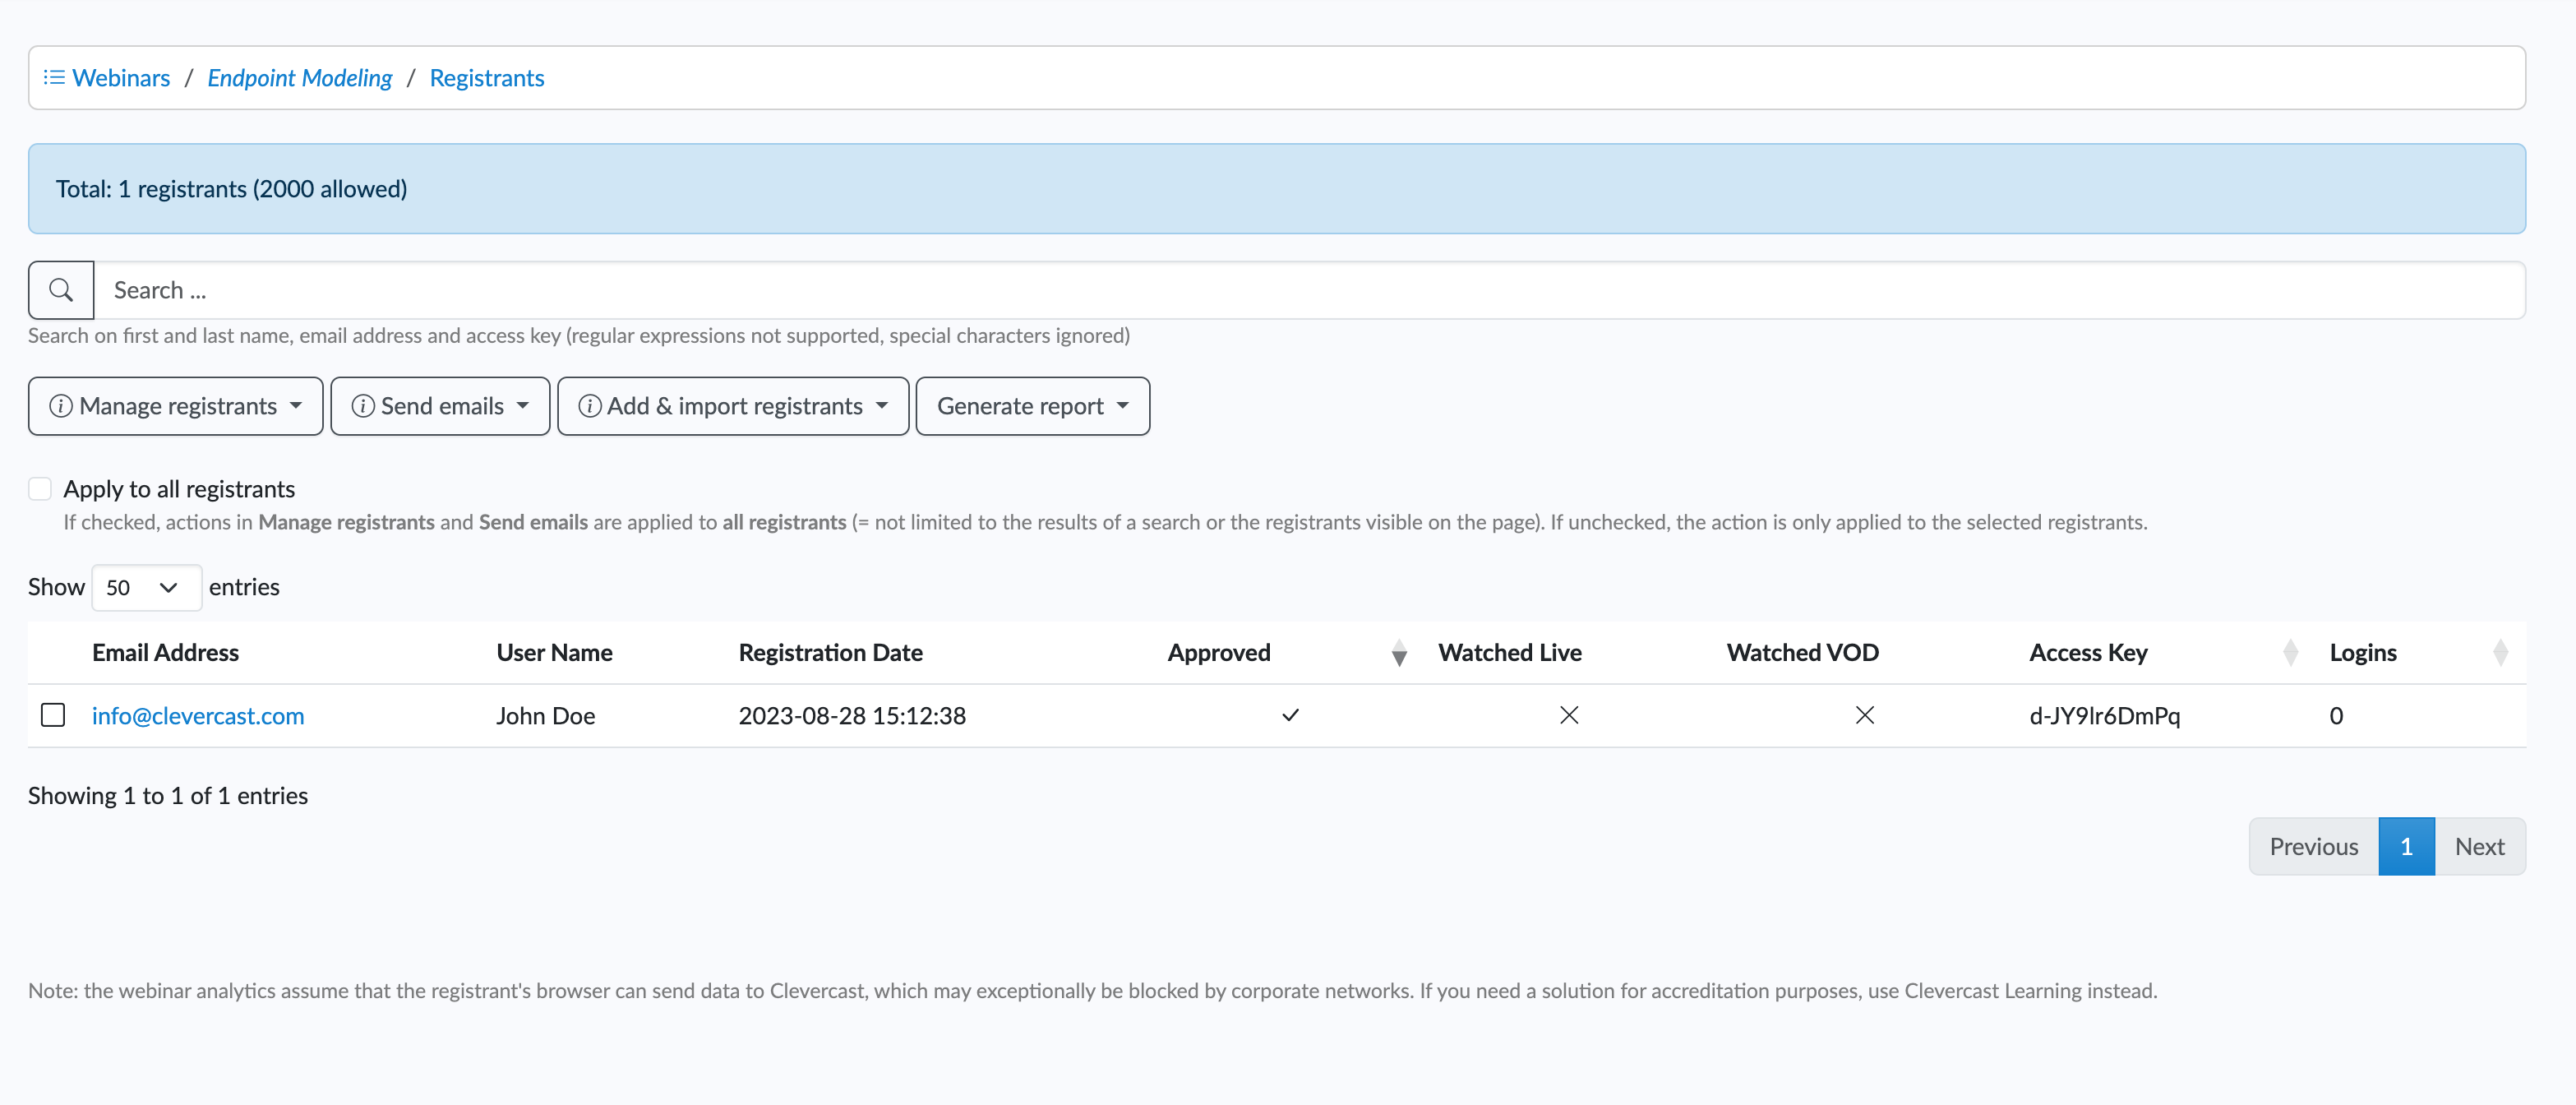
Participants who have submitted the registration form are added to this list. The following columns provide extra info about each participant:
- Approved: checked if the registrant has been approved
- Watched Live: minutes of live video watched by the registrant
- Watched Vod: minutes of Video on-Demand watched by the registrant
- Access Key: the key that is part of the webinar link, unique for each registrant
- Logins: number of times the registrant has been given access to Clevercast via a new browser session. In case of one-step registration, this will be set to 1 when someone registers. In case of two-step registration, this will only be set to 1 when someone clicks on the button/link in the registration email. The number of logins is incremented every time a registrant starts a new browser session, by using his/her link with secret key in a different browser. Note that browser sessions require a cookie, so the number of logins will be incorrect if the use of cookies is restricted by a company network (firewall, proxies) or browser settings (e.g. private browsing, certain add-ons).
Important: Clevercast Webinar is not made for accreditation purposes which require proof that a participant has watched the stream. The watched live and VoD minutes assumes that the video player can send data to Clevercast's analytics module, but this may be blocked by some corporate networks. So while the analytics will be accurate for most participants, there aren't sufficient guarantees. For accreditation purposes, we recommend to use Clevercast Learning instead.
By clicking on the email address of a registrant, you can see and edit the details of individual registrants.
Use the ‘Manage Registrants’ dropdown button to execute batch actions for multiple registrants. Select the registrants either by clicking on multiple rows or by checking ‘Apply to all registrants’.
- Approve registrants & send email: sets all selected registrants to approved and sends an invitation email to all of them (even if they already received one).
- Approve registrants without email: sets all selected registrants to approved, but doesn't send an invitation email.
- Undo approvals: sets all selected registrants to 'not approved', without any emails being sent.out
- Delete registrants: this will delete all selected registrants (no email is sent). If a registrant is deleted, the unique link that was sent to the registrant will no longer work.
Use the ‘Send Emails’ dropdown button to send emails to multiple registrants. Select the registrants either by clicking on multiple rows or by checking ‘Apply to all registrants’.
- Send invitation emails sends an invitation email to all selected registrants which are approved. No email is sent to unapproved registrants.
- Send reminder emails sends a reminder email to all selected registrants which are approved. This action is only possible while the webinar start time is in the future.
- Send follow-up emails sends a follow-up email to all selected registrants which are approved, no matter if they attended the live webinar. This action is only possible when the webinar start time is in the past.
Use the ‘Add & import registrants’ dropdown button to create new registrants.
- Add registrant lets you add a registrant through a form.
- Import registrants: lets you import new registrants by uploading a UTF8 encoded comma-separated values file. The fields in the CSV file should be in the same order as in the file you get when you click the ‘Generate report’ button.
Use the ‘Generate report’ dropdown button to download the data on the registrants page in CSV or XLS format.
Tabs
Add customizable tabs to the webinar page to display information, an external widget (iFrame), downloadable handouts, public & private chat, info about the speakers, a survey, audience polls, breakout webinars, and more.
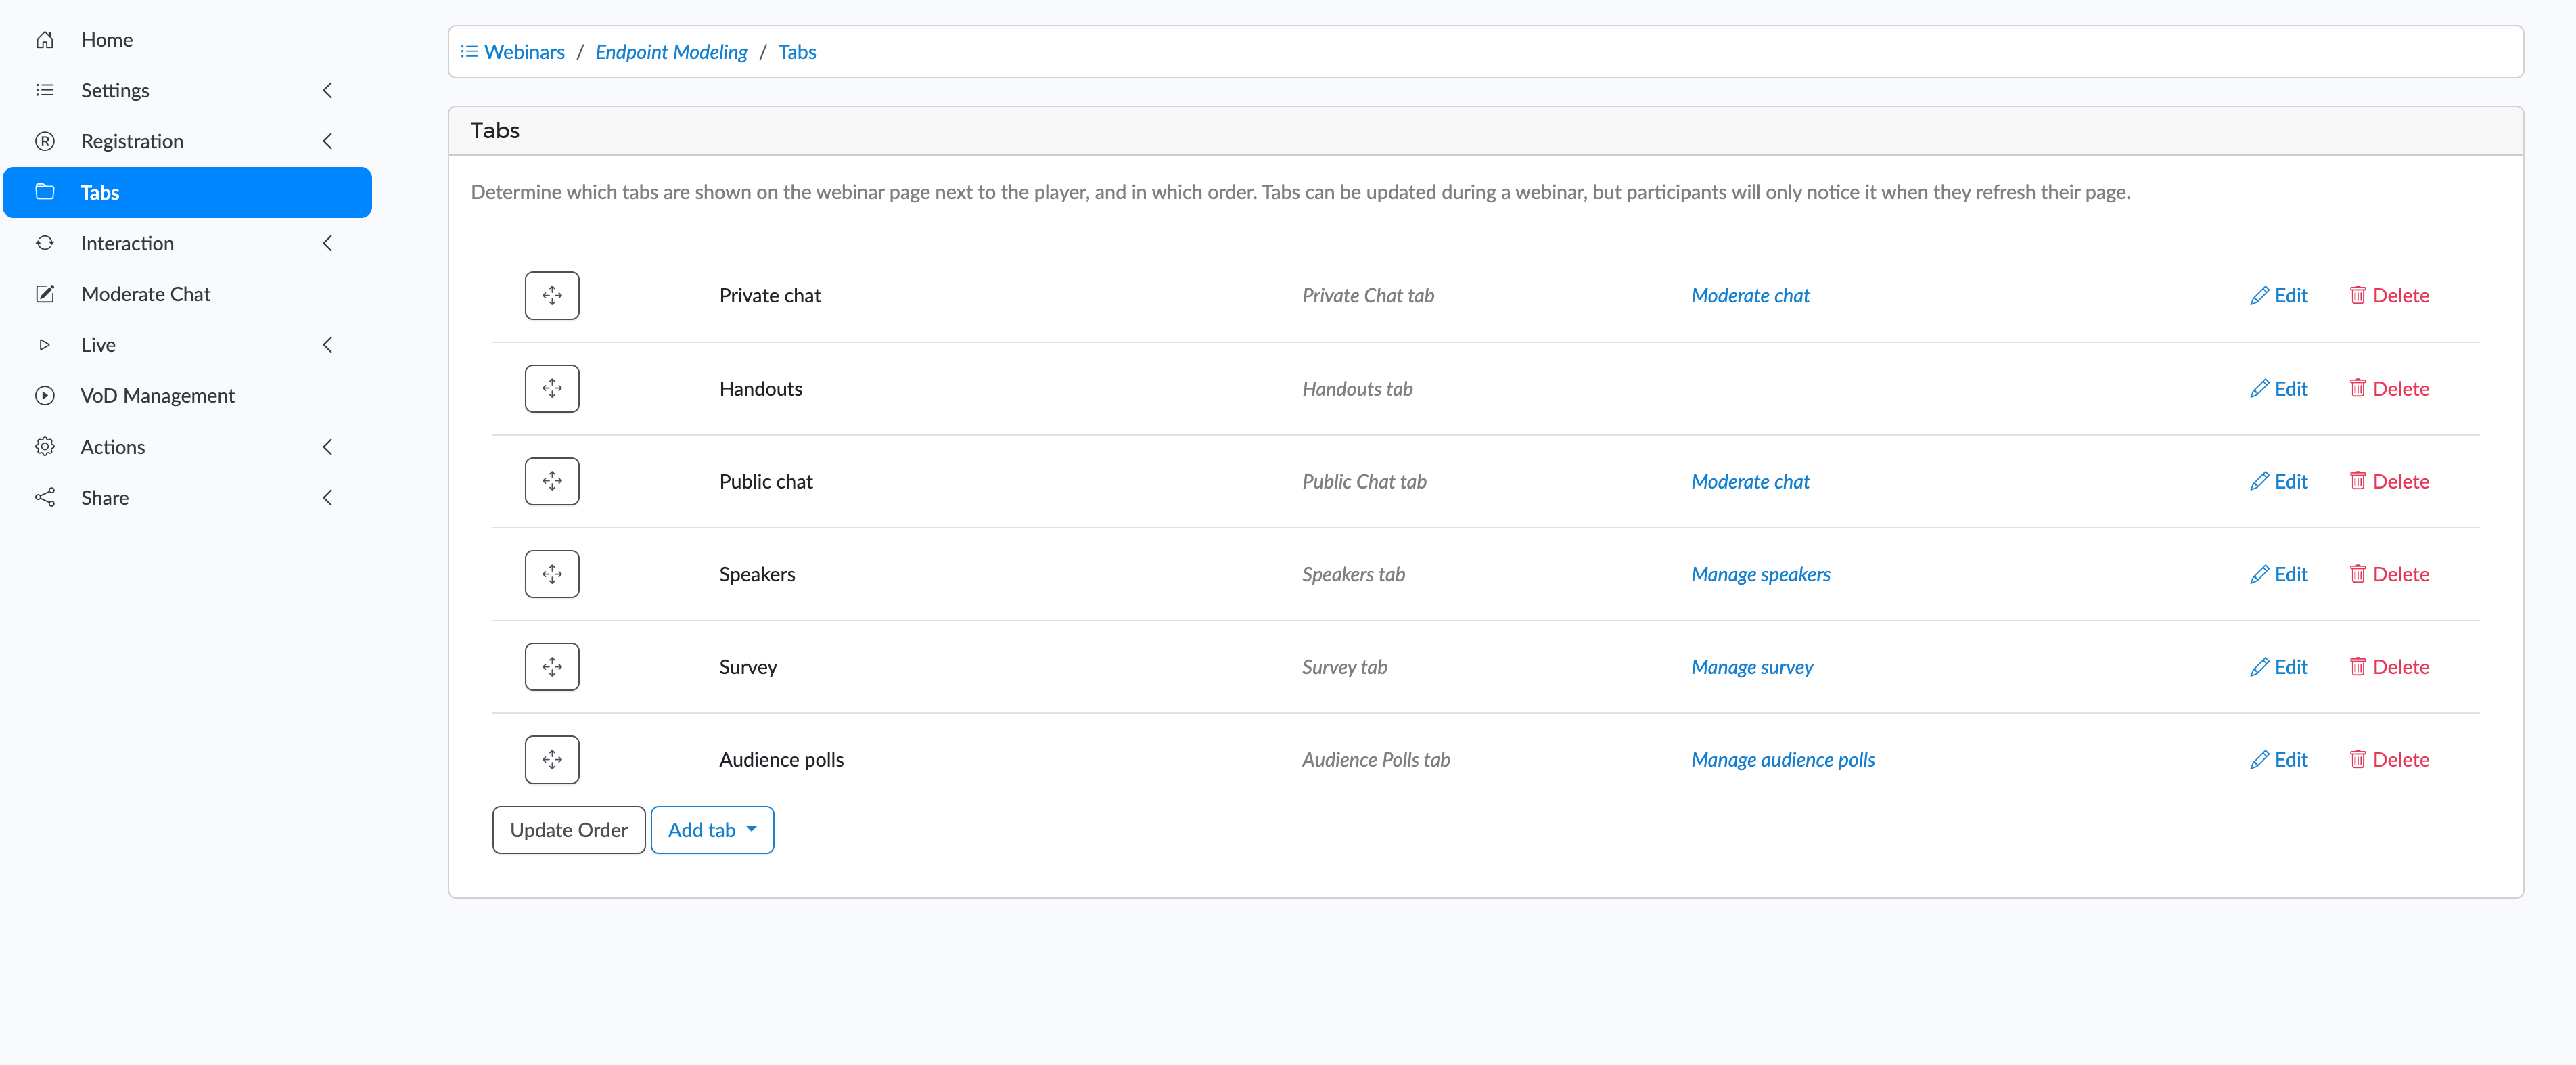
Every tab has its own configuration, that determines what will be shown on the webinar page. For every tab, you can set a title and an (optional) message to be displayed below the title.
Below is more information on how to configure specific tabs.
Text / IFrame
This tab may consists of a text section (e.g. the webinar's summary, agenda, links to other pages ...).
Alternatively, you can use an iFrame to embed an external widget in the tab. This lets you add external functionality (e.g. walls.io, sli.do ...) to the webinar. To do this, click on the Source button of the Message field and copy the iFrame into it.

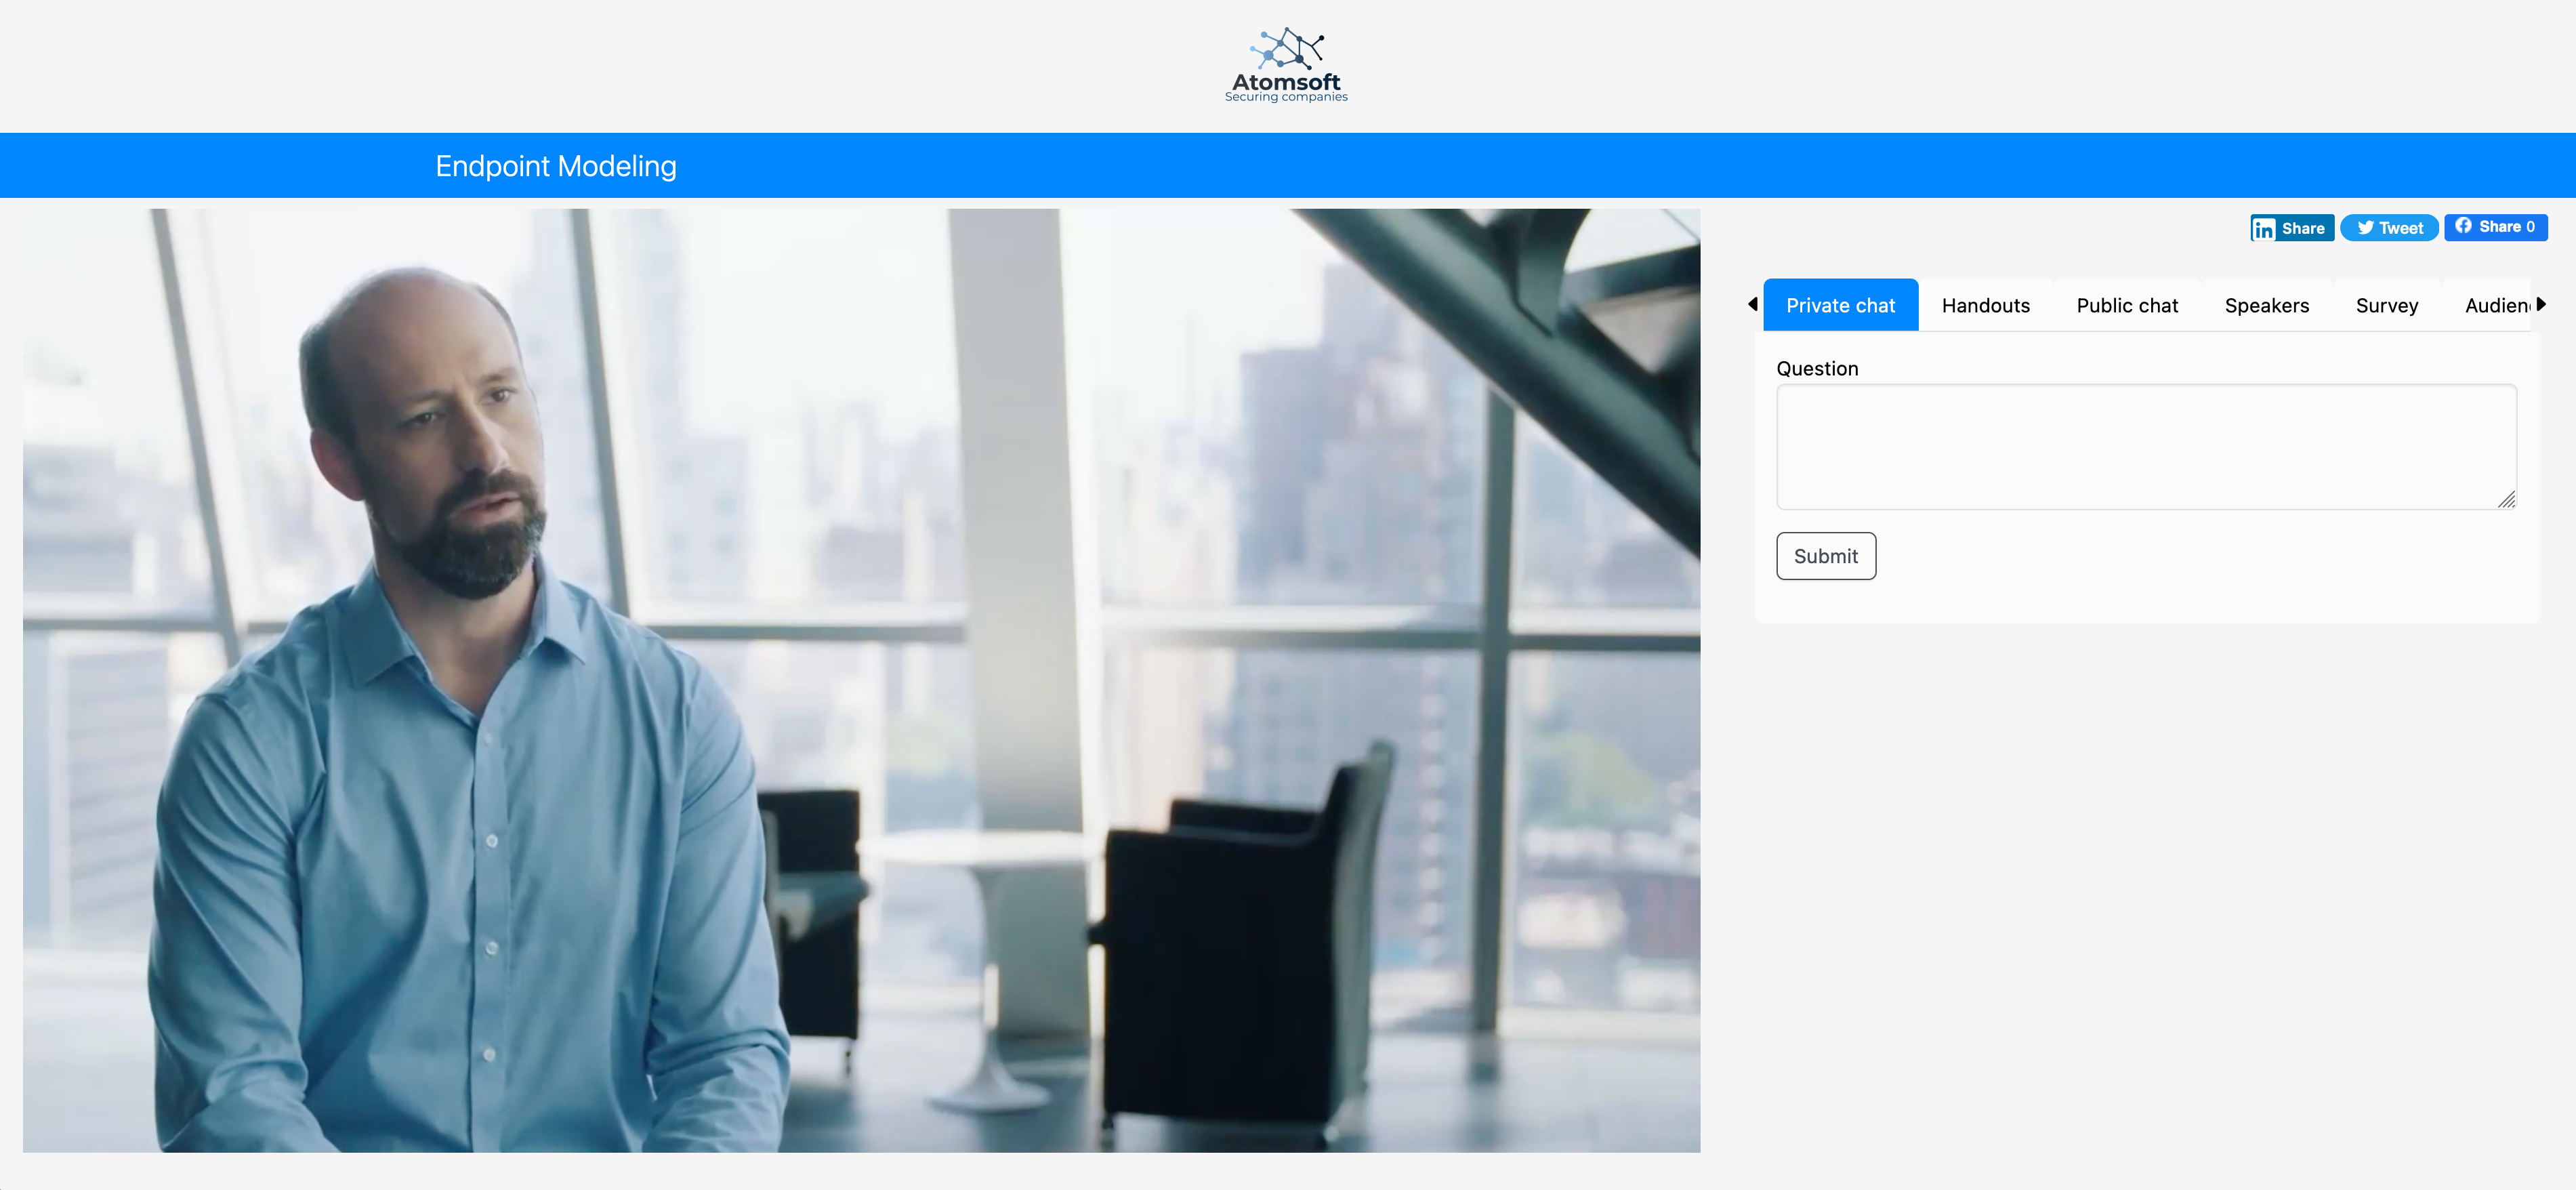
Private Chat
Participants can communicate privately with webinar moderators (not visible for other participants) via questions or chat:
- If you select Questions, participants can send private text questions but not receive a text response. In that case, the aim is for the speaker to answer the questions in the video.
- If you select Chat, participants can send private text questions and receive text answers for moderators.
You can select a different option during the live and on-demand webinar. In both cases, you can also let Clevercast email each question to the organizer and/or moderators (see the ‘Moderators and Tags’ section below).
Note that private chat is only available if registration is required. Questions are also possible for webinars without registration.
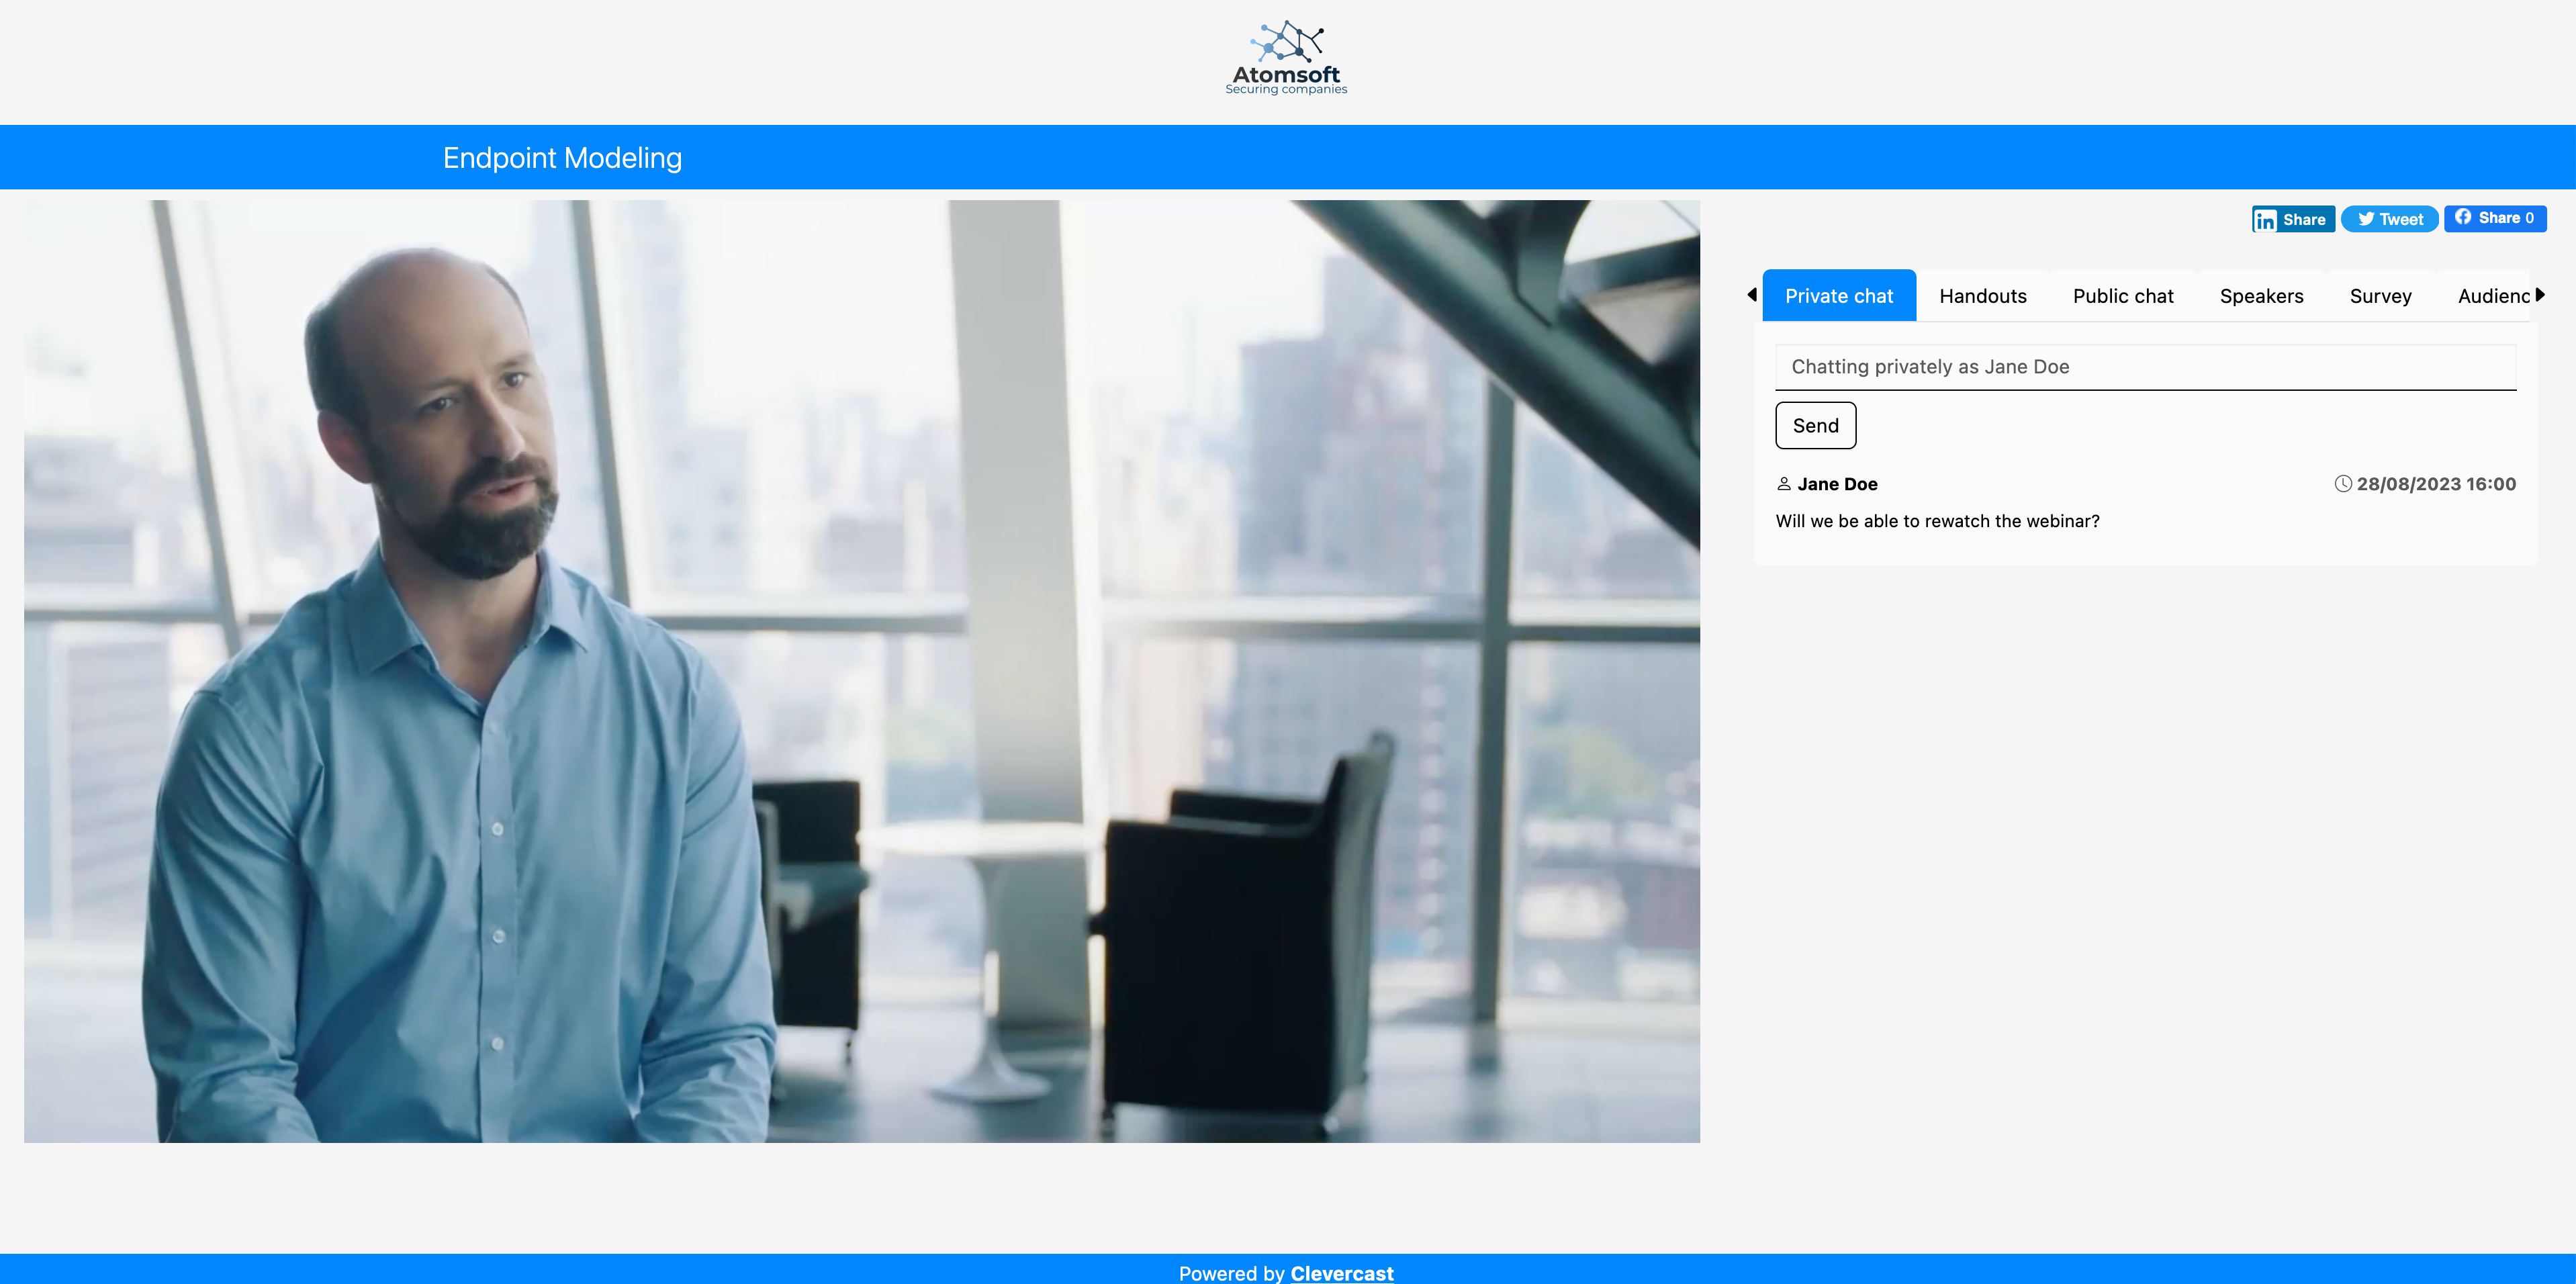
Clevercast lets you download all chat messages in a CSV file.
Public Chat
If you check ‘Public Chat’ the webinar will contain a tab/panel that lets all participants and moderators communicate with each other through text chat (requires registration). If the ‘Close public comments when live event ends’ option is checked, Clevercast doesn't allow new messages after the live webinar ends.
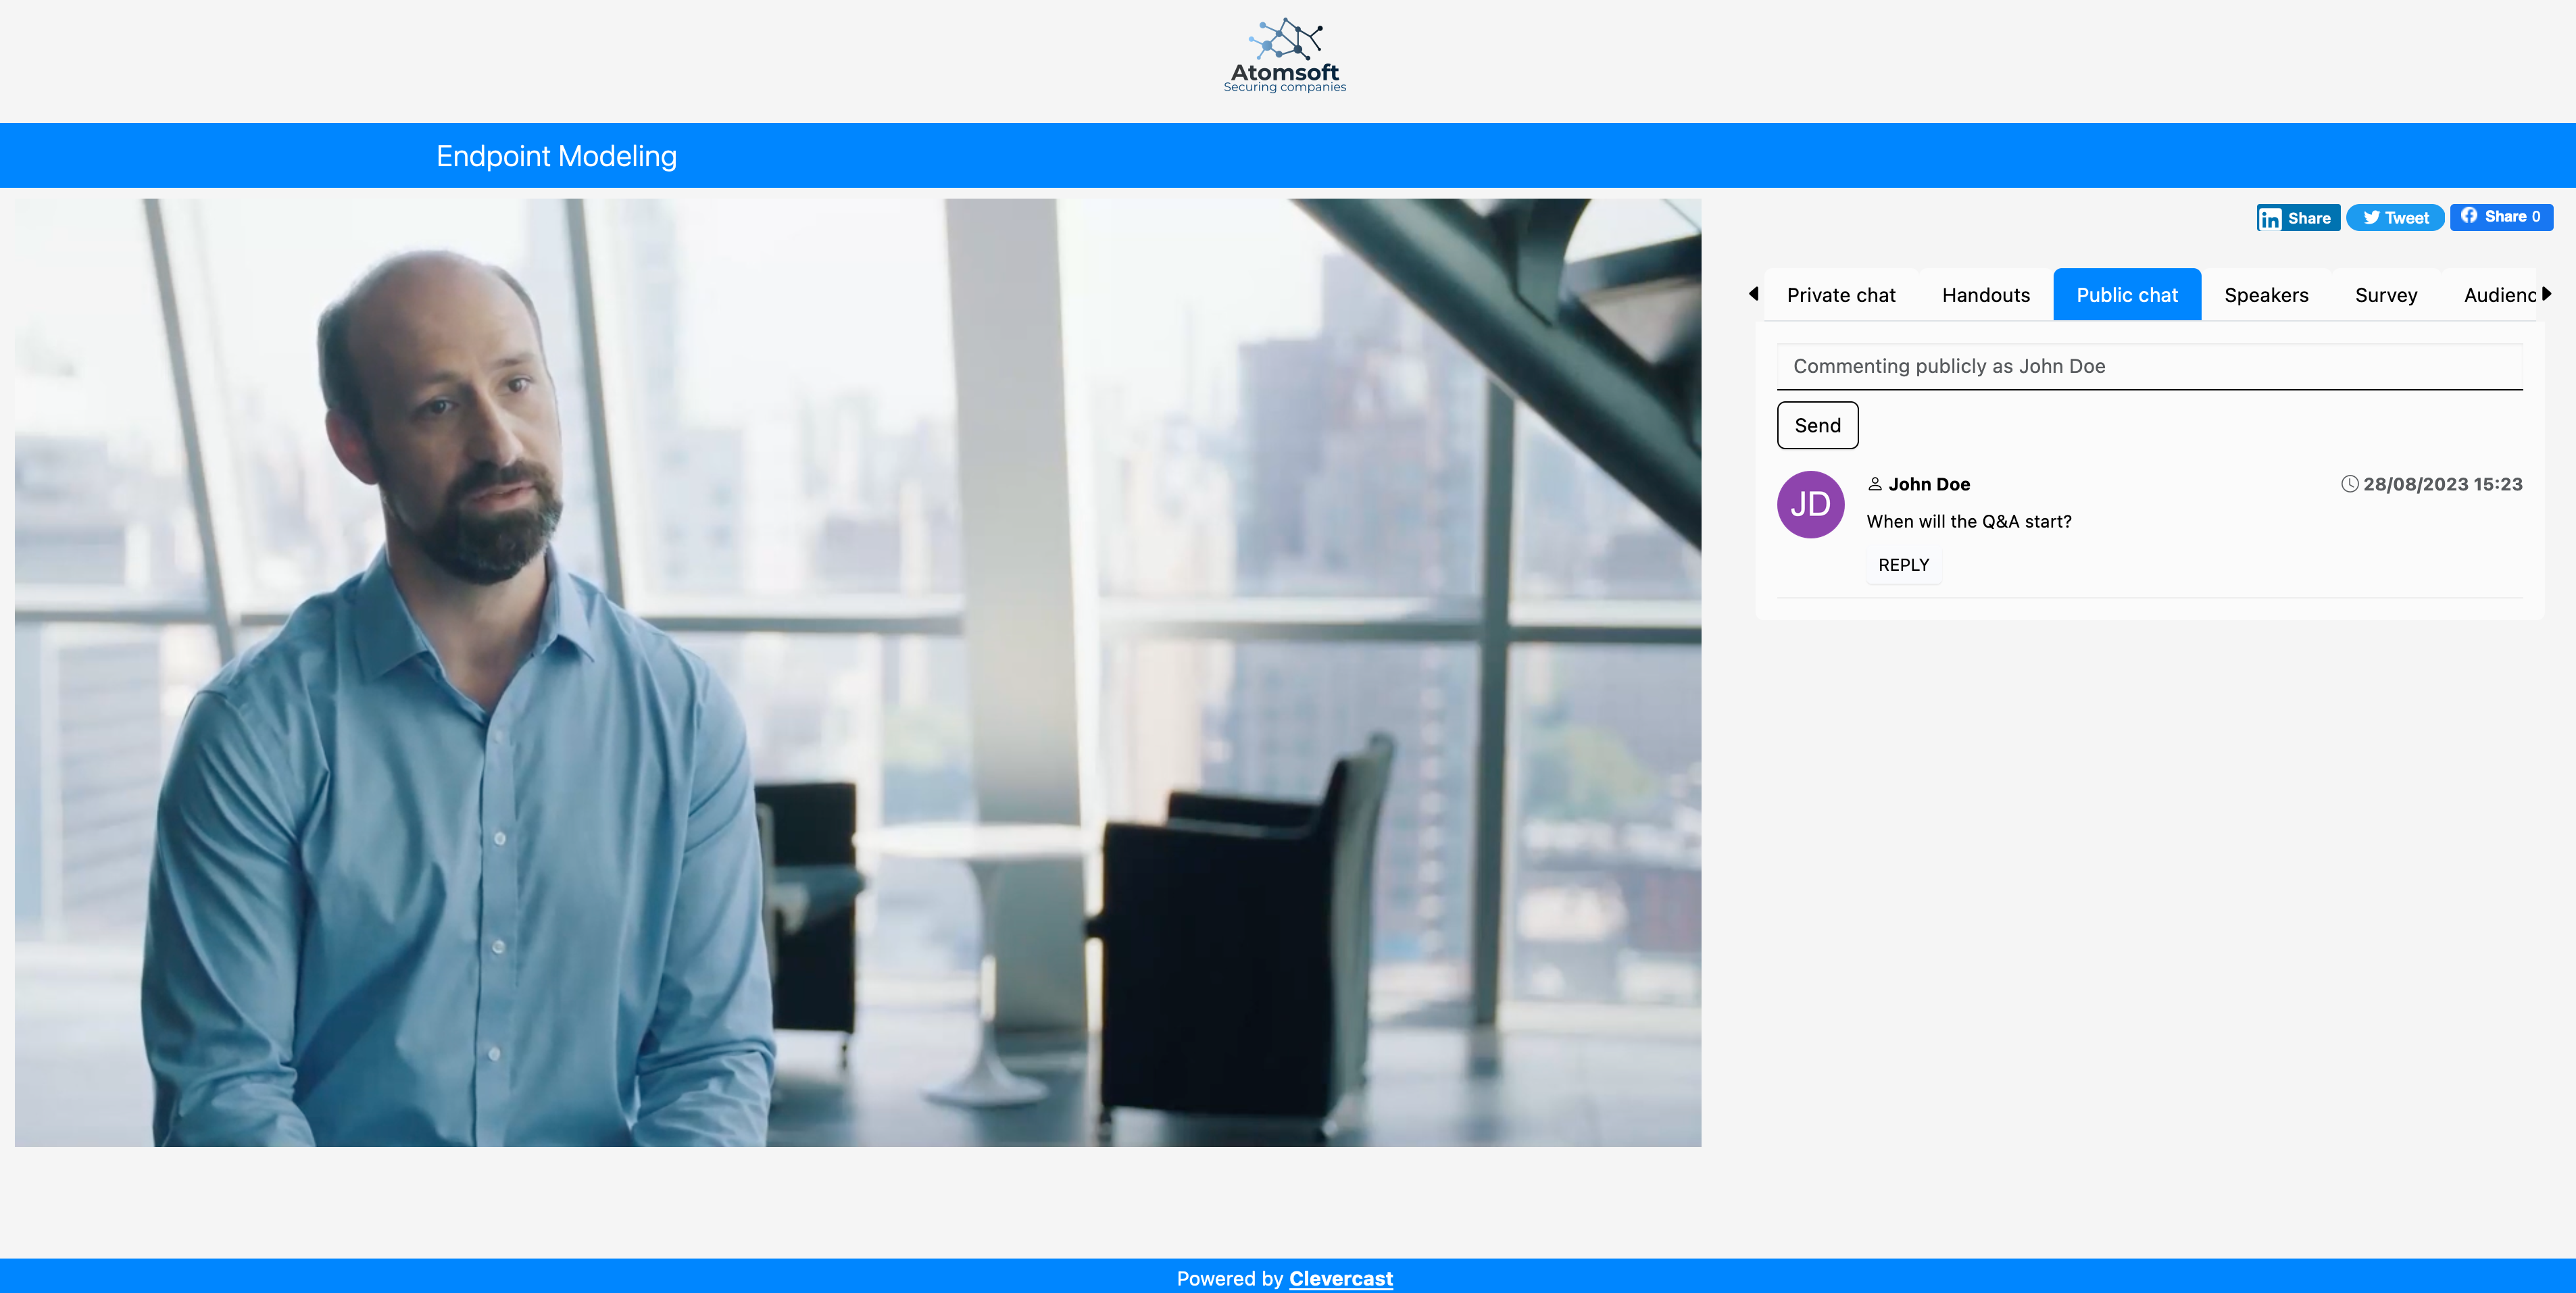
Clevercast lets you download all chat messages in a CSV file.
Audience Polls
This tab allows you to ask multiple-choice questions during the live stream and (optionally) display the result to your participants. It requires registration to be active.
After you add the tab, you can configure and manage the poll questions through the 'Interaction > Manage Audience Polls' menu (see below).
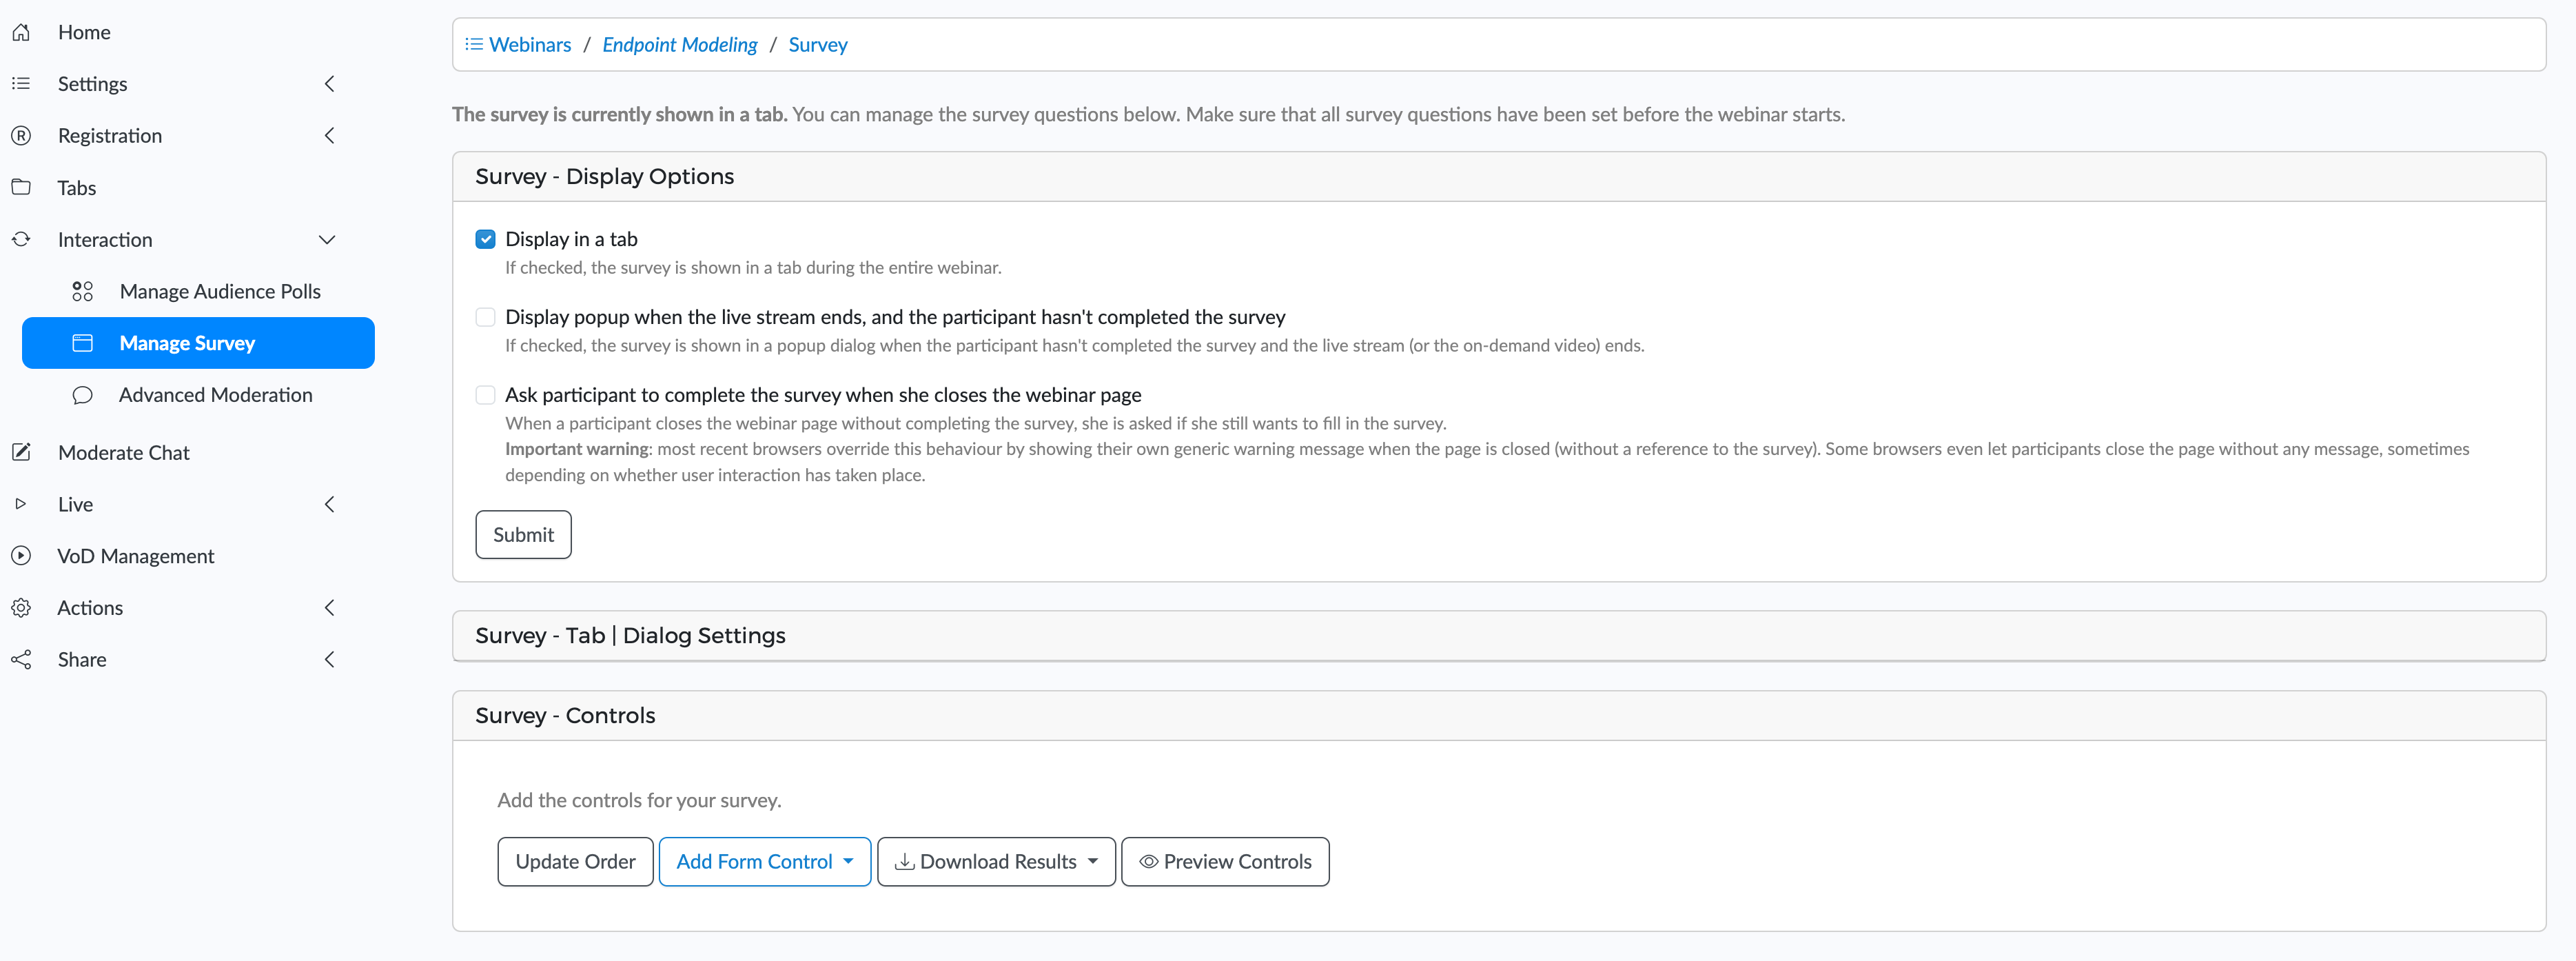
Survey
This tab shows a list of questions that can be completed by the participant at any time (before, during or after the webinar). Note that it is also possible - alternatively or additionally - to show the survey in a popup dialog when the live stream ends.
After you add the tab, you can configure and manage the survey form through the 'Interaction > Manage Survey' menu (see below).
Interaction
The ‘Interaction’ submenus lets you manage certain interactive features of the webinar.
Manage Audience Polls
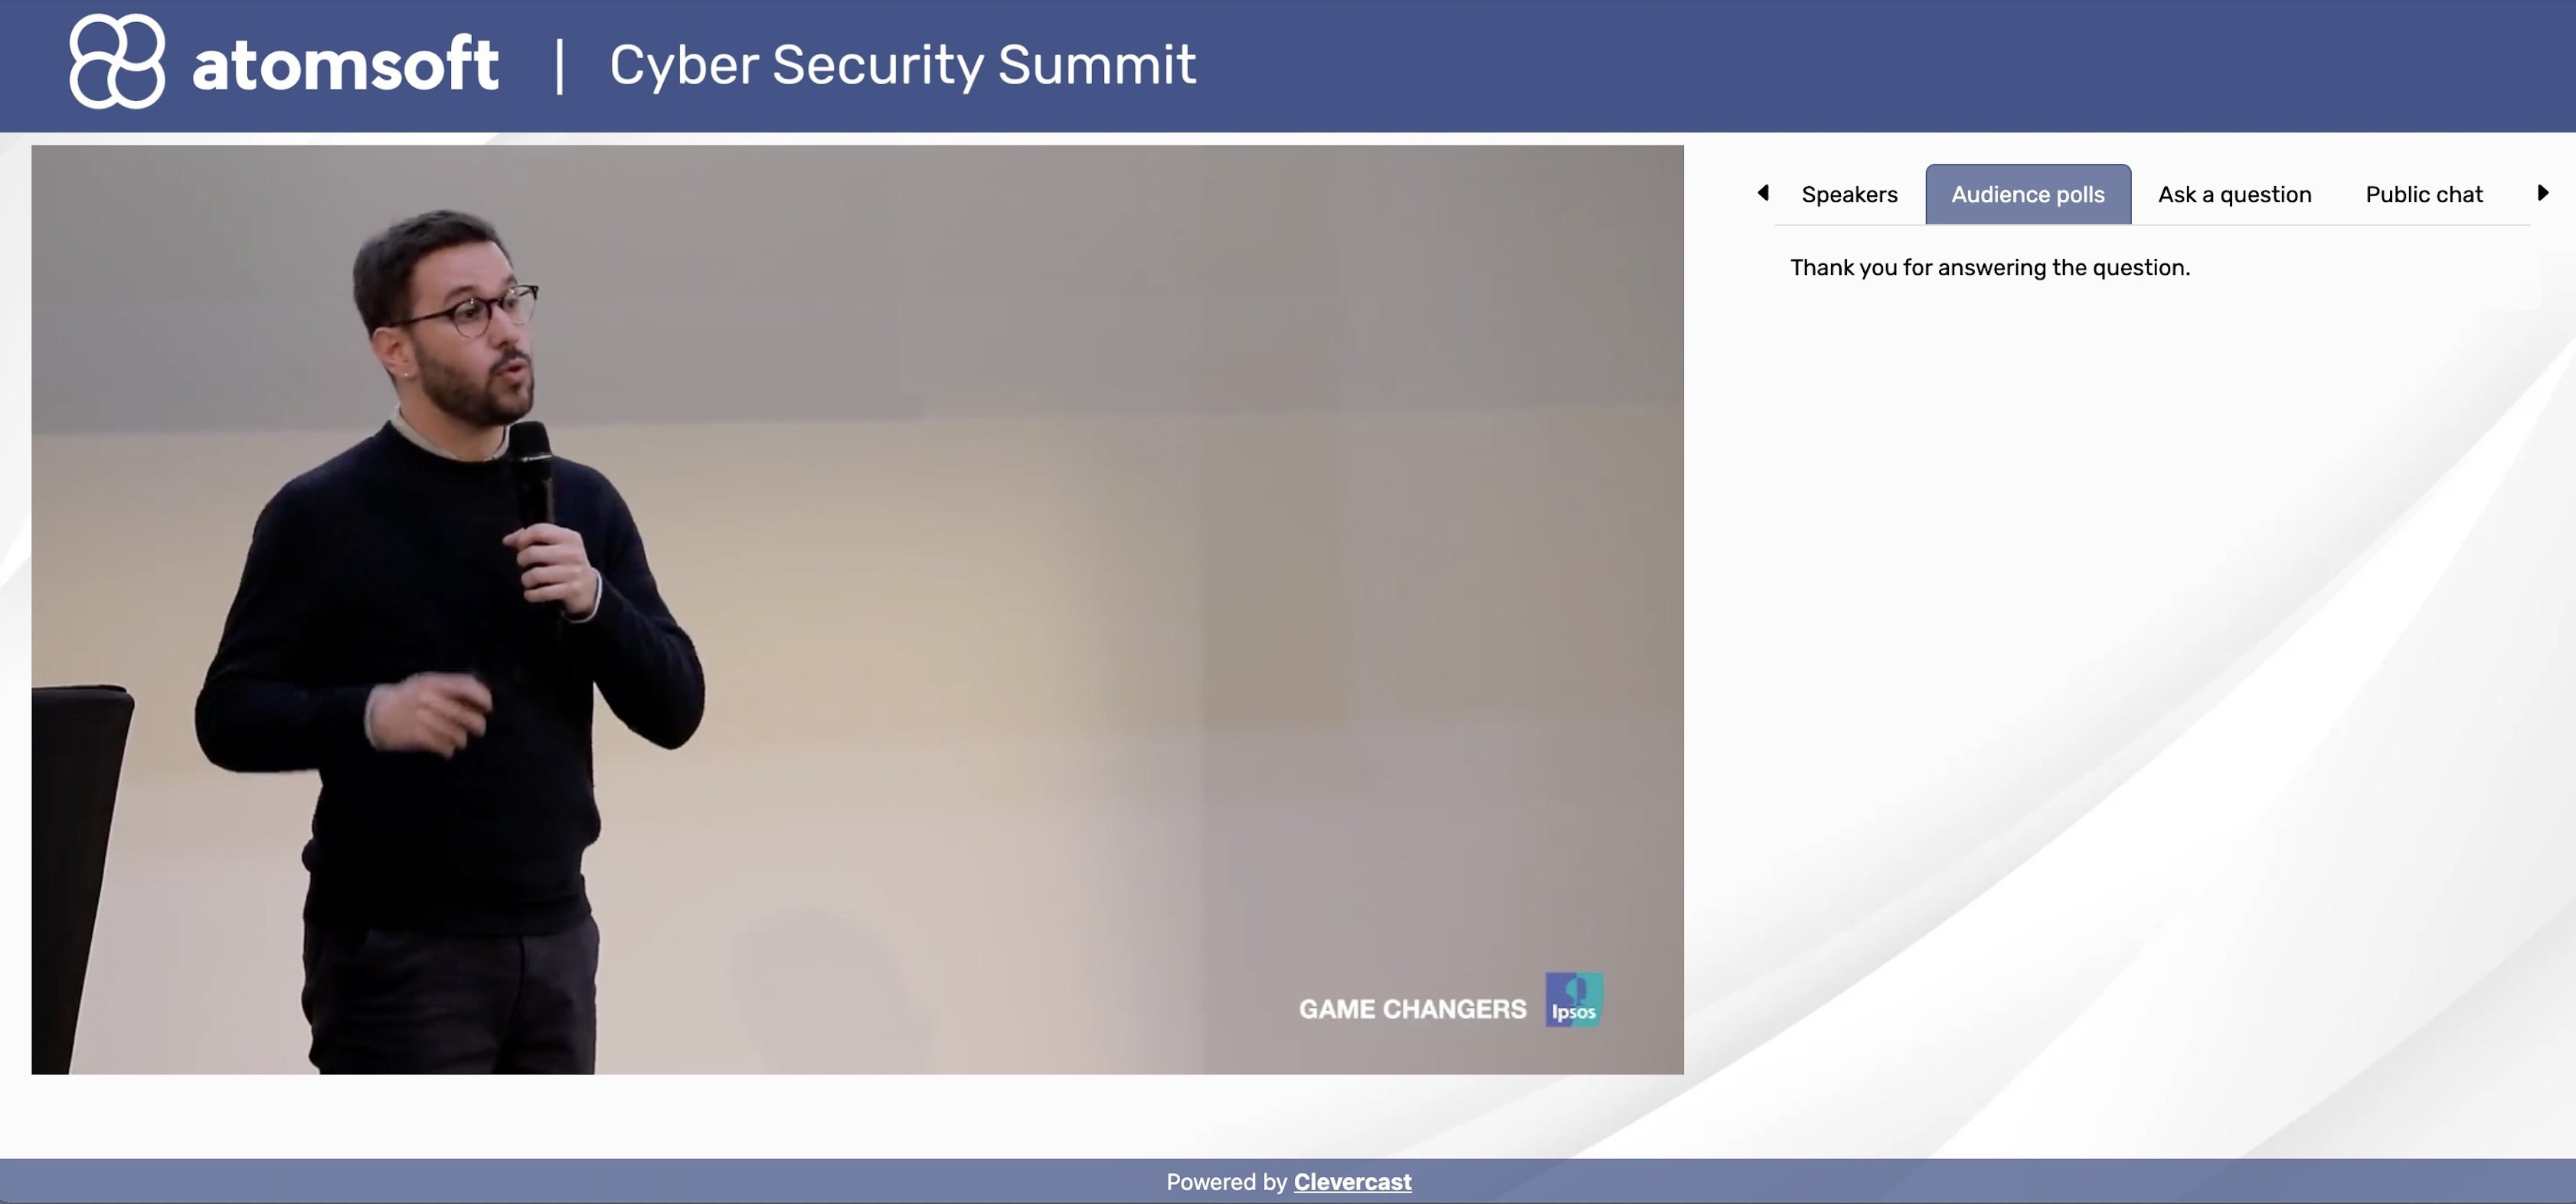
During a live webinar, you can question your participants by means of audience polls. These are multiple-choice questions that are shown in the frontend in the 'Audience Polls' tab on the right of the video player (see the frontend screenshots below).
Note: audience polls are not available for public webinars.
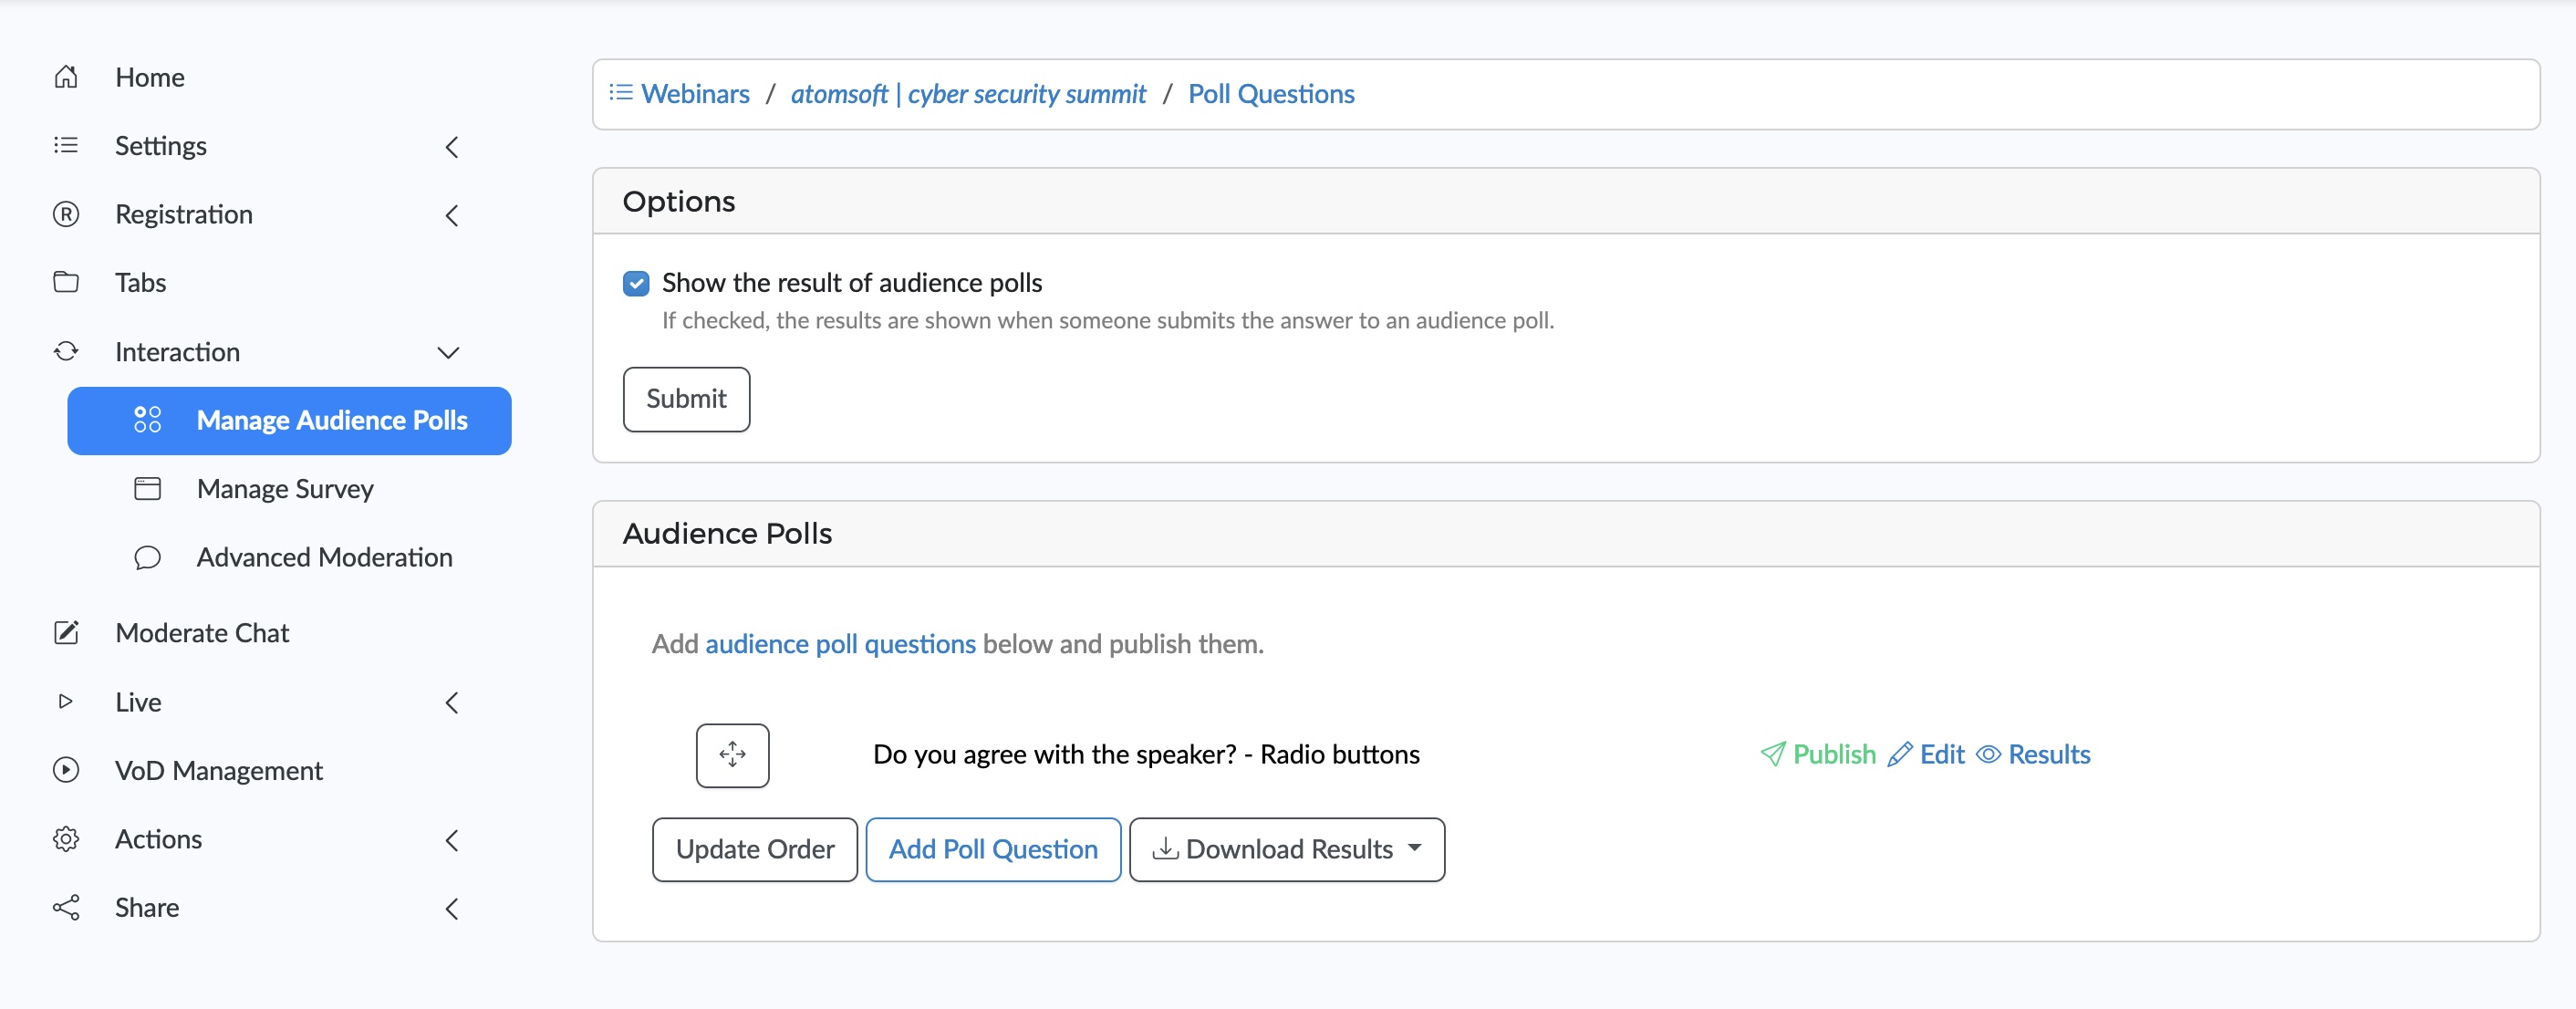
To add audience polls to a webinar, first go its 'Tabs' menu and add an 'Audience Polls' tab. After you do this, a 'Manage Audience Polls' sub-menu will appear under the 'Interactions' menu. Go to this backend page to create, manage and publish polls. Administrator can create 'audience polls' for a webinar in advance.
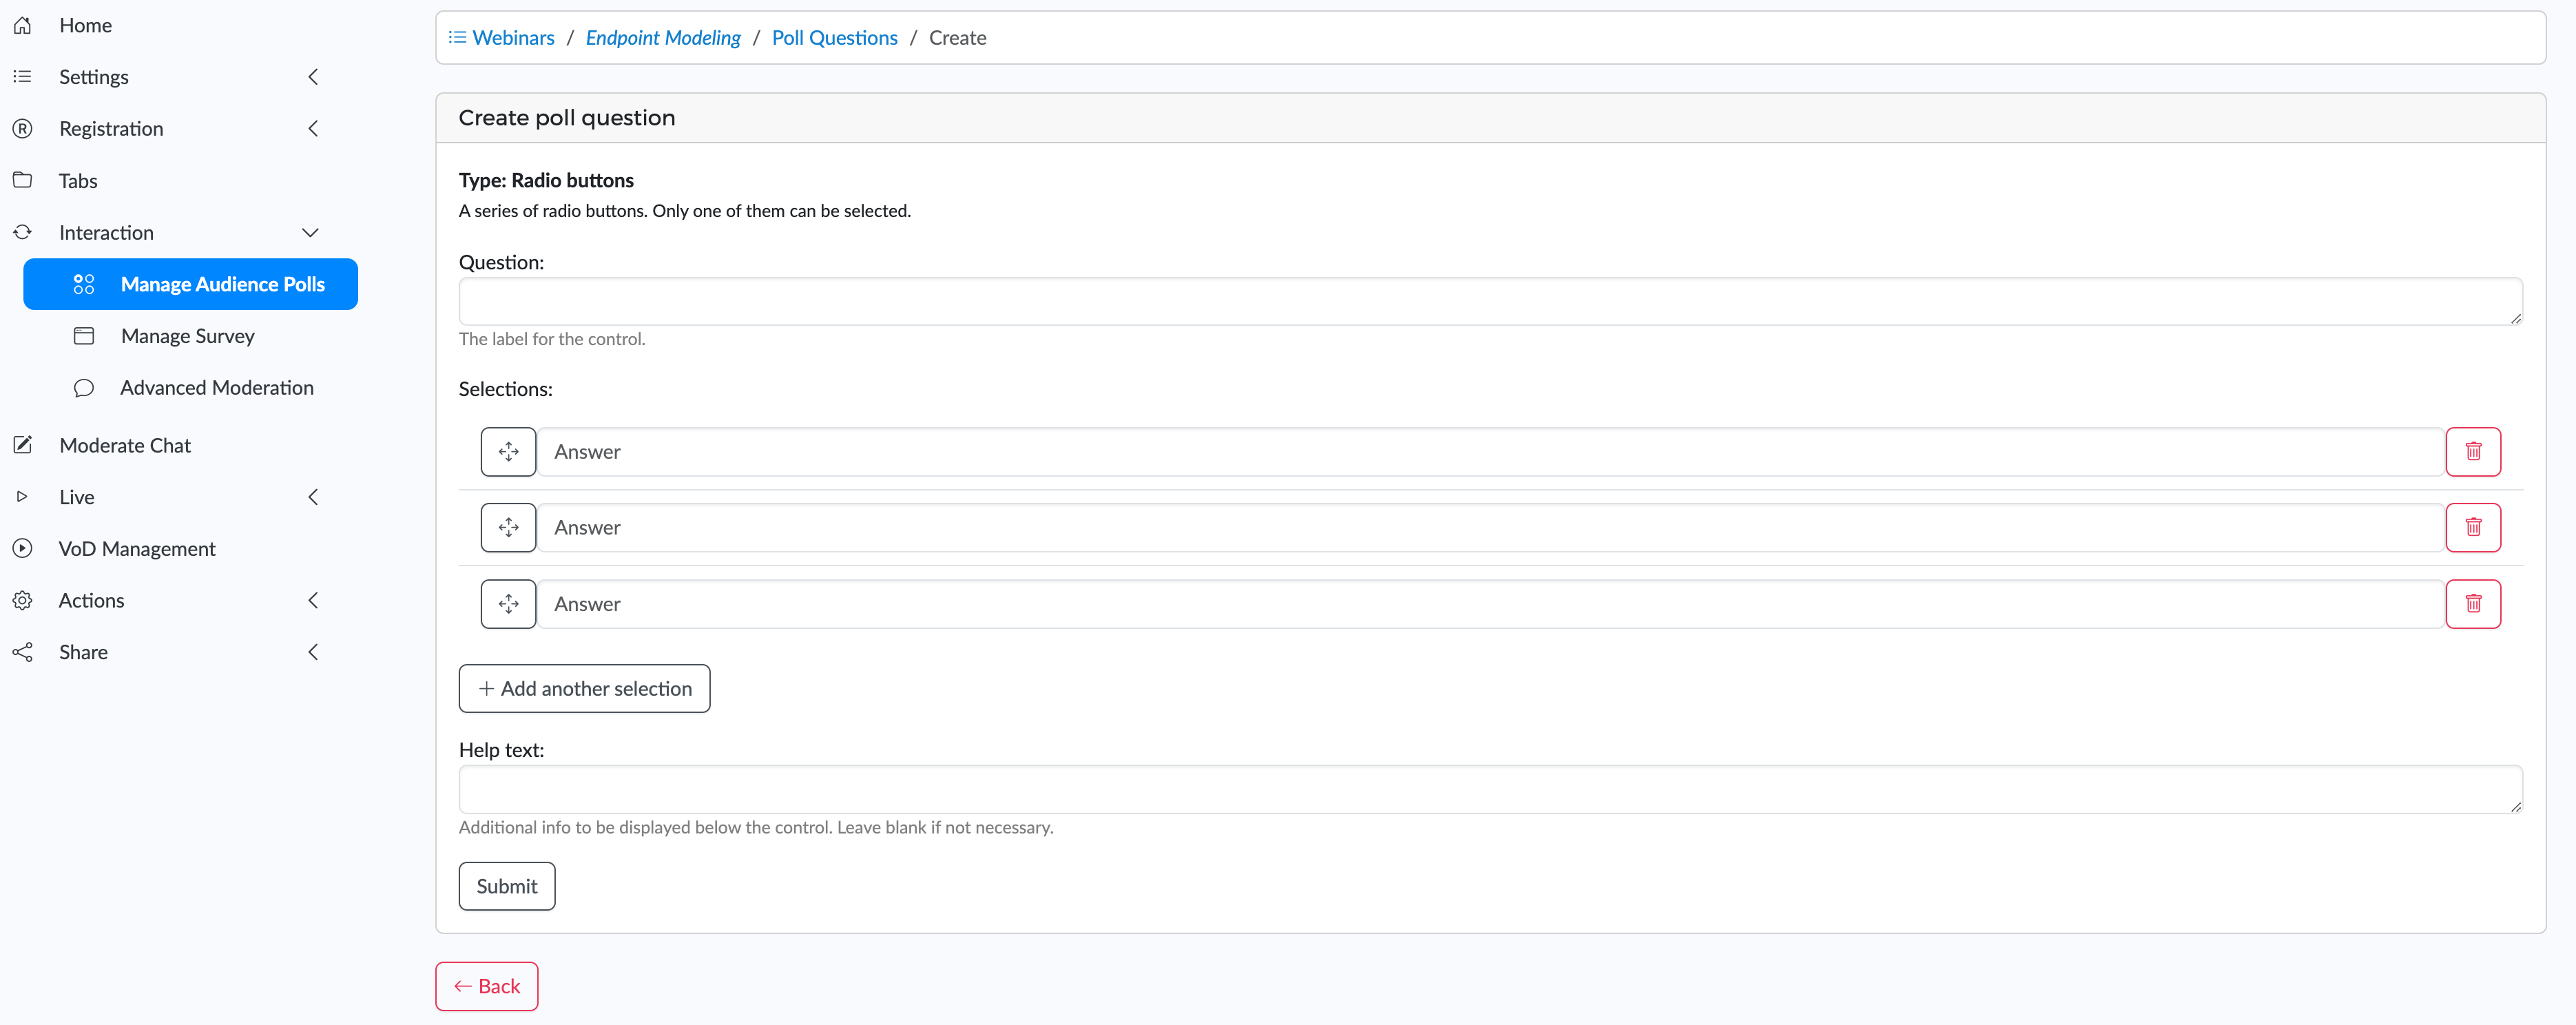
Audience polls can only be published during the live webinar. Press the 'Publish' button to show an audience poll to the webinar particants.
When a poll question is published, it is immediately shown to the webinar participants in the tab next to the player. The tab has an indicator, which lights up when a new question is published.
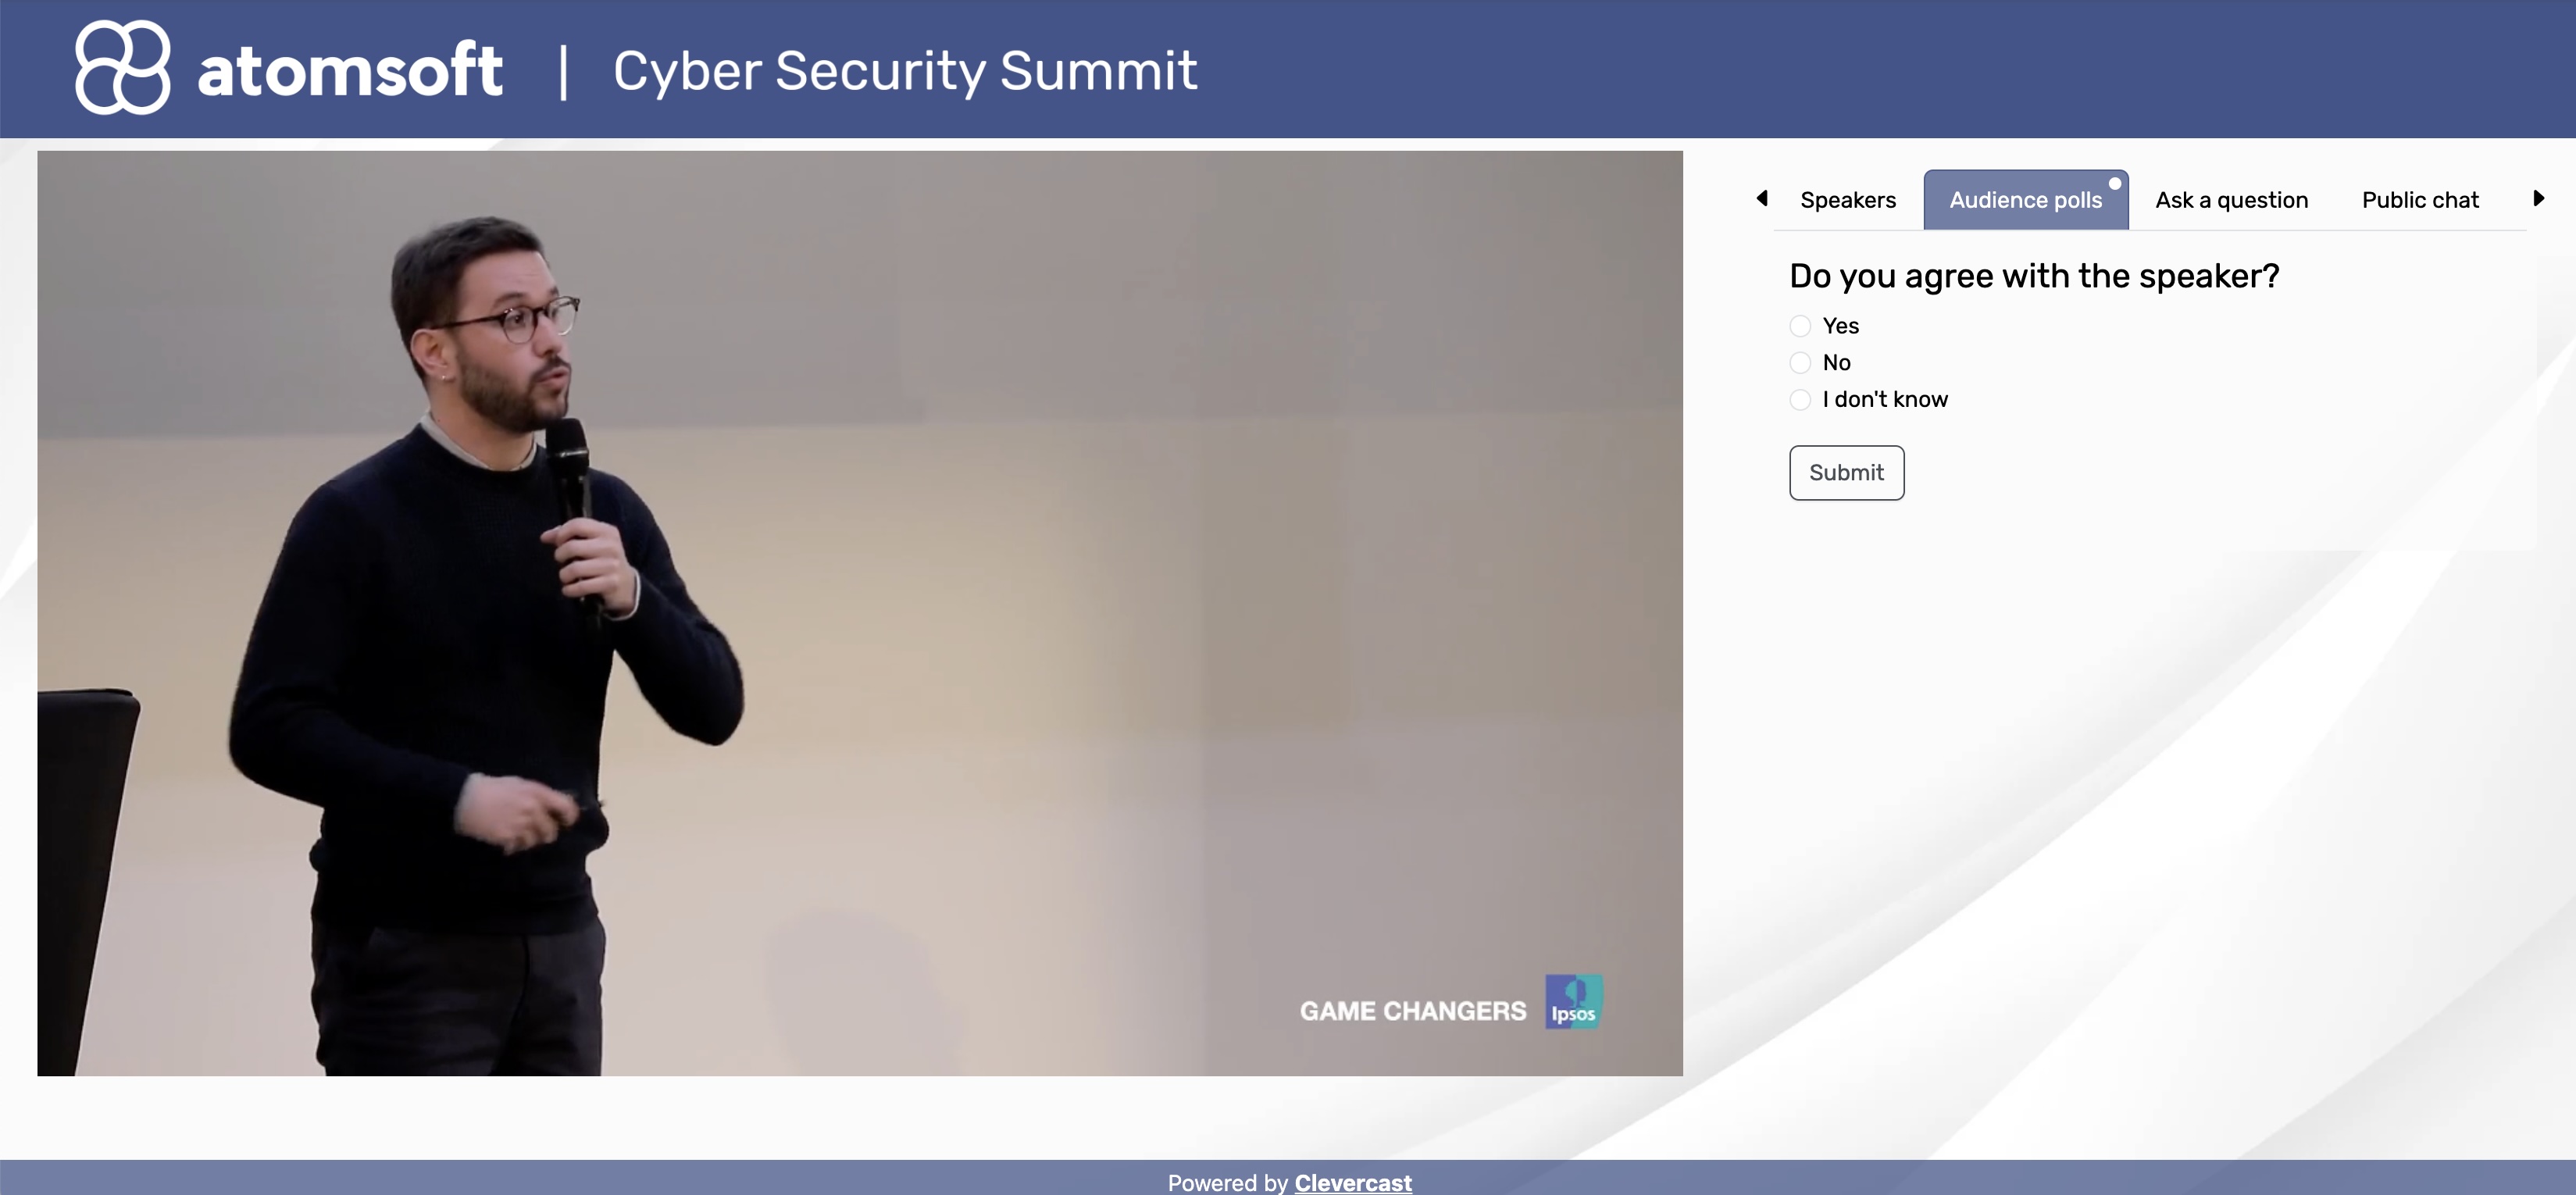
When a webinar participant answers a poll question, the preliminary results of the poll are shown to him/her in the same tab (unless the webinar is configured not to show results, see below). As more people answer, the results are automatically updated.
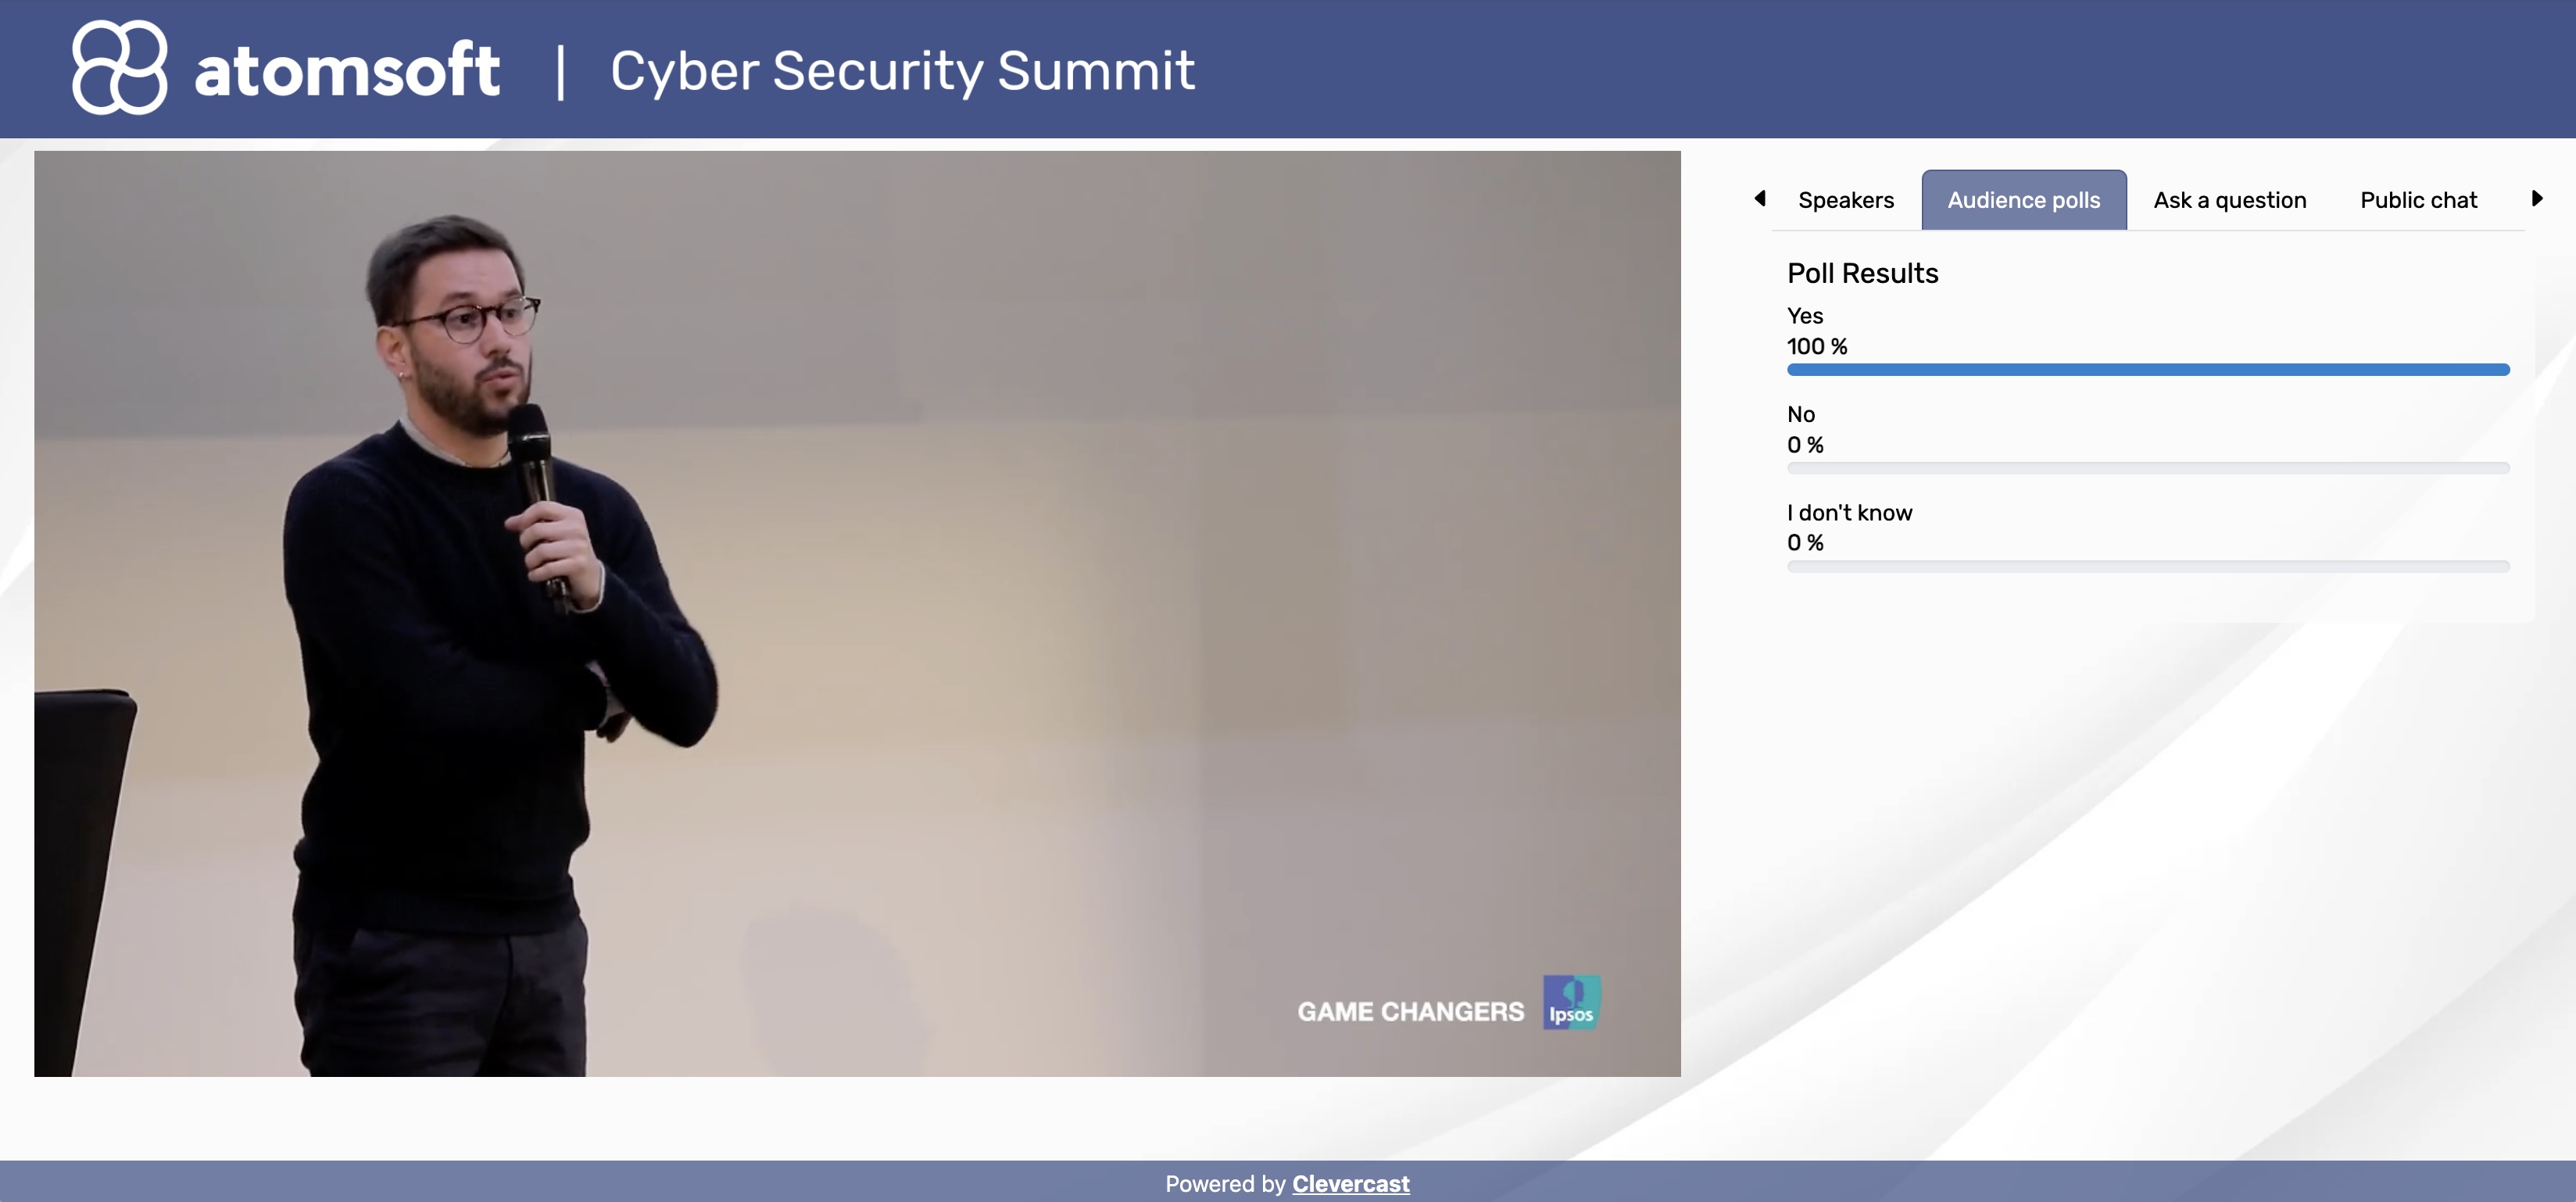
By default, the results remain visible until an administrator publishes a new poll question.
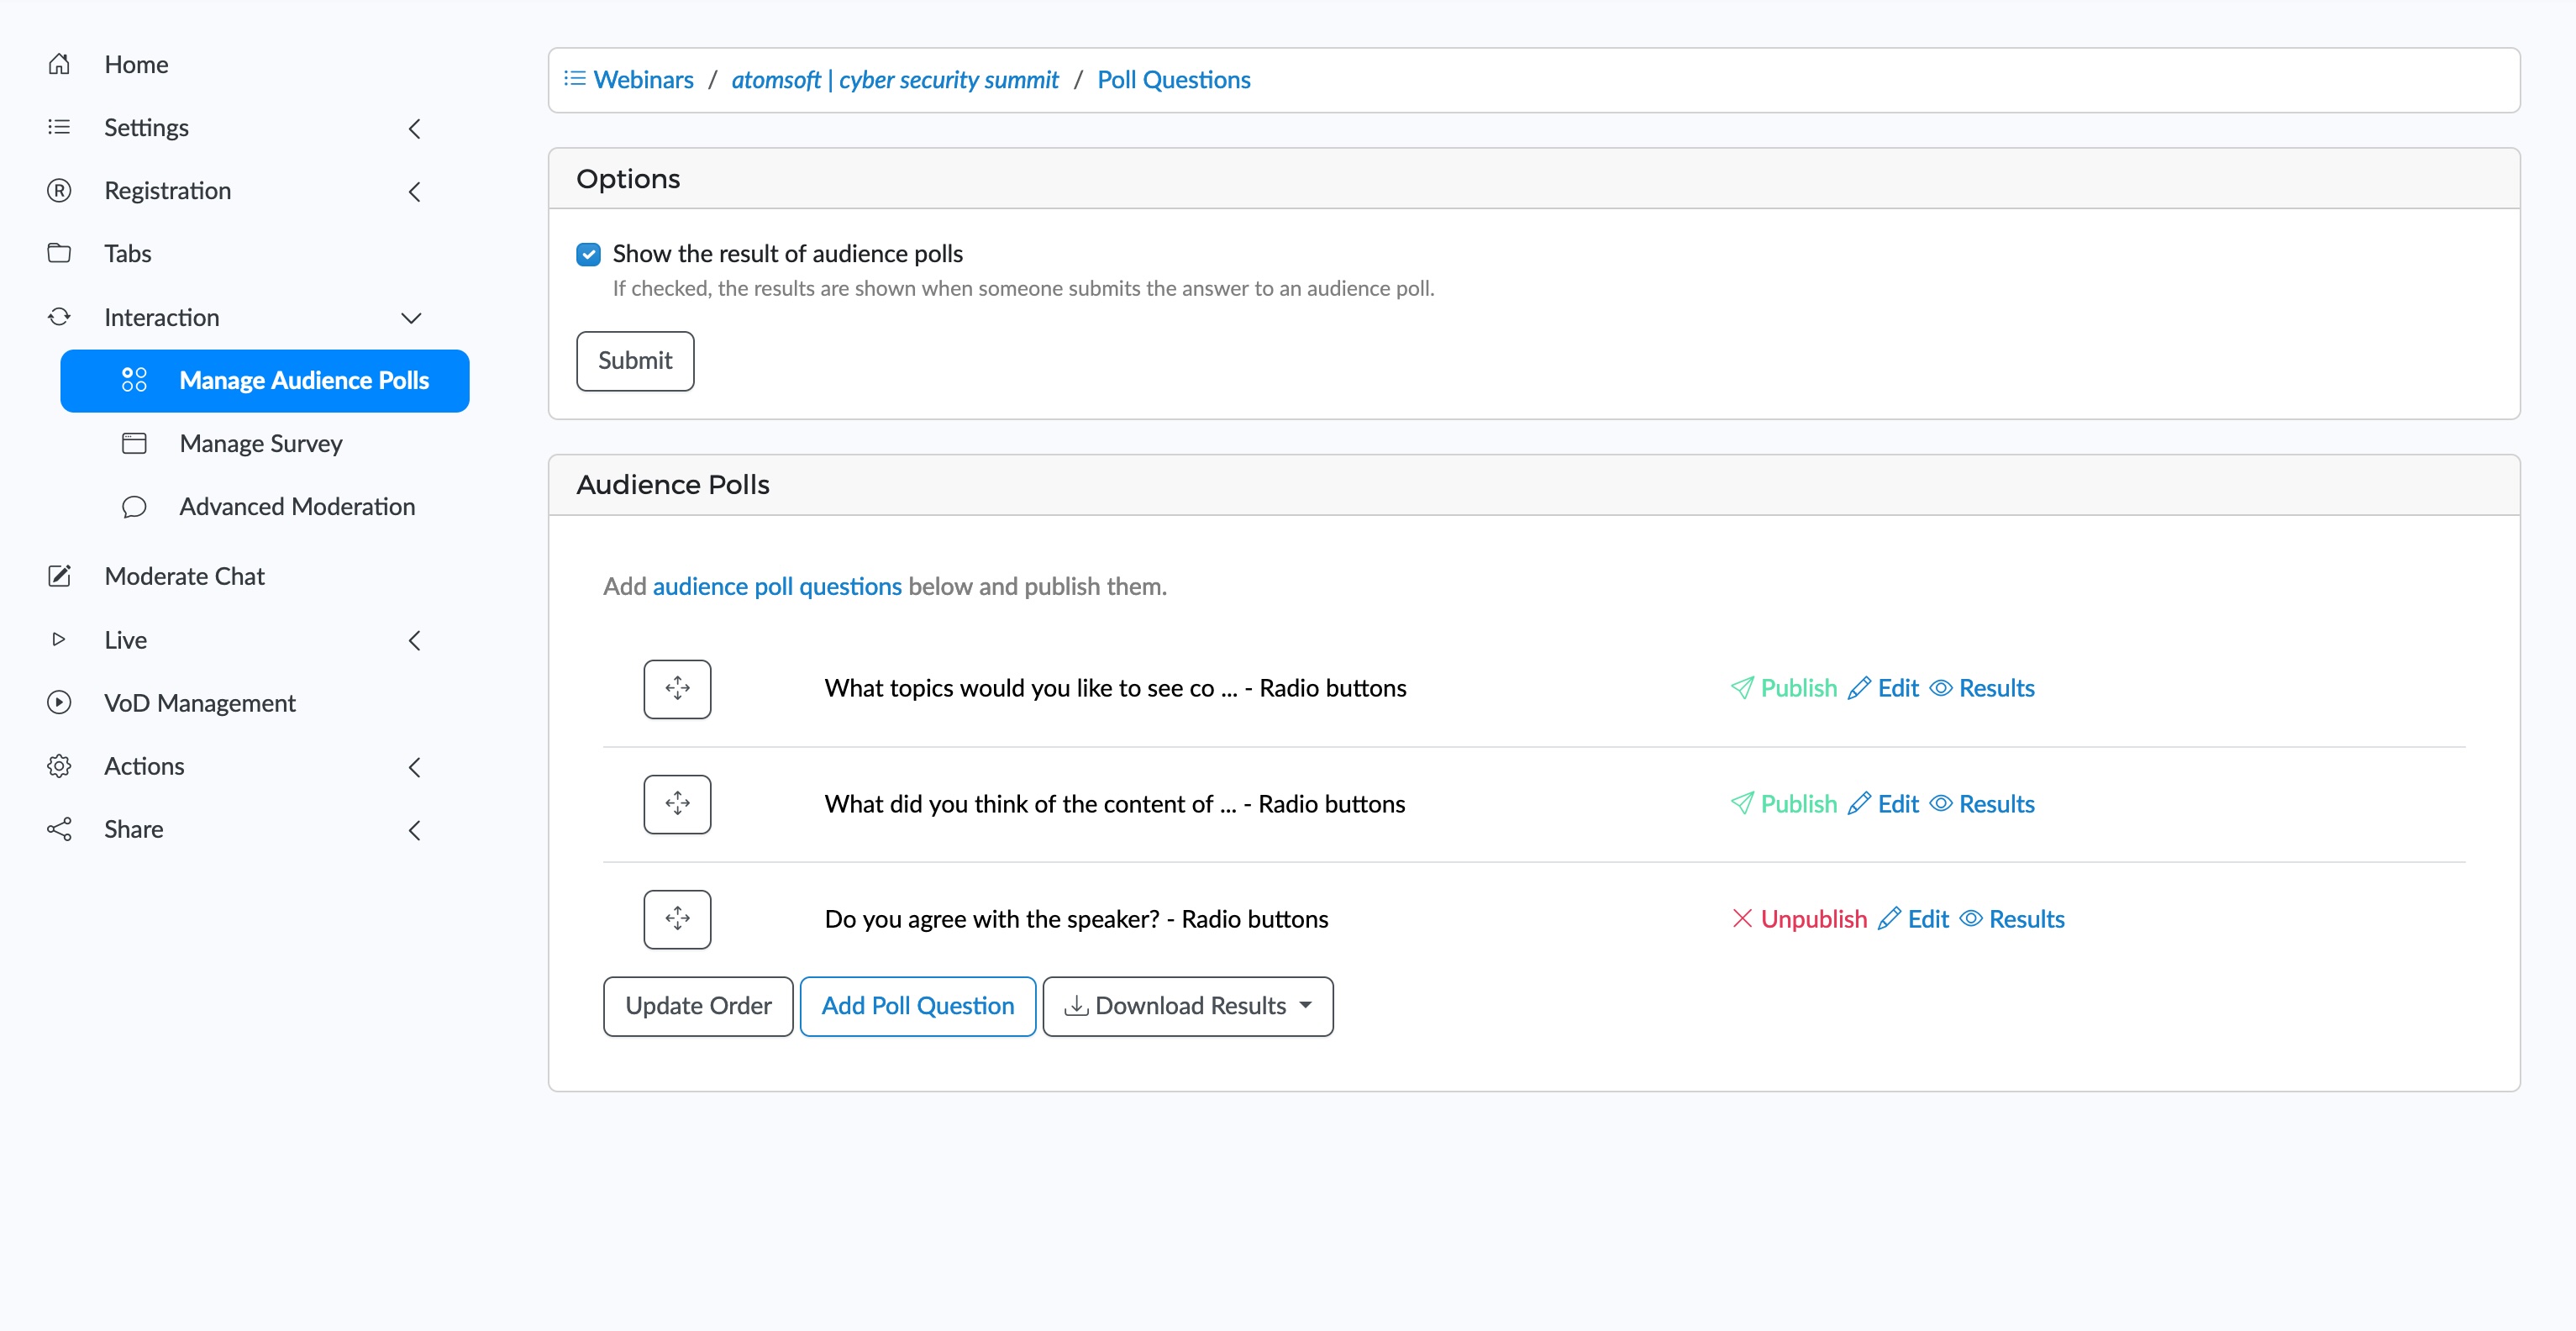
Administrators can create new poll questions at any time. To publish one of these questions, the previous question must first be unpublished.
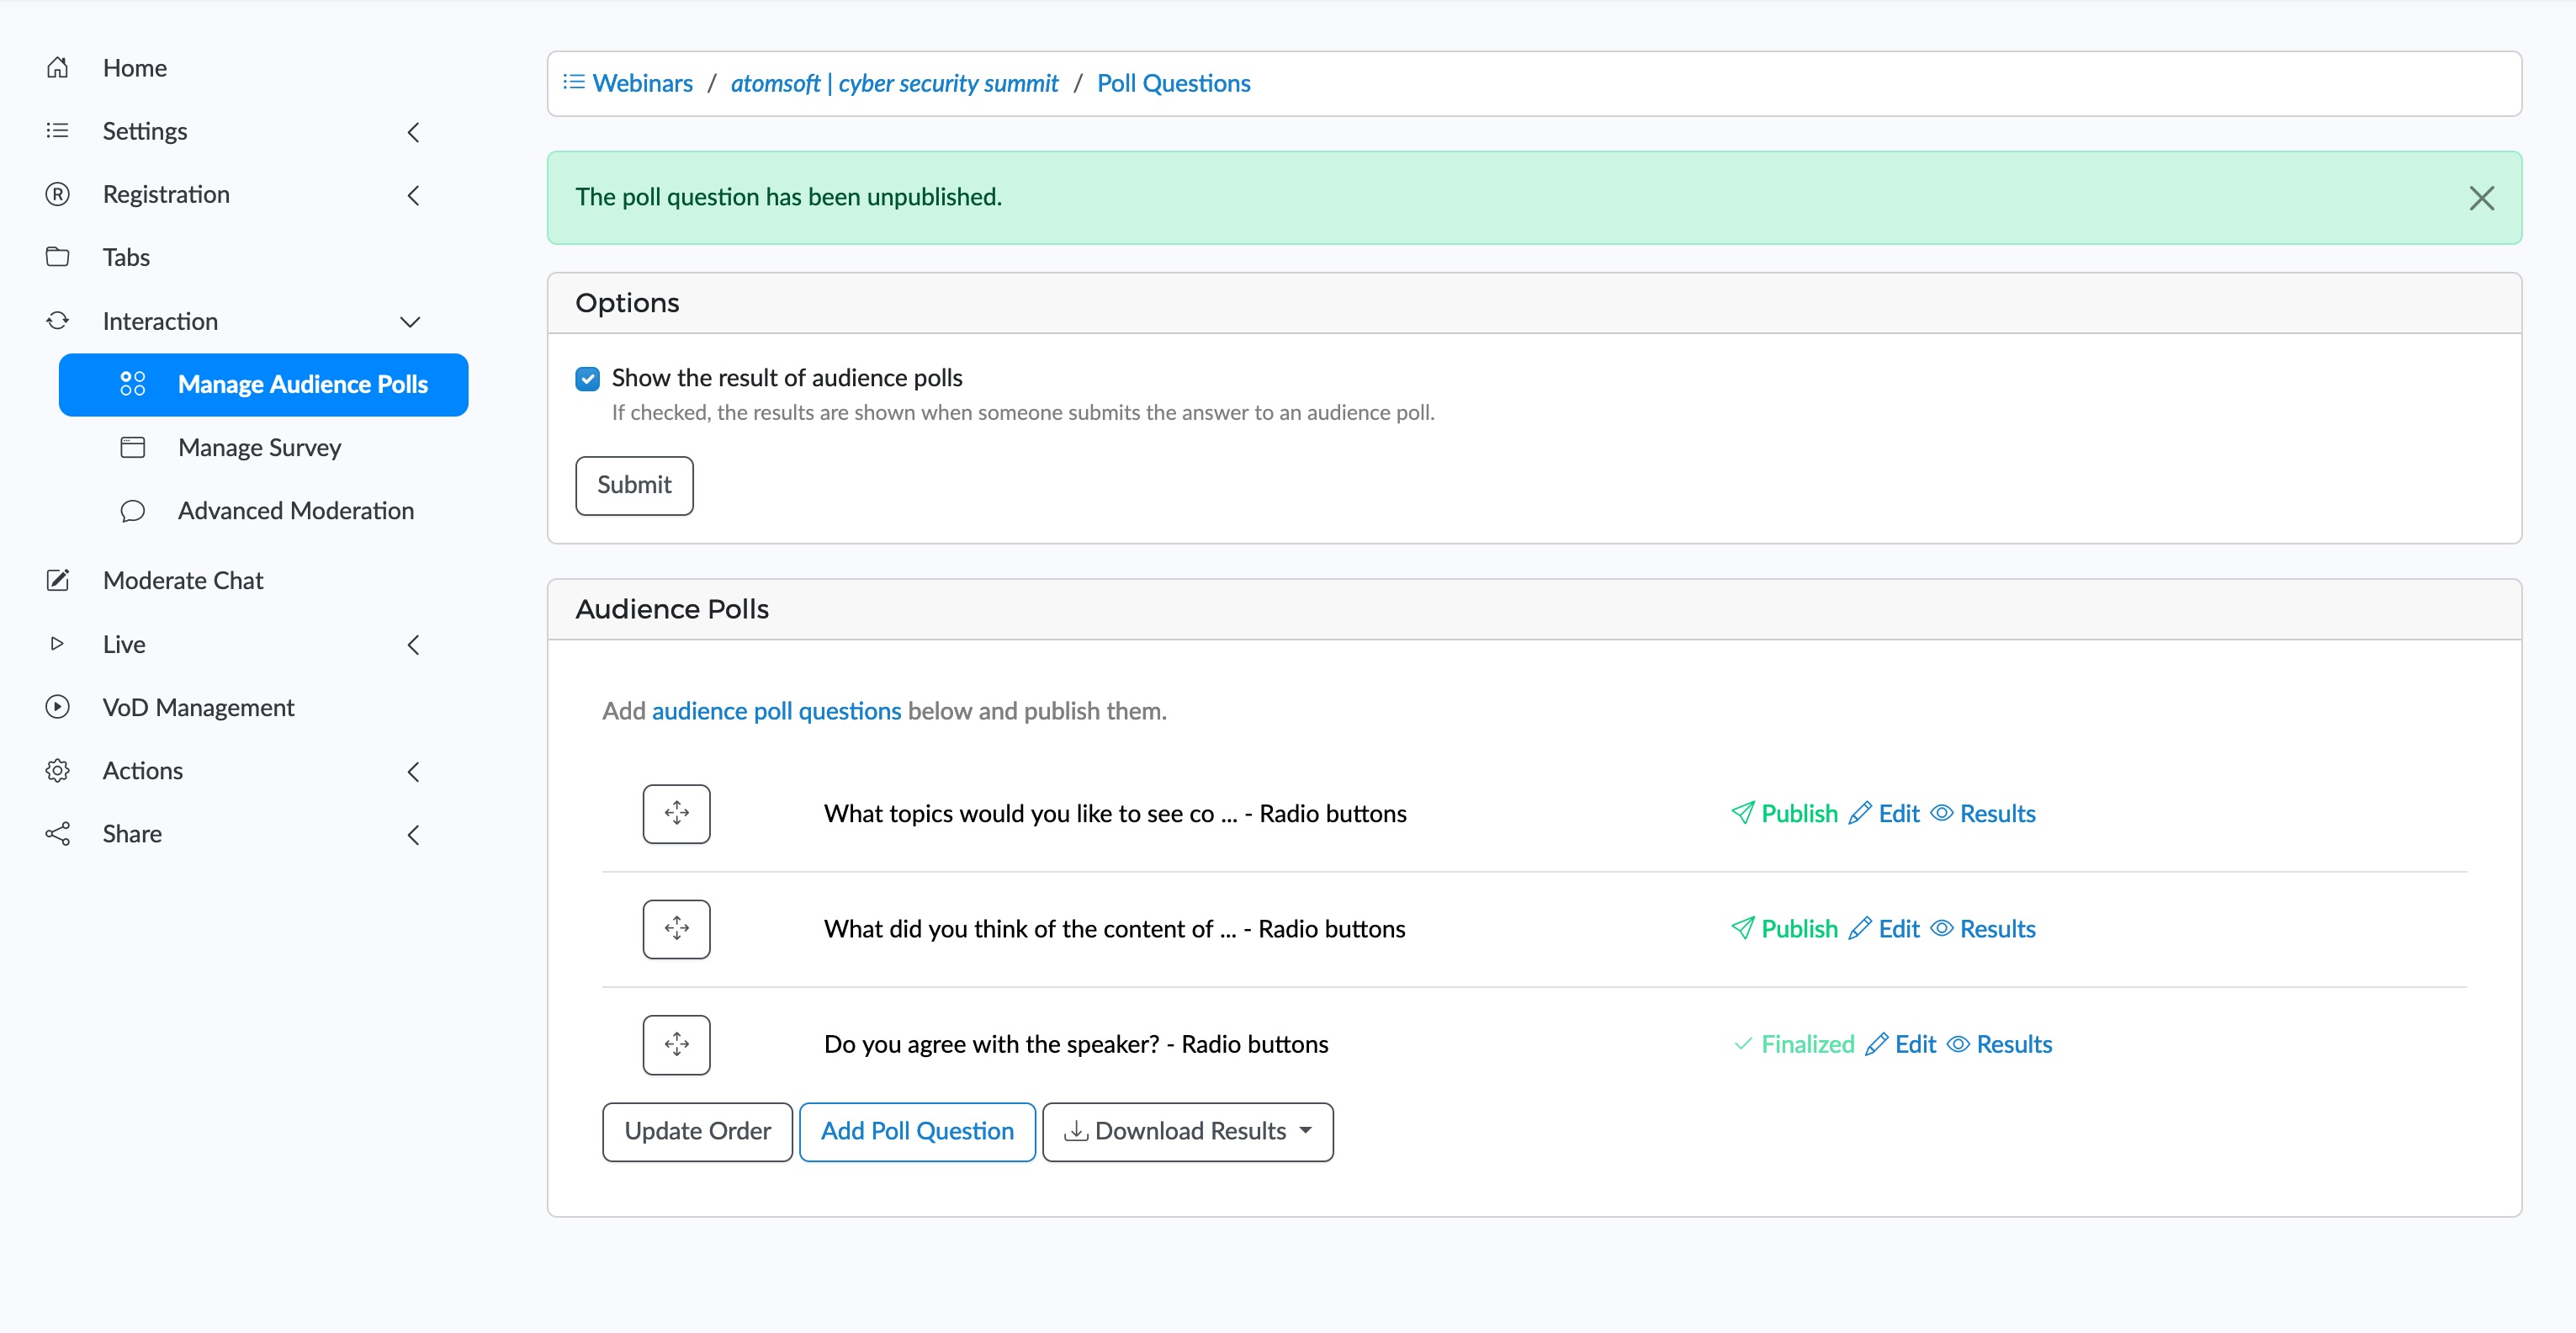
After unpublishing the previous poll question, a new question can be published. Until this happens, the results of the unpublished poll remain visible to participants (but they are no longer able to answer the unpublished question).
Note: a poll question that has been unpublished is set to finalized and can not be published again, except when no answer was given (e.g. testing purposes).
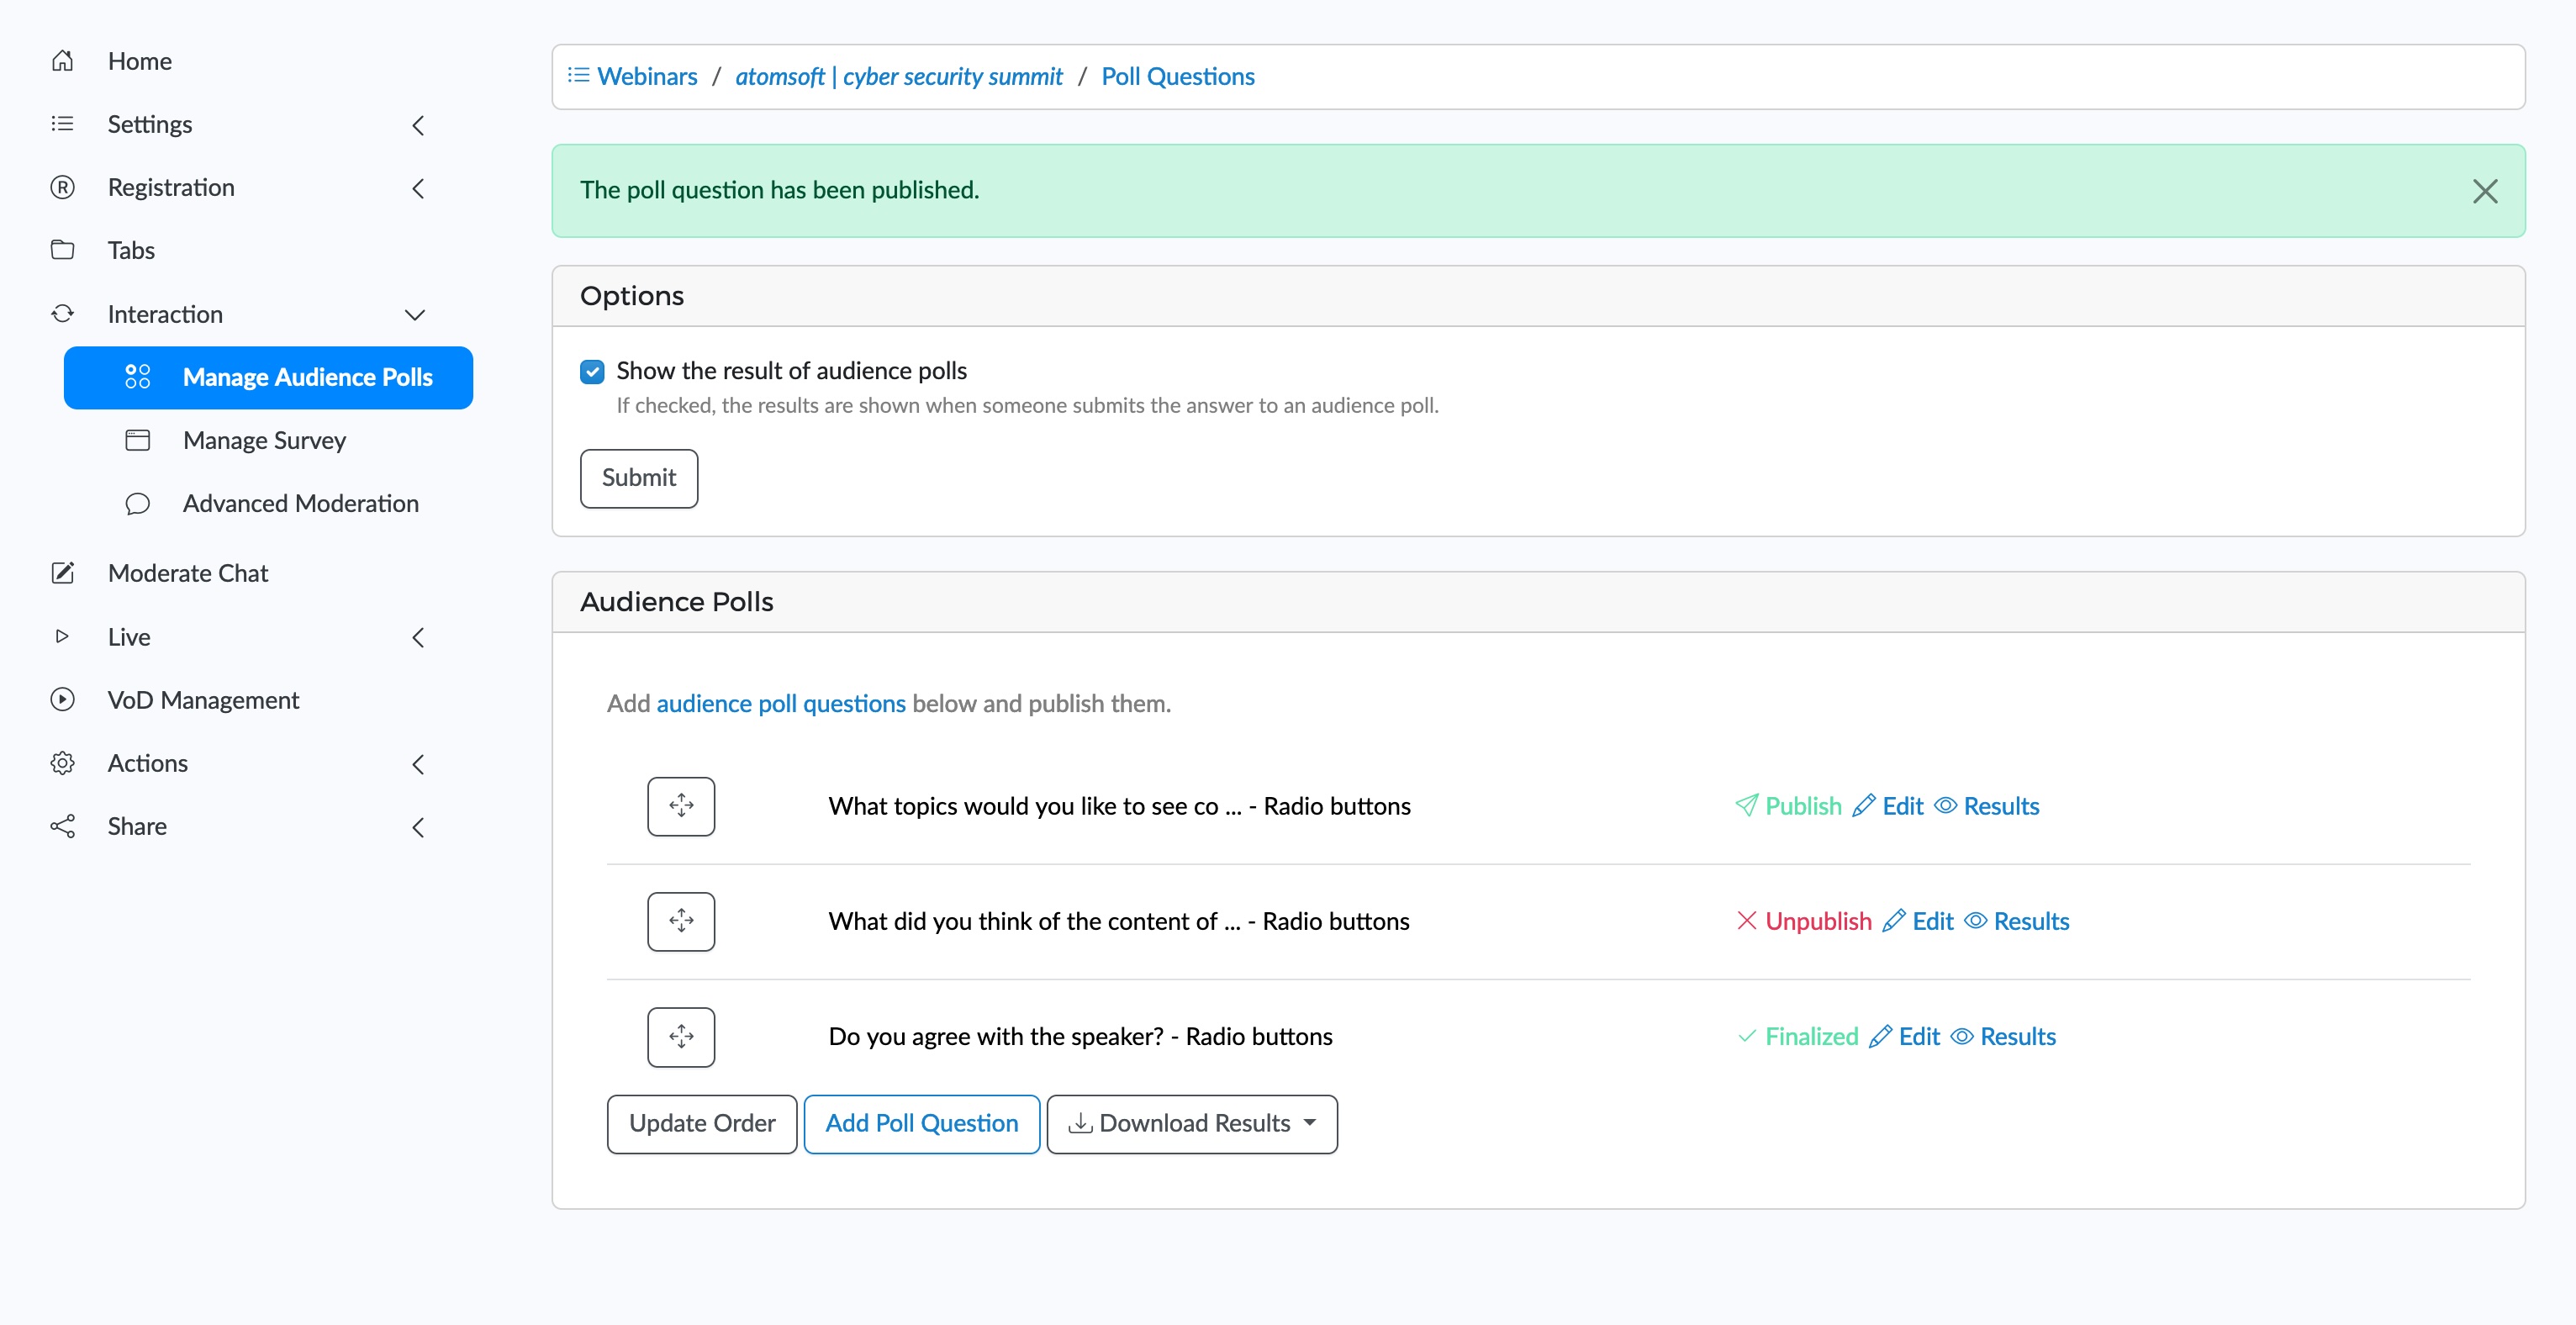
When a new poll question is published, participants automatically see the new poll question (instead of the results of the previous poll).
If you don't want the results to be shown (anymore), uncheck 'Show the results of audience polls' in the 'Audience Polls' tab and press 'Submit'. This ensures that the results are replaced by a thank-you message. As administrator, you can change this setting at any time: it will immediately affect the frontend (= results shown or not shown).
After the webinar is over, you can download the results as a CSV file (which can be opened in Microsoft Excell or Google Spreadsheets).
Manage Survey
The ‘Manage Survey’ page allows you to ask a set of multiple-choice and open questions. The first section shows the display options:
- show the survey in a separate tab/panel
- show it in a popup dialog after the live webinar ends
- ask participant to complete the survey after closing the page (not recommended, browser behaviour is unpredictable)
Your survey can consist of different form controls (e.g. edit boxes, textarea fields, radio buttons, checkboxes ...). You should create and configure them before the live webinar starts, otherwise some participants may not see all questions.
You can also see all answers and download them in CSV format on the ‘Survey’ page.
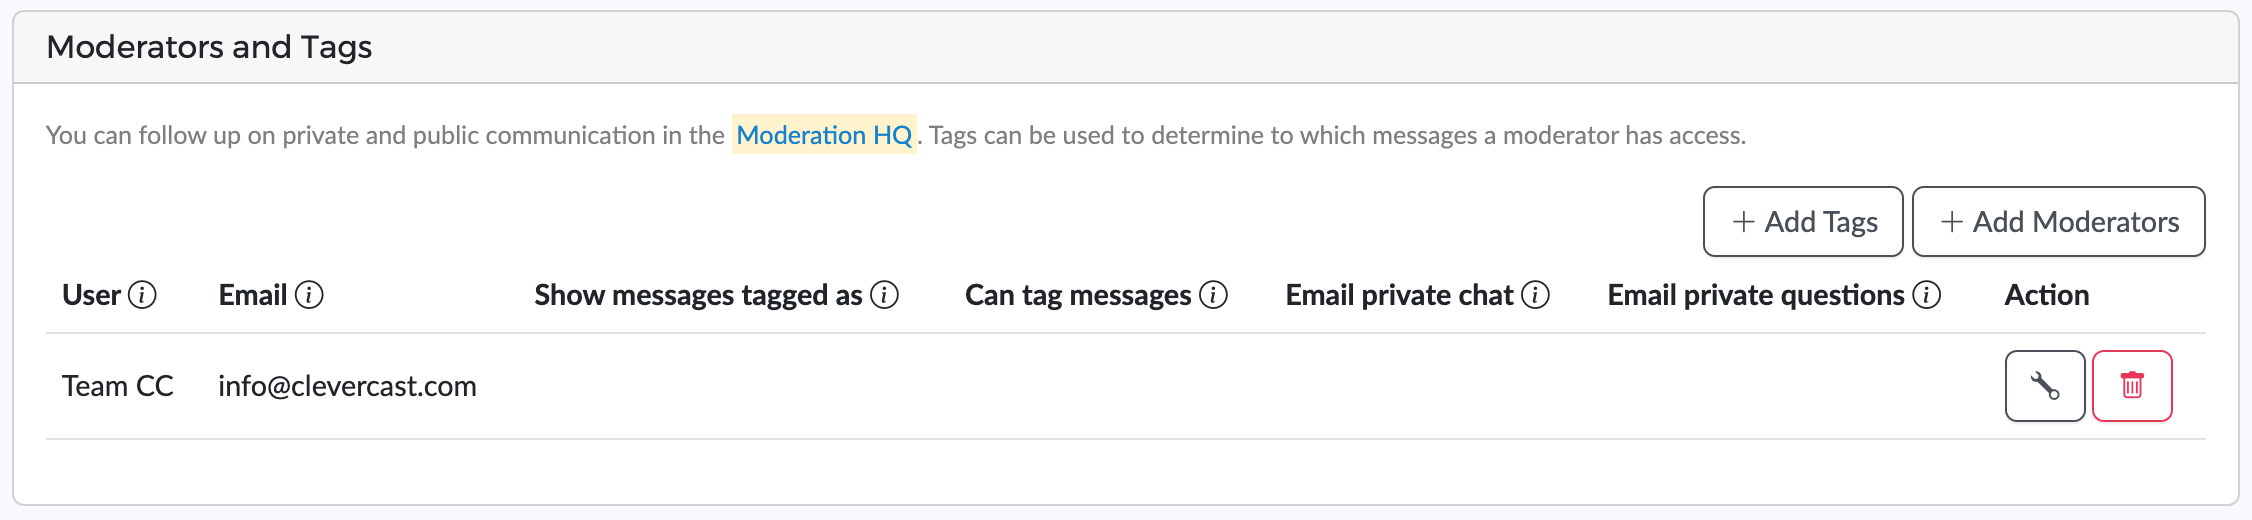
Advanced Moderation
This is an advanced option for webinars with a large number of participants, where the main moderators add tags to messages, which are followed up by other moderators.
For a simple webinar, this is unnecessary. By default, all Clevercast users with sufficient permissions can act as moderator and see all private and public messages on the Moderate Chat page (see below).
The ‘Advanced Moderation’ settings allow you to let Clevercast send all incoming private and/or public messages by email to certain moderators. They also allow you to restrict certain moderators to messages with a certain tag.
Note: the Advanced Moderation menu is only shown after you add a private or public chat tab.
Moderate Chat
The ‘Moderate Chat’ menu directs you to a separate page that allows admin users with the 'moderator' permission to moderate private and public messages. It also lets them add service messages, which are shown on top of the video player, and see the progress and results of live audience polls.
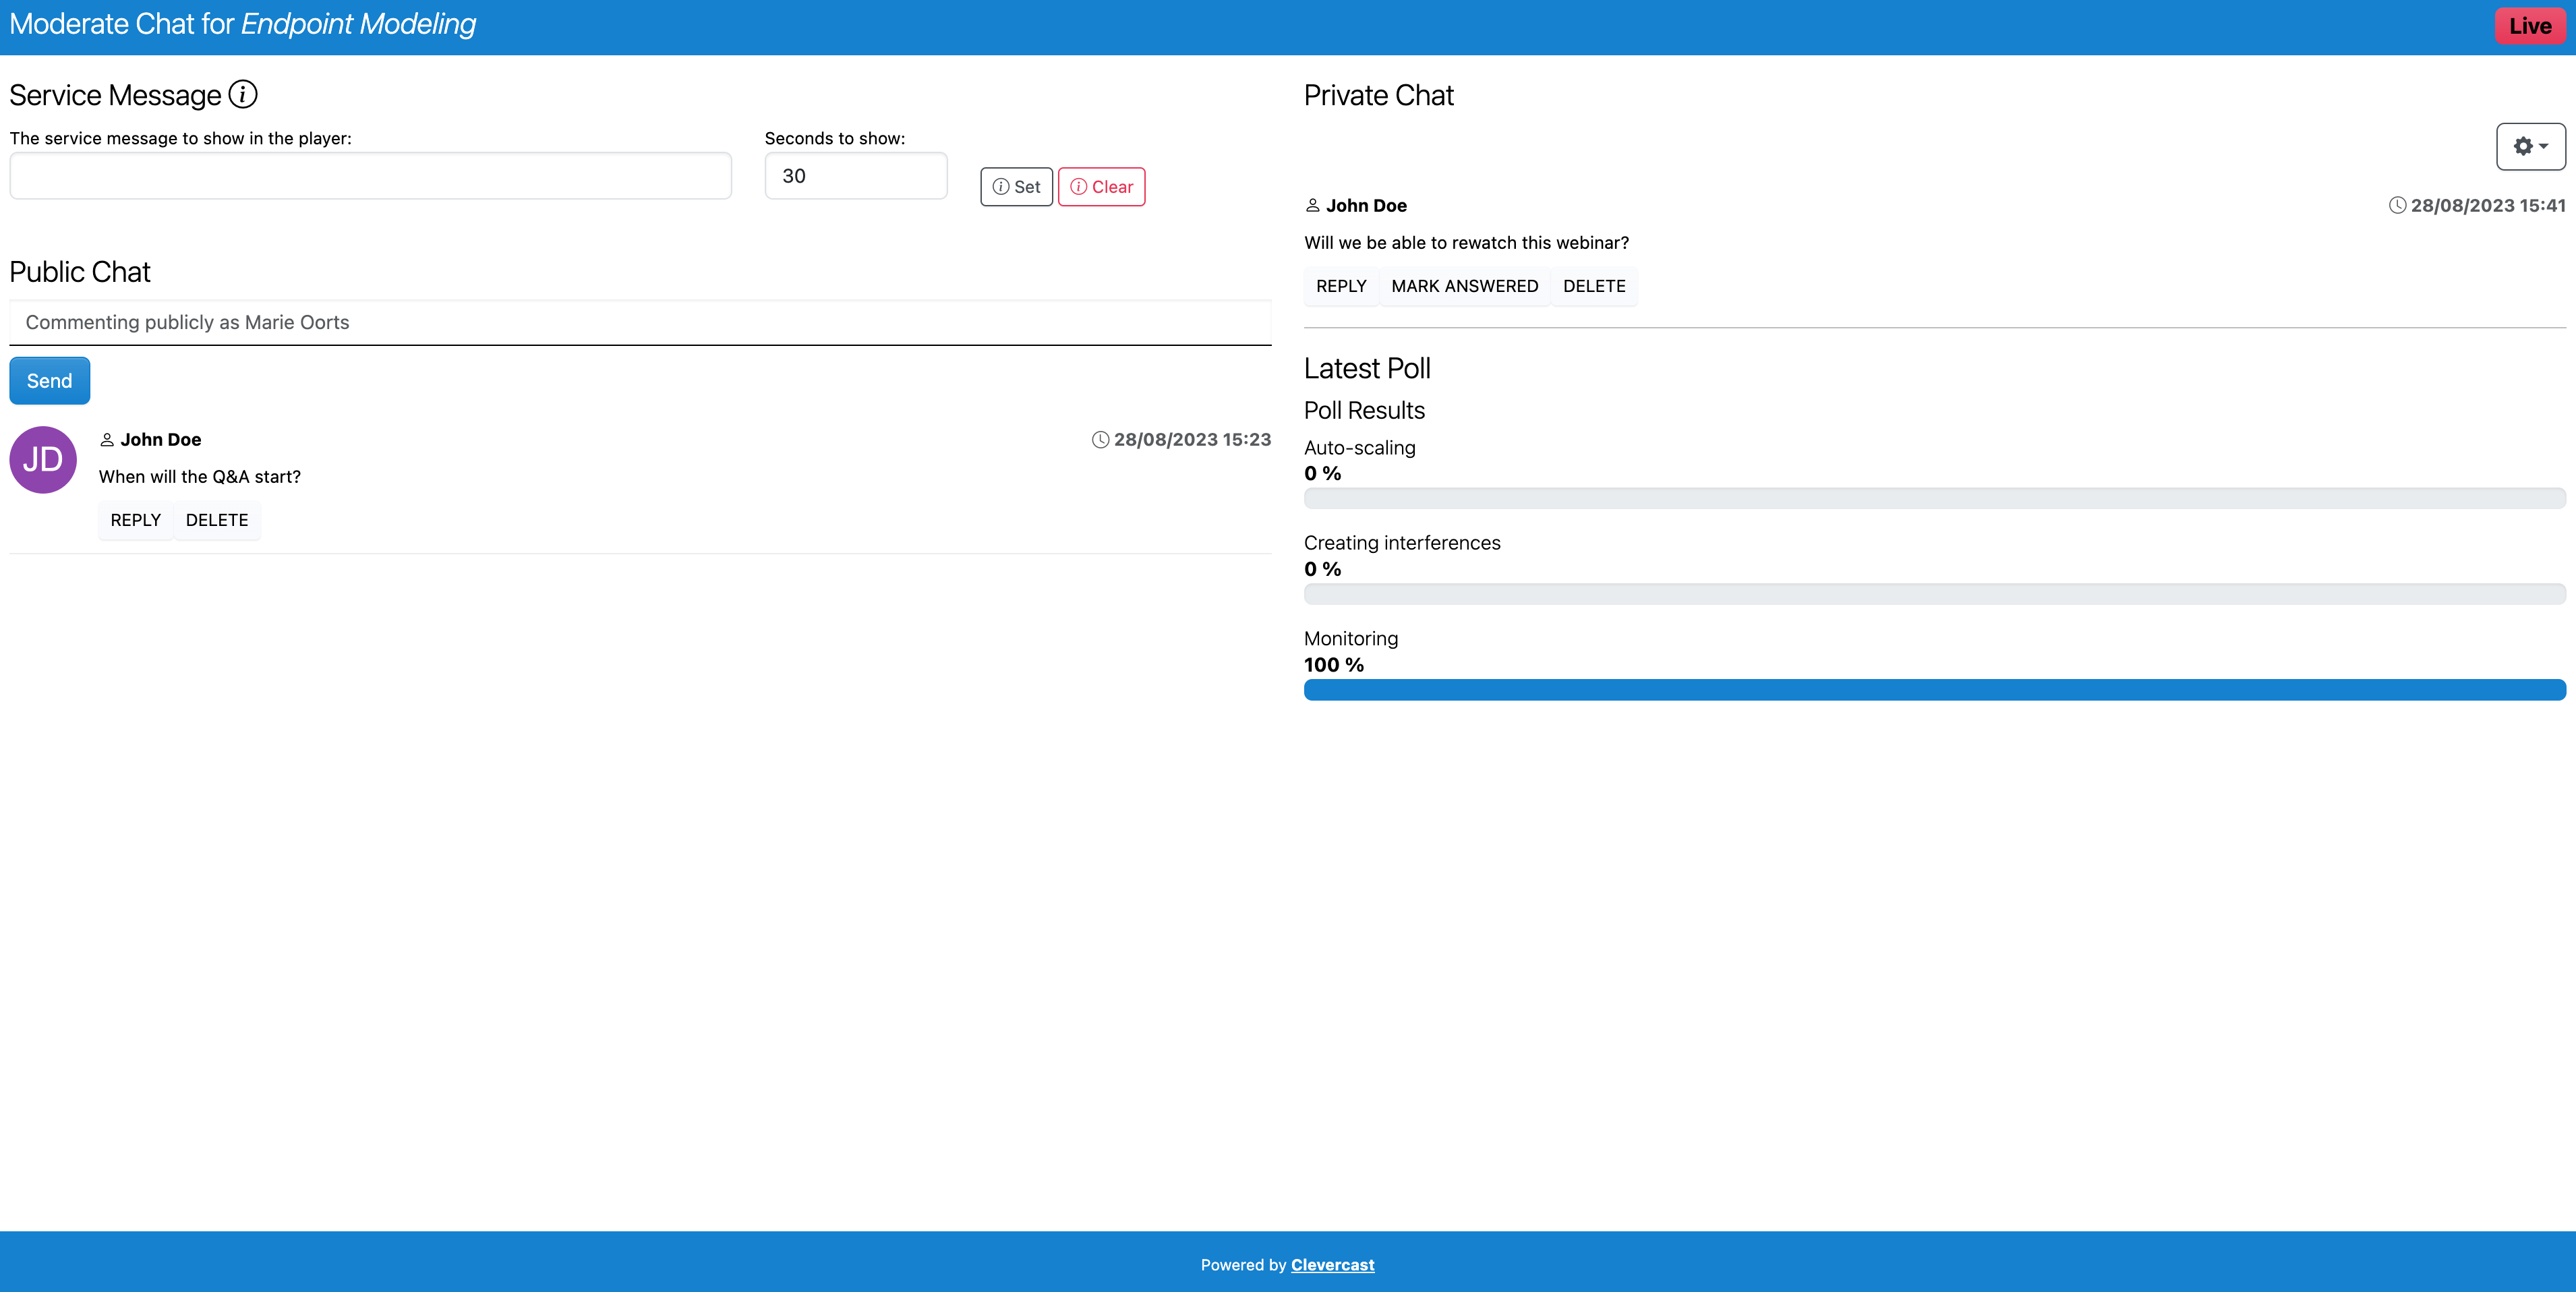
New messages will automatically appear on top of the list, no page refresh is needed. When a private chat message is answered (or marked as answered) it will disappear from the page, unless you set the option to show answered questions.
When a live webinar is started, service messages can be sent. A service message is shown to participants in the player on top of the video, during the given number of seconds or infinitely (until you unset it). They can be used in case of technical problems or to pass on additional information. Since they are shown in the video player, they are also visible to those who watch fullscreen.
Clevercast allows you to create users with a ‘Moderator’ role whose access is limited to the 'Moderate Chat' page.
Live
Before you start
A webinar always has a certain event status, which determines:
- if you can start broadcasting
- what your viewers can see in the player embedded on the webinar page
- if language rooms are available to interpreters, subtitlers and correctors
- when a cloud recording is made
We strongly recommend to first read our guide on how to manage a live event about the status of an event and when to update it.
The Live menus
The Live menu consists of a number of sub-menus, which allow you to manage the different aspect of a live stream. Which menus and settings are available depends on the webinar's broadcast protocol and the features of your plan.
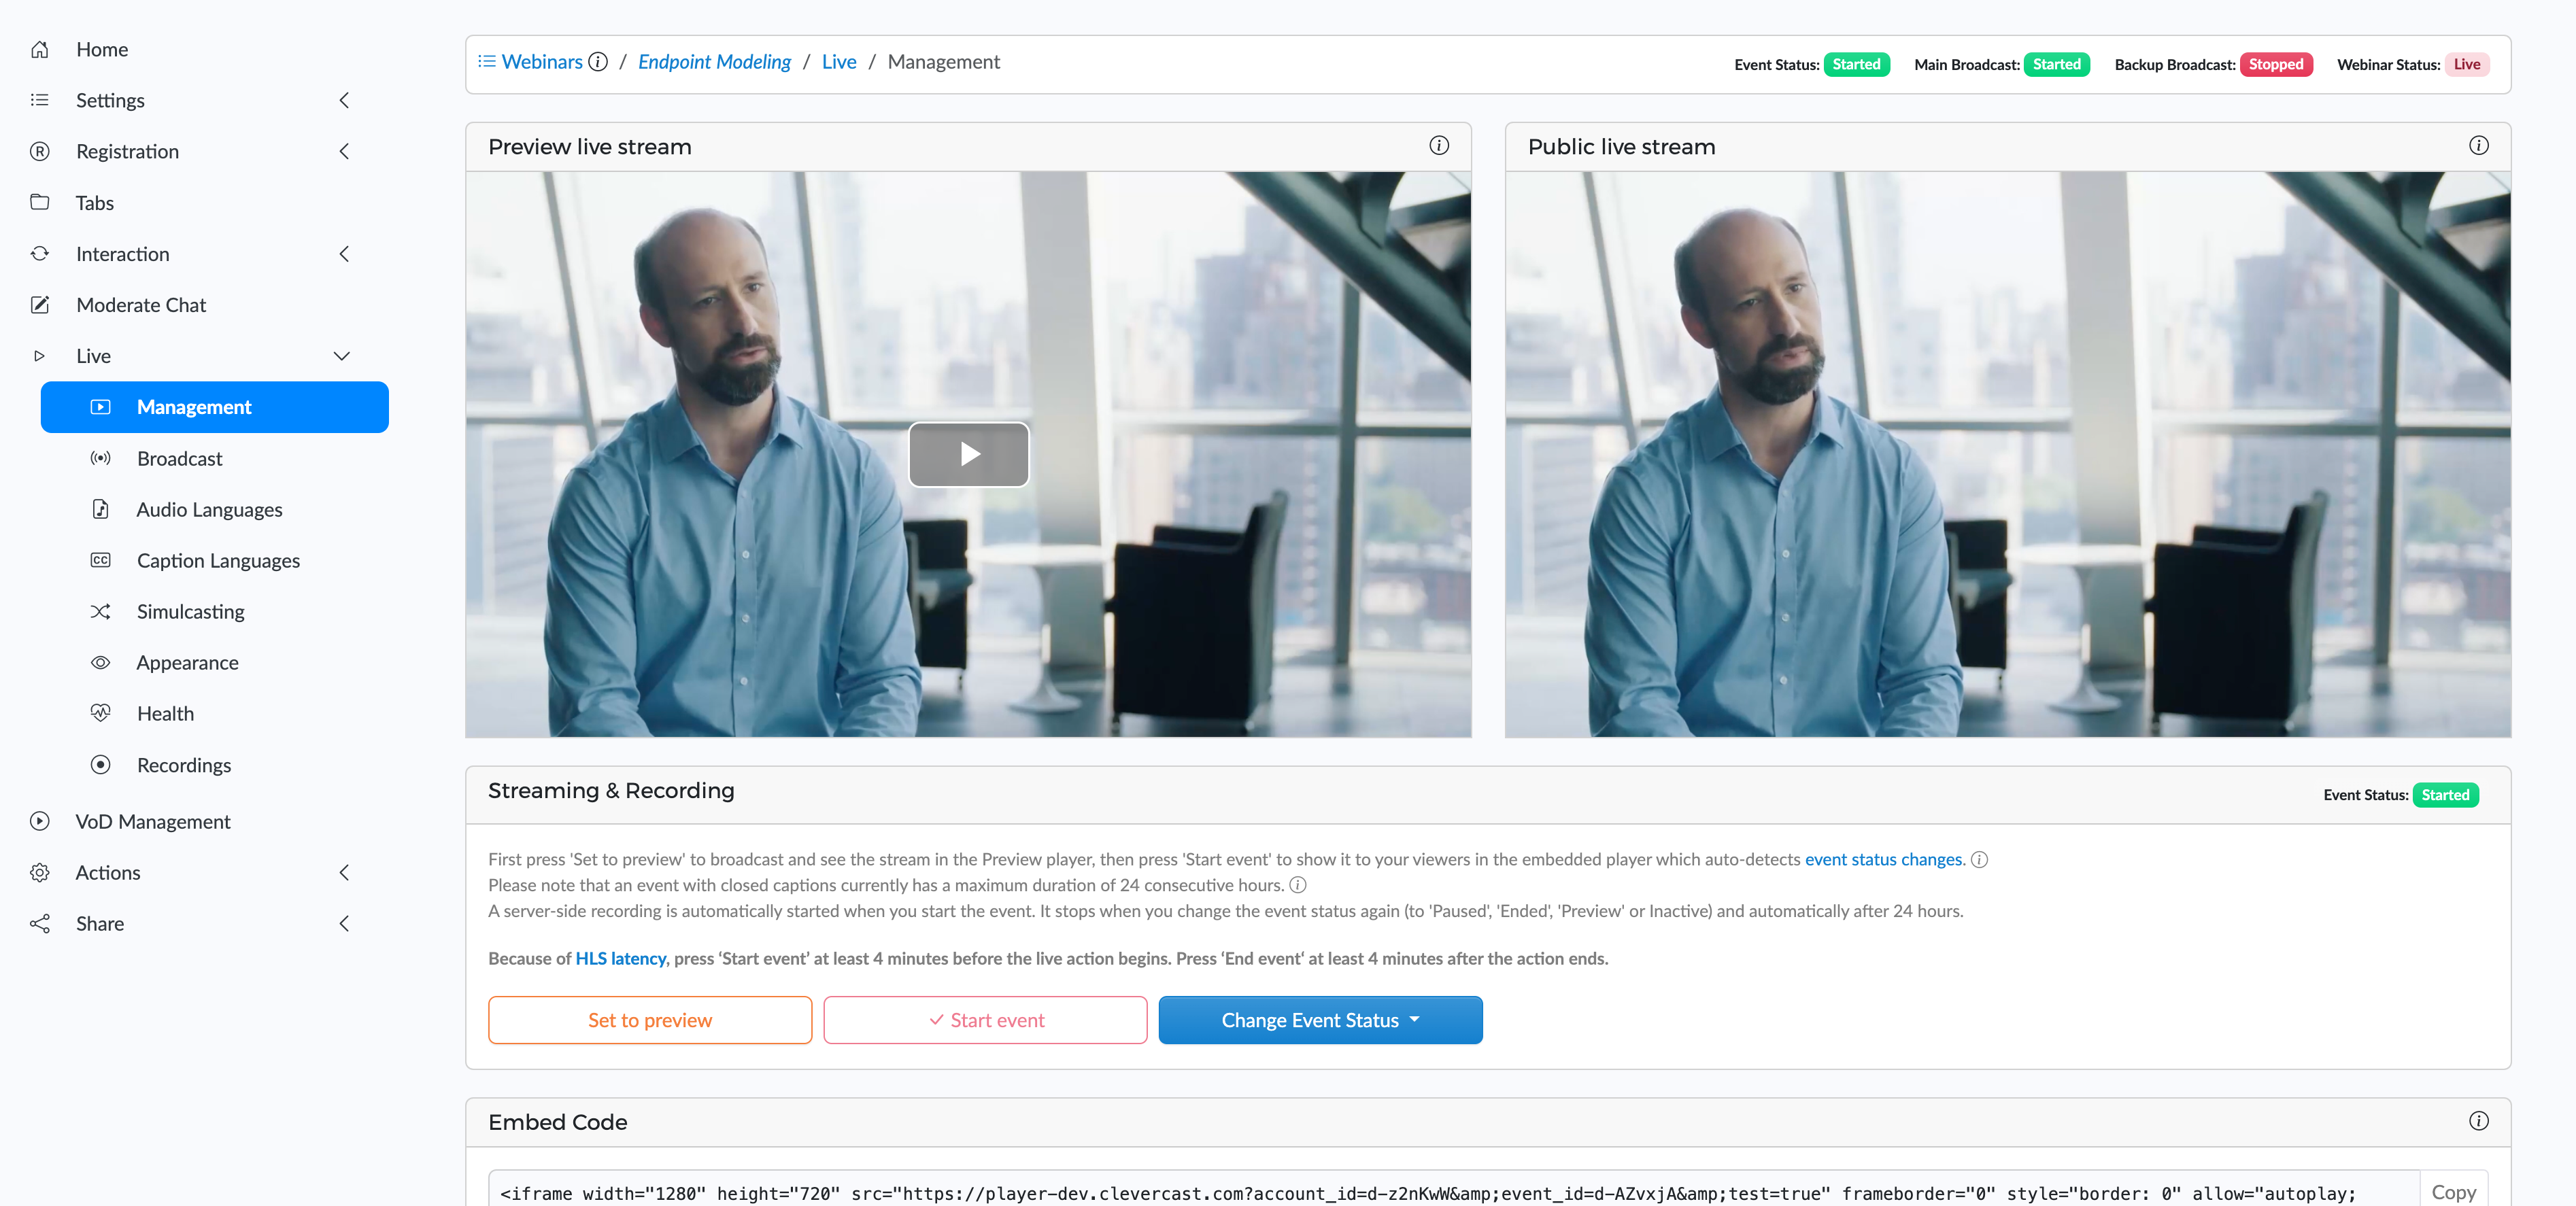
In addition to the webinar status, all tabs display the current event status and the main and backup broadcast statuses. When a broadcast is being received by Clevercast, this is set to Started.

For further documentation on the Live functionality, please refer to the Event page section of the enterprise platform manual.
A webinar has the same functionality as the Event page in enterprise mode, using an embeddable player instead of a hosted webinar page, with a few minor exceptions:
- The Management tab doesn't have Name, Description and Resolutions settings. In the webinar backend, these settings are available on the General page
- The Appearance tab doesn't allow you to choose a Player profile and Viewing Profile. In the webinar backend, they are also set on the General page (inside the Configuration panel). The Appearance tab also doesn't allow you to set a scheduled start time, since the webinar already has a start time (which is used for the countdown timer).
For webinars with simulive streaming, the Management tab will contain a Set Simulive Stream panel that lets you configure the simulive stream. For more info, see the Simulive Webinars section of the simulive streaming manual.
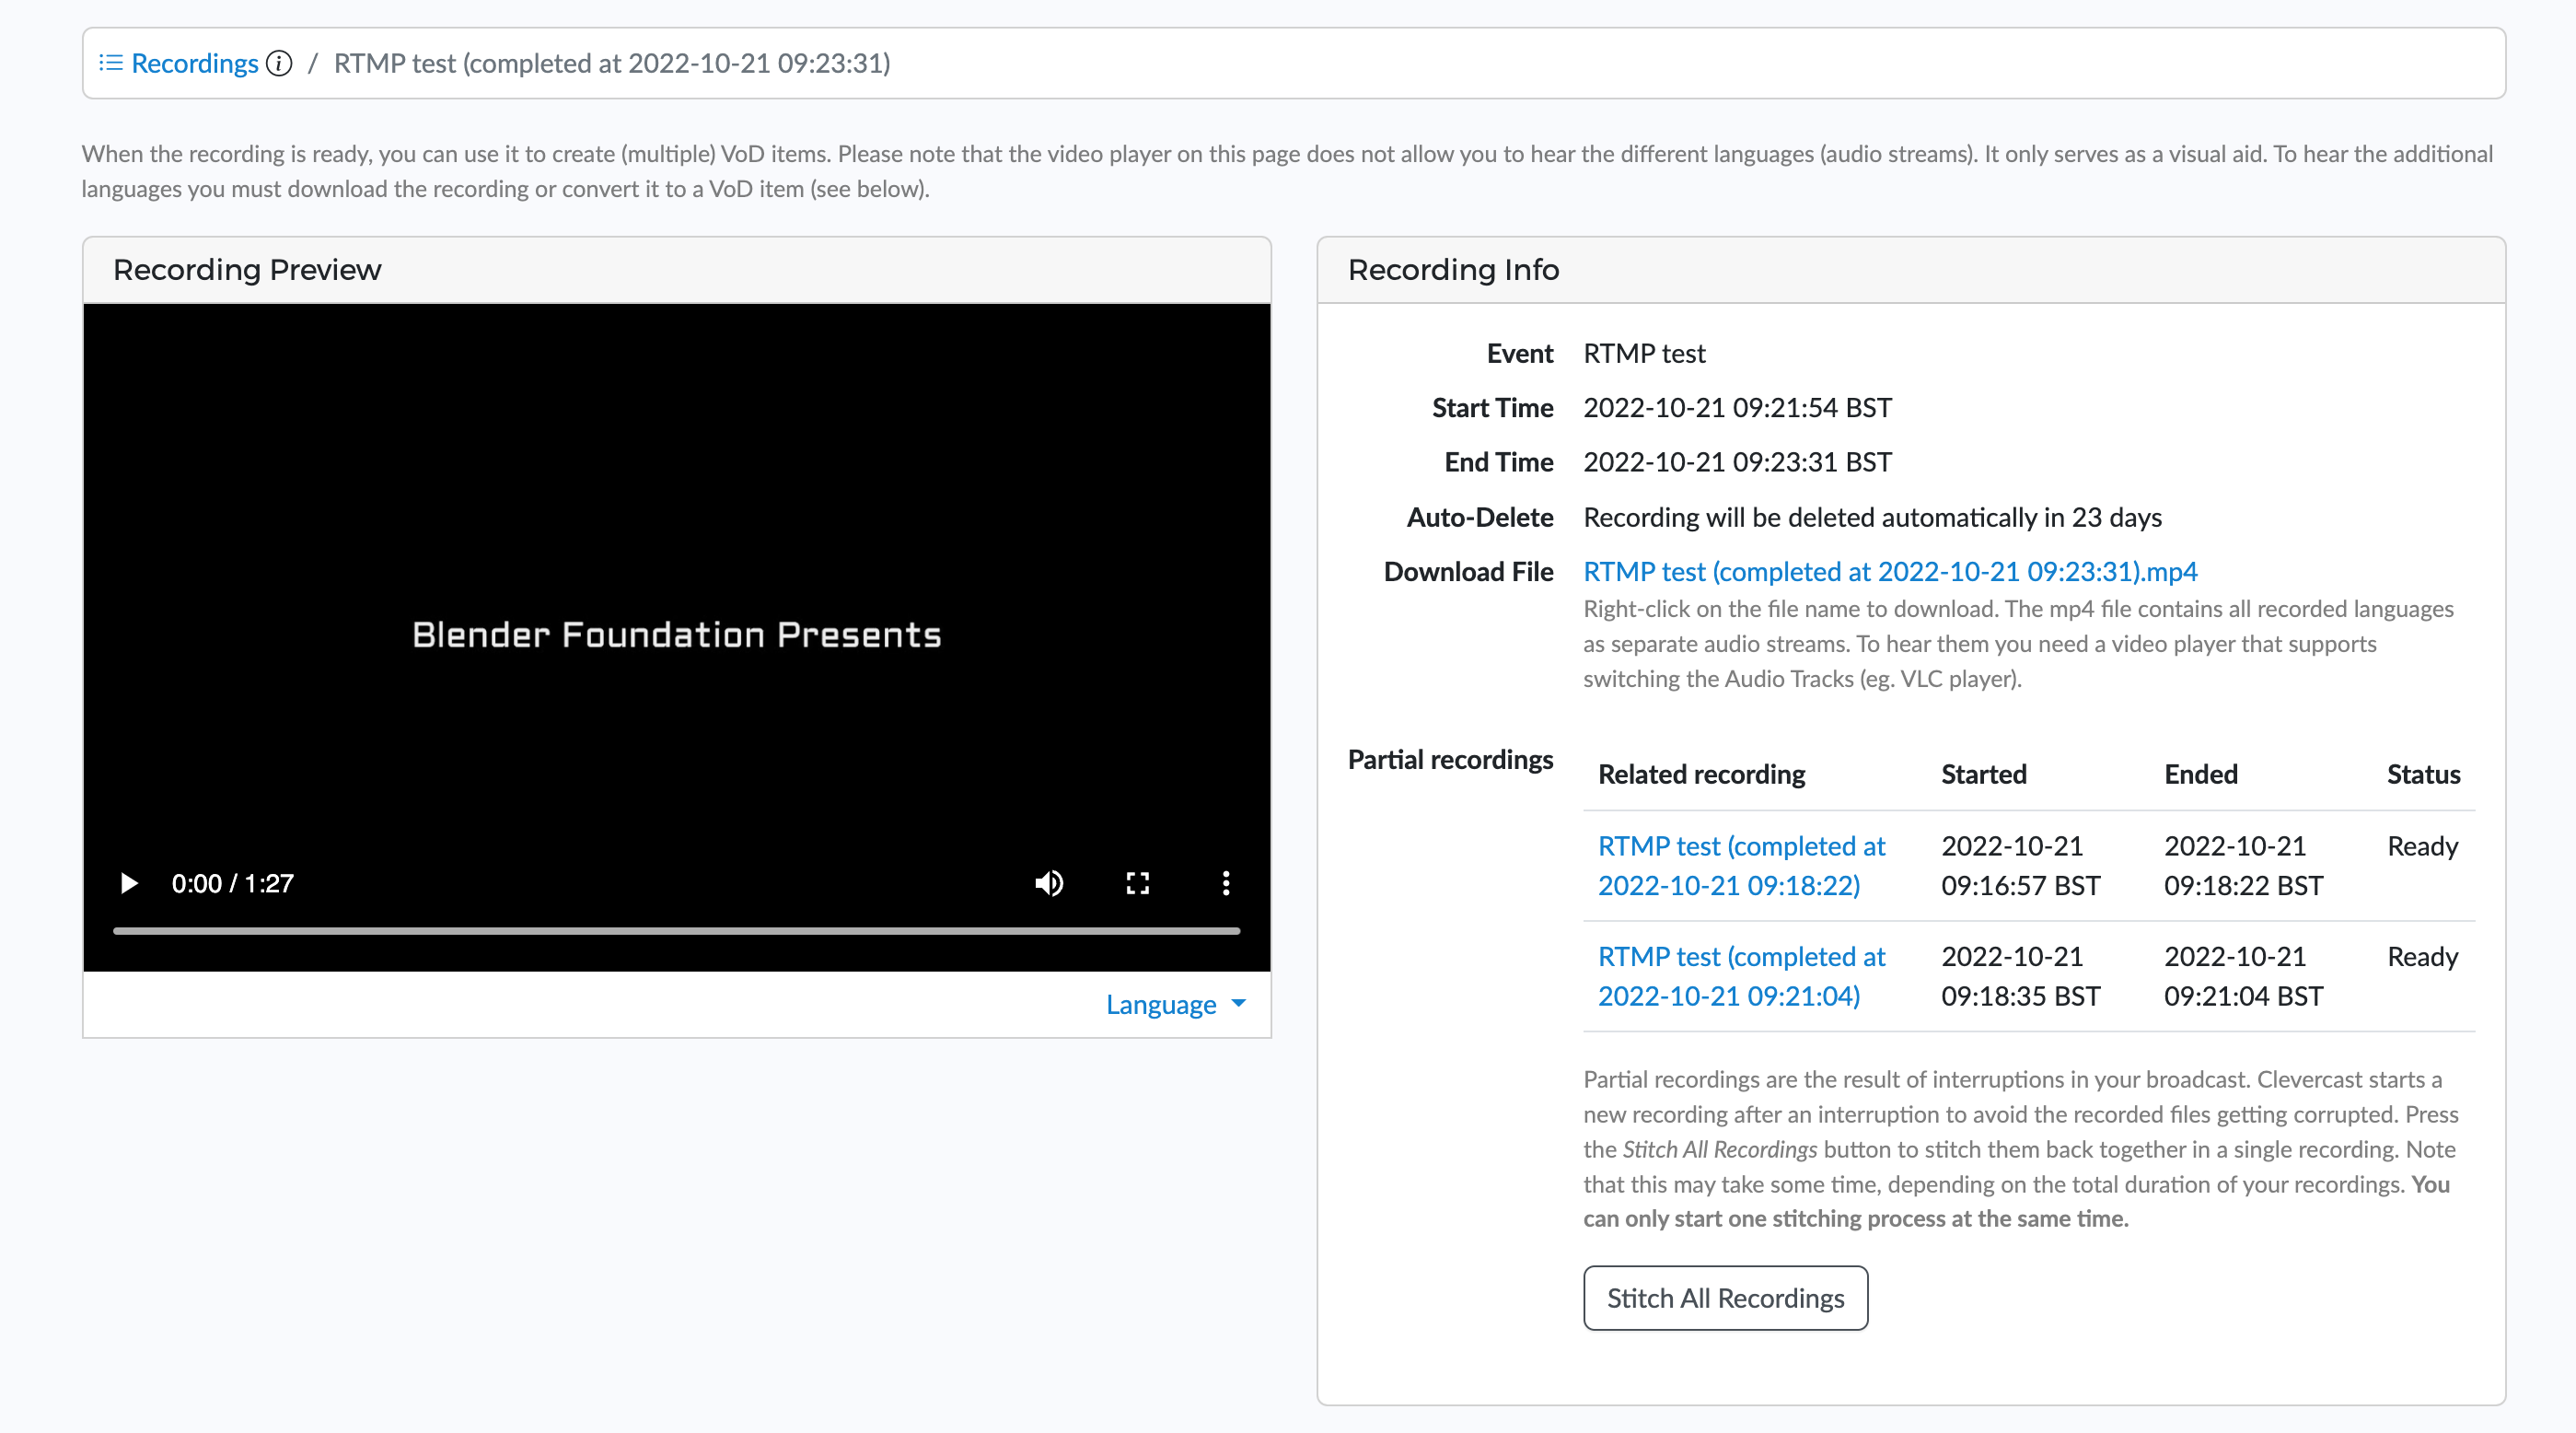
Recordings
A cloud recording is created every time you press the ‘Start event’ button. The recording can be downloaded and/or published once the event is ended or paused.
In case of a multilingual live stream, the live stream is recorded as a single mp4 file containing the video stream and all audio streams (= languages). Clevercast records the outgoing audio streams: so any background volume that is part of the live stream, will also be part of the recording (it isn’t possible to remove this afterwards).
Notes:
- the maximum duration of a recording is 24 hours! Clevercast automatically ends a recording 24 hours after you’ve started your event.
- recordings are deleted automatically after 30 days. You should publish or download them before that happens.
- we strongly recommend to always make a local recording of your stream! An online recording can be interrupted by a temporary lack of upload bandwidth or network issues, which may result in an imperfect or incomplete recording.
Partial & stitched recordings
When your broadcast to Clevercast is interrupted, Clevercast may start a new recording to avoid the recorded file becoming corrupted. This may result in two or more recordings after a live session.
In such case, Clevercast allows you to stitch the different recordings back into one single continuous recording. Note: if the broadcast interruptions were so short that they were not visible in the live stream, they will also not be visible in the stitched recording.
The easiest way to stitch a recording is to go to the detail page of a recording that has been interrupted. Apart from the recording itself, the page will show the list of partial recordings from the save live sessions. To stitch all partial recordings, press the ‘Stitch All Recordings’ button below the list. This will result in a new continuous recording that spans all partial recordings.
VoD Management
Convert cloud recording to on-demand
In most cases, a webinar will start out live and may end as Video on-Demand (VoD). By going to the VoD Management page, you can trim the webinar's last cloud recording and publish it as VoD. This involves the recording to be transcoded to multiple resolutions (for adaptive streaming) and published on the CDN. It will take some time, depending on the duration of your live stream.
On the VoD Management page, press the ‘Preview and Trim Video’ button to select the start and end point for the Video on-Demand. Then press the ‘Publish’ button to let Clevercast transcode and export the video.

If you leave the ‘Automatically set webinar status to on-demand when the video is published’ option checked, Clevercast will set the webinar status to on-demand when ready. This will automatically make the on-demand webinar available to your participants. If you uncheck this option, the webinar status will remain ‘Live - Ended’ until you manually set it to on-demand (through the Update Webinar Status dropdown on the backend's Home page).
Once an on-demand video is published, the VoD Management page lets you modify some of its properties (depending on your plan). For example, you can set another poster image which is initially shown in the player (before the video starts playing).
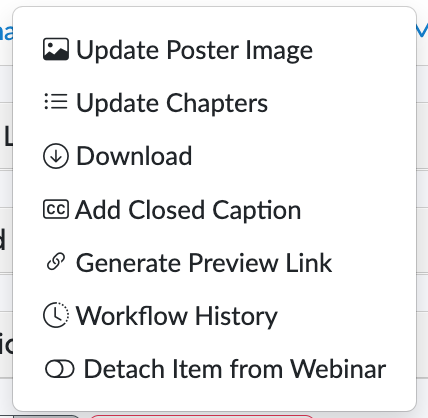
You can also add chapters to the video. Chapters allow your viewers to jump to a specific section of the video. You add a chapter by seeking to the correct position in the video and providing a title and (optionally) a description.
If you want to use another on-demand video for your webinar, you can delete the video. This will not delete the cloud recording, so you can trim and publish the recording again.
Upload video
You can also upload a video to Clevercast. As long as no video is published, the VoD Management page will let you select a video file on your computer and upload it to the webinar. The file must be transcoded to multiple resolutions (for adaptive streaming) and published on the CDN. This will take some time, depending on its duration.
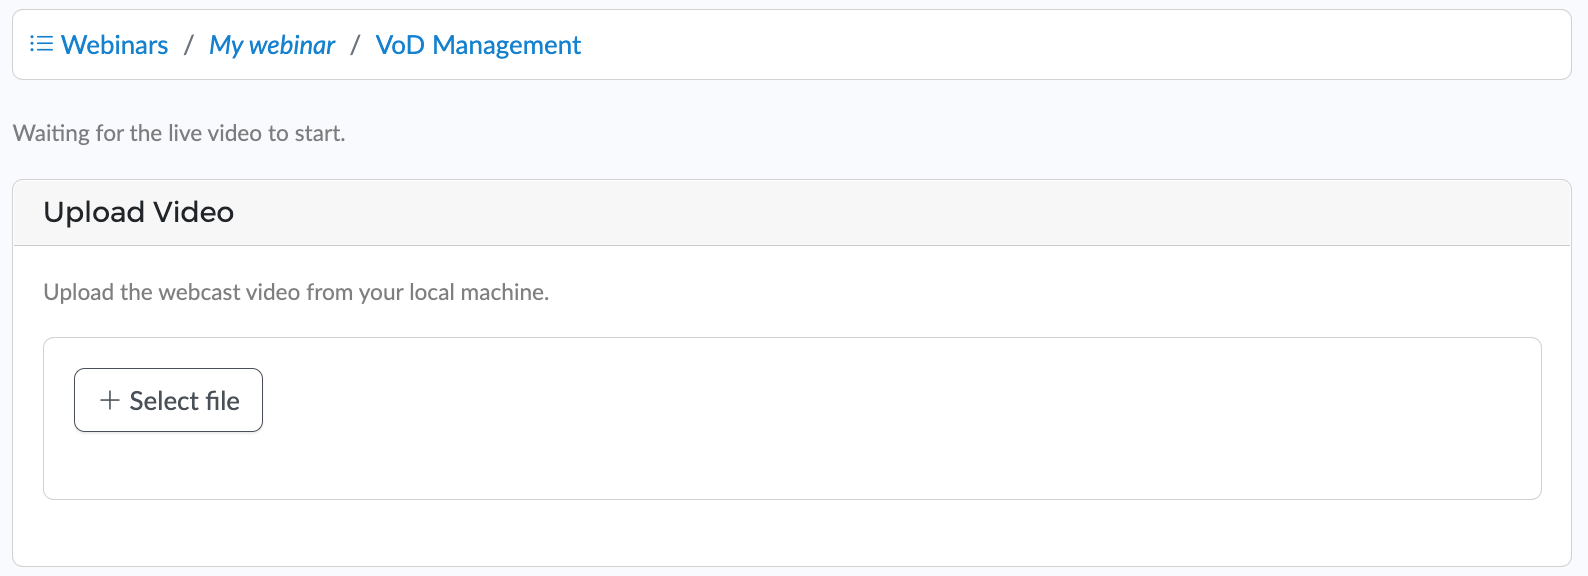
When the uploaded file has been transcoded and published, you can set the webinar status to on-demand (through the Update Webinar Status dropdown on the backend's Home page).
Advanced
Breakout webinars
Breakout webinars allow you to split up a single webinar into multiple simultaneous webinar sessions, allowing participants to freely choose between them.
Setting up breakout webinars
In most cases, the parent webinar and the breakout webinars will have the same look and feel. During the configuration process it is easier to set up the parent webinar first and then create breakout webinars based on it.
When you’re done, go to the ‘Settings > General‘ page of the parent webinar and select all of its breakout webinars (see screenshot below).

All selected webinars automatically become breakout webinars (to undo this, unselect them again).
Breakout webinars and registration
The main point of using breakout webinars is that participants can navigate to these webinars without having to register again. Therefore the parent webinar and all breakout webinars share the same registration page, emails and registrant management.
Registration configuration and management can only be done via the registration menus of the parent webinar. The registration page and emails can be configured, just like any other webinar. The same goes for managing registered participants (e.g. approving and importing them, (re)sending emails). Everything works like it does for a single webinar. All webinars can also be converted to Video on-Demand.
Statistics remain available separately for each of the webinars. The registration menu of the breakout webinars will still let you see the per-registrant statistics for the breakout webinar, so you know who watched each breakout webinar and for how long.
Accessing breakout webinars
Participants who try to access one of the webinars, without being registered, are directed to the same registration page (configured in the registration settings of the parent page). After registering they get access to the webinar, and also to all other breakout webinars.
To allow your participants to move easily from one webinar to another, you can add a Breakout tab to each of the webinars. This will automatically include a link to the parent webinar and to all the (other) breakout webinars.
Security
Clevercast’s backend application is secured according to state of the art security protocols, which are regularly updated. Clevercast always uses HTTPS and valid certificates. Within the backend, users can have different permissions according to their role.
Clevercast webinars (frontend) are streaming-only both live and as Video on-Demand. Clevercast also uses abstraction when generating webinar links, which makes them impossible to guess. When using two-step registration, participants only get access via their unique link to the webinar, which they receive by email.
Please keep in mind that a 100% waterproof solution for confidential videos doesn’t exist. Even if the video connection is secure, participants can still use screen recording software to record and share the video.
Clevercast is fully GDPR compliant