Enterprise Platform Manual
Platform overview
Clevercast is a suite of SaaS applications for Live and Video on-Demand (VoD) streaming. Clevercast Enterprise is the common name for all solutions where you embed our video player in your website or in a third-party application, by copying our embed code or by using our Player API. This includes our solutions for Multilingual and Simulive streaming.
This manual describes how to use Clevercast Enterprise. If you need a fully hosted solution for single-language or multilingual events, see the manual for our Webinar Platform.
Clevercast is perfectly suited for global audiences. For the delivery of streams to your viewers, we use global CDNs with local edge servers all over the globe. This guarantees a fast connection to every viewer’s location.
All Clevercast plans share the same basic platform, user interface and menu structure. Depending on your plan, additional menus, pages and features may be available. Note that this manual contains information for all different types of enterprise plans. Some sections will only be relevant if the features are part of your plan.
This overview describes the top-level menus and briefly explains the terminology used in Clevercast.
The Dashboard page
The enterprise platform is only accessible to admin users with valid login credentials. After logging in, a user is directed to the dashboard. The contents of the dashboard depend on your plan and permissions.
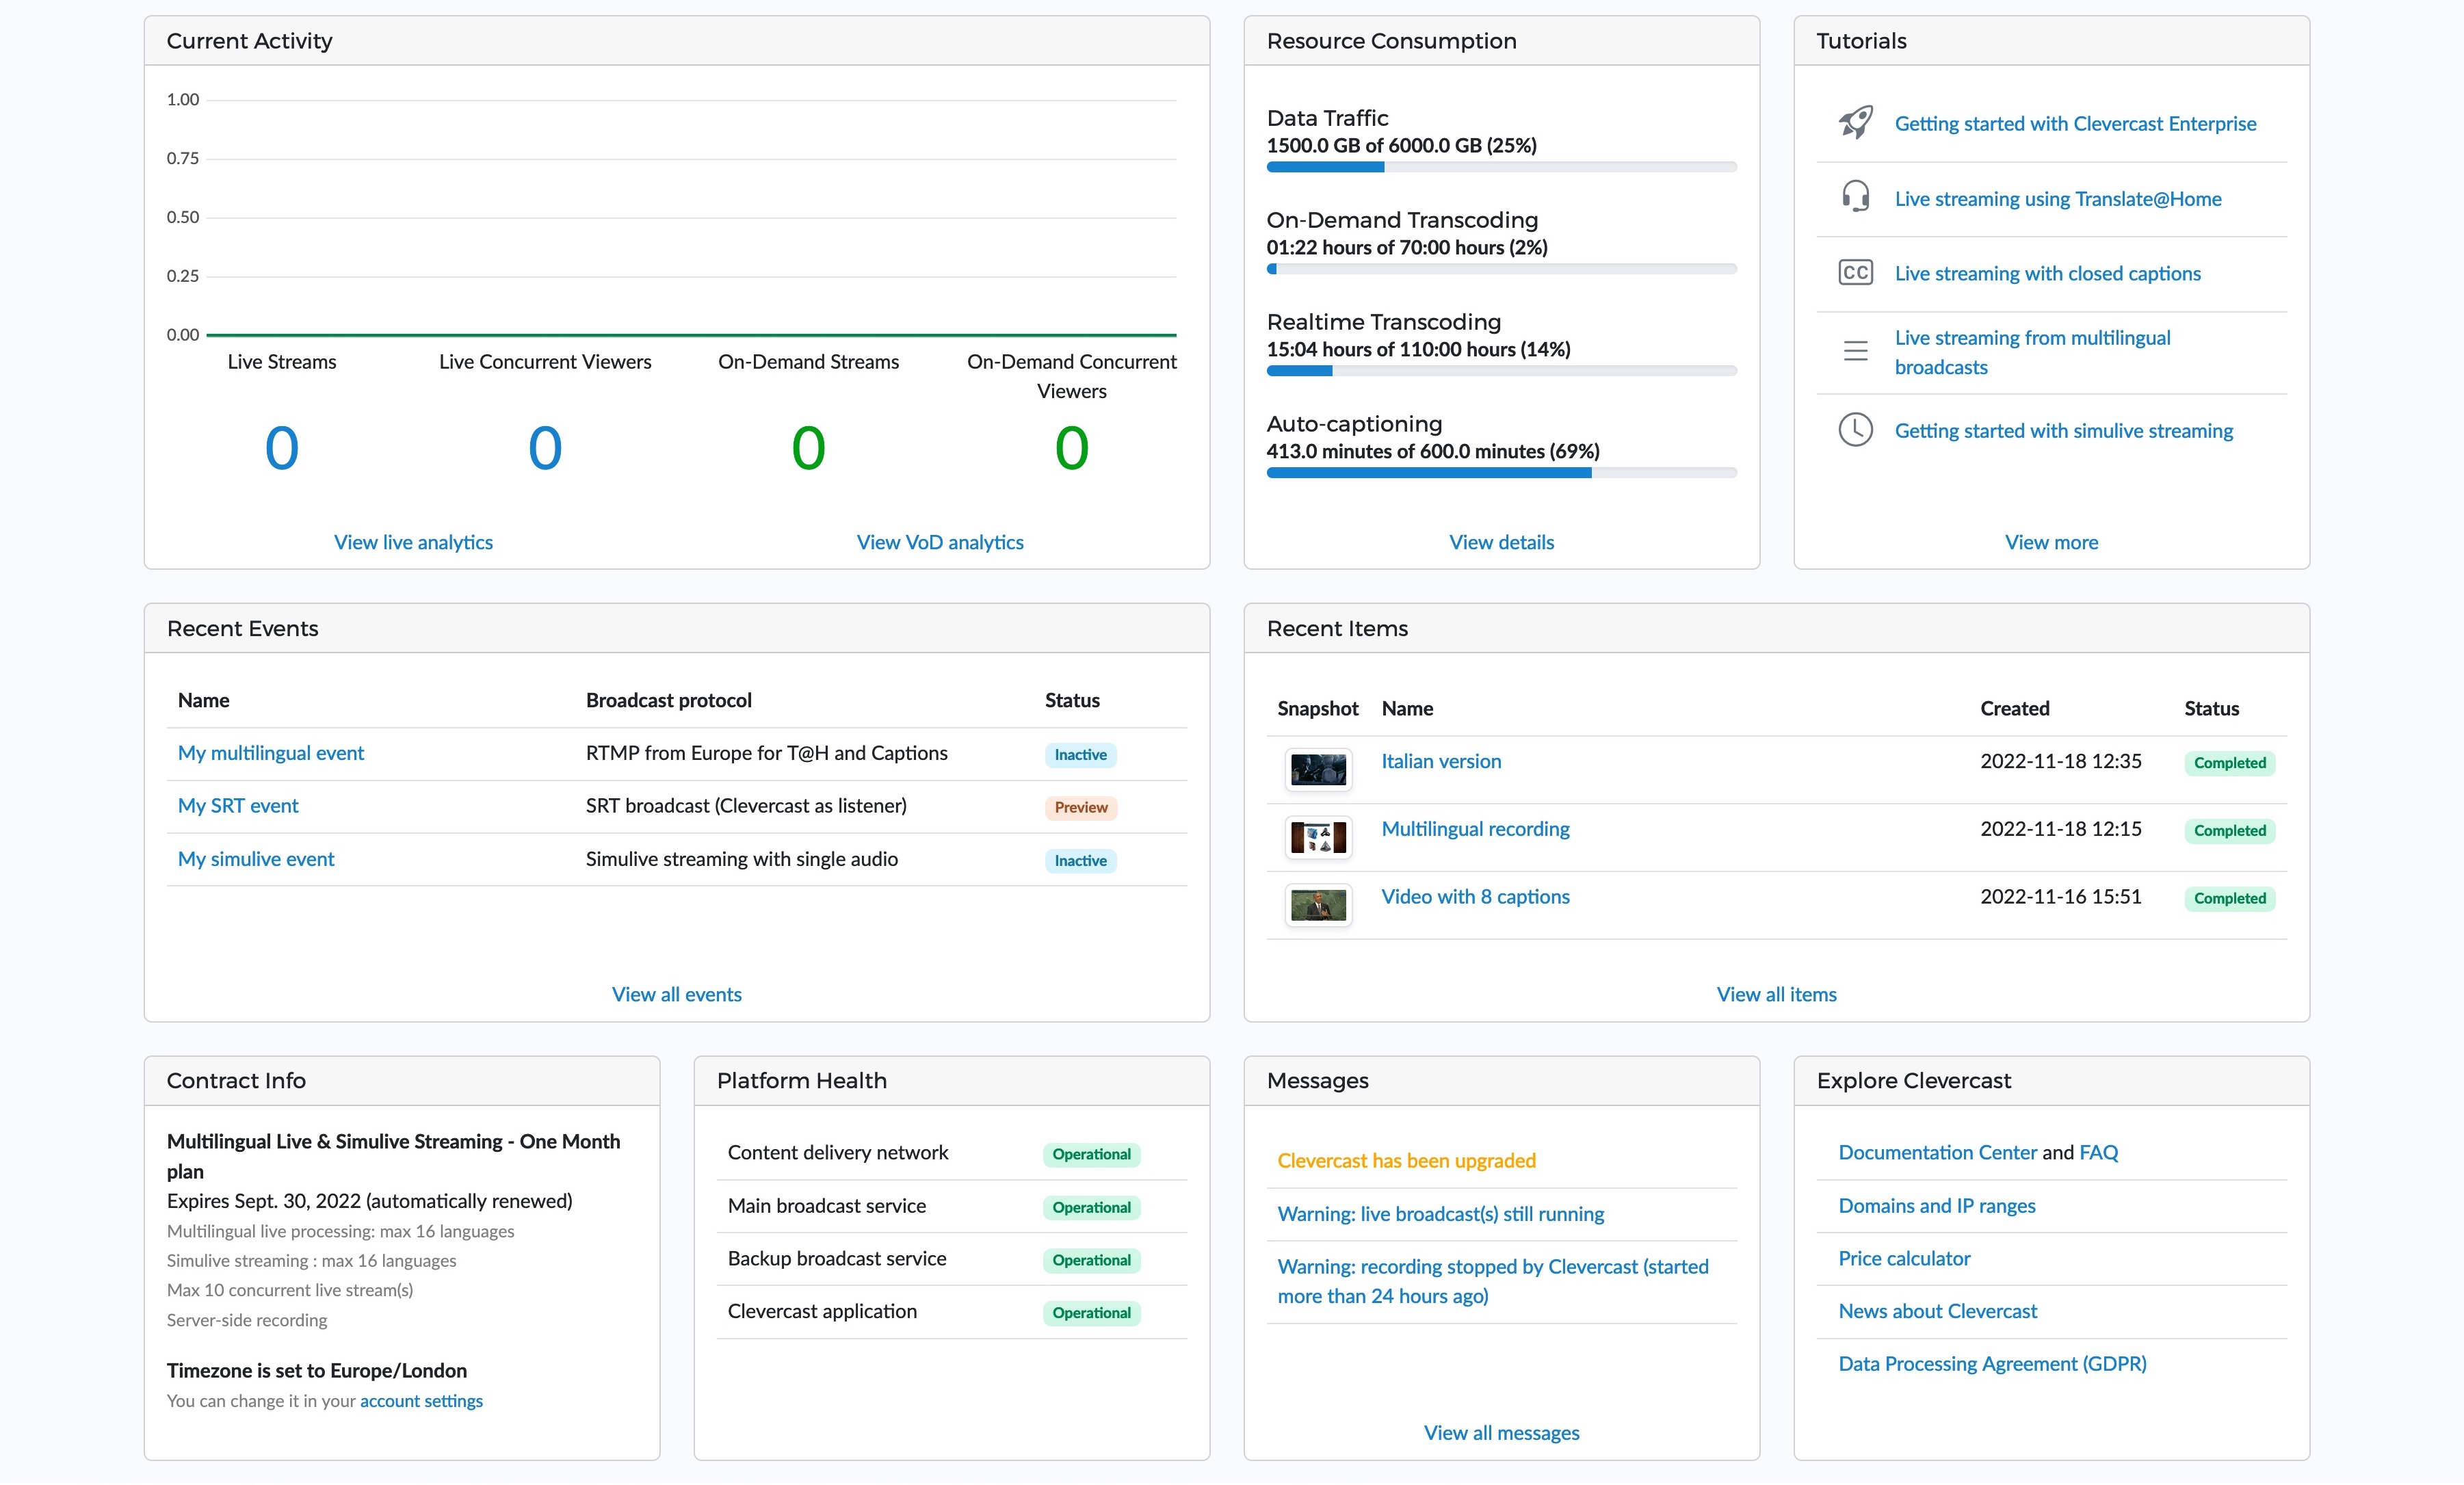
The dashboard panels contain links, allowing you to go directly to a specific menu and page. On top of the page are the top-level menus, which allow you to navigate through the platform.
The Media menus
The ‘Media’ menu has a number of submenus. Most of them serve to manage your Video on-Demand media (items, tags, playlists, workflow profiles). Additionally, the ‘player’ and ‘viewing profiles’ menus determine how the embedded Clevercast player is rendered (for both VoD items and live events).
Note that access to some of these sub-menus may depend on your plan:
- Items: this allows you to manage your account’s Video on-Demand items. Each media file (= video, audio or image) made available through Clevercast for on-demand viewing is called an item. Internally, each item refers to the file(s) on the CDN used for streaming. It also contains metadata concerning the item's content (e.g. title, description, tags), its rendering and accessibility (e.g. privacy, player, viewing profile) and the way it is processed (e.g. workflow profile).
- Tags are keywords which can be automatically or manually assigned to items. They let you order and filter items and do bulk actions on them.
- Players: a player profile determines the way the embedded player looks and behaves. Two built-in players are available when your account is created. The 'Default' player is assigned to every VoD item and playlist you create. The 'Default Live' player is assigned to every live event. Read our guide on how to embed and configure the player for more info.
- Viewing profiles: a viewing profile allows you to limit the accessibility of a VoD or live in the embedded player. By creating a viewing profile, you can whitelist and blacklist viewers based on their domain, IP address and country. By default, the built-in 'Public' viewing profile is used, which doesn't limit accessibility.
- Playlists: a playlist profile allows you to show multiple VoD items in a single embedded player, with a menu that allows viewers to jump to separate items in the playlist.
- Workflow profiles: a workflow profile defines the sequence of tasks and actions that are automatically executed after a new media VoD source is ingested. Note that workflow profiles are mainly intended for long-running plans with lots of videos. For most purposes, you can just use the default workflow profile that comes with your account.
The Upload menu
This allows you to upload source files for a VoD item. After a video source is uploaded, it is automatically transcoded to multiple resolutions for adaptive streaming and published on the Content Delivery Network (CDN). See the VoD Items section below for more info.
The Live menus
- Events: the Events menu lets you create and manage live streams. You can use the same event for consecutive live streams or create separate events, which has the advantage that you get separate analytics for each live stream. Unless specified otherwise in your plan, your account allows for one simultaneous live stream. This means that you cannot broadcast to two events at the same time.
- Recordings: all Clevercast plans include cloud recording of live streams. Depending on your plan, this lets you download the recordings and/or publish them as VoD items.
- T@H connection tests: this menu is only available if your plan includes Translate@Home. It allows you to test if an internet connection suffices for remote simultaneous interpretation.
The Analytics menus
This contains the following sub-menus:
- Active Livestreams: shows the viewers currently watching a live stream through Clevercast player
- Finished Livestreams: detailed statistics about live streams that are finished.
- Currently Watched VoD: shows the viewers currently watching a VoD item through Clevercast player
- Previously Watched VoD: detailed statistics about VoD items watched in the past.
For more info, see the analytics tutorial.
The Account menus
This contains the following sub-menus:
- Overview: contains information about your plan, the resources usage of your account (like live processing hours) and daily data traffic
- Settings: lets you determine the general behaviour of your account and allows creating FTP hotfolders
- Roles: roles consist of permissions which let you restrict user access to certain aspects of the application. Users with the default ‘Admin’ role have access to all menus and pages.
- Users: allows you to create and manage users and assign roles to them. Users log in with their email address and password. If the user's role includes the ‘Change Password’ permission, a user is allowed to change her own password.
- API: access to Clevercast’s browseable and self-documented REST API (if included in your plan).
- Include Files: lets you publish small files (eg. CSS files, images) on our CDN, so you can use them for other purposes (e.g. player or webinar styling).
Note for advanced purposes: a role's access to VoD items can also be limited based on workflow profiles. If a role doesn't have access to a certain profile, it also doesn't have access to any item with that workflow profile.
Clevercast Player
Use of Clevercast Player is included in all plans. It is based on popular open source projects Video.js and Hls.js. Clevercast player can be used to deliver (live) video and audio, embedded in a site or third-party platform. It ensures an optimal experience on all screens and devices.
Clevercast player can be embedded by using an iframe (inline frame). To display a VoD item, playlist or live event on your website, just copy its embed code from the page in Clevercast. The player profile determines the way the embedded player looks and behaves. You can also use the Player API to instantiate the player and/or modify its behavior.
For more info, see our guide on embedding and configuring the player. Clevercast can be used with an ad server that supports HTTPS delivery.
Adaptive Streaming
Live and on-demand video is delivered using the HTTP Live Streaming (HLS) protocol, in order to display the most suitable video stream on any device at any time. When rendering the video, the player is able to switch dynamically between streams with a different resolution and choose the most suitable one for the playback device (depending on screen size and available bandwidth, memory, available CPU and GPU resources).
The player supports High Definition (HD) video, both live and on-demand. The use of adaptive bitrate streaming allows viewers with non-HD compliant devices or insufficient bandwidth to watch videos in a lower resolution. For further explanations, see our website.
Video on-Demand Items
Source file ingest
VoD items are created by processing a source file, which can be ingested in a number of ways:
- HTTPS upload via the upload menu) in Clevercast
- FTP Upload through hotfolders (see below)
- Conversion of the cloud recording of a live stream (if part of your plan)
- Upload via the API (if part of your plan)
In each of these cases, the video or audio source is automatically transcoded by Clevercast to multiple resolutions for adaptive streaming (using the settings in your workflow profile) and published on the Content Delivery Network (CDN). This may take some time, depending on the resolution and duration of your source file.
Clevercast supports ingest of most modern video source formats. In general, we recommend the following format for 1080p video sources:
- Container: MP4
- Resolution: 1920x1080 px
- Codec: H.264 Main or High profile
- Frame Rate: 25 fps
- Video Bitrate: 8-10 Mbps (or lower, depending on your video quality)
- Keyframe: 2 Seconds
- Audio Bitrate: 128 Kbps / 48 kHz
- Audio Format: stereo
- Audio Codec: AAC
HTTP uploads
The Upload menu allows you to upload source files for a VoD item over HTTP. HTTP uploads are limited to files up to 200 GB. For larger files, you should use FTP instead.
For multilingual accounts, select the correct audio language in the upload form.
FTP uploads through Hotfolders
The Account > Settings page allows you to create and configure hotfolders, for the upload of media files via FTP(S). Each hotfolder comes with a set of FTP(S) credentials (username/password) and a workflow profile, which will be used for processing the uploaded files.
Note that the name of files uploaded to hotfolders may only contain alphanumeric characters, dots (.), hyphens (-) and underscores (_). Files that do not comply with these rules will be renamed automatically by our FTP server (all conflicting characters will be replaced by an underscore).
To create an FTP hotfolder, select Account > Settings in the top-level menu. On the ‘Settings’ page, click open the ‘Hotfolders’ panel and press the ‘Create New Hotfolder’ button. Clevercast will display the domain name of the FTP server and the username and password for FTP authentication.

Once a file is completely uploaded to the hotfolder, Clevercast will move the file (so it will no longer be visible by your FTP client) and turn it into a VoD item.
The Items list
When a source file has been uploaded (or you start converting a recording), Clevercast creates an Item that lets you see the transcoding status, preview the transcoded video and manage its metadata.
The new item is automatically added to the items list. The items list allows you to search or filter existing items and to execute batch actions on selected items (e.g. add or remove tags, update privacy, viewing profile, player settings).
The Item page
Item management
Every item has a detail page, where you can update the item properties, copy the embed code, set the snapshot (poster image), add chapters, see metadata, etc.
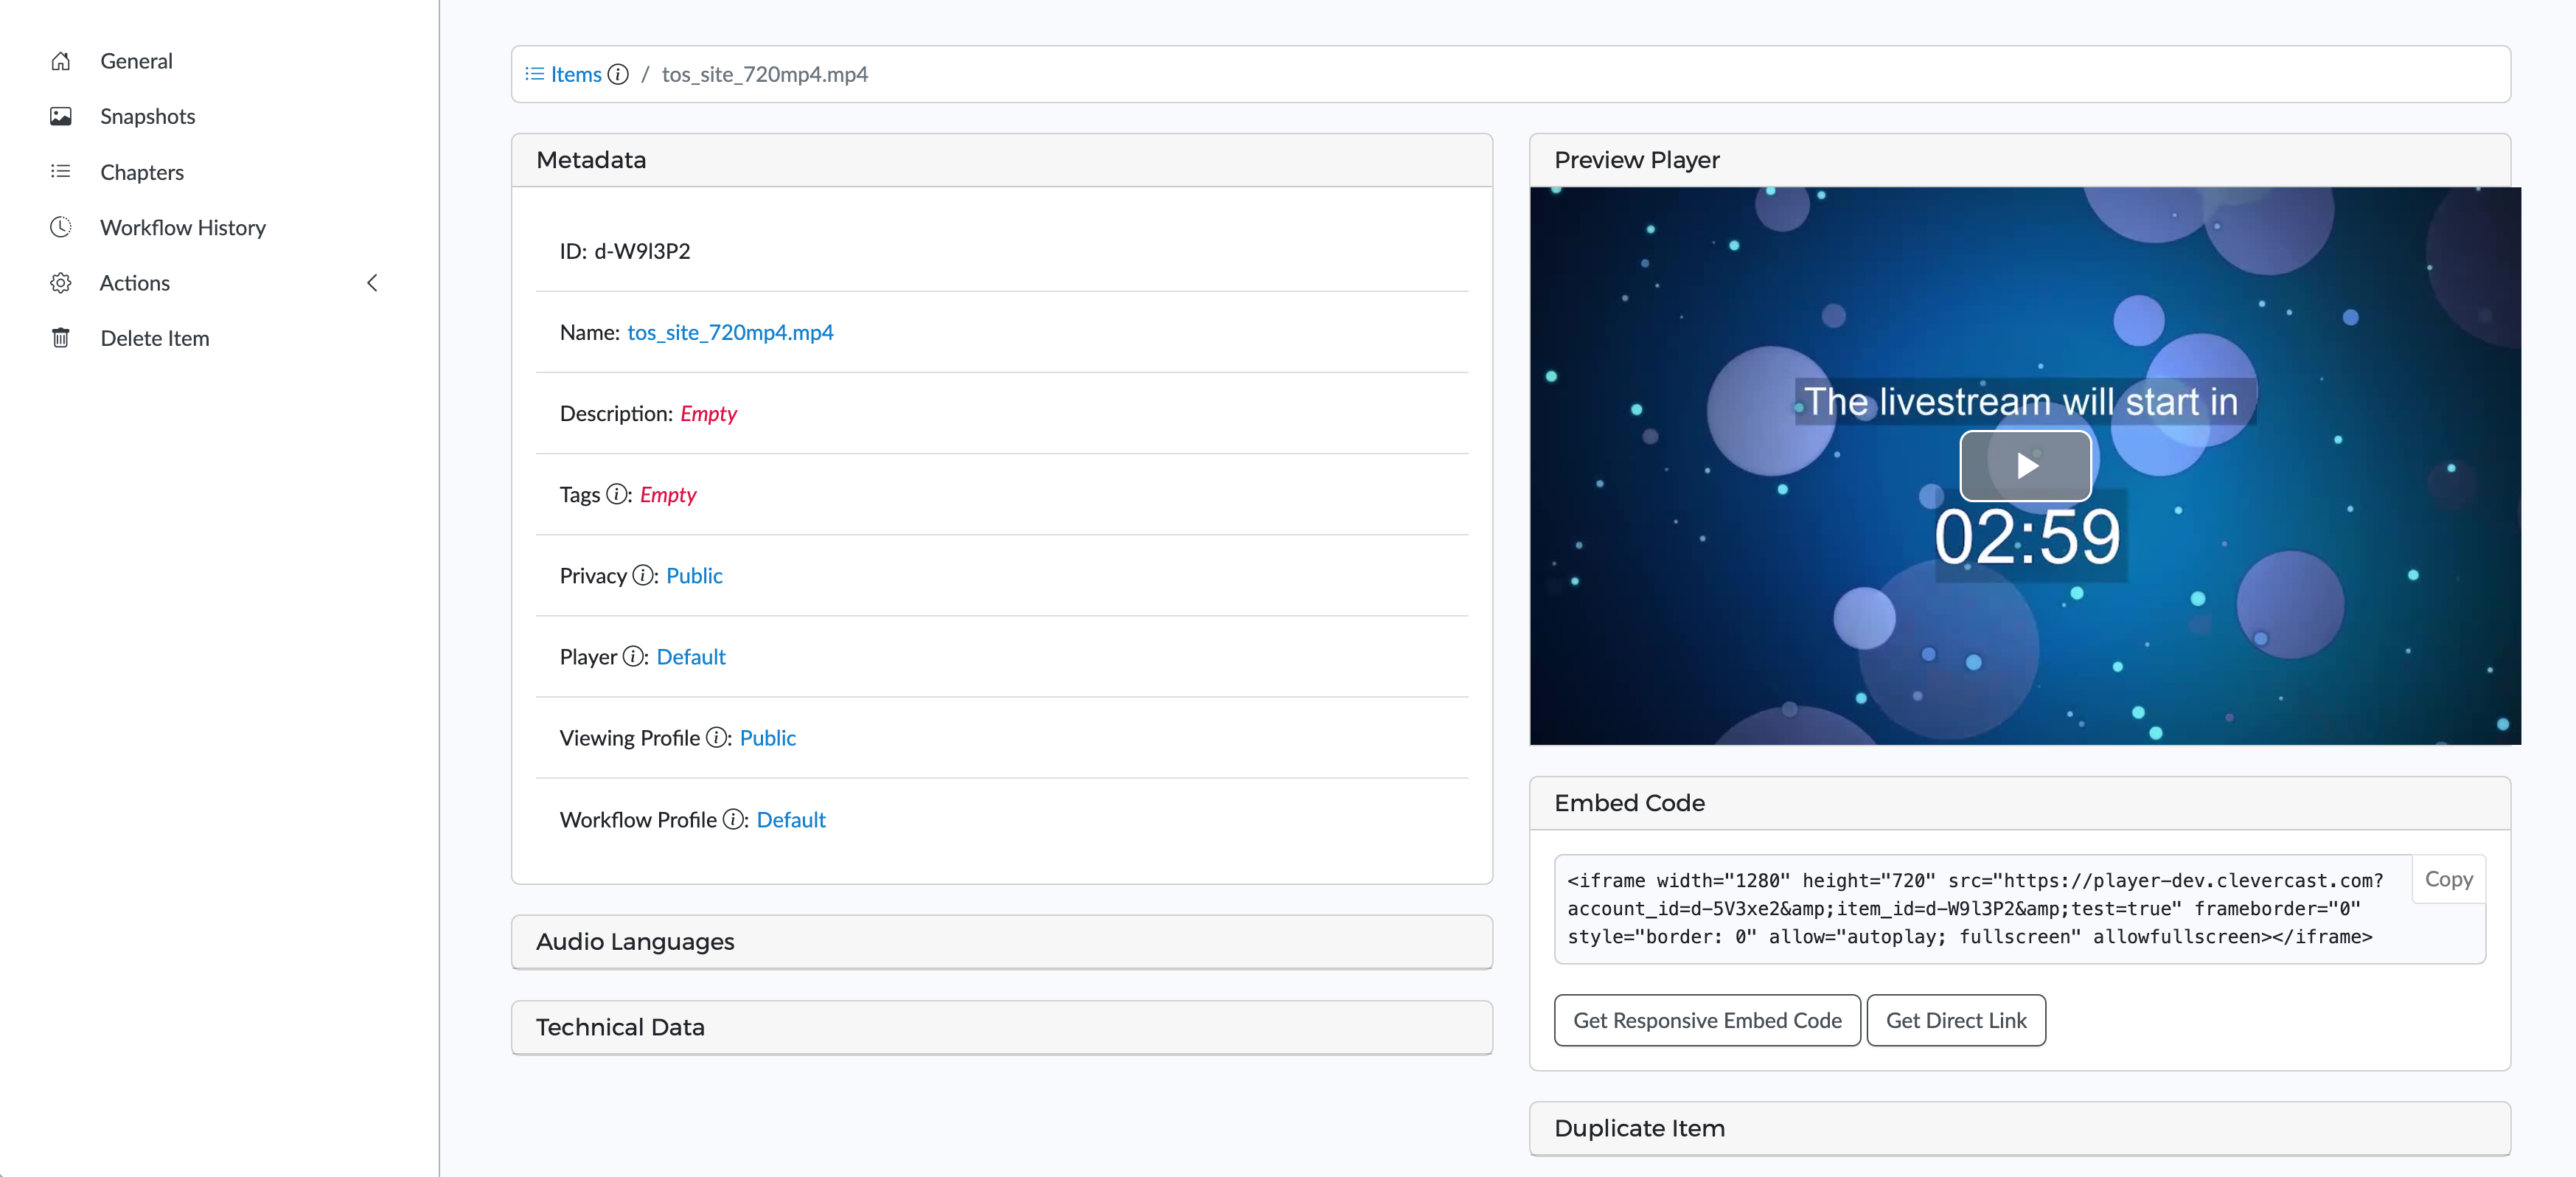
When the item has been transcoded and published on the CDN, you can play the video in the preview player.
Customizing an item
Using the Snapshot menu, you can upload an image or select a frame from the video (select the frame and click on 'Take snapshot'). After submitting the image, the player will automatically use it as its poster image.
Using the Chapters menu, you can add chapters to a video. You can choose to upload an image or select a frame from the video. Fill out the information for title and description and click on Submit.
The Duplicate Item panel lets you make a copy of the item with a different start and/or end point (note that this will take a new VoD transcoding).
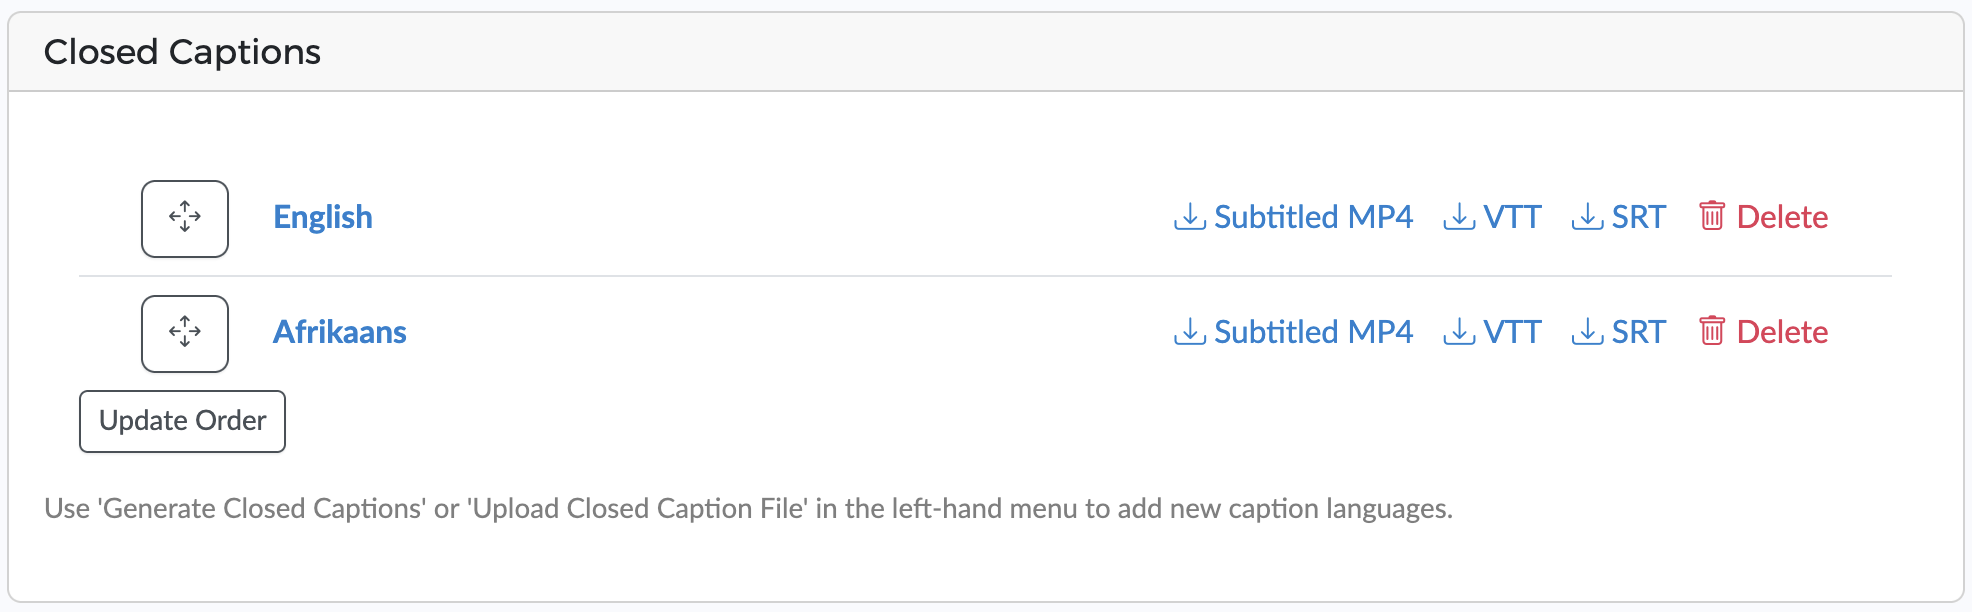
Adding closed captions
AI generated captions
If you have a multilingual plan that includes AI hours, you can use AI to generate closed captions for a VoD video. Select the Actions > Generate Closed Captions menu on the left of the item page. A pop-up dialog appears, the content of which is different depending on whether the item already has closed captions.
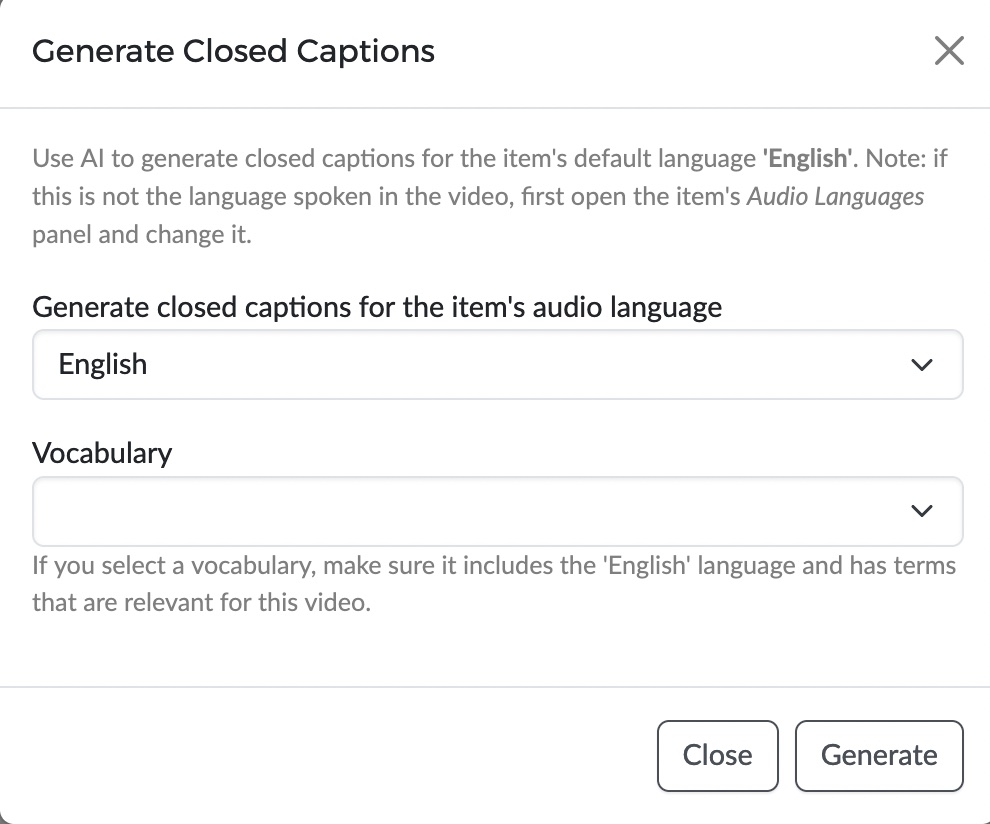
If the item doesn't have closed captions, Clevercast will first let you generate closed captions for the language spoken in the video (see 'Audio Languages' panel on the item page). Optionally, you can select an AI Vocabulary to be used during the speech-to-text conversion. Press the 'Generate' button, wait a few minutes and then refresh the item page: open the 'Closed Captions' panel to see the generated WebVTT file, or select the caption language in the video player.
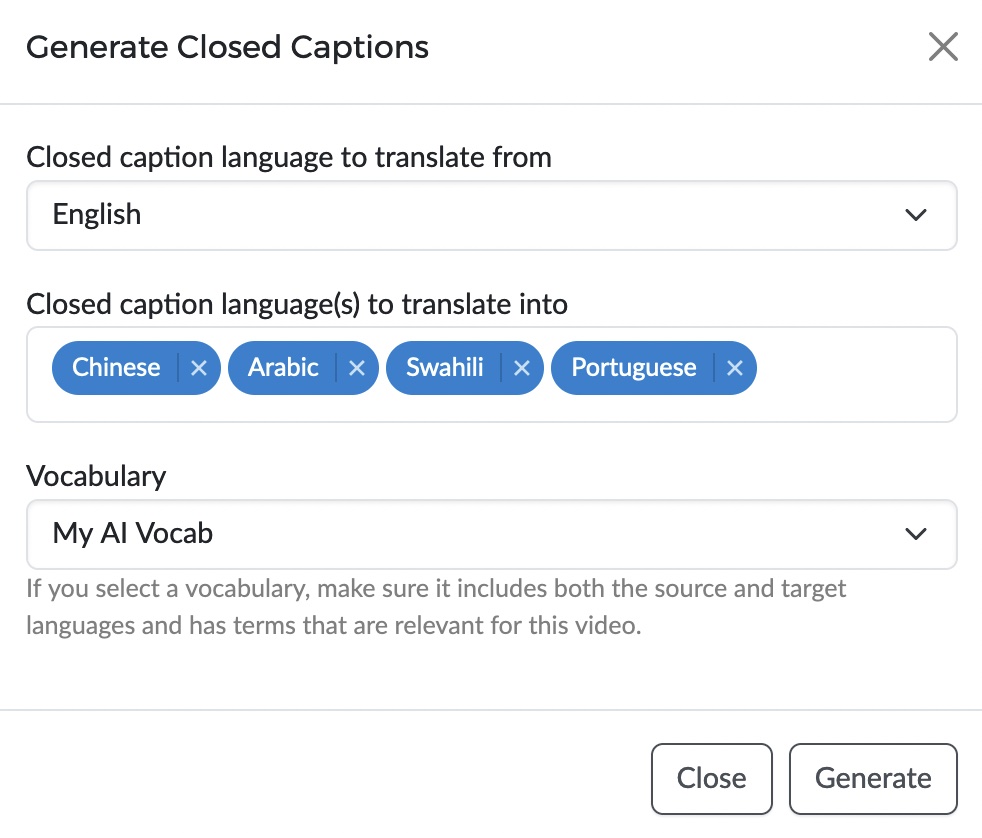
When the item contains (at least) one caption, Clevercast lets you generate other caption languages through AI translation. The dialog now lets you select the language to translate from, the language(s) to translate into and (optionally) the AI Vocabulary to be used during the translation. You can translate the captions into as many languages as you want (unless you use the item as a simulive source)
Please note that AI minutes are charged when you generate VoD captions.
Uploading WebVTT files
To add closed captions, select the Actions > Add Closed Caption menu on the left of the item page. This will display a popup dialog that lets you upload the WebVTT file for a given language.

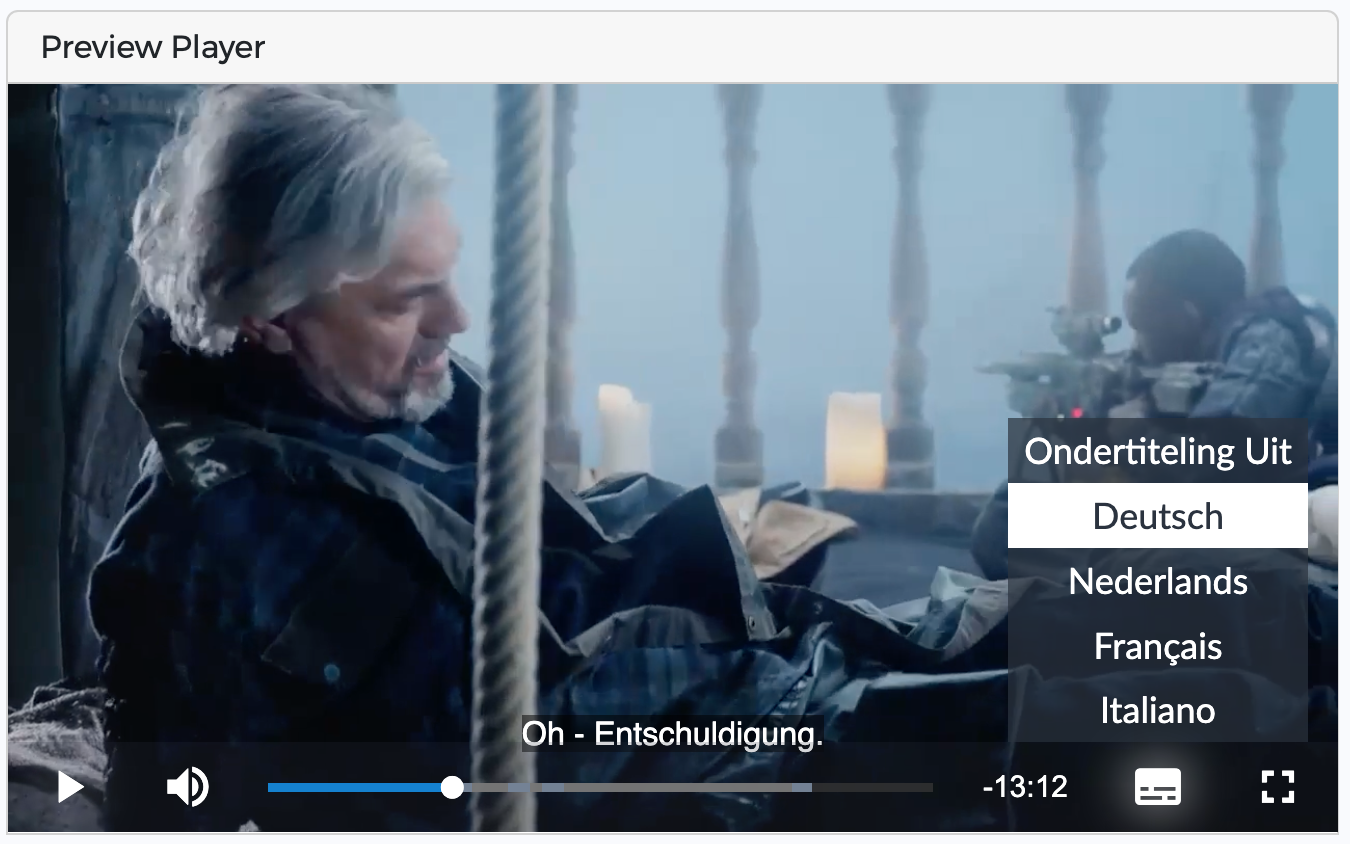
After the WebVTT file has been uploaded, Clevercast player will automatically contain a CC menu that lets you select closed captions.
The uploaded WebVTT files must be valid (e.g. see this online WebVTT validator).
If your plan includes simulive streaming, make sure that the captions take into account the duration of the intro. If the intro is added afterwards, make sure to time shift the WebVTT file before uploading it.
Creating an item with multiple audio languages
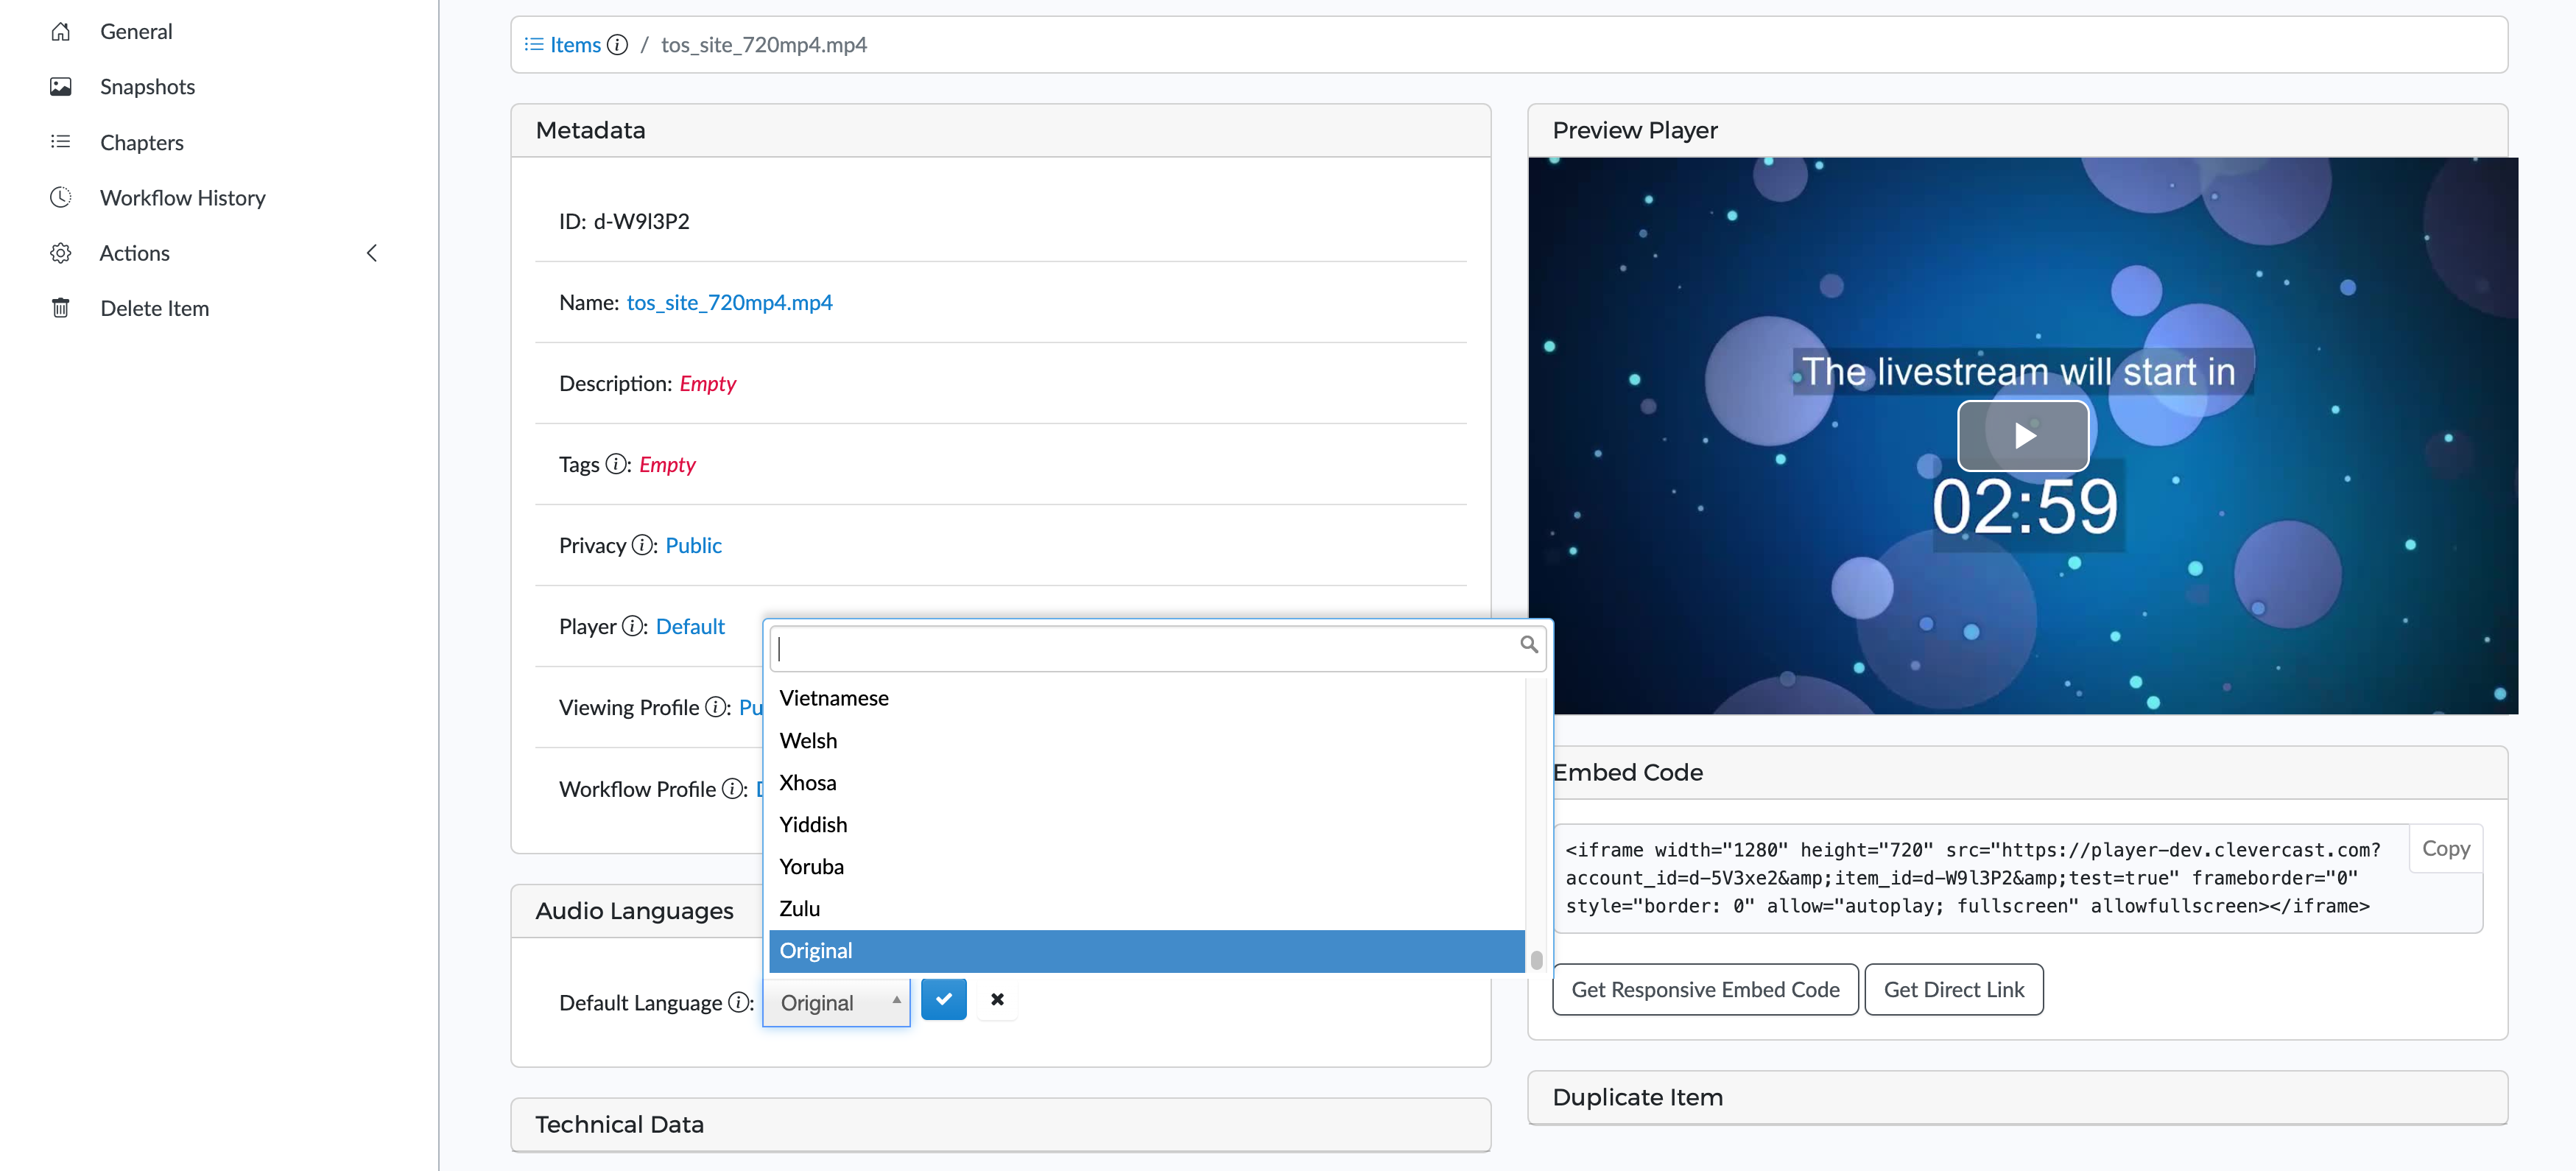
First make sure your VoD item has the correct language. This depends on your selection when uploading the file to Clevercast. To verify or change it, select the ‘Audio languages’ panel and use the ‘Default Language‘ control to select the language spoken in the uploaded video. If the video contains multiple languages, you can select ‘Original’.
There are two ways to create the audio languages: by letting Clevercast generate them using AI (if AI hours are included in your plan) or by uploading Mp3 files yourself.
Note: if your plan includes simulive streaming, you can use a multilingual item as the source of a simulive stream with multilingual audio.
AI Generated Speech Translations
Before you can use AI to generate speech translations, the item must at least contain one closed captions file. If it doesn't, first generate or upload one.
We recommend generating closed captions for all speech languages (while using a vocabulary). If you don't, Clevercast will automatically translate the closed captions (not using a vocabulary).
On the item page, press Actions > Generate Speech Translations in the left-hand menu. This will direct you to a page where you can select the AI speech languages and set their order.

Under the ‘Select AI speech translations‘ panel, select the languages you want to add. Make sure they are ordered as they should appear in the video player menu (this cannot be changed afterwards). Then press 'Create Item'. A new item will be transcoded and published (this will take some time, depending on the duration of your video).
Uploaded Mp3 Files
On the item page, press Actions > Upload Speech Translation Files in the left-hand menu. This will direct you to a page where you can upload the Mp3 files for the speech translations. Under the ‘Upload new audio file‘ panel, select a language and an Mp3 file on your computer and press Submit. Do this until you have uploaded all translations.
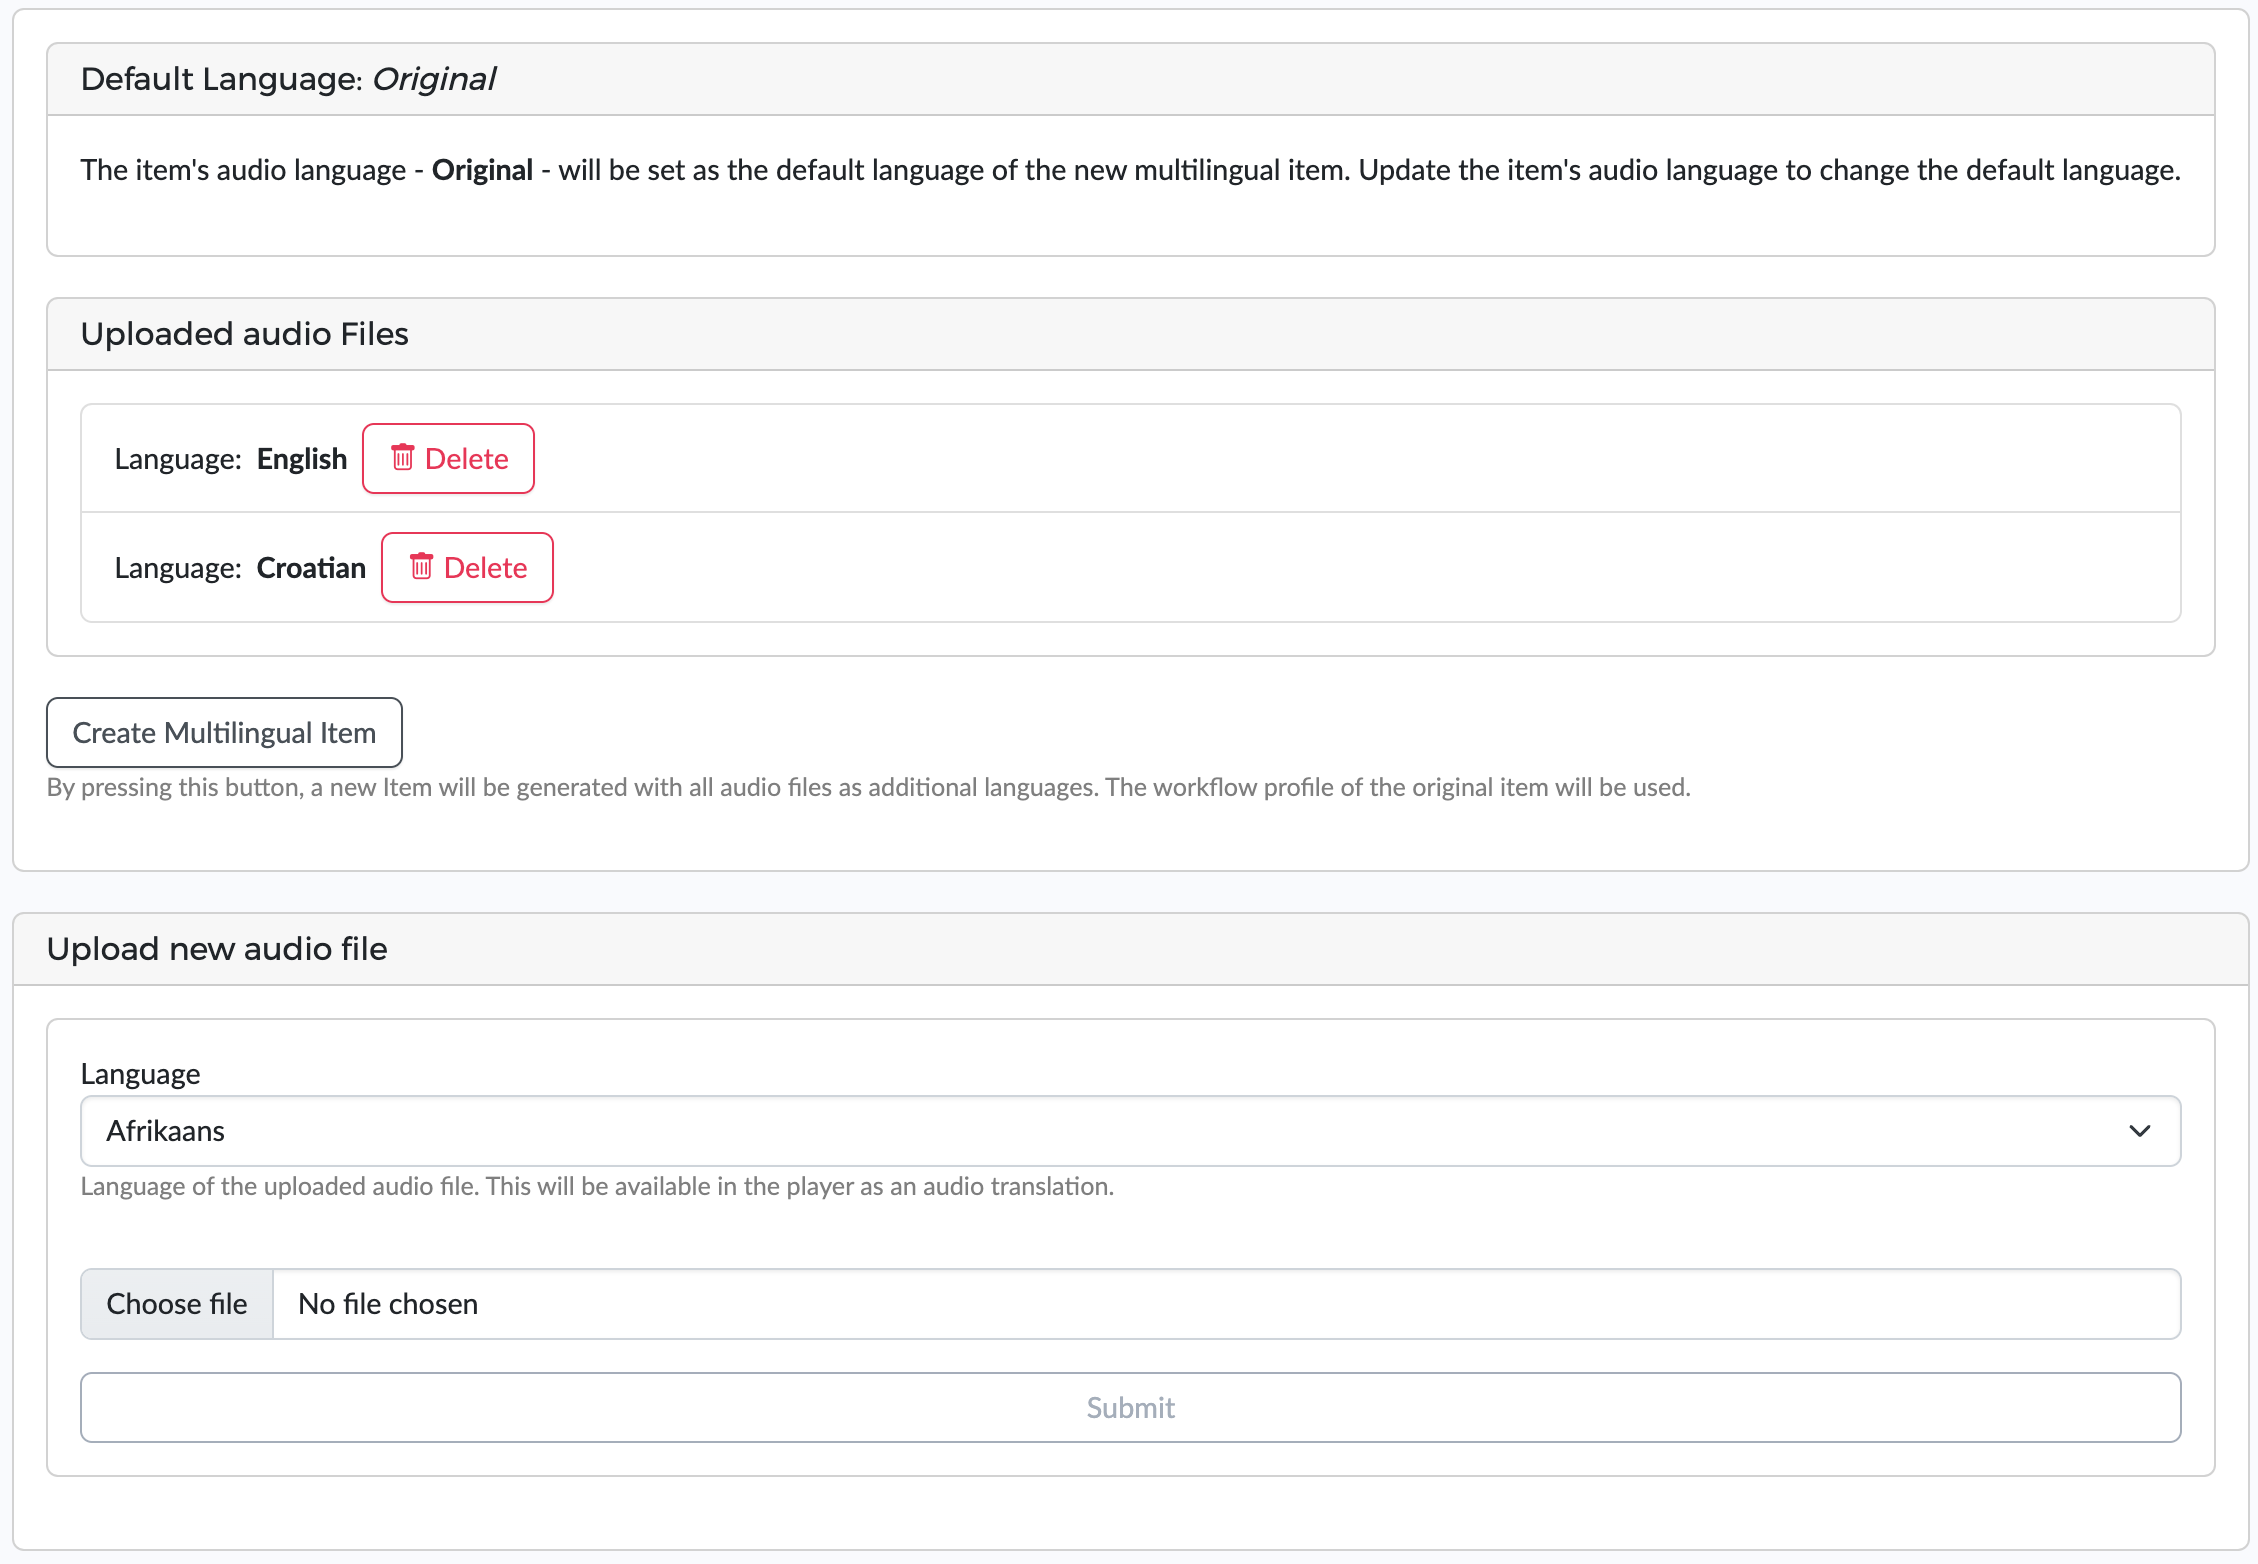
Note that the uploaded Mp3 files must have the same duration as the video. We recommend an audio bitrate of 128-256 Kbps and an audio sample rate of 48 kHZ.
When all Mp3 files have been uploaded, press the ‘Create Multilingual Item‘ button: Clevercast will create a new multilingual item and transcode it for adaptive streaming. By going back to the Media > Items menu, you can see this item and select its detail page.
Generate MP4 with burnt-in subtitles
Clevercast can also burn closed captions for a specific language into the video. To do this, select the Actions > Generate MP4 with burnt-in subtitles menu on the left of the item page.
This will display a popup dialog that lets you select:
- the closed caption language to be burned into the mp4
- options that determine the look & feel of the subtitles
- the choice to create a new item from this MP4, which can be used for adaptive or simulive streaming via Clevercast
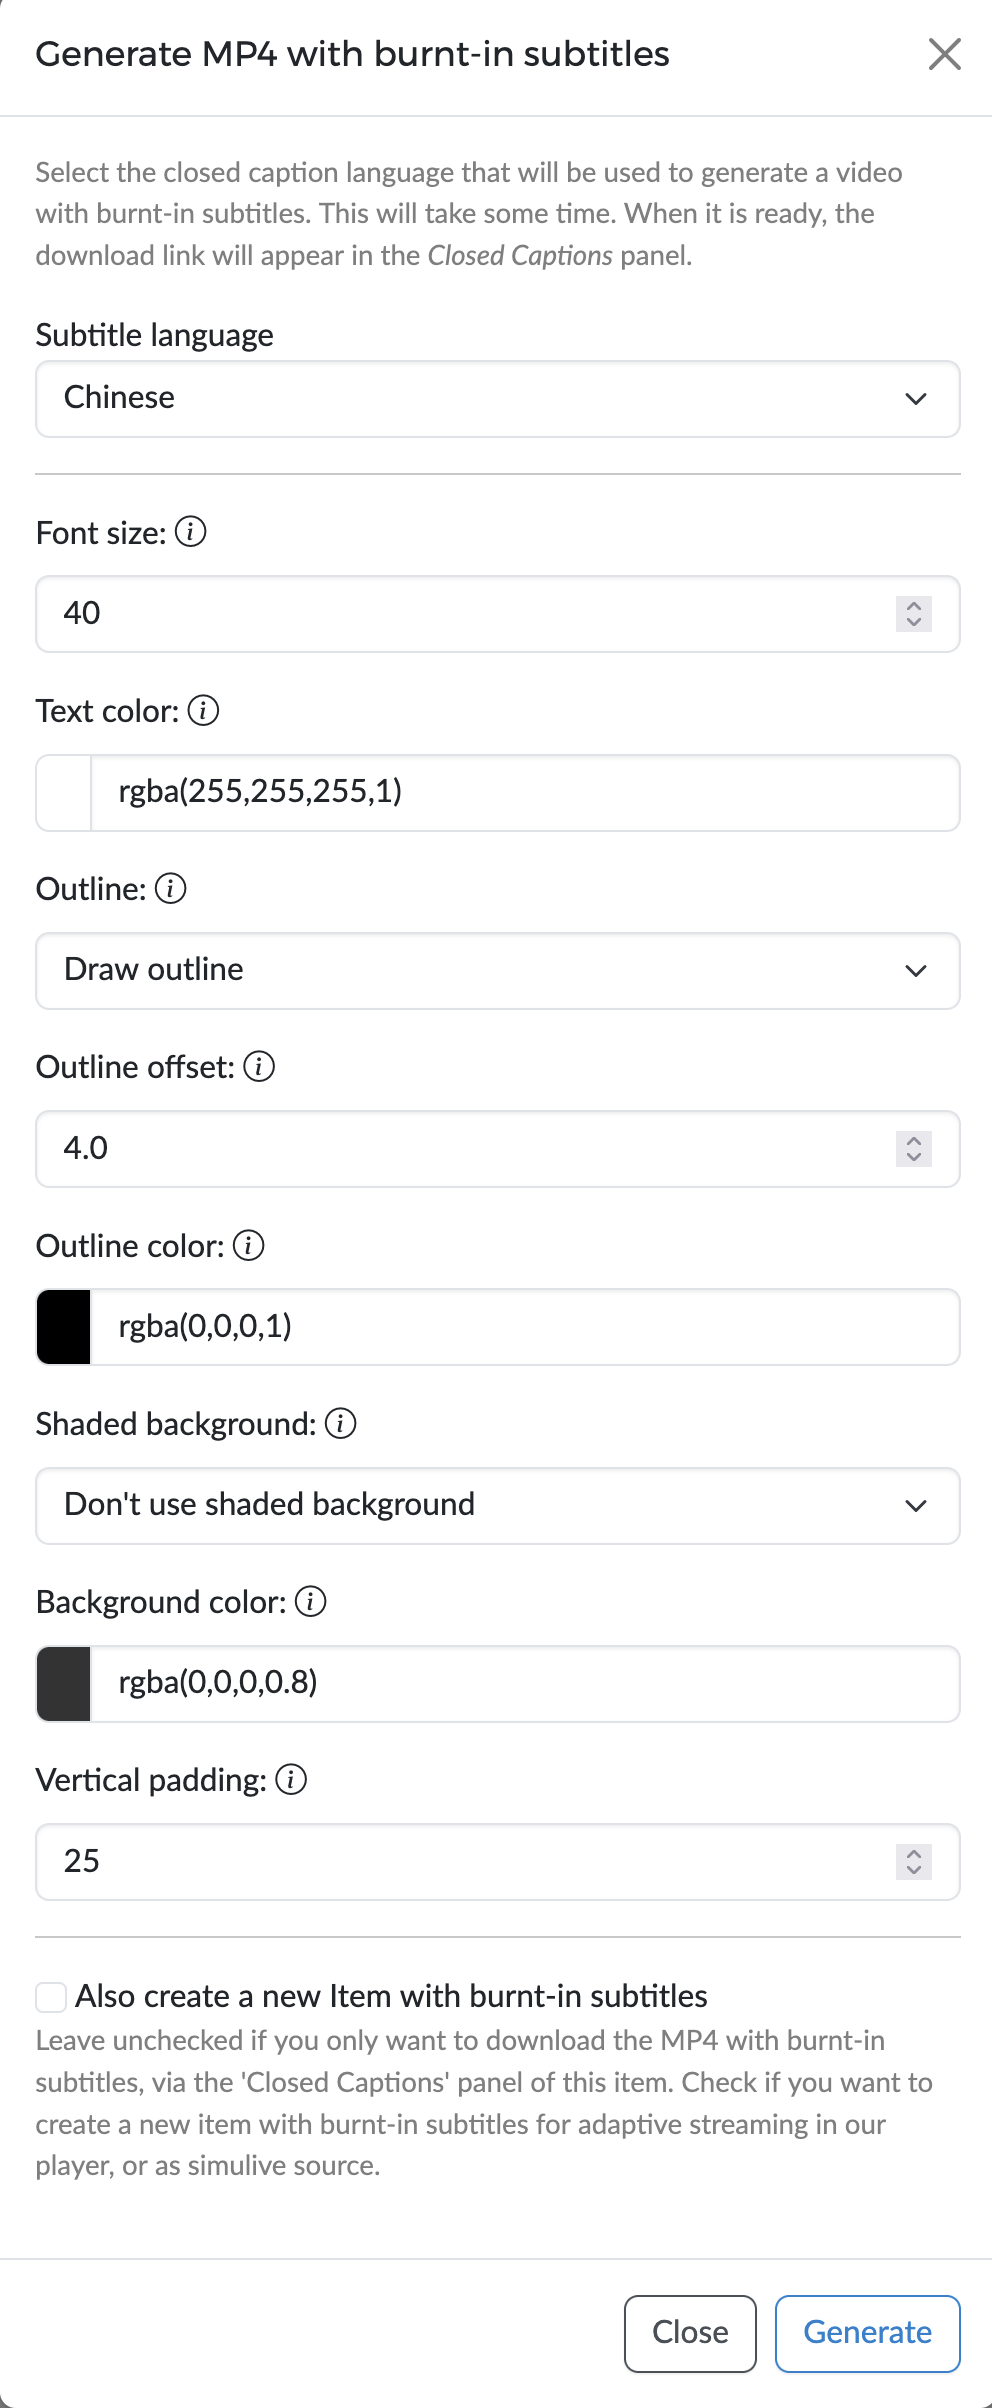
When the subtitles have been generated, the link to download the MP4 will be available in the 'Closed Captions' panel.
If you chose to generate a new item, it will appear in the list (this may take a while, depending on the duration of your video). Note: to use this item for simulive streaming, select Actions > Set as simulive source in the left-hand menu.
Using Items on your website
Items can be used outside of Clevercast by copying the embed code (on the Item detail page) and using it on your website or third-party application. Alternatively, the embed code can be retrieved using the item API.
External viewing in Clevercast player is only possible if the item's privacy property is set to 'public' or 'unlisted' and the conditions in the item's viewing profile are met.
Changes made to an item after the embed code is copied (eg. changing the item’s privacy setting, setting a different poster image) will automatically be reflected in Clevercast player.
Live Events
Before you start
A live event always has a certain status, which determines:
- if you can start broadcasting
- what your viewers can see in the embedded player
- if language rooms are available to interpreters, subtitlers and correctors
- when a cloud recording is made
We strongly recommend to first read our guide on how to manage a live event about the status of an event and when to update it.`
Note that an event with AI-generated captions or speech currently has a maximum duration of 24 consecutive hours. If your event spans multiple days, set the event to Inactive or Ended during breaks and reset it again.
Creating a live event
To create a new live event, use the 'Live > Events' menu to go to the events overview page. To create an event with AI-generated closed captions and/or voice translations, press the 'Create AI Multilingual Event' button. For other types of events, press one of the Create Event buttons on the left side of the screen. A popup dialog is displayed, allowing you to select:
- Name: a name for your live stream, for your own information.
- Broadcast Protocol: this determines the way your broadcast will be processed by Clevercast. See our guide on which broadcast protocol to choose.
- Broadcast Origin: the continent from which the broadcast (or stream relay) originates. This is used to verify if the broadcast protocol is suitable.
- Streaming Resolutions: Clevercast does cloud transcoding to deliver your stream through adaptive streaming in multiple video resolutions. Make sure the highest resolution doesn’t exceed your broadcast resolution, to avoid unnecessary data traffic consumption.
For events with multiple audio languages, you also need to select:
- Default Language: this is the floor audio language of your live stream. It will be the audio language selected by default in the video player when a user initially presses the play button. If the floor audio contains multiple languages, you can select Original instead of a language.
- Latency: you can choose between Default Latency and Low Latency (more info). Select the Low Latency option only if your primary goal is to maximize audience engagement. It will result in a reduced read-ahead buffer in the video player, potentially leading to increased buffering for your viewers. If the stream includes AI-generated closed captions, we strongly recommend using Default Latency (using Low Latency will reduce the quality of the captions).
When you press the Submit button, Clevercast creates the new event and redirects you to its detail page for further configuration.
The Event page
The event page consists of a number of tabs, which allow you to manage the different aspect of a live stream. Which tabs and settings are available depends on the broadcast protocol and the features of your plan.
All tabs display the current event status and the main and backup broadcast statuses. When a broadcast is being received by Clevercast, this is set to Started.

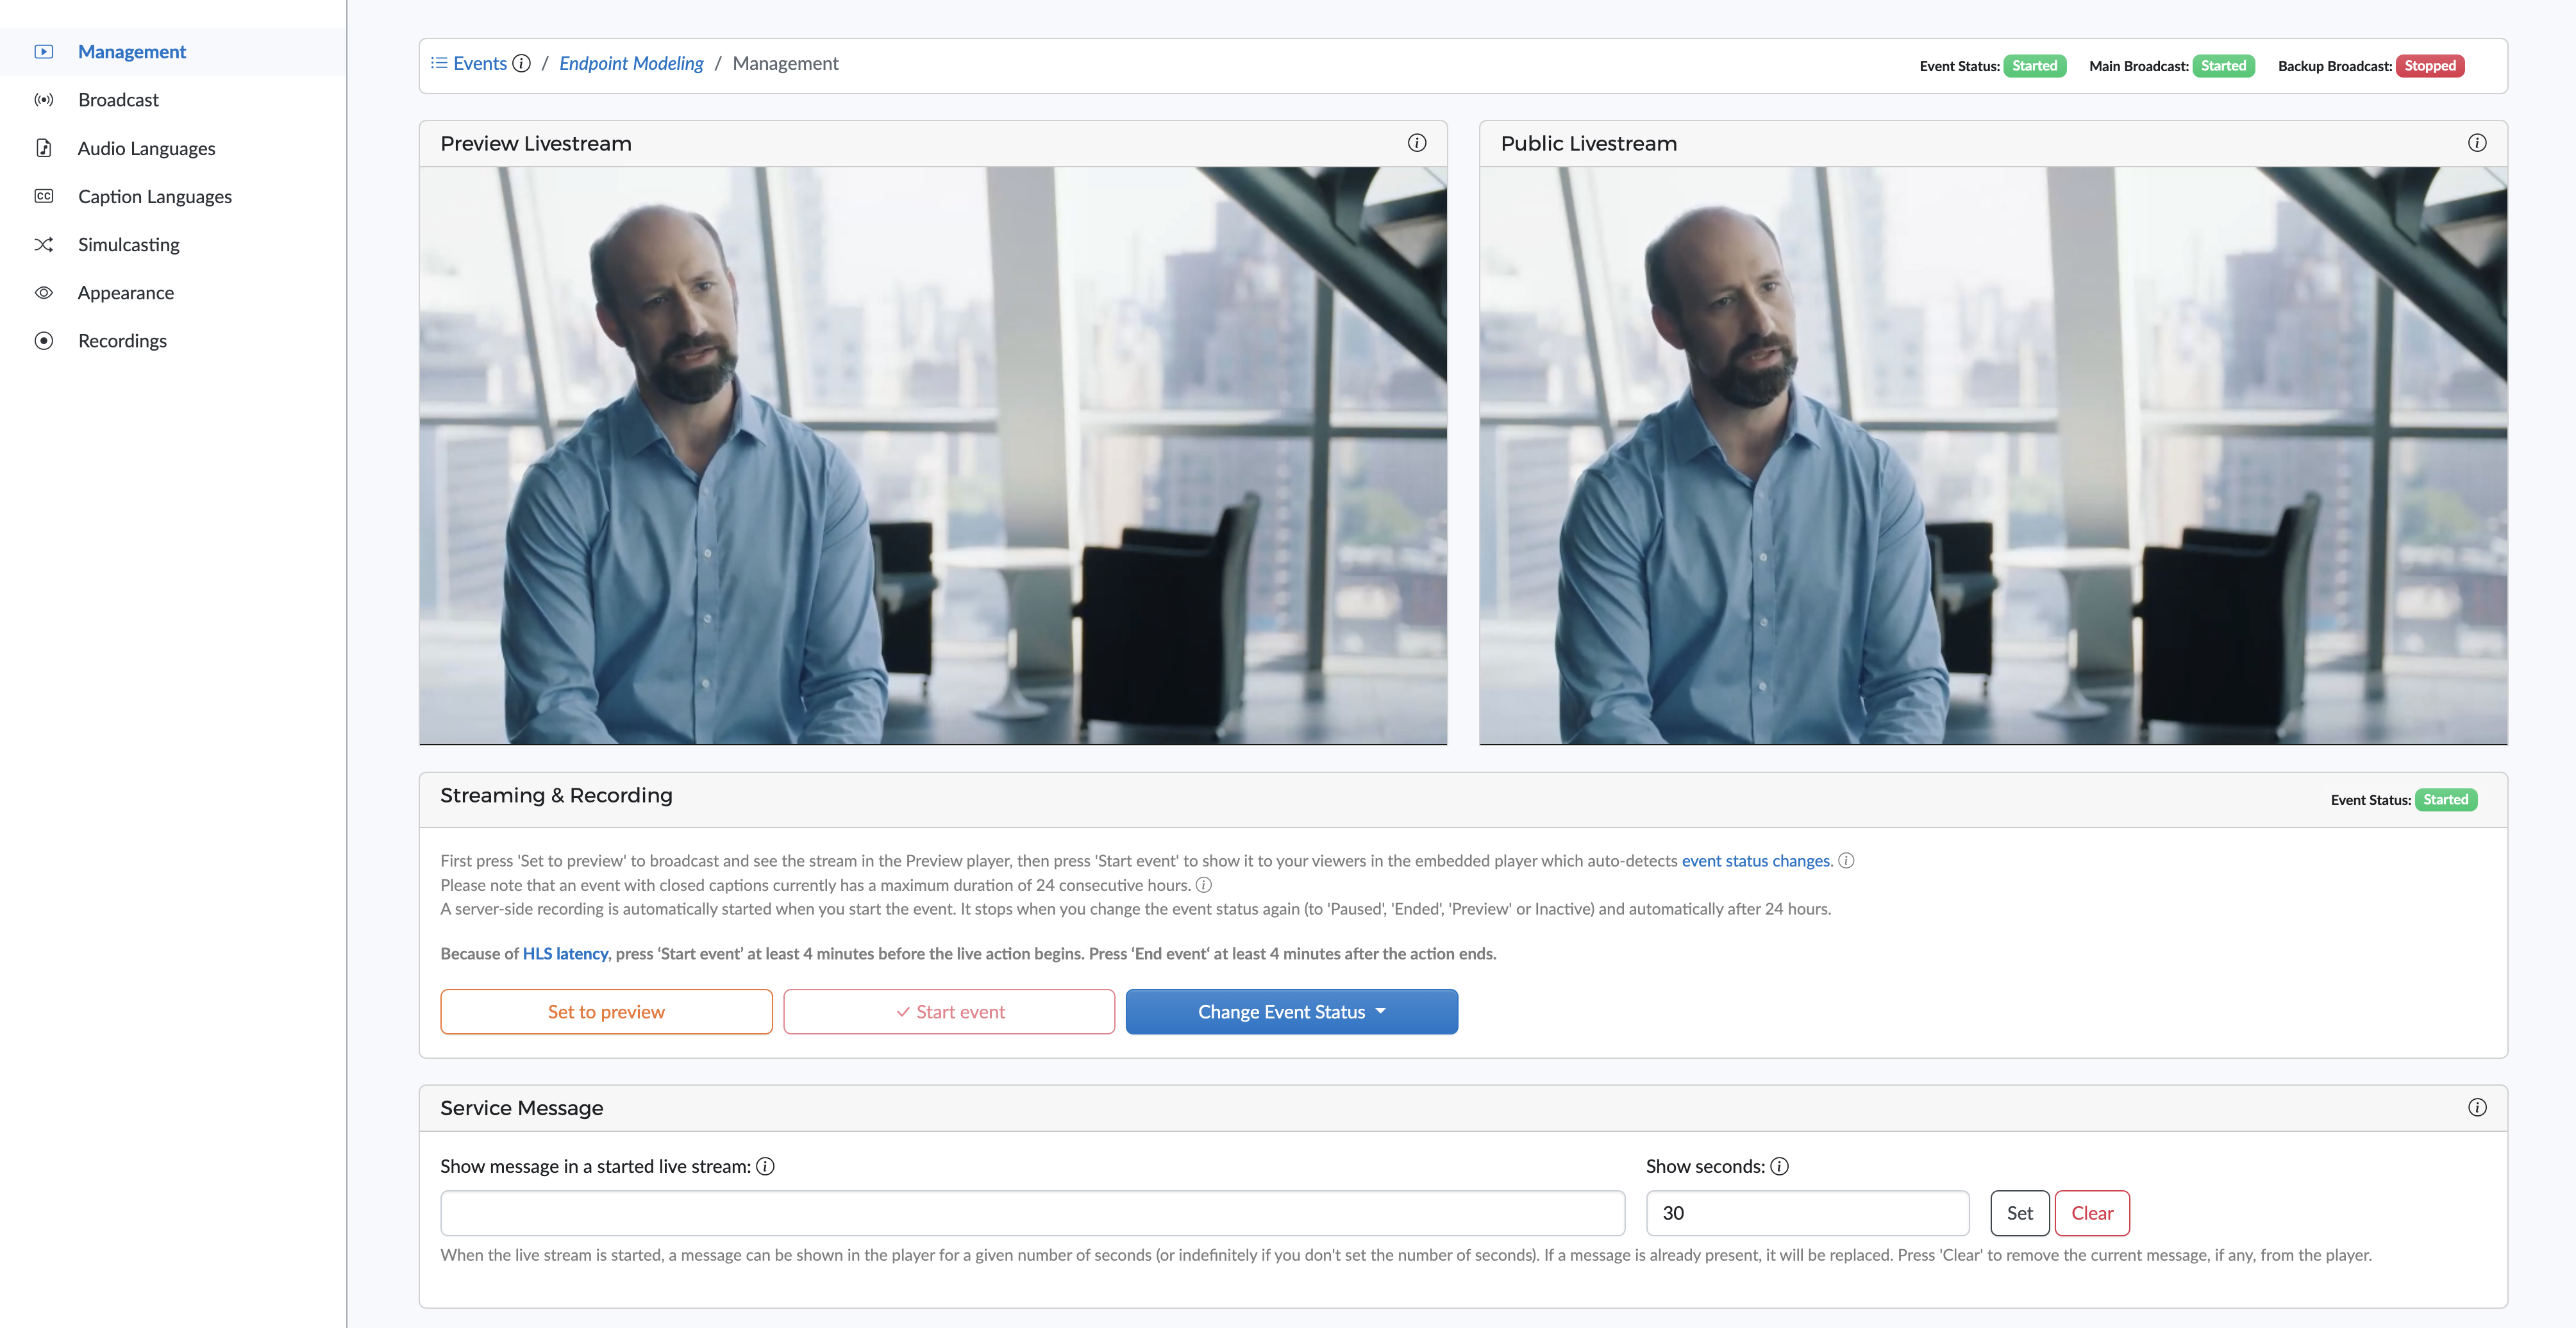
Management
The Management tab lets you change the event status, watch the video stream, show messages in the player during the live stream and copy the embed code.
- The Set to preview, Start event and Change Event Status buttons allow you to change the status of the event. Be aware that a status change may take some time.
- The Preview player lets you see the live stream when a broadcast is received by Clevercast and the event is not yet
Started. Note that most broadcast protocols require the event status to be set toPreviewbefore a broadcast can be received by Clevercast. - The Public player behaves in the same way as the embedded player as shown to your viewers. This player automatically detects the status changes of your event and acts accordingly.
- The Service Message can be used to show text messages in the embedded player while the event status is
Started. You decide how long the message is displayed in the player. - The Embed code can be copied to your website or third-party platform. The embedded player will behave in the same way as the public player, including status changes and failover to the backup broadcast. For more info, see our guide on embedding and configuring the player.
In enterprise mode it also allows you to update the Name, Description, Resolutions and Is Permanent Event settings.
- Name and Description: the name and description of your live stream, for your own information.
- Resolutions: the resolutions in which your broadcast will be transcoded in the cloud and therefore will be used for adaptive bitrate streaming.
- Is Permanent Event: an event can be permanent or not (except for single-language RTMP events). Non-permanent events get automatically deleted after 30 days. Note that all analytics data remain available after an event is deleted.
- Replace ended event by VoD item: this allows you to select a VoD item that will be automatically shown in the (embedded) player after the event ends. See our tutorial for more info.
Broadcast
The Broadcast tab contains the settings for your encoder or application to configure the broadcast to Clevercast.
For most broadcast protocols, Clevercast supports a fully redundant setup, which allows you to broadcast to a main and backup server on different geographical locations. Use the settings in the Backup Broadcast panel to send the same broadcast to both servers simultaneously. Clevercast player will detect if one of the streams is down and automatically failover to the backup stream, without your viewers having to refresh the page. This is also the case for the remote interpretation and captioning rooms.
For more info, see our guide on configuring your encoder or relay app.
Audio languages
The Default language
The 'Audio Languages' tab lets you set the default language, which refers to the language spoken in your broadcast (also known as the floor language). When the player is rendered for the first time, this language is selected by default (unless you specify a different language in the embed code or via the API). Afterwards, the player remembers a viewer's selection.
If the floor audio contains multiple languages, you can select Original instead of a real language. In that case, the first language in the player will be called ‘Original’ and contain the broadcasted audio, no matter what language is spoken.
AI Speech languages
Any of the multilingual broadcast protocols with support for 'T@H and Captions' (RTMP and SRT) support AI Speech languages. This lets you add simultaneous speech translations to the live stream that are generated by AI (also known as synthetic voices or AI dubbing).
For each language, Clevercast lets you choose a male or female voice. For certain languages (e.g. English, Spanish, Portuguese, French, Dutch) you can also choose a specific regional pronunciation (e.g. British, US, Australian or Indian English). AI and Human Interpreter languages can be combined in the same live stream.
For more info, see the Audio languages section of our AI Live Streaming Manual.
Remote Simultaneous Interpretation languages (Translate@Home)
Translate@Home is the name of the solution for Remote Simultaneous Interpretation (RSI) in Clevercast. If your broadcast protocol supports it, you can add as many extra audio languages as allowed by your plan (keep in mind that floor audio also counts as a language).
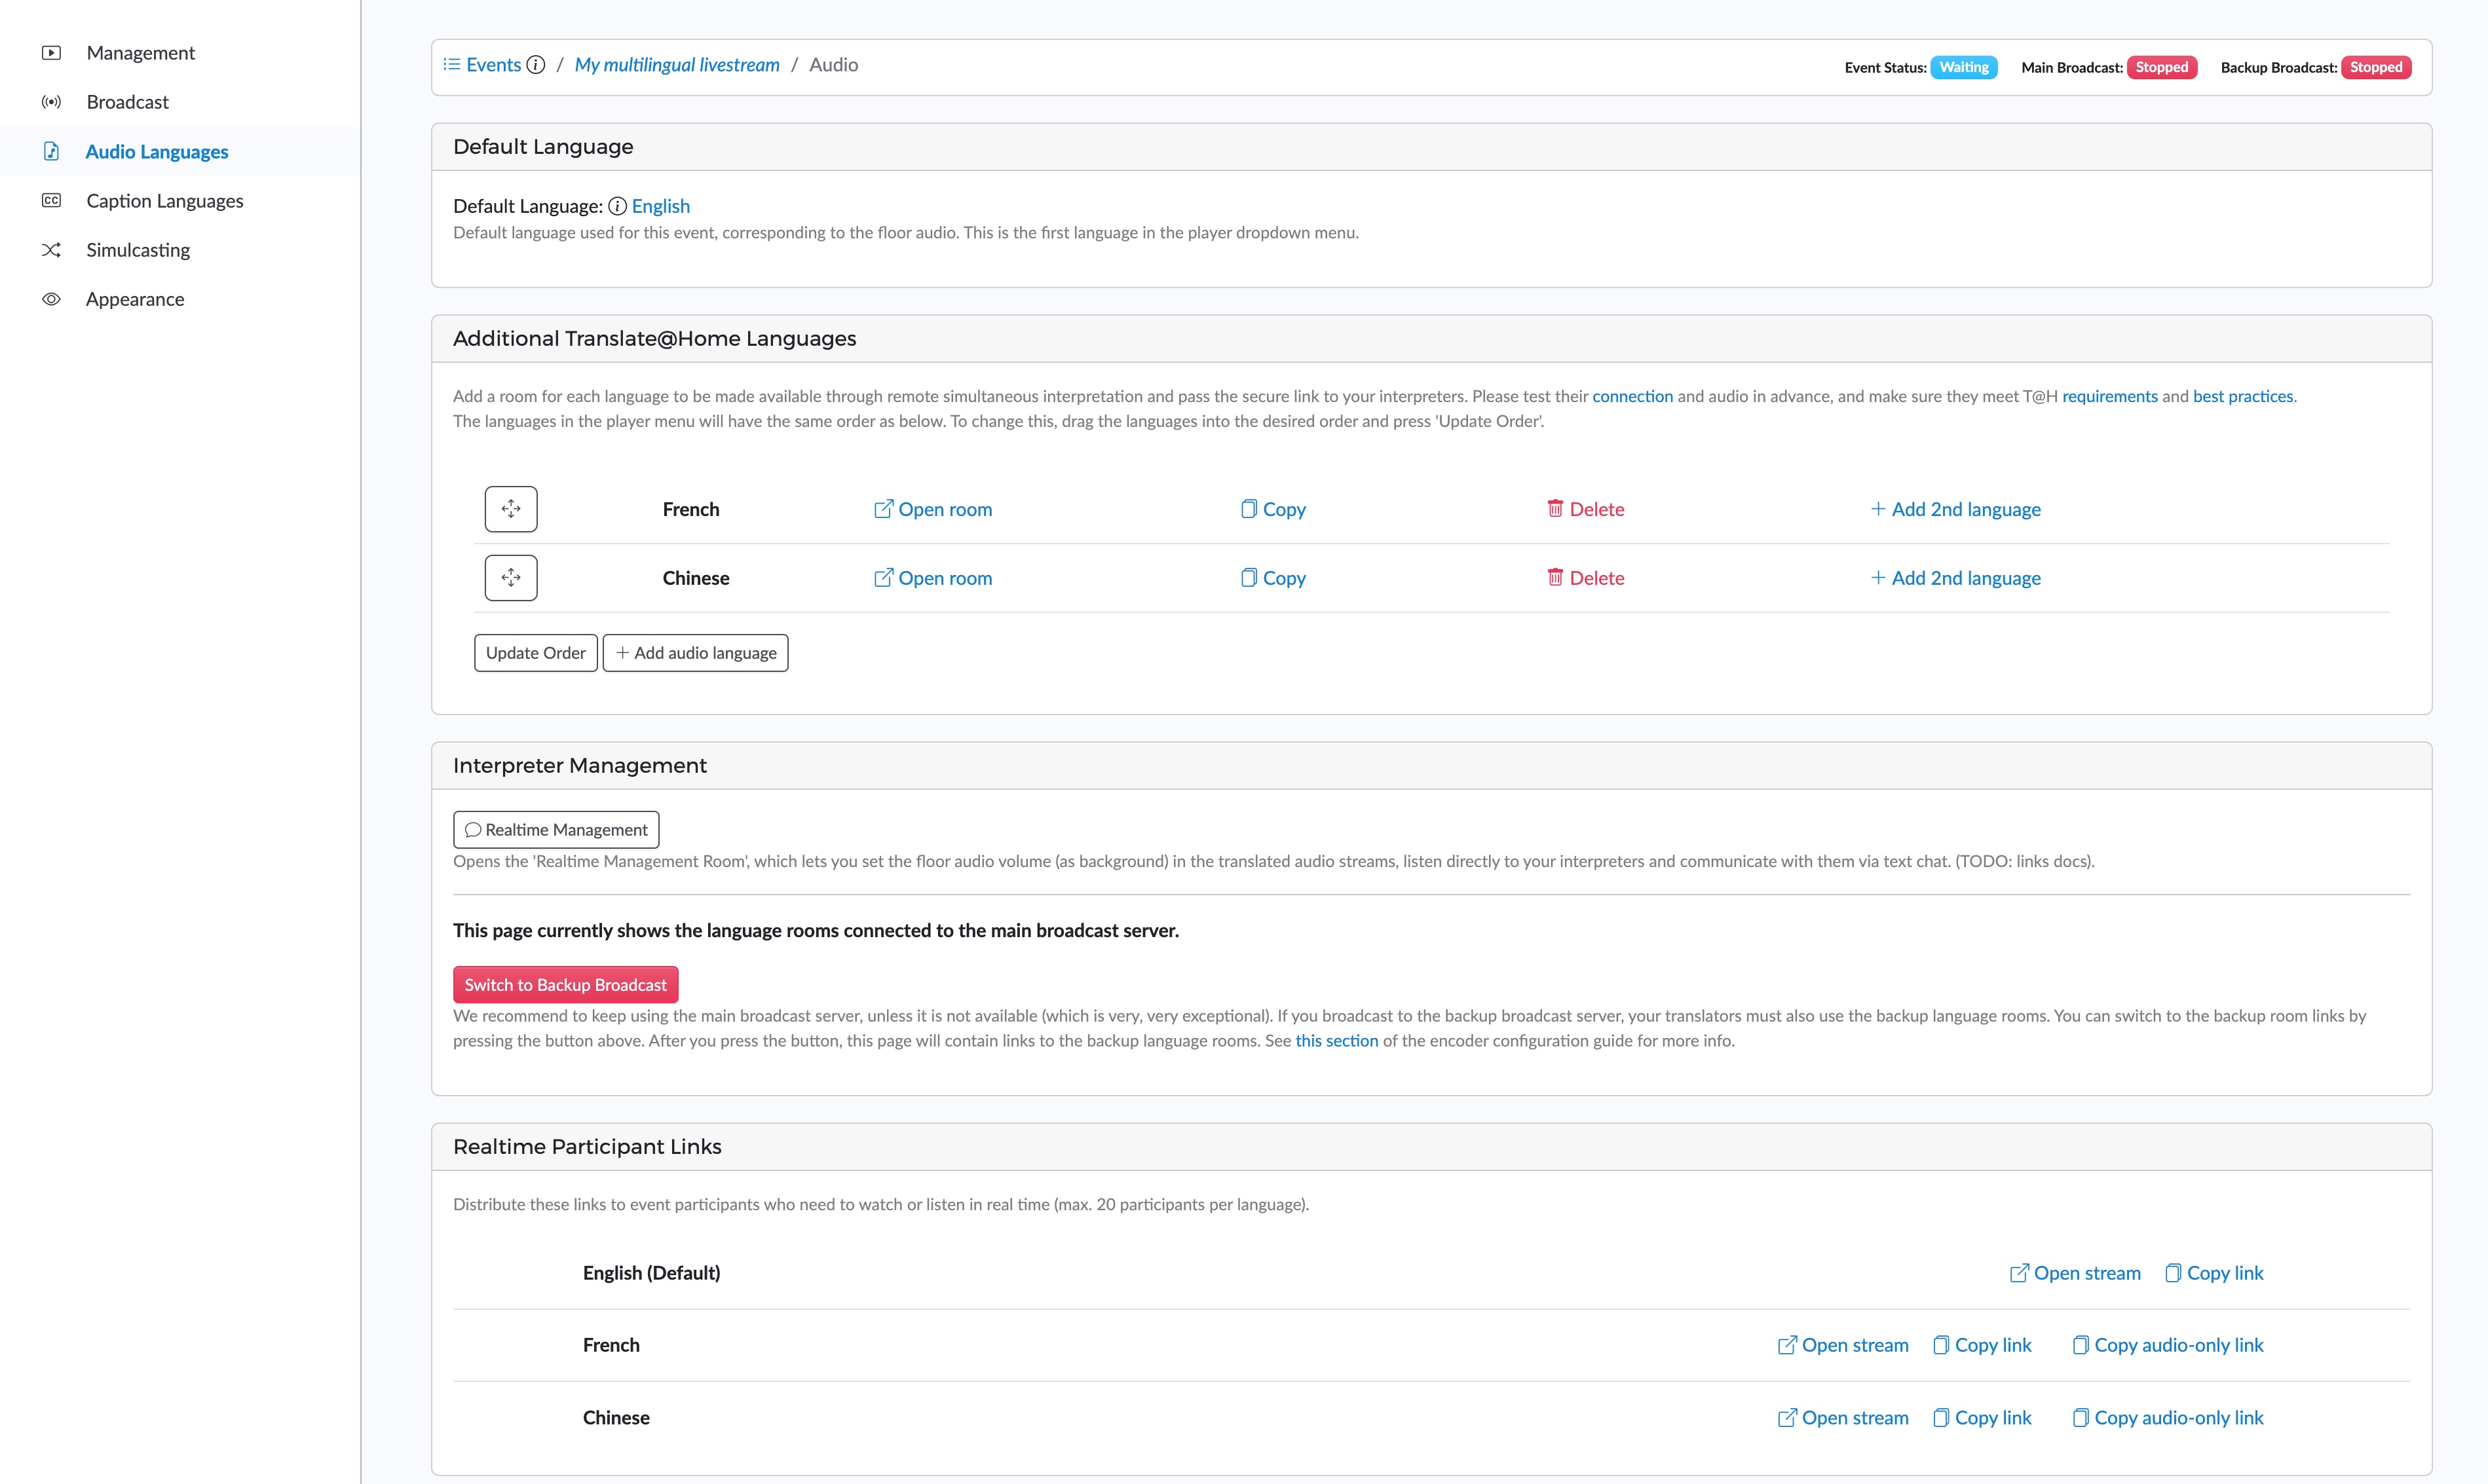
For each T@H language, Clevercast creates an interpreter room for remote simultaneous interpretation, protected by a secret key in the URL. Interpreters use this room to watch and listen to the incoming video stream, while simultaneously translating it. Use the 'Open room' link to go to the interpreter room, and 'Copy' to send the URL to your interpreter(s). If an interpreter needs to translate two languages during the same event, add the second language using 'Add 2nd language'.
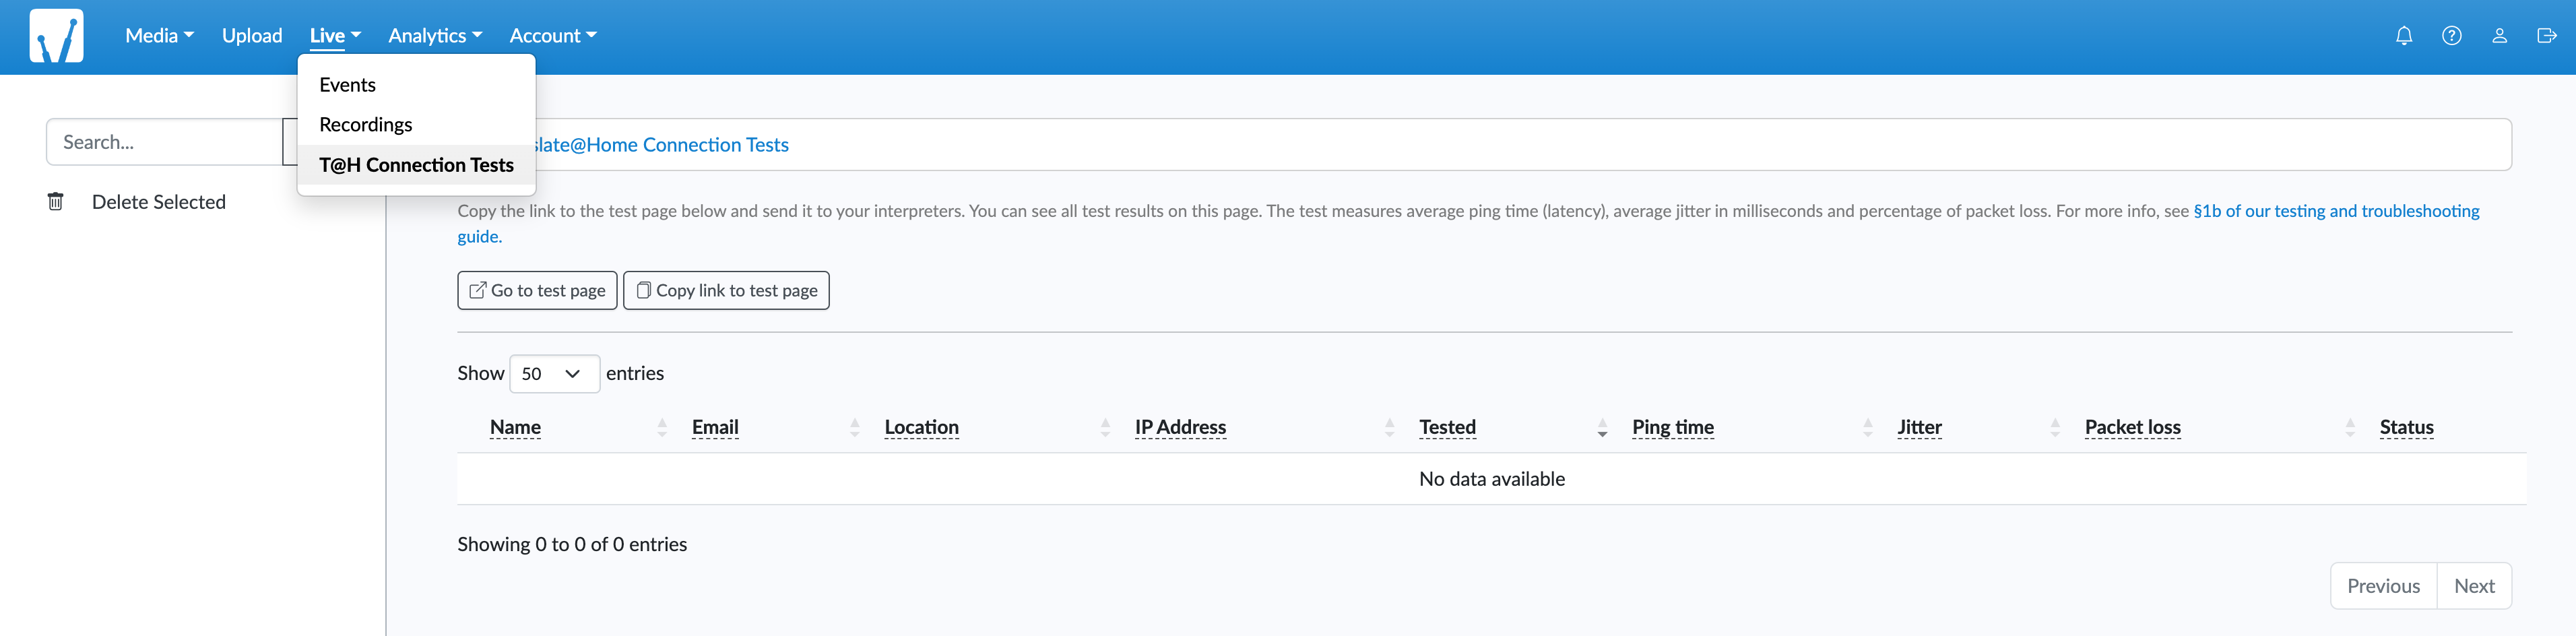
Clevercast allows you to test the internet connection of interpreters in advance, via the Live > T@H Connection Tests menu. This should already give you an indication of whether an interpreter’s connection is suitable.
The Real-time Management button gives you access to the Real-time Management room, allowing you to monitor the event.
If your plan has support for speakers or other people following the event without any latency through Clevercast - either from home or from the event location - the page will also contain Realtime Participant Links.
More info:
- For more info about setting up bilingual interpreter rooms, T@H connection tests, and support for real-time participants, see the Advanced T@H Features section below.
- For more info about using an interpreter room for remote simultaneous interpretation, see our interpreter manual.
Broadcasted languages
If the selected broadcast protocol involves sending multiple audio tracks or channels along with the video, the tab will contain an Additional Broadcast languages panel. This allows you to choose the names of the broadcasted languages and order them. The order of the languages will correspond to the options in the player menu.
The number of languages should match the broadcast protocol and settings (see Multilingual Broadcasts and the encoder configuration guides).
Note: if multiple languages are spoken, you can select 'Original' as the default language of your event, and add the real languages as additional languages. This way, the floor audio can be the first track/channel of your broadcast (which your viewers can select as 'Original'), followed by the interpreted languages.
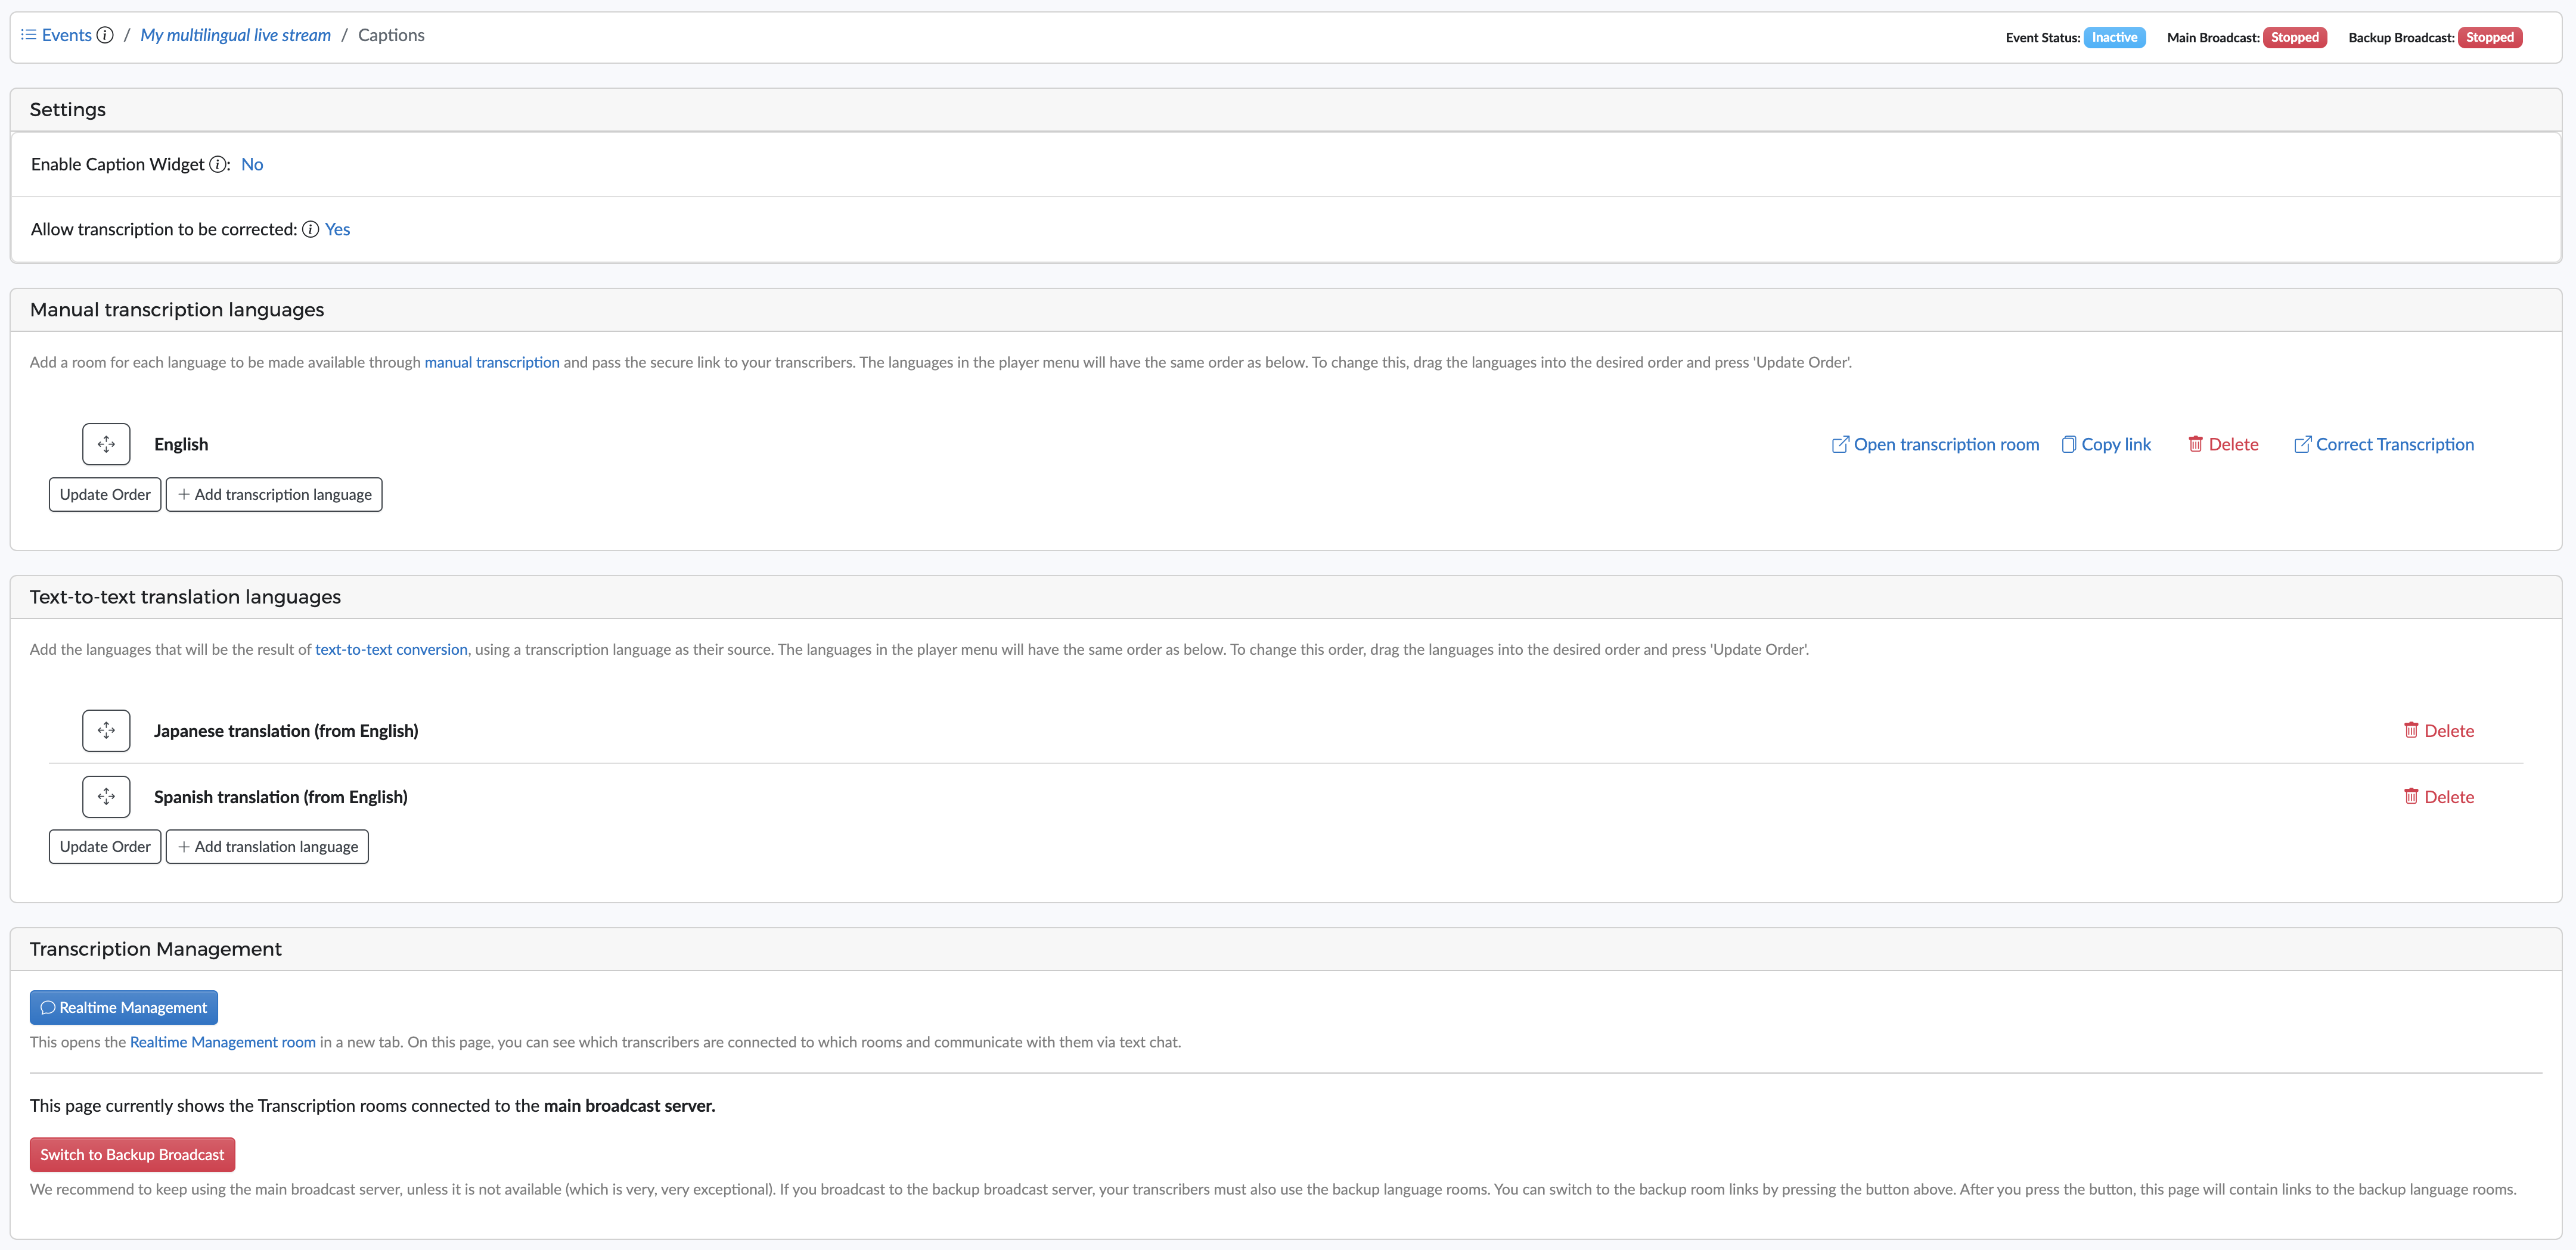
Caption languages
The closed captions tab lets you add closed captions to your live stream, depending on your plan and on the event's broadcast protocol.
In addition to a live stream with closed captions, Clevercast also allows you to make the AI text conversion and translation(s) available in the form of a real-time scrolling transcript without delay for on-site participants. These links can also be used by remote participants in virtual events.
Closed captions can be generated by AI (with or without real-time human correction) and by human subtitling. Both ways can be combined in the same live stream.
AI-Generated Closed Captions
In this case, a language model is responsible for speech-to-text conversion and text-to-text translation, resulting in closed captions in one or more languages. This configuration is also needed if you use AI speech translations, with or without showing the closed captions.
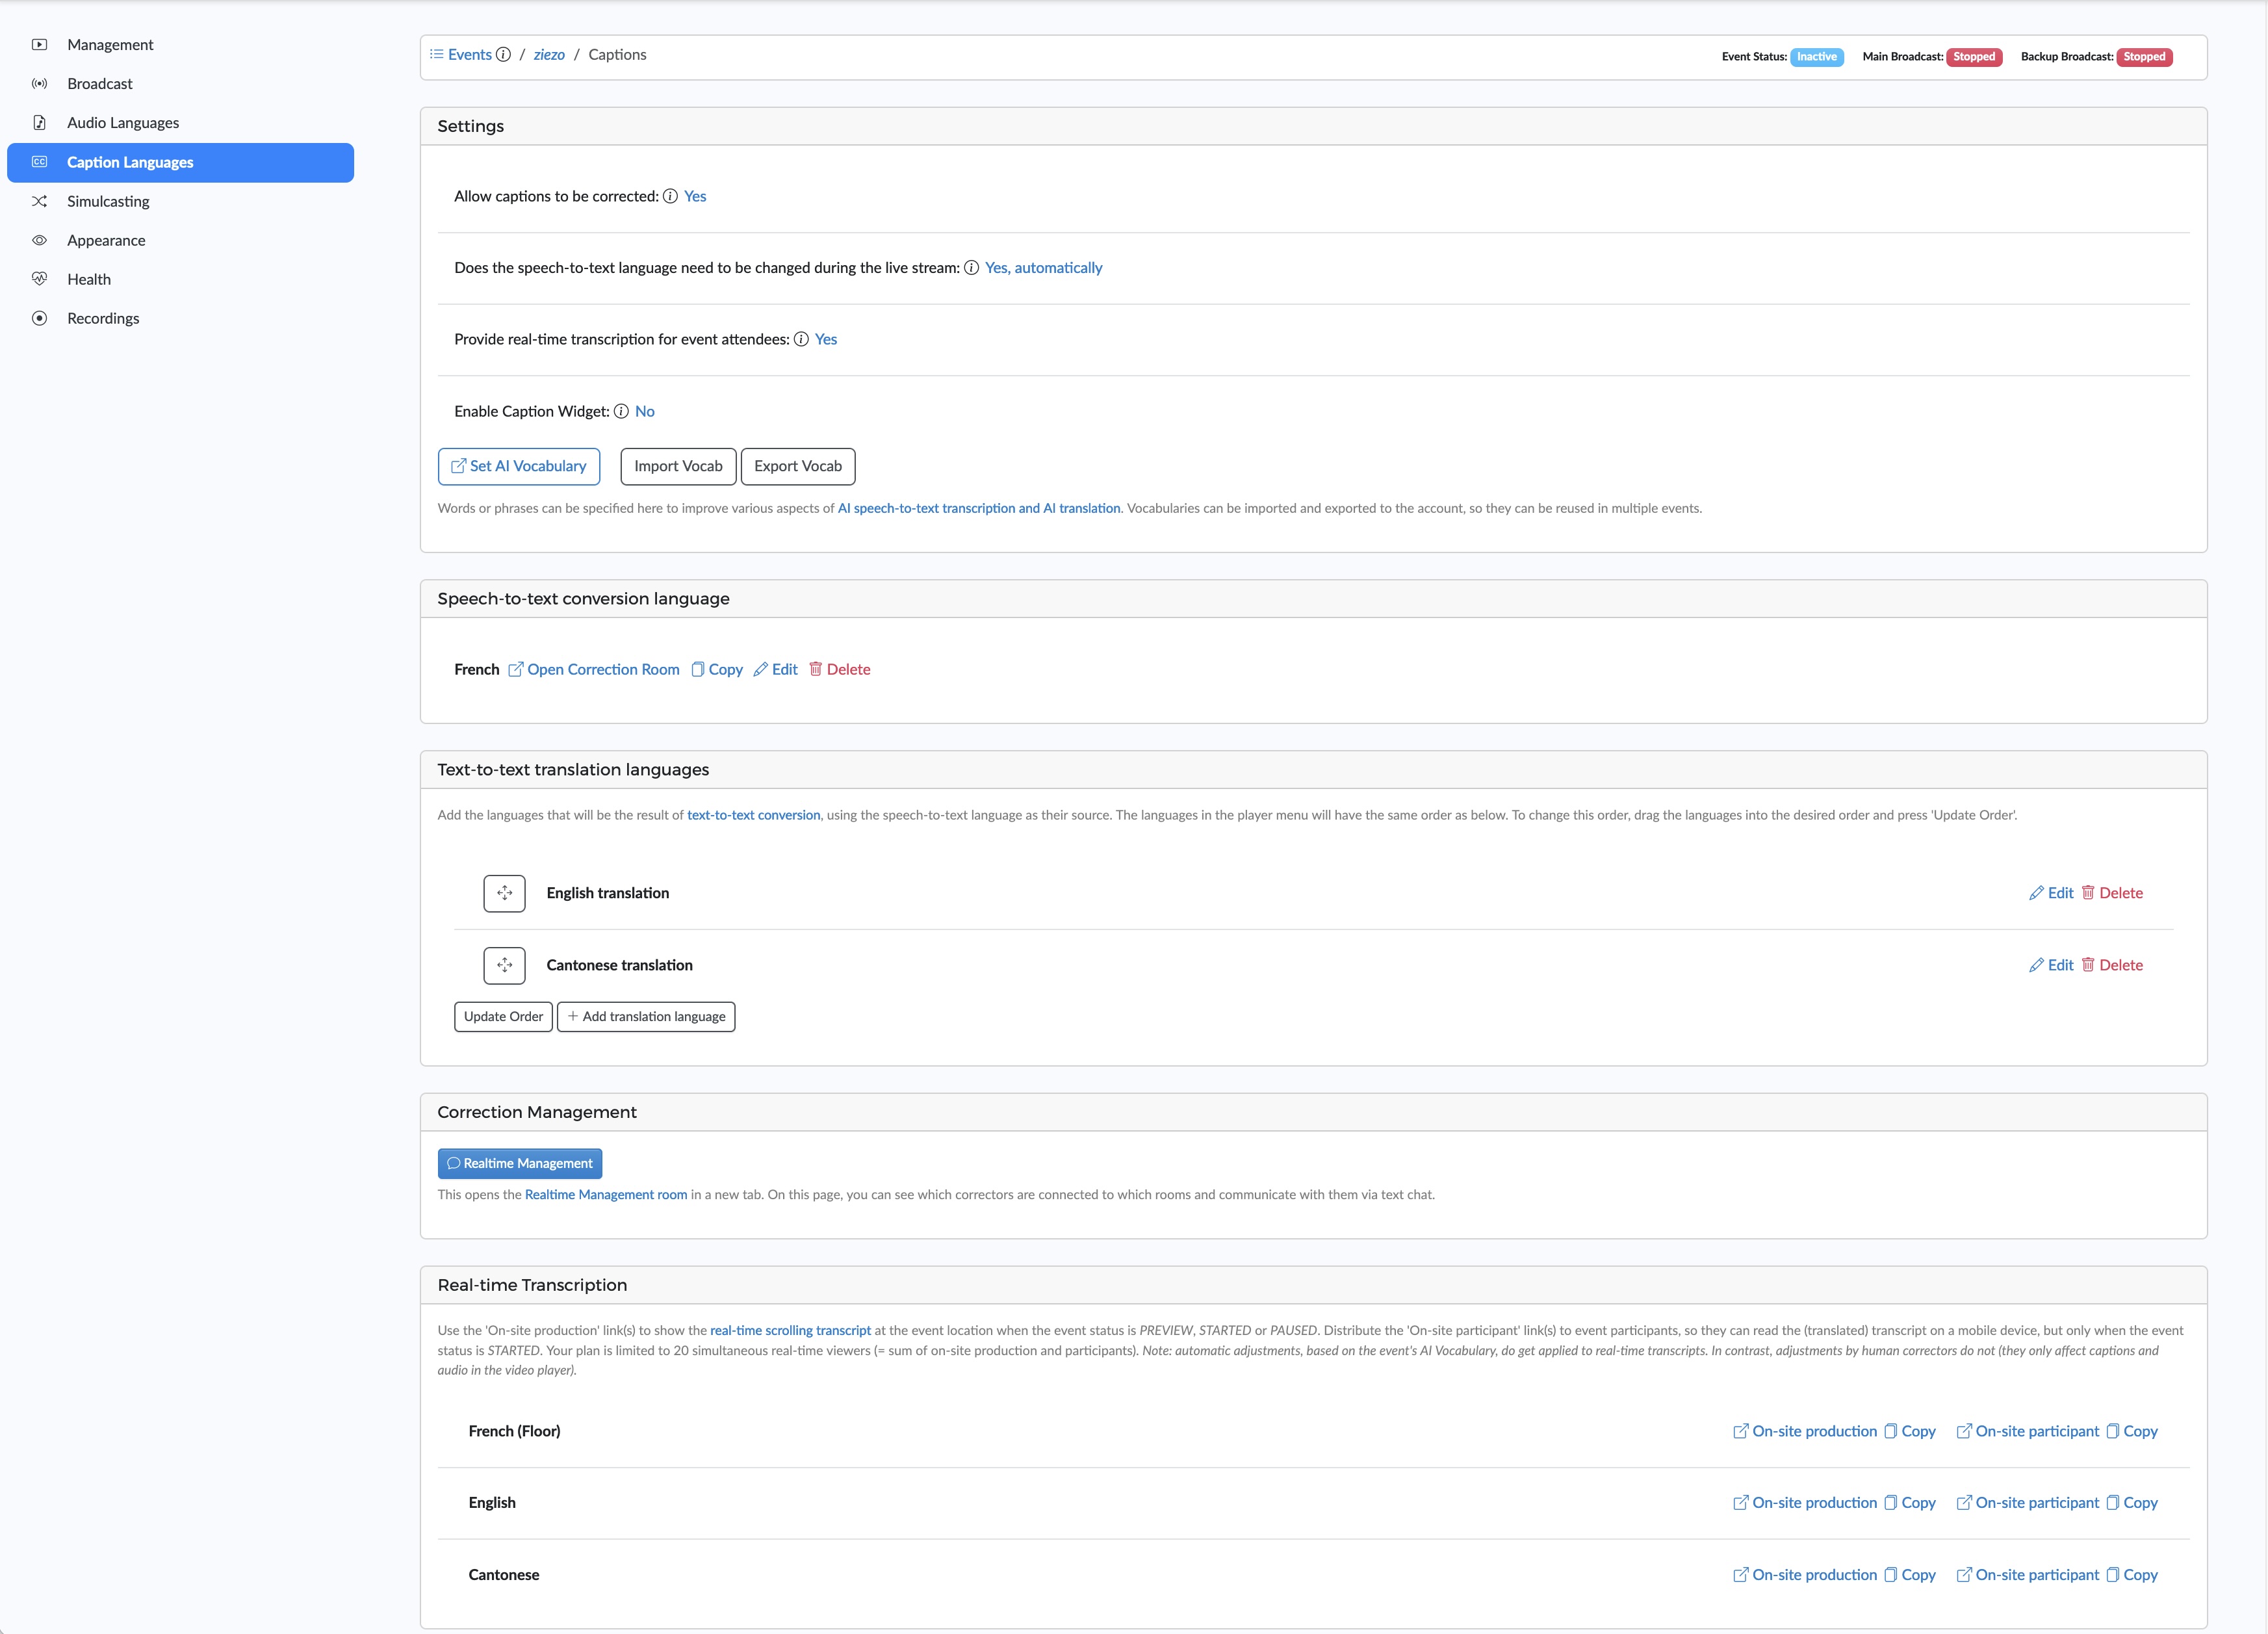
Apart from AI captioning settings and configuration, this tab also gives you access to (optional) tools to improve the accuracy of the AI-generated closed captions and speech translations:
- the AI vocabulary lets you define terms specific to your live stream, which are used by the language model to improve the speech-to-text conversion
- the real-time AI Correction Room allows your correctors to edit the speech-to-text conversion in real-time, just before it is used as source for the speech translations
For detailed info on configuring AI-generated captions, see the Closed Caption languages section of our AI Live Streaming Manual.
Human subtitling
Instead of using AI speech-to-text, a human subtitler can also generate closed captions (in real-time). For each subtitling language, there is a direct link to the Subtitling Room interface, which you can copy and distribute to your subtitlers.
Manual subtitling can be combined with text-to-text translations. Like speech-to-text, the manually generated subtitles can be corrected in the Correction Room room.
A live stream with manual subtitling is delivered with about 50 seconds of delay. If you also use correction, there will be an additional 20 seconds of delay.
Because of the high quality of AI-generated captions with human correction, human subtitles are usually only used for specific purposes (e.g. to add subtitles for the Deaf and Hard of Hearing (SDH) that should contain extra context information). This makes it increasingly difficult to find professional subtitlers. If desired, we can source them for you (on a project basis).
Simulcasting
The Simulcasting tab lets you simulcast a live stream via RTMP and SRT to social media channels and other endpoints, including social media platforms such as YouTube, Facebook and LinkedIn.
A multilingual event has additional options, depending on your plan:
- If a live stream includes AI-generated closed captions, they can be included as subtitles in the simulcasted stream.
- If a live stream has additional audio languages, a combination of the video stream and one of the audio translations can be simulcasted.
For more info, see the Simulcast Manual.
Appearance
The Appearance settings determine the look and feel, accessibility and behavior of the embedded Clevercast player:
- Player: determines which Player profile will be used by the embedded player. By default, this is the Live Player which is initially created with no pause button and autoplay and muted turned on.
- Viewing Profile: determines the accessibility of the live stream in the embedded player. By creating a viewing profile, you can whitelist and blacklist viewers based on their domain, IP address and country.
- Player Countdown: if set, the player will display a countdown timer, either until your event status is set to
Started, or until the countdown is complete. - Images: images displayed in the embedded player when the event status is not
Started. You can set a separate image per status and/or a general image that will be displayed for each status without an image. - Messages: messages displayed in the embedded player when the event status is not
Started. A message will only be displayed if no image is available. If no image or message is set, Clevercast will display its default message for the status.
Health
The Health settings give you feedback regarding the broadcast you are sending. The information on this page indicates when Clevercast receives your broadcast, includes warning concerning the configuration of your encoder, an incorrect bitrate or frame rate, a choppy stream....
The messages on the health page can have three different levels:
- Info: these are messages for informational purposes. For example to indicate that an incoming stream is detected.
- Warning: these messages are displayed if your broadcast is not in line with our recommendations or best practices. By themselves, these are not major issues, but they may cause lower quality or give rise to other problems (e.g. a frame rate that is too high may cause not all frames to arrive in a timely manner).
- Error: these are issues that will give rise to a failing or faltering stream. They require you to take action.
Errors and warnings are also shown at the top of all other event tabs.
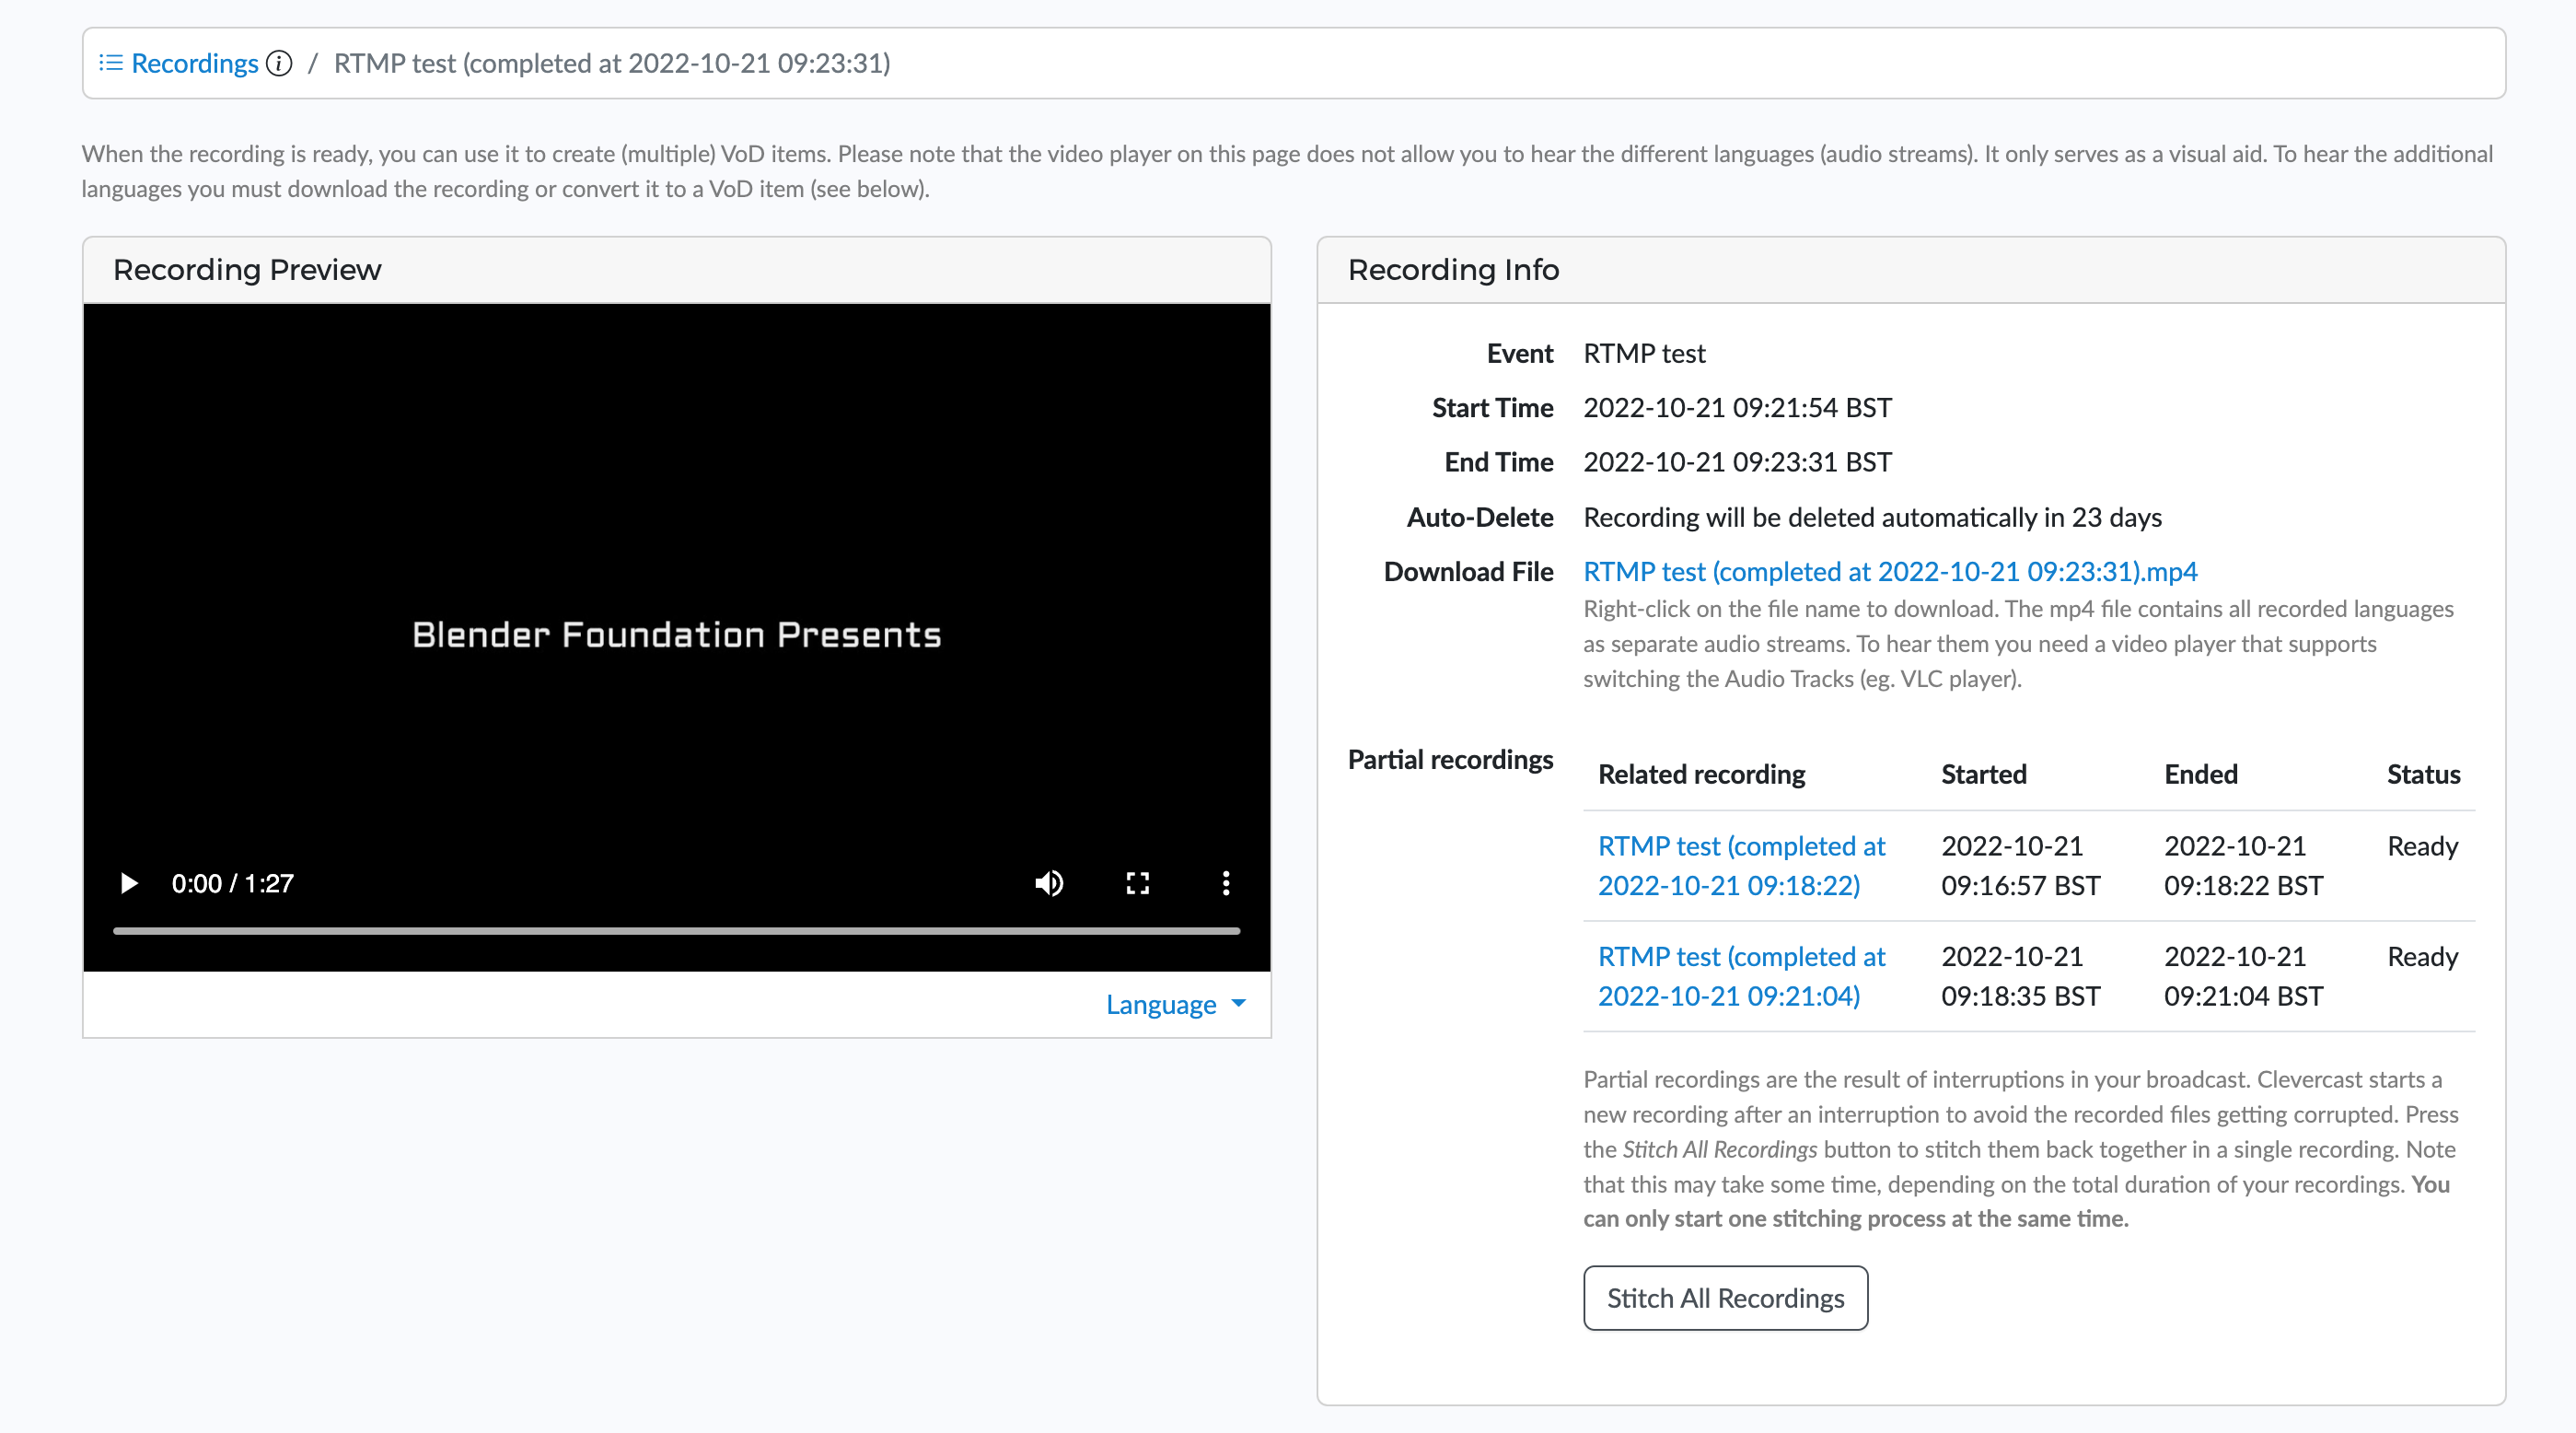
Recordings
This tab lists the cloud recordings (see below) for this event. The list of cloud recordings for all events is available via the Live > Recordings menu.
Cloud recording
A Cloud Recording is created every time an event is started. The recording can be downloaded or published after the event is ended or paused.
In case of a multilingual live stream, the live stream is recorded as a single mp4 file containing the video stream and all audio streams (= languages). Note that when using Translate@Home, the outgoing audio streams is recorded: so any background volume that is part of the live stream, will also be part of the recording (it isn’t possible to remove this afterwards).
Recordings can be published to VoD (including speech translations and closed captions). You can also download the mp4 file from the recording page. In case of a multilingual video, the downloaded MP4 file contains a single video stream with all additional languages as separate audio streams (except for AI speech translations, which can be downloaded separately as AAC files). To be able to hear them, you need a video player that supports switching the Audio Tracks (e.g. VLC player).
Notes:
- the maximum duration of a recording is 24 hours! Clevercast automatically ends a recording 24 hours after you’ve started your event.
- recordings are deleted automatically after 30 days. You should publish or download them before that happens.
- we strongly recommend to always make a local recording of your stream! An online recording can be interrupted by a temporary lack of upload bandwidth or network issues, which may result in an imperfect or incomplete recording.
Events with closed captions
If your event has closed captions, Clevercast will also record them as WebVTT files. For the recorded .vtt files to have a correct timing, it is necessary that you first set the event status to Preview and start broadcasting, before starting the event. If you start the event without setting it to Preview or without a broadcast already running, the timing of the recorded VTT files will not be correct. In that case, the closed captions of the Video on-Demand will also be out of sync.
Events with AI speech translations
If your event has AI speech translations, they can be downloaded separately as .aac files.
Partial & stitched recordings
When your broadcast to Clevercast is interrupted, Clevercast may start a new recording to avoid the recorded file becoming corrupted. This may result in two or more recordings after a live session.
In such case, Clevercast allows you to stitch the different recordings back into one single continuous recording. Note: if the broadcast interruptions were so short that they were not visible in the live stream, they will also not be visible in the stitched recording.
The easiest way to stitch a recording is to go to the detail page of a recording that has been interrupted. Apart from the recording itself, the page will show the list of partial recordings from the save live sessions. To stitch all partial recordings, press the ‘Stitch All Recordings’ button below the list. This will result in a new continuous recording that spans all partial recordings.
Publish recording to Video on-Demand item
The recording page lets you trim the start/end of the recorded video and publish it as a VoD item. Press the ‘Trim Video‘ button to select the start and end point of the VoD item you want to publish. Click on the Submit button: the start and end offset will be set on the recording page.
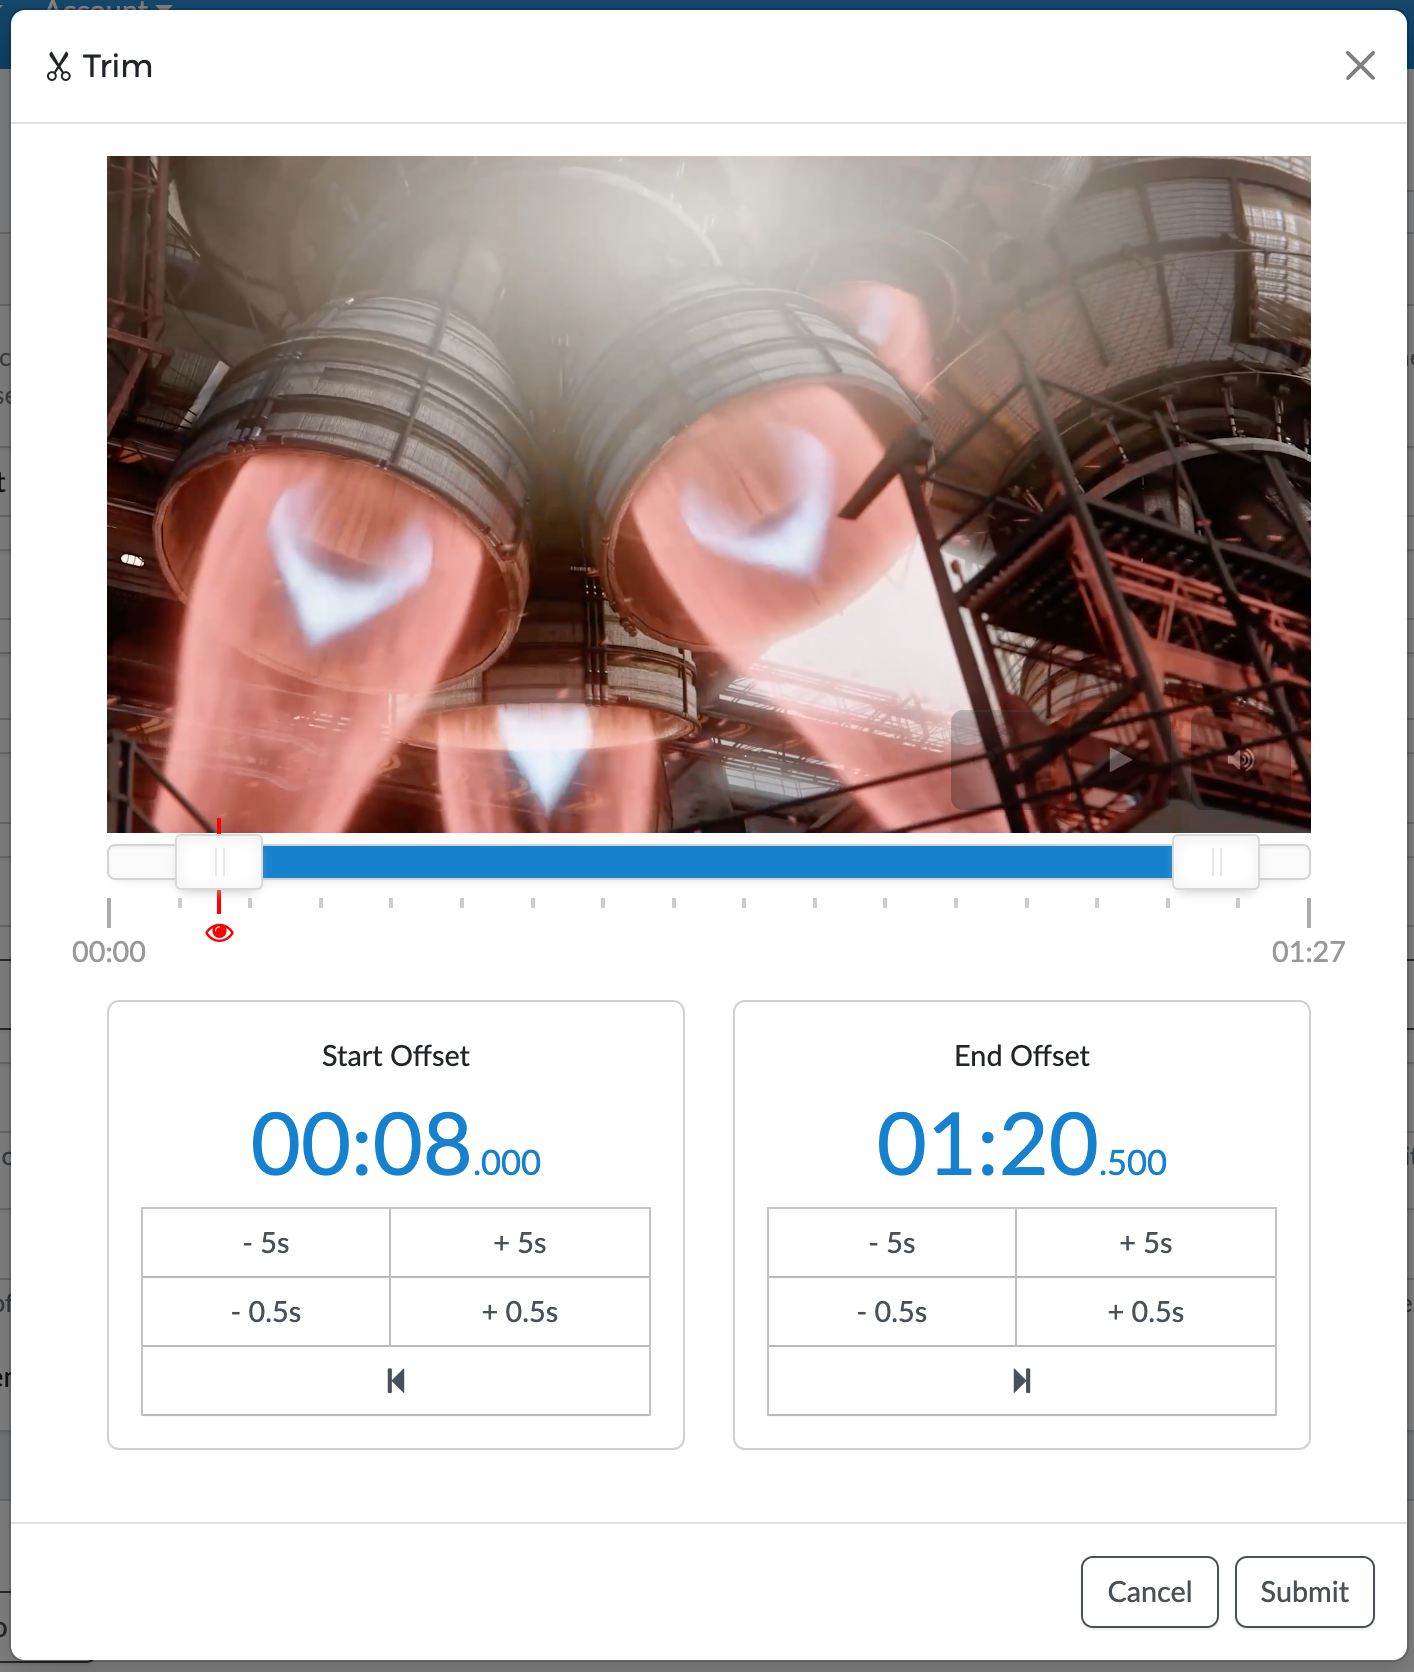
Continue to fill in the other form fields and press the ‘Convert to Item‘ button. The video will be transcoded for adaptive streaming and exported to the Clevercast CDN (this may take some time).
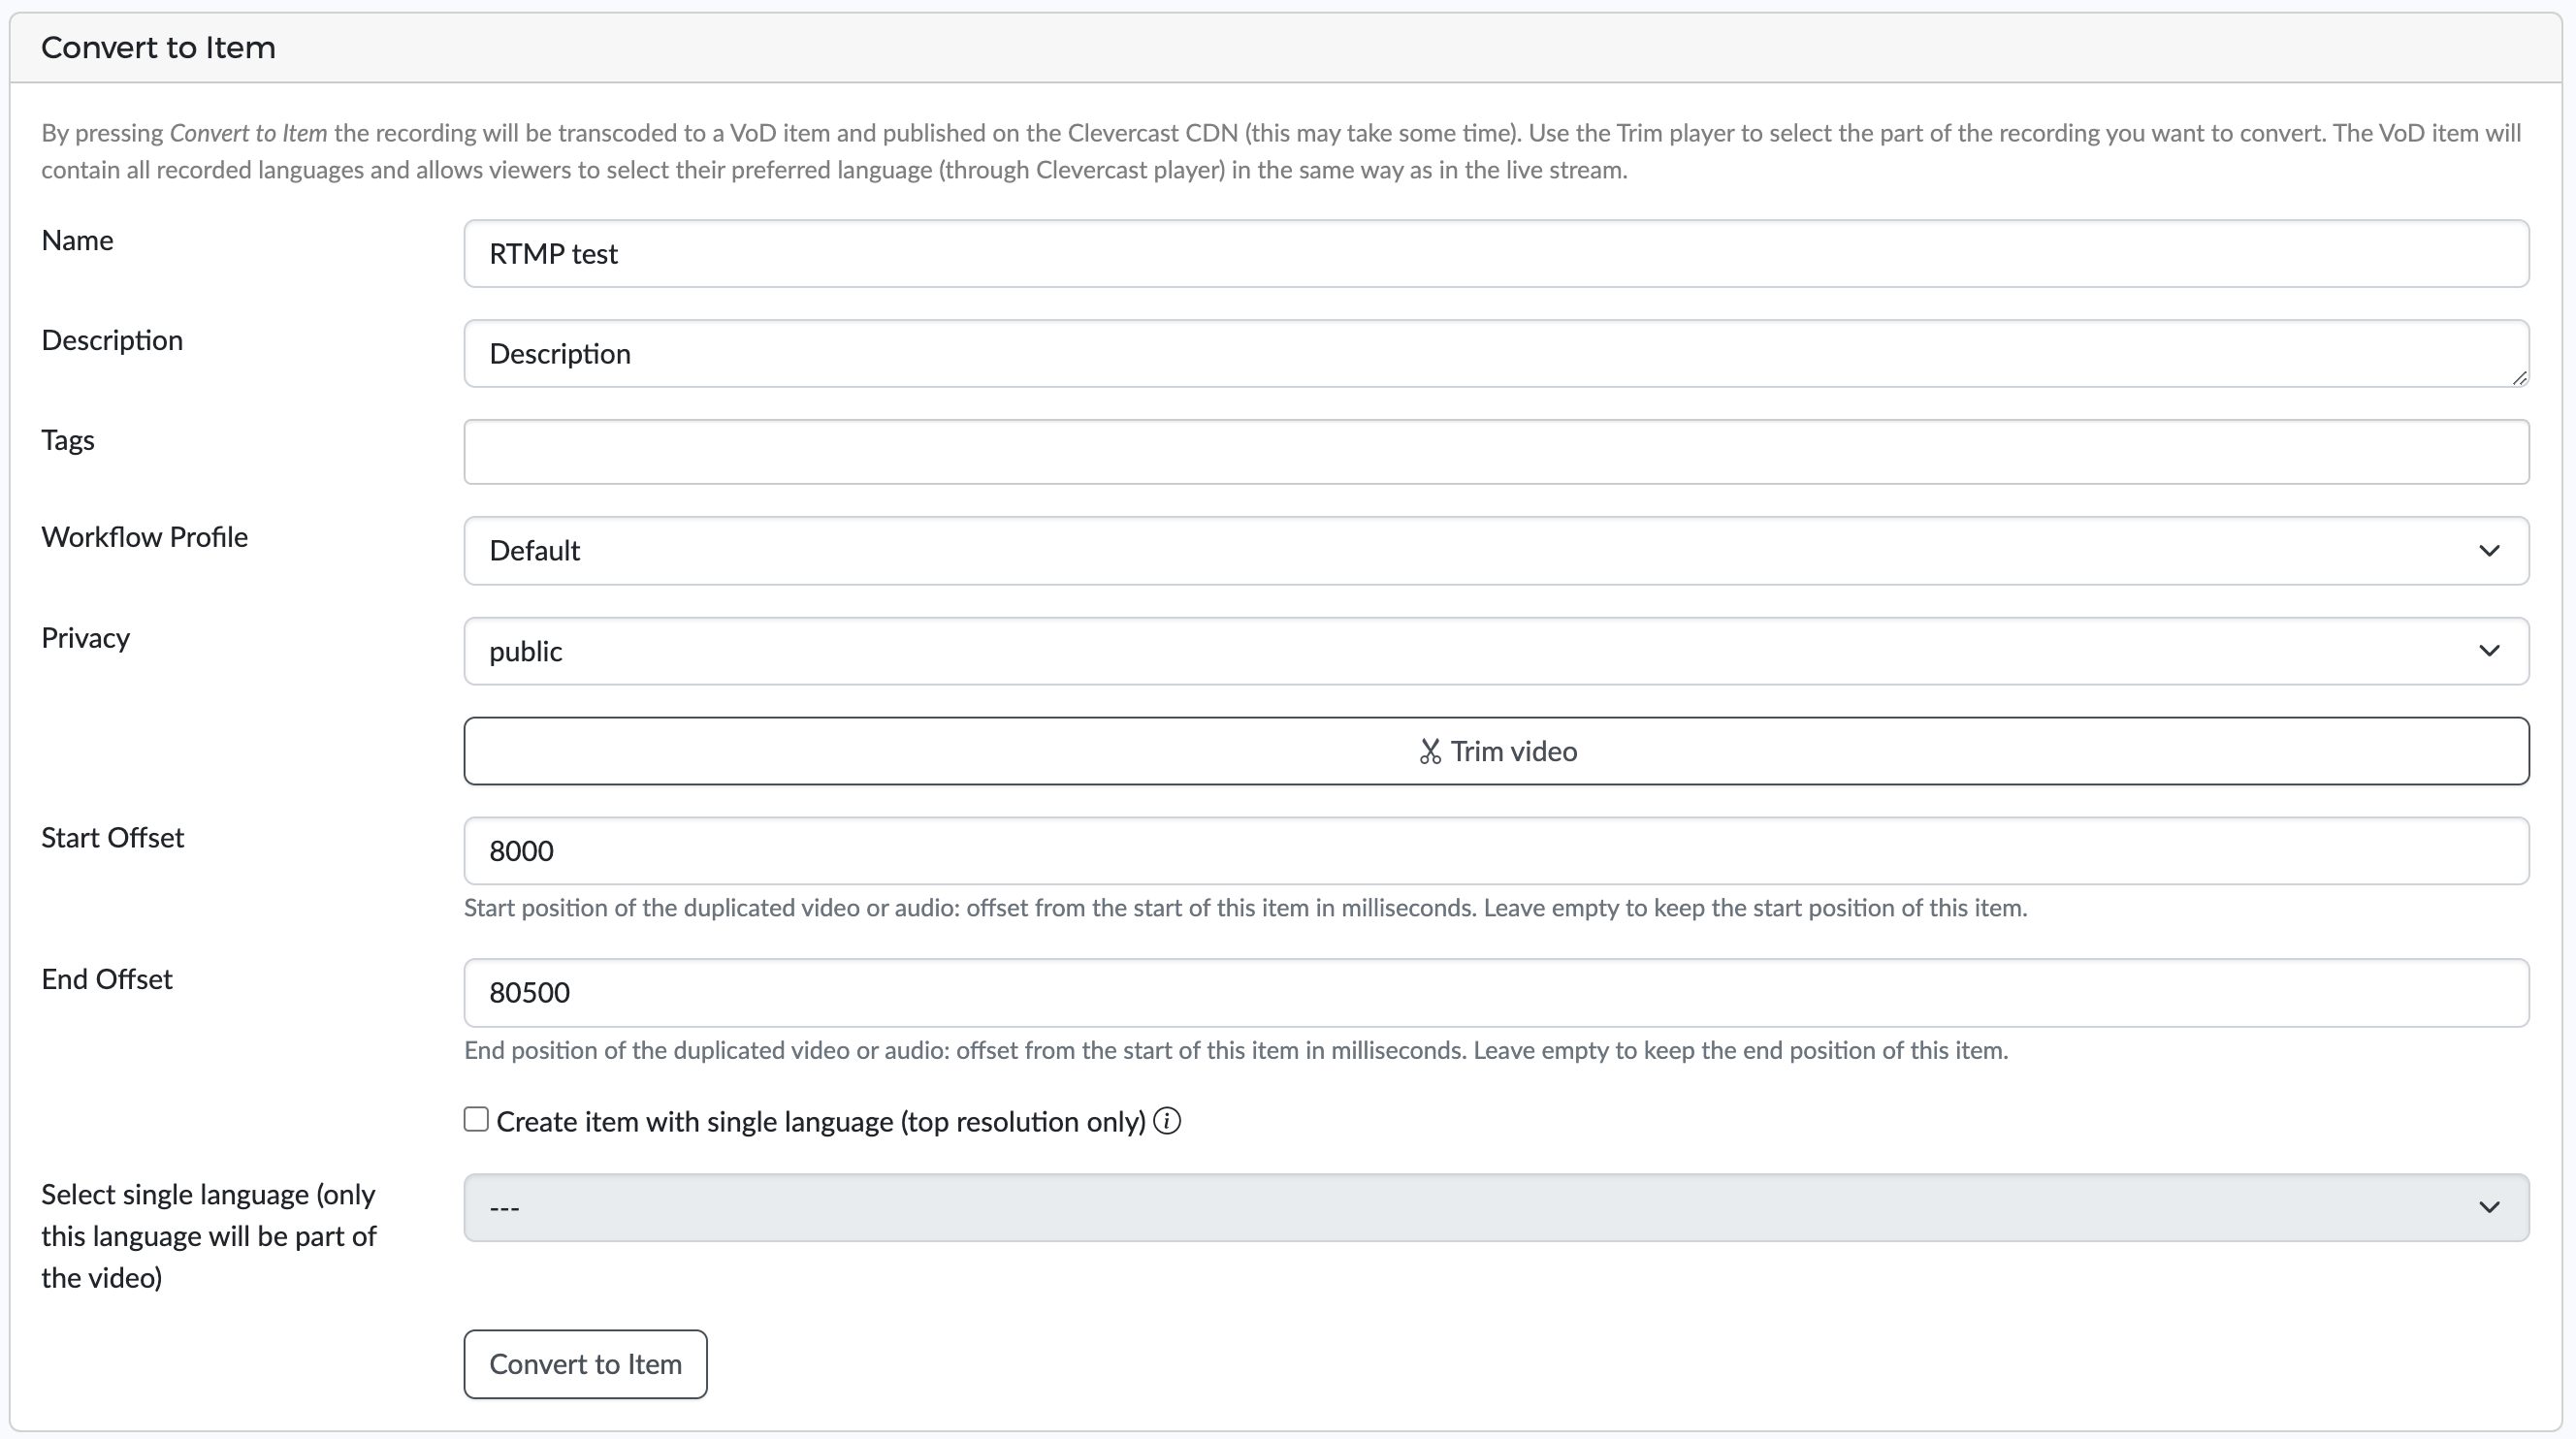
If the recording includes extra audio languages and/or closed captions, the VoD player will also contains the same menus with the same languages. You can copy the VoD embed code to your website, in the same way as the live stream.
Convert multilingual recording to single-language video(s)
If your recording contains multiple audio languages and you need (to download) video(s) with a single audio language, you can convert the recording to single-language VoD item(s). To do this, make sure that:
- 'Create item with single language (top resolution only)' is checked
- The preferred audio language is selected in the dropdown: 'Select single language (only this language will be part of the video)'

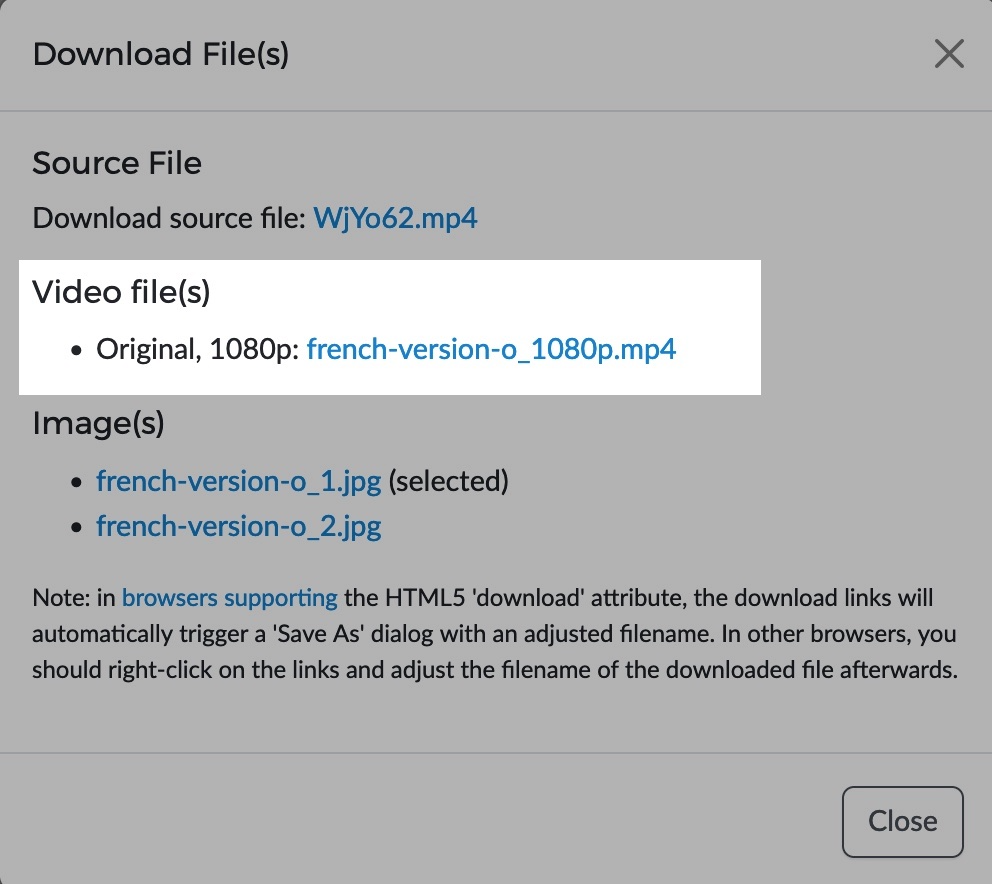
After pressing the ‘Convert to Item‘ button, the conversion to a (single-language) VoD item will start. This may take some time. After the conversion has finished, you can go to the Item page and select Actions > Download in the left-hand menu. A dialog will appear: download the single-language MP4 file by right-clicking on the link under Video file(s).
Advanced T@H Features
T@H Connection Tests
Clevercast offers a way to test the internet connection of potential interpreters in advance.
As a Clevercast administrator, you can see all test results on the ‘T@H Connection Tests’ page (available under the ‘Live’ > ‘T@H Connection Tests’ menu). On this page, you can also copy the link to the test page and send it to your interpreters.
Doing the test is simple. Interpreters just have to paste the test link in the address bar of their Firefox browser, enter their name, email and location and press the Start button. The browser will establish a connection with Clevercast and start sending data packets. After 30 seconds, the result is available.
Before doing the test, interpreters should make sure to:
- Use the same computer and internet connection as during the live stream
- Use an ethernet cable (no wireless connection!)
- Close all unnecessary applications on the computer, in the same way as during the live stream
The test measures:
- Average ping time in milliseconds. Ping (or latency) measures the time it takes for a small data set to be transmitted from the interpreter’s computer to Clevercast and back to the interpreter’s computer again. Ideally it should be under 250ms, but a higher value doesn't necessarily result in poor audio quality. Even a ping time above 750 ms doesn’t have to be a problem in itself, but could lead to other issues like jitter and packet loss.
- Average jitter in milliseconds. Jitter is the amount of variation in packet delay (packets are usually sent at regular intervals and take a set amount of time). The bigger the differences in delay between packet arrivals, the more jitter. This is often caused by network congestion and sometimes route changes. Ideally it should be under 30ms, but a value under 100ms may still be acceptable.
- Percentage of packet loss. A bad connection leads to packets not arriving in time, and thus being lost. The audio codec needs to correct this, leading to lower audio quality. Ideally no packets should be lost, but less than 15% packet loss may still be acceptable (depending on the expected audio quality). If there is packet loss, the audio codec needs to make corrections, leading to lower audio quality.

Ideally you should see average ping times under 250ms, jitter under 30ms and zero packet loss. But if this isn’t the case, it doesn’t necessarily mean that the connection cannot be used.
Clevercast distinguishes three possible test results:
- Good: the connection is expected to be suitable for simultaneous interpretation.
- Average: the connection may be suitable for simultaneous interpretation, depending on the audio quality during auditory tests (and your requirements).
- Bad: if possible, use a different connection. If you must use this connection, test sufficiently in advance to ensure that the audio quality is sufficient for your purposes.
Please note that this result is a rough indication of the connection at the time of testing. A good test does not guarantee the best possible audio quality during the live stream, just as an average test does not mean that the connection is unusable (e.g. it could be due to temporary network congestion).
We strongly recommend always performing an auditory test to judge the actual audio quality of an interpreter. Keep in mind that other things such as the computer, headset, location and experience of an interpreter also determine the audio quality.
Note: avoid opening interpreter rooms (or language management rooms) in multiple browser tabs! This can cause all kinds of problems with your connection, audio quality...
Bilingual interpreter rooms
Translate@Home allows event managers to add a second language to an interpreter room. This will allow interpreters to switch between the two languages in the interpreter room. This way, they can translate the floor audio into two different languages, without having to leave the interpreter room.
This allows, for example, for a bilingual event translated by a single interpreter. When the language in the floor audio changes, the interpreter can continue to translate. She only has to press the button to switch to the other interpreter room.
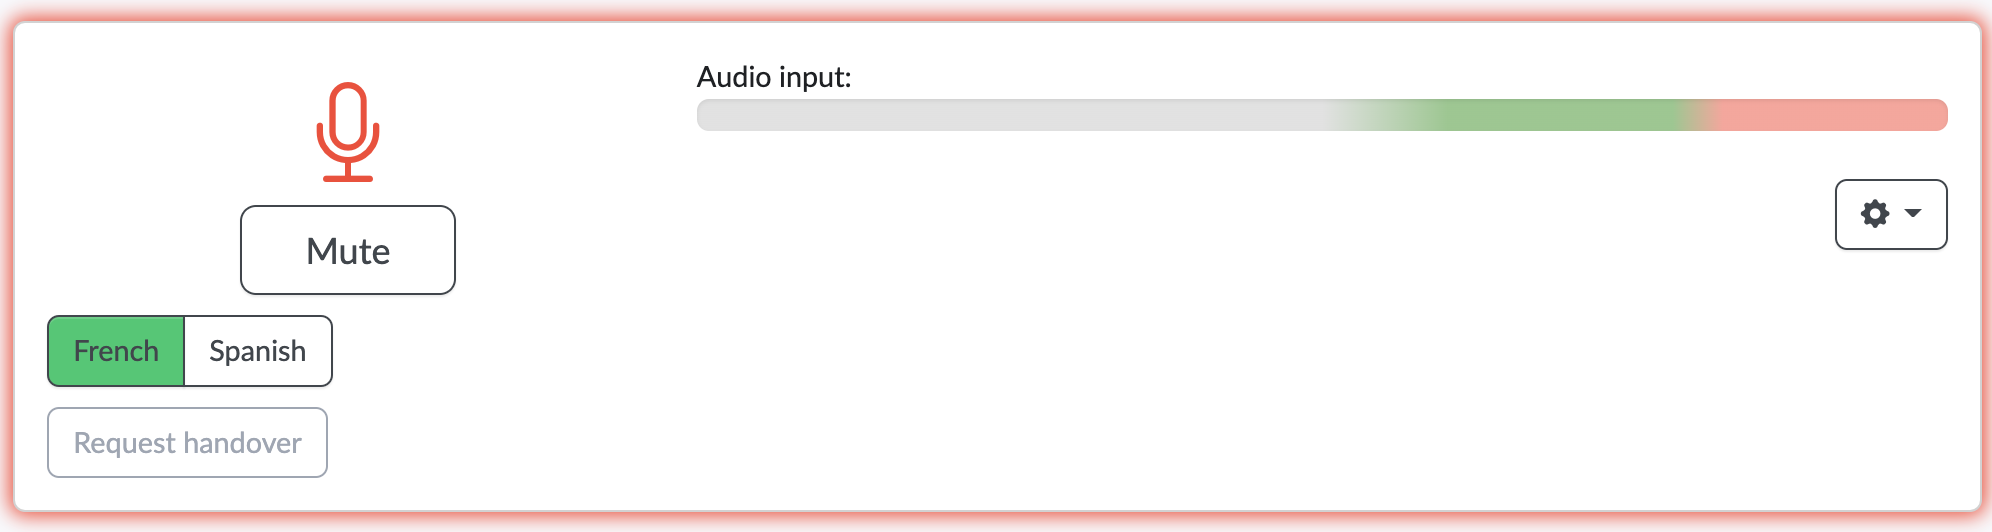
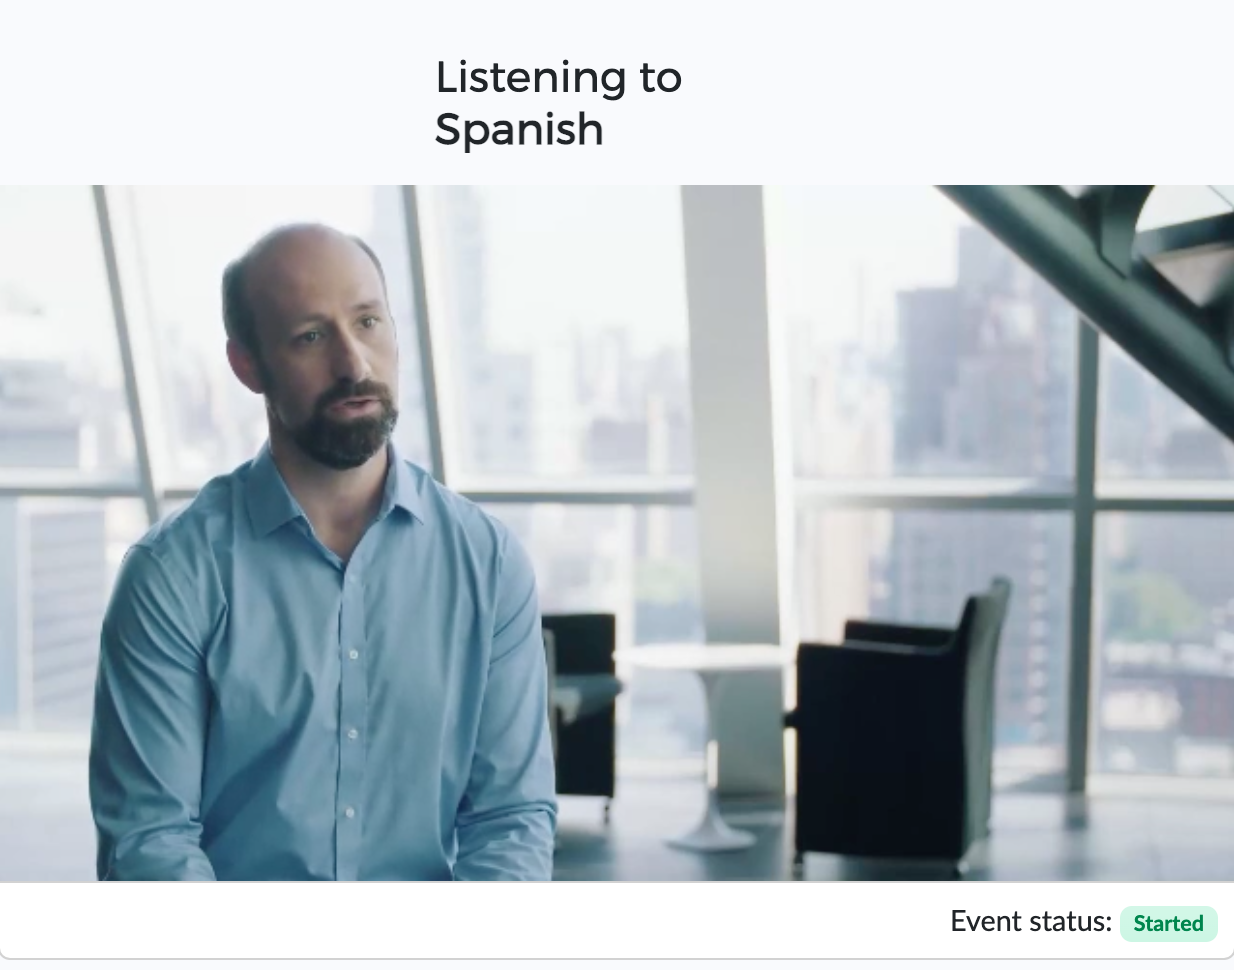
In the image above, the translator can choose to translate the floor audio into French or Spanish. When she is not muted, her translation is automatically sent to the language that is currently selected. For more info on how to use bilingual interpreter rooms, see the T@H interpreter manual.
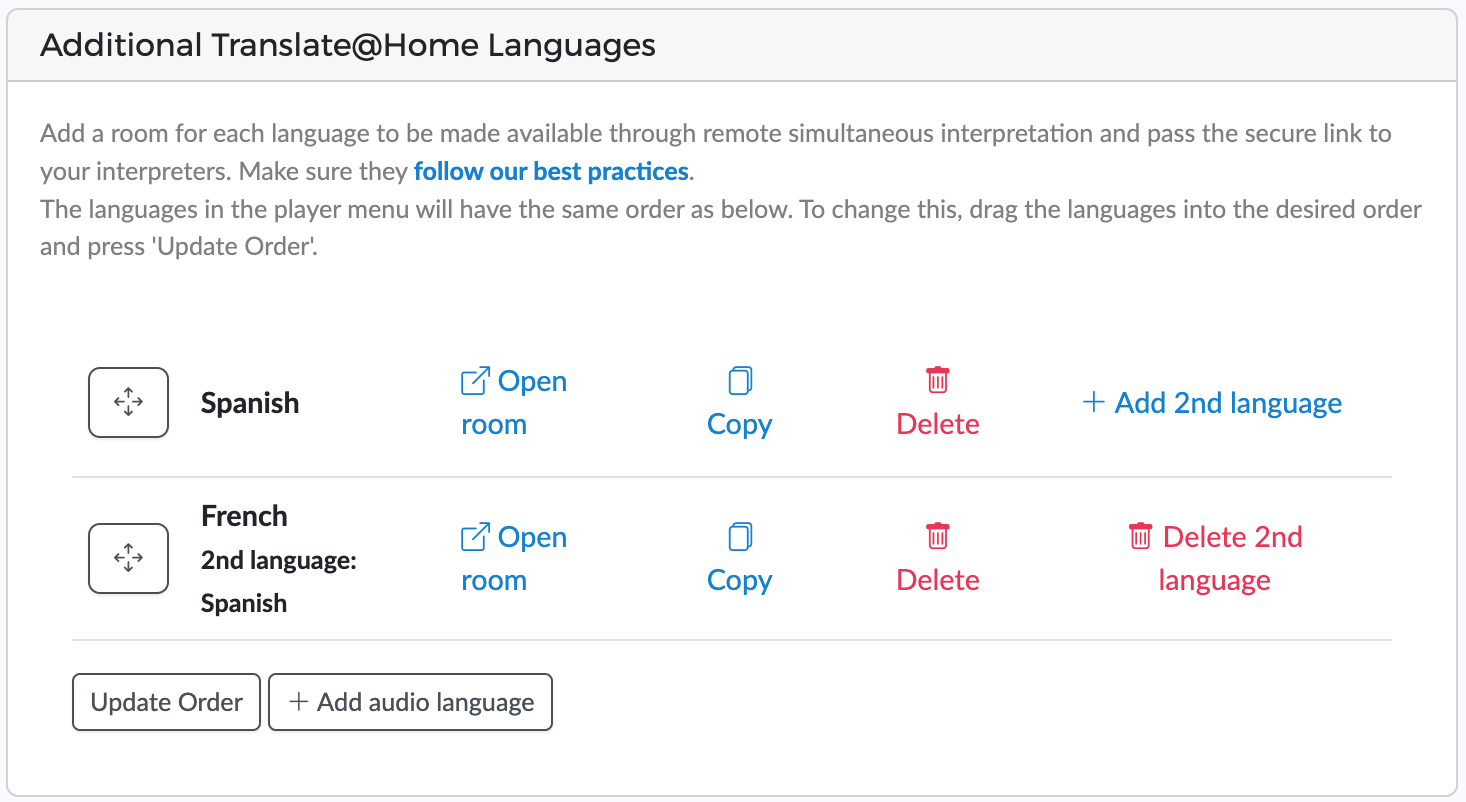
A bilingual interpreter room is created when an event manager adds a second language to an already existing interpreter room. For a language to be selected as a second language, it must also have its own interpreter room for the same event.
Real-time participants
Clevercast T@H also supports hybrid events, where a number of real-time participants need to listen to the translated audio (and optionally also watch the video) in real-time.
Real-time participants may be:
- present at the event location and in need of audio translation in real-time
- speaking from home and in need of real-time video and audio (translation)
Real-time participants are an optional feature, which must be included in your plan.
If this option is enabled for your plan, the Audio languages’ tab of an event contains a 'Real-time Participants Links' panel. For each language there will be a secure link for real-time video with audio and for real-time audio only. As an event manager, you are responsible to distribute these links to the relevant participants.
When the event starts, participants only need to open these links in a browser with sufficient support for WebRTC (Chrome, Firefox, Safari, Edge) and press the play button. Participants will automatically hear the event in the correct language, either with or without video. Note that the number of real-time participants is limited and their maximum number is determined by your plan.
A video + audio player is ideal for participants at home, for example speakers being added to a live stream via production software like vMix or an in-browser studio like Streamyard. This allows them to see the event video in real-time, while listening to the simultaneous translation in their own language.
Note: if a participant is already receiving the video feed in real-time (e.g. via Microsoft Teams), it may be a better solution to send her the audio-only player instead. Since the audio-only player only contains the simultaneous interpretation, the participant won’t hear herself speak. See below for more info.
An audio-only player is ideal for participants at the event location. When the event starts, they just use their smartphones to click on the link, press the start button and listen to the translation (e.g. using headphones with a mini jack).
Behaviour of the real-time players
Since the video and audio-only players have different purposes, their behaviour is slightly different.
The real-time video player allows participants to hear the translations in their own language. When the interpreter is muted - which means that the current speaker is speaking their own language - they hear the floor audio instead. This means that they will also hear themselves speak. So they will either have to use a headset or mute the player when they are speaking.
The real-time audio-only player also allows participants to hear the translations in their own language. But when the interpreter is muted - which means that the current speaker is speaking their own language - they will hear nothing. Since they don't hear the floor audio, they will not hear themselves speak.
The audio-only player can therefore also be useful in a remote setup where a participant already receives video and floor audio from the production (eg. through WebRTC or MS Teams). Via our audio-only player, the participant can listen to real-time translations of other speakers. Note that, in this scenario, the participant has two audio sources and may have to reduce the floor audio when she wants to listen to the translation.