Getting started with Clevercast Webinar v1 (deprecated)
Deprecation Notice
Please note that version 1 of Clevercast Webinar is OUTDATED as of 21 September 2023 and will be removed on 31 december 2024! Unless you still have a v1 account, use our latest getting started guide instead.
This tutorial only applies to accounts created before 21 September 2023 which haven't been upgraded. It explains briefly how to get started with Clevercast Webinar v1. For more information, see also our Clevercast Webinar v1 Manual.
Creating a webinar
After logging into the Clevercast backend as administrator, you will be directed to your account's dashboard.
Go to the Webinars menu. Click on one of the ‘Create Webinar’ buttons in the sidebar to create a new webinar. A popup dialog will appear, in which you can choose the name and basic settings for your new webinar (the presence of some settings depends on the type of webinar):
- Name: select the name of your webinar
- Webinar UI Language: the language of the user interface in the front-end
- Broadcast Protocol: the broadcast protocols used when live streaming
- Default video language: the default language that is being spoken in the live stream. If multiple languages are spoken, you can select 'Original'.
- Registration: select the registration type
- Max Number of Registrants: the maximum number of participants that are allowed to register for this webinar
- Resolutions: the resolutions that are used for adaptive streaming. Clevercast will do cloud transcoding of your incoming stream so the player can switch between different resolutions. The highest available resolution depends on your plan.
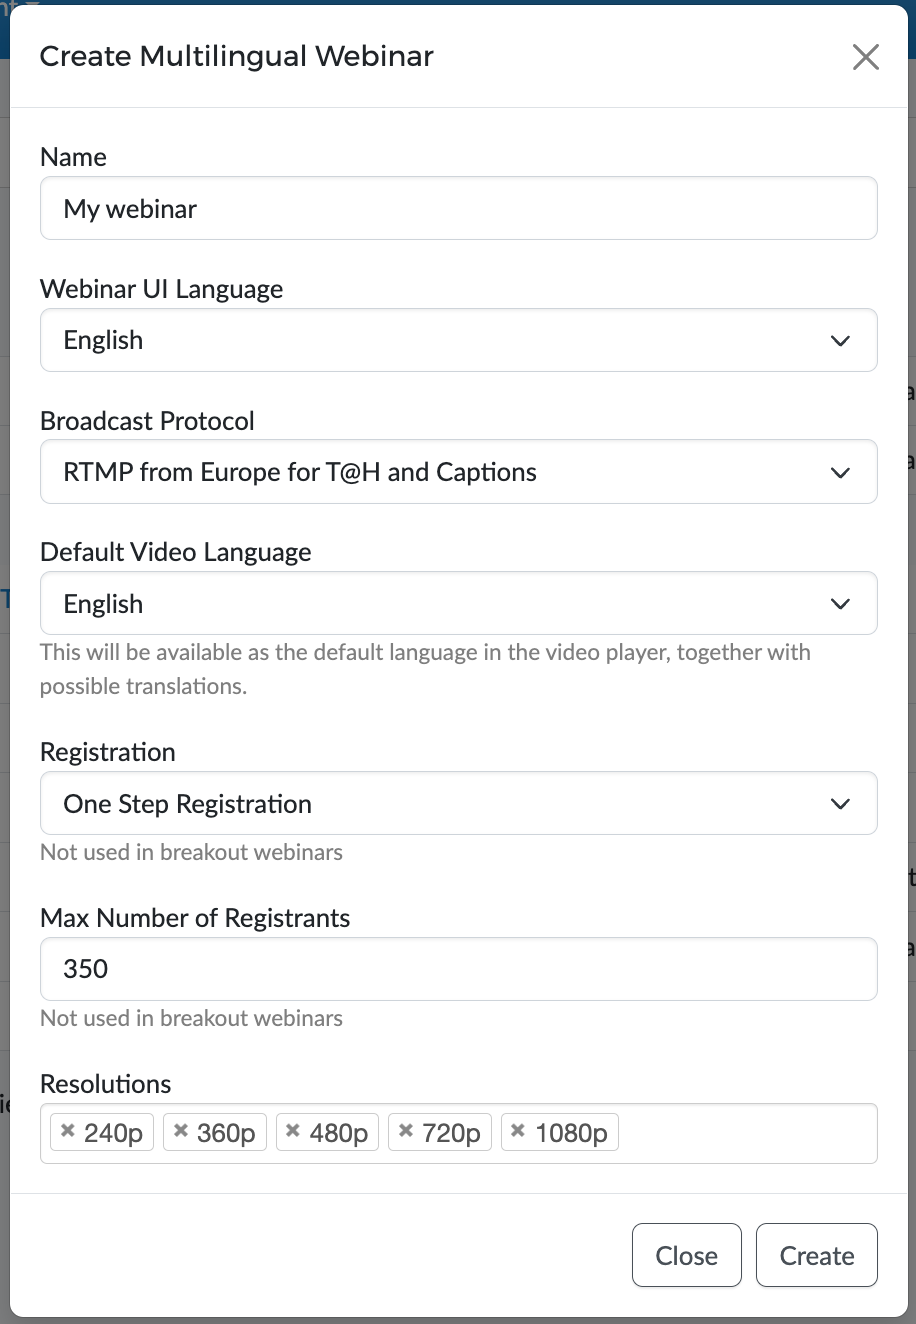
When you press ‘Create’, Clevercast will create your new webinar and redirect you to its home page.
Webinar home page
The webinar home page shows you the main settings and current status of your webinar. The available settings and menus in the sidebar depend on your role and permissions.
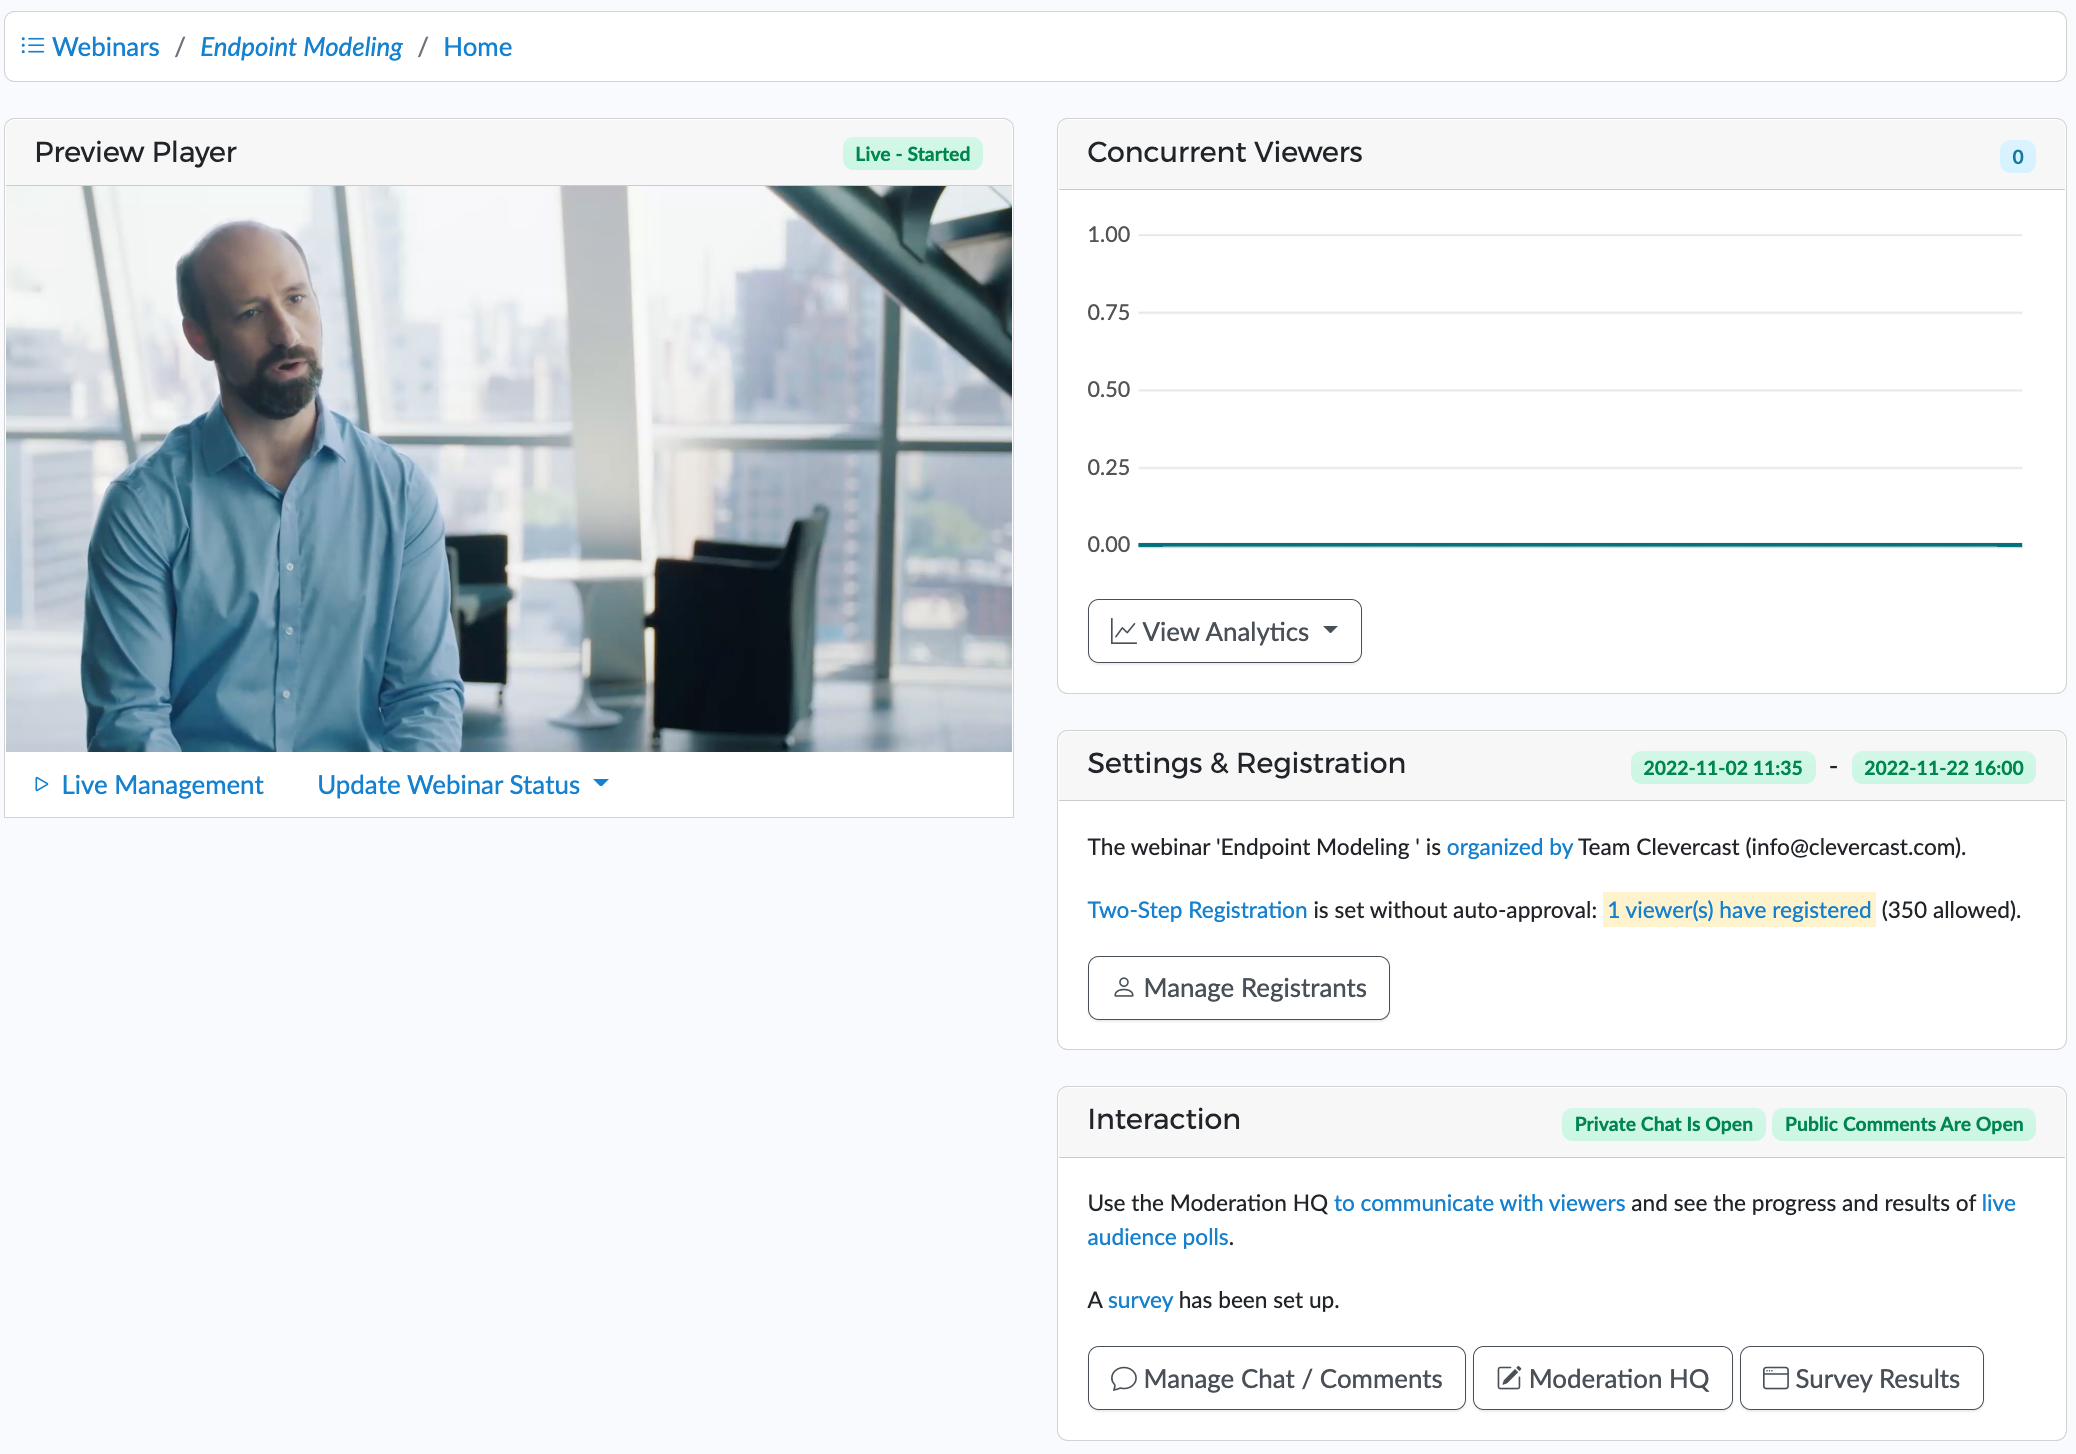
Webinar status
A webinar always has a status that determines what the participants will see in the front-end. It is always visible in the top right corner of your screen. There are four main statuses:
- Live: the front-end displays the live stream player.
- On-Demand: the front-end displays the Video on-Demand (VoD) player. This allows participants to see a recorded or uploaded video, which allows pausing and seeking.
- Canceled: the front-end displays a helper page with the message that the webinar has been canceled.
- Not-Available: the front-end displays a helper page with the message that the webinar is no longer available.
A newly created webinar automatically has the Live status. As administrator, you can change the status through the ‘Update Webinar Status’ dropdown button on the home page.
When the main webinar status is live, its behaviour also depends on the live event status. See below for more info.
Configuring a Webinar
Settings
To start, take a look at the different Settings menus which let you determine the appearance and behavior of your webinar. Before making a webinar available to participants, its start time should be scheduled.
When you make a change to the settings, you can immediately see its effect by opening the ‘Actions’ menu and pressing ‘View Webinar Page’. As a result, the front-end webinar page where participants will see the video (after they have registered) will be displayed in another tab.
Registration
Clevercast supports 3 types of registration:
- No Registration: the webinar is publicly accessible. All participants get access to the webinar page. Since participants are unknown, public/private chats and voting are not available.
- One Step Registration: when someone tries to access a webinar for the first time, he is redirected to the registration page. After submitting the registration form, the participant is immediately redirected to the webinar.
- Two Step Registration: when someone tries to access a webinar for the first time, he is redirected to the registration page. After submitting the registration form, the participant receives an email with a unique link for access to the webinar.
Select the type of registration, via the dropdown button on the Registration Page, before starting to configure the registration page. The available settings and options depend on the registration type.
When you make a change to the registration page, you can immediately see its effect by opening the ‘Actions’ menu and pressing ‘View Registration Page’. As a result, the front-end registration page will be displayed in another tab.
Interaction
The ‘Interaction’ sub-menus let you add interactive functionality to the webinar. See the webinar manual for the different types of interaction (availability depends on your plan). When you make changes to the settings, you will also immediately see the effect on the webinar page.
To test the interactive features, you can:
- Go to the webinar page in a second browser (register first if necessary). Make sure that you are not logged into the backend when you use the interactive features in the second browser (e.g. public and private chat).
- Open the Moderation HQ in your first browser (where you are logged in as admin) by opening the ‘Actions’ menu and pressing ‘View Moderation HQ’. The Moderation HQ lets you see the messages from your first browser and answer them as moderator.
Managing a live webinar
The Live Management page allows you to manage the different aspect of the live stream.
Before you start
- To manage a live stream, it is important to know about the event status, live stream latency and event flow.
- For multilingual live streams, you should know which broadcast protocol to choose and how to configure your encoder.
- For Translate@Home: you'll need to know about the Real-time Management room for testing and communication with interpreters.
Live streaming guides
Depending on your broadcast protocol, choose one of the following getting started guides.
- Managing a single-language live stream
- Managing a live stream with multiple audio tracks or channels
- Managing a live stream with Translate@Home
- Managing a simulive stream
Important: these guides refer to enterprise plans. For a webinar plan, please skip step 1 ('Creating the event'), since the event is automatically created when you create a webinar. All other steps remain the same.
Manuals for interpreters using T@H
If you have a multilingual plan with Translate@Home, your interpreters should take a look at the Interpreter Manual, which includes the requirements and best practices for using T@H.
Publishing to Video on-Demand
Converting a cloud recording
In most cases, a webinar will start out live and may end as Video on-Demand (VoD). Clevercast automatically records the live stream and lets you convert it to VoD. Note that we strongly recommend to always make a local recording of your stream as well (since network issue may result in missing parts or a corrupted cloud recording).
On the VoD Management page, press the ‘Preview and Trim Video’ button to select a start and end point for the Video on-Demand. Then press the ‘Publish’ button to let Clevercast transcode and publish the video resolutions (for adaptive bitrate streaming) on the CDN. This will take some time.
If you leave the ‘Automatically set webinar status to on-demand when the video is published’ option checked, Clevercast will set the webinar status to on-demand when ready. This will automatically make the on-demand webinar available to your participants. If you uncheck this option, the webinar status will remain ‘Live - Ended’ until you manually set it to on-demand (through the Update Webinar Status dropdown on the back-end's Home page).
Upload video
You can also upload a video to Clevercast. As long as no video is published, the VoD Management page will let you select a video file on your computer and upload it to the webinar. Since the file must be transcoded to multiple resolutions (for adaptive streaming) and published on the CDN, this will also take some time.