Getting started with Clevercast Webinar
This tutorial explains briefly how to get started with Clevercast Webinar. It is intended for first-time users who want to discover quickly if Clevercast Webinar suits their purposes. It contains basic info on how to create a webinar, configure it and manage the live and VoD stages.
For more information, we recommend reading the Clevercast Webinar Manual.
Introduction
Clevercast Webinar consists of a frontend (the webinar itself and its registration page, accessible to participants) and a backend (for administrators, moderators, registration managers). When you create a webinar, you can select the frontend user interface language. The backend interface is only available in English.
The default webinar flow starts with a live stream, which is recorded in the cloud and can be made available as a Video on-Demand (VoD) afterwards. It is also possible to organize live-only, VoD-only, or simulive webinars.
The registration page
If registration is required, participants will automatically land on the registration page before they get access to the webinar page. By default, the registration page uses the same logo/banner and color scheme as the webinar. But its look and feel can be fully customized, as well as the text and form elements on the page.
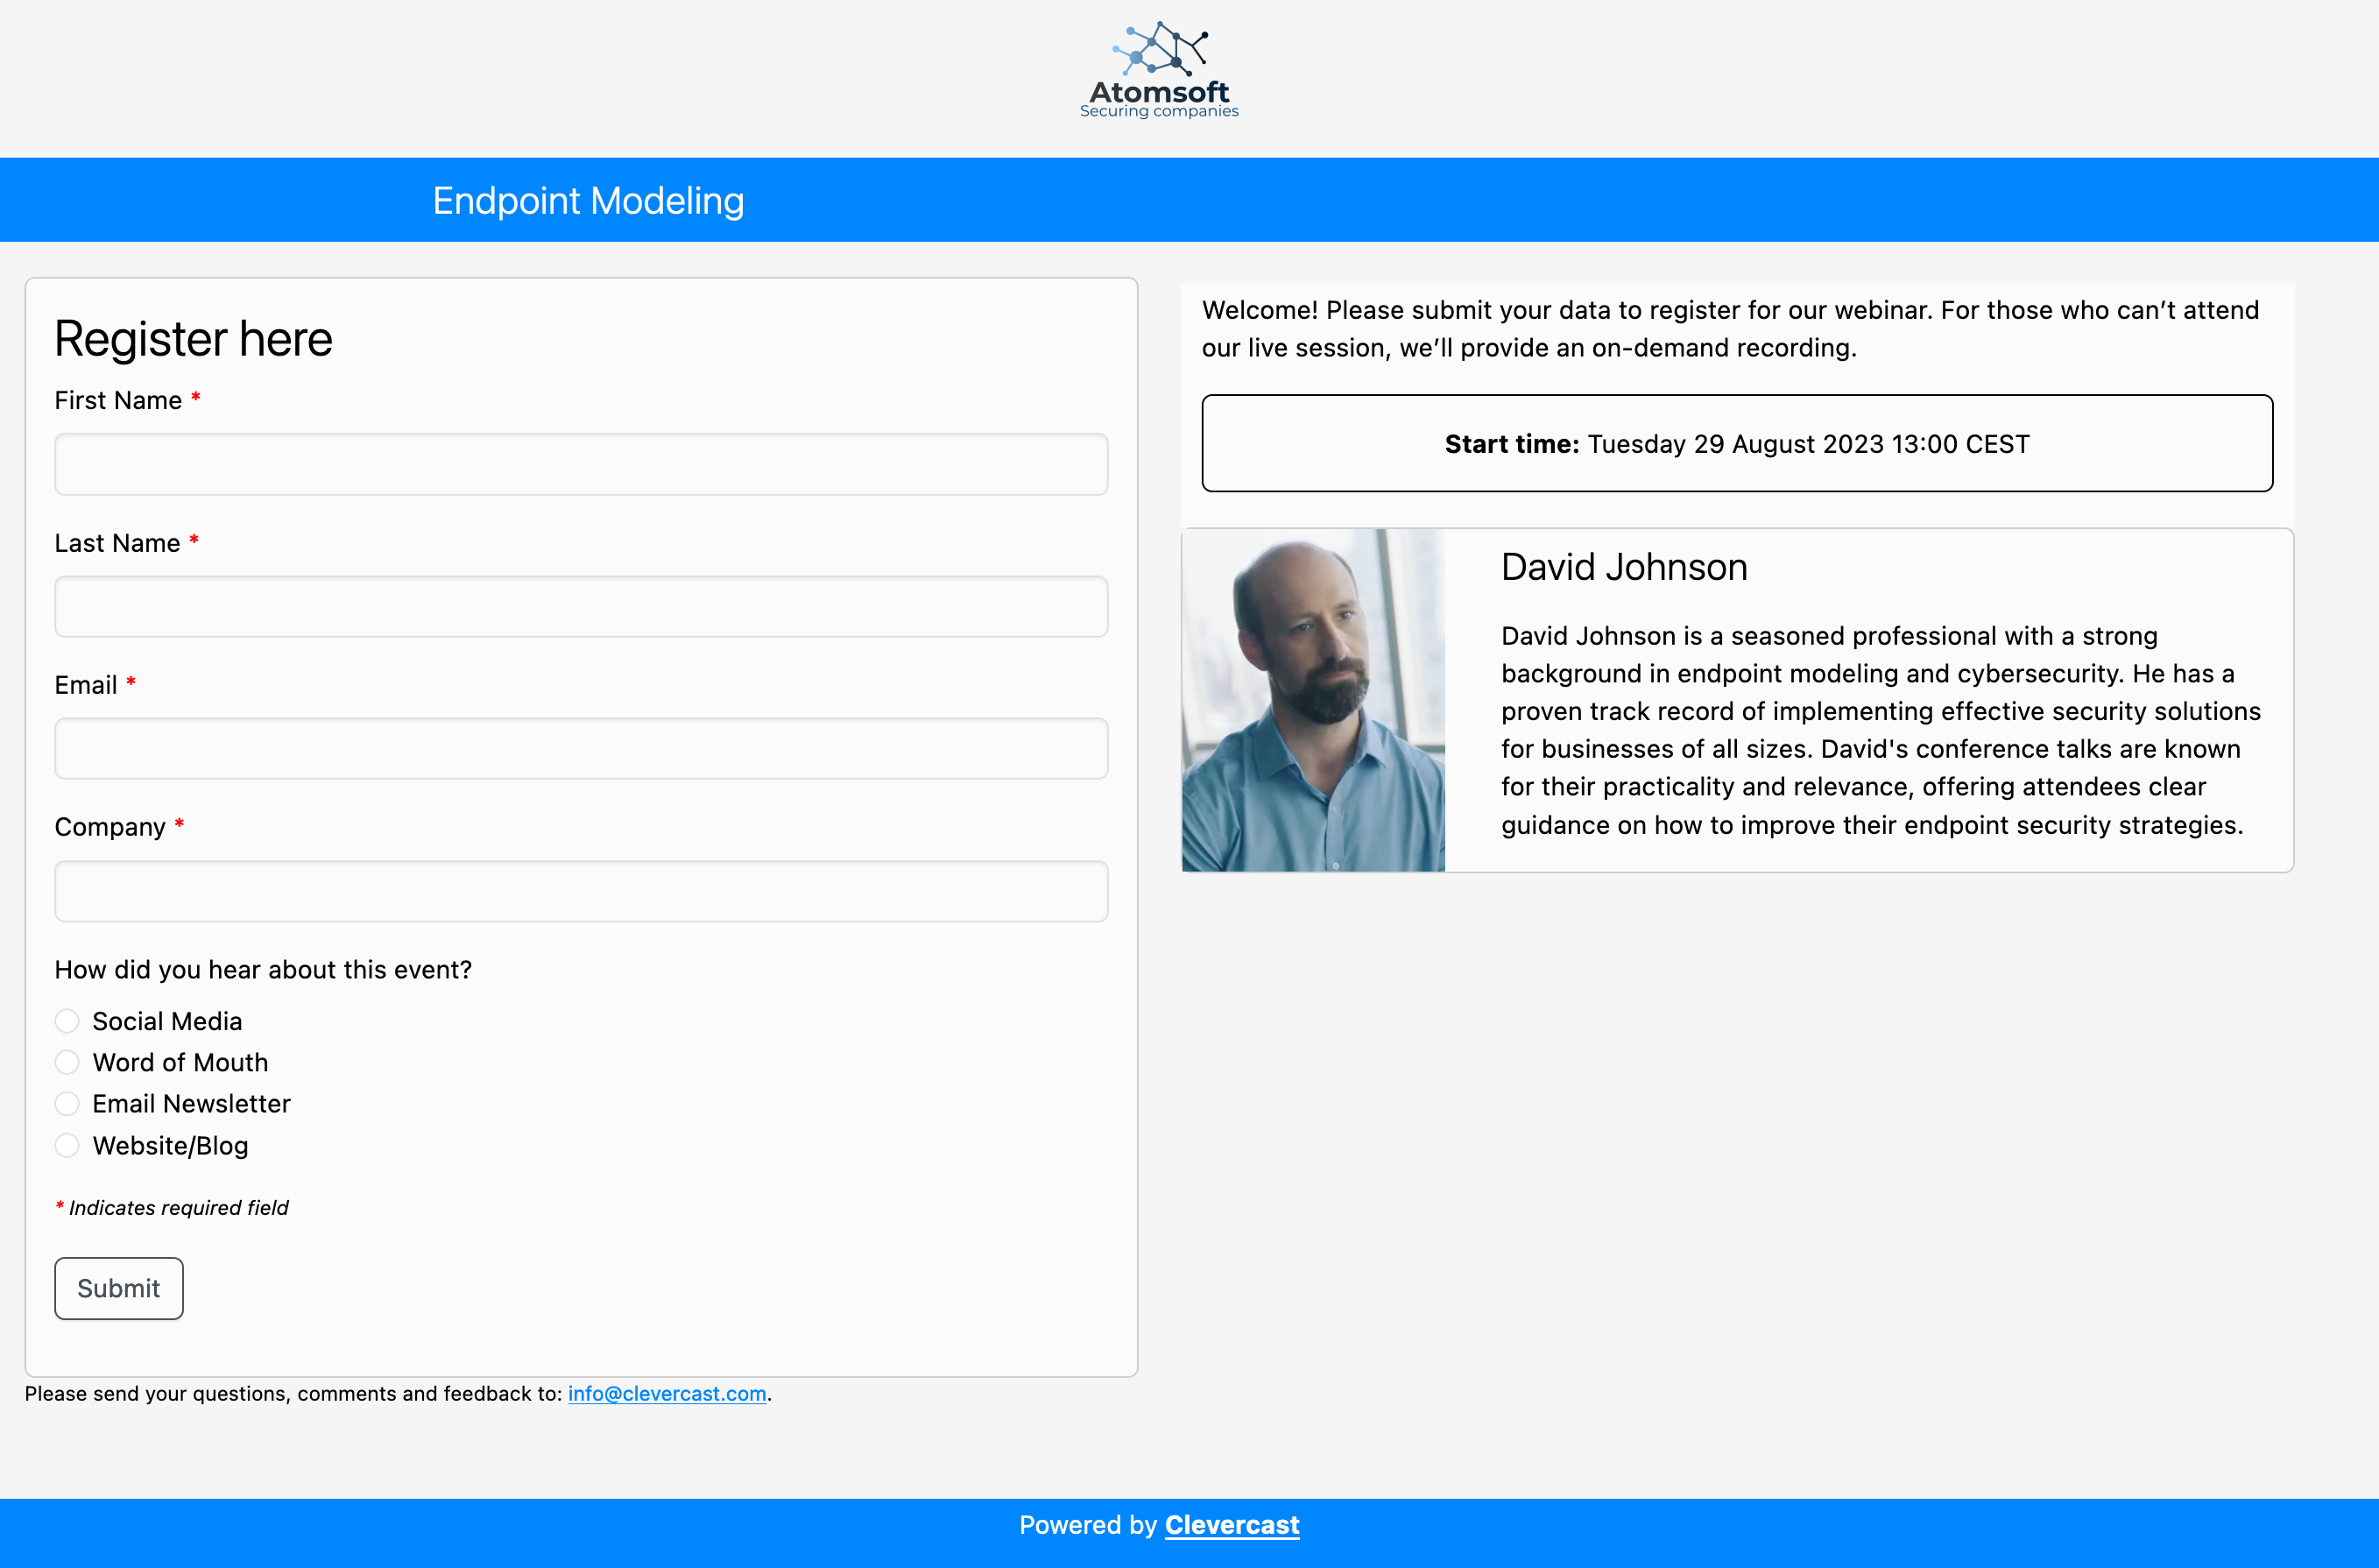
Registration (or invitation) usually requires Clevercast to send a custom email to participants. Clevercast also allows you to send reminder and follow-up emails. Visuals and text of all emails can be fully customized.
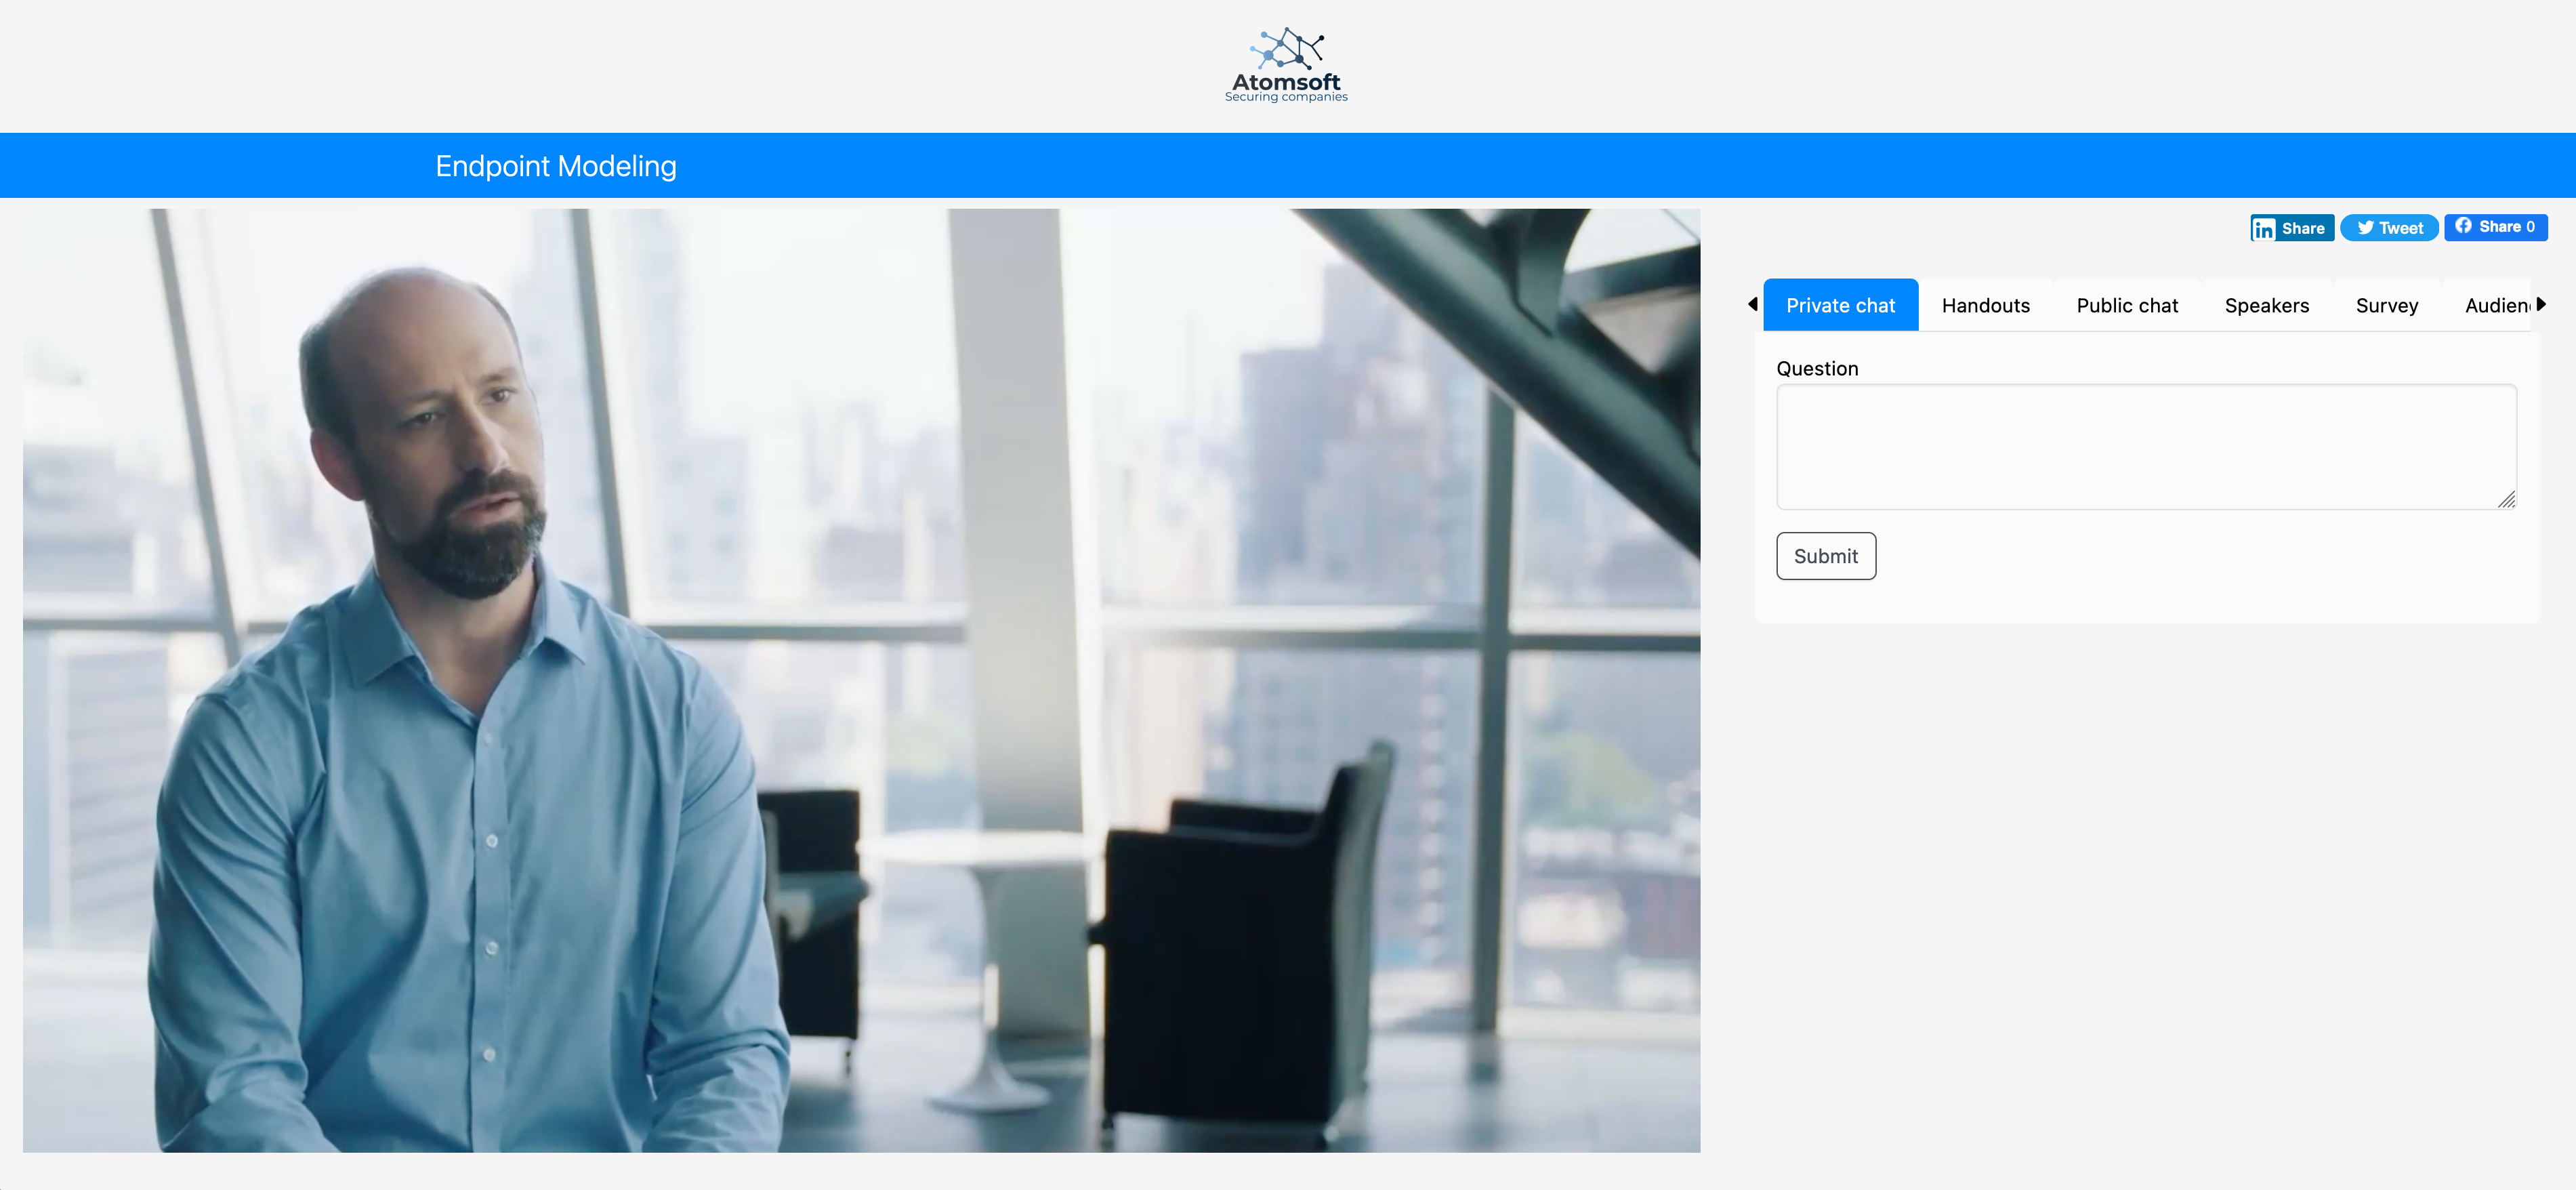
The webinar page
After registration is completed (or if you have a webinar without registration) a participant will land on the webinar page. The webinar page has a responsive design. On large and medium sized screens, webinar functionality is available in side-by-side tabs on the right of the player. On small screens, the tabs are replaced by sliding panels that appear below each other.
Creating a webinar
After logging into the Clevercast backend as administrator, you will be directed to your account's dashboard.
Go to the Webinars menu. Click on ‘Create Webinar’ in the sidebar to create a new webinar. A wizard lets you determine the global look and feel and configuration of your webinar.
Note that when creating a new webinar, Clevercast lets you copy the configuration of an existing webinar. If you have multiple webinars that have a similar look and feel and/or behaviour, we recommend starting with the first one and fully configuring it. You can then replicate this when creating the other webinars.
For detailed information about the wizard, see the webinar manual.
After finishing the wizard, Clevercast creates the new webinar and redirects you to its home page.
Backend home page
The home page of a webinar in the backend shows you the main settings and current status of your webinar.
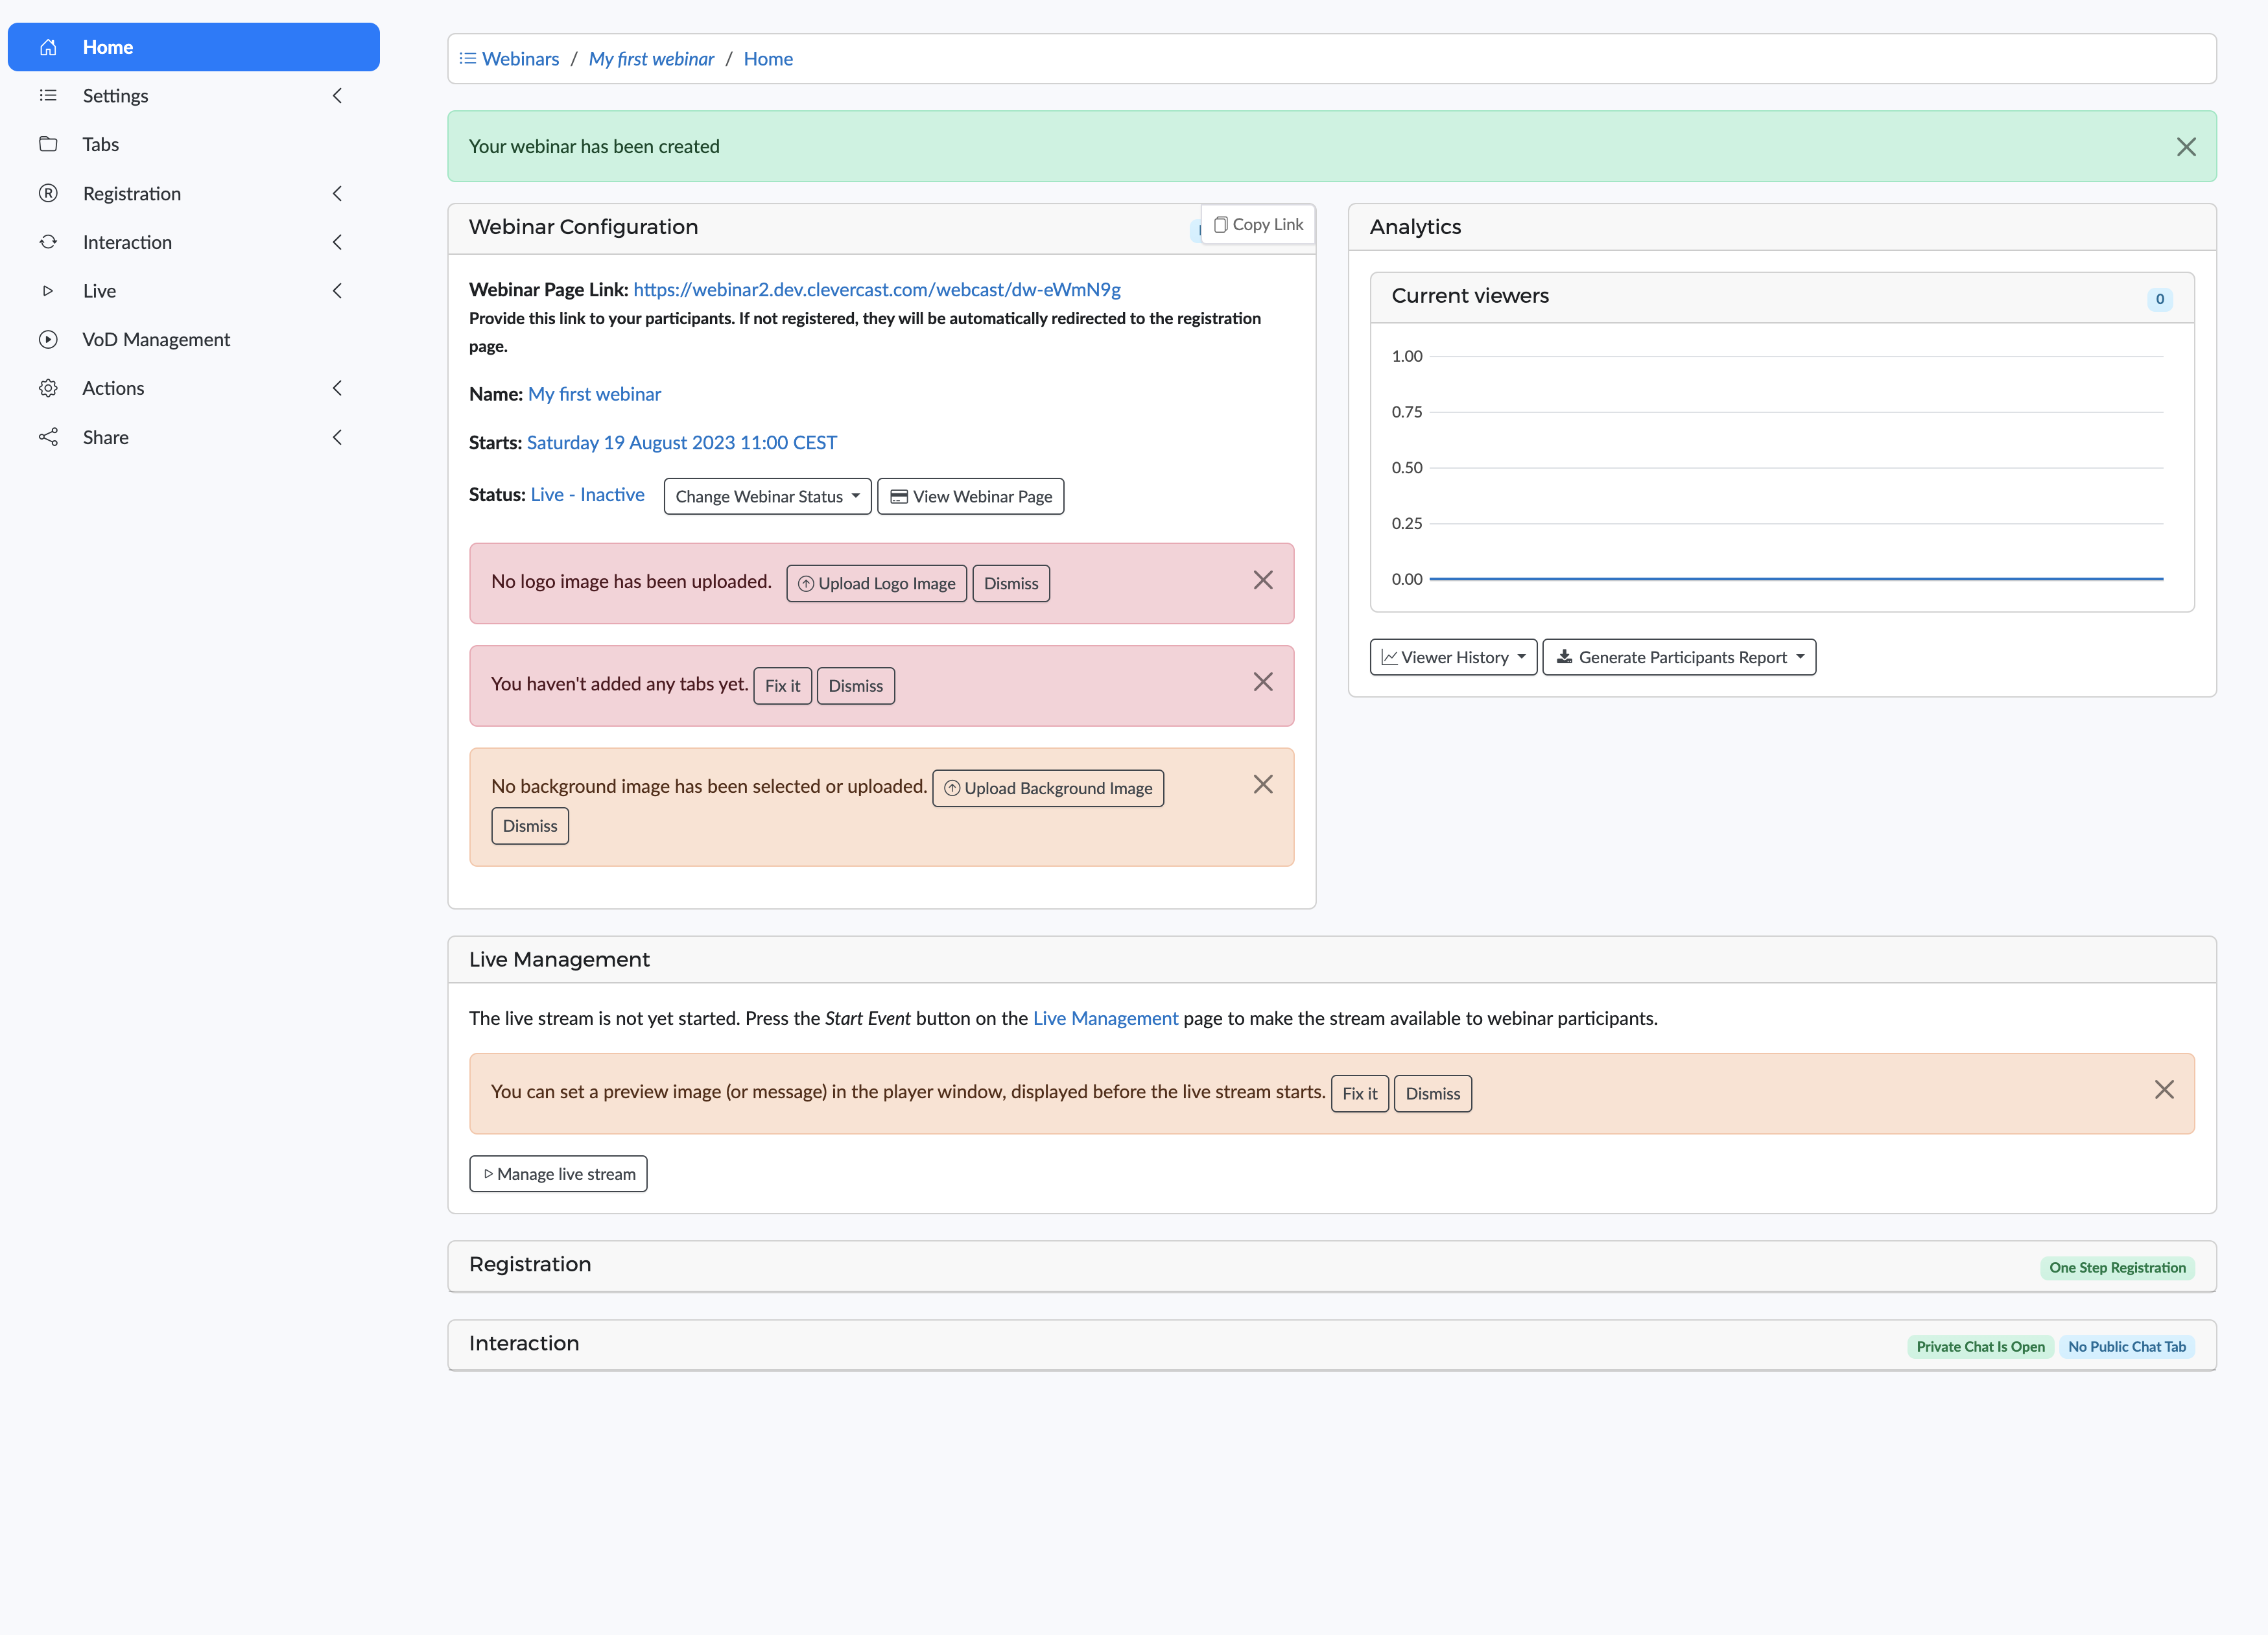
The home page may contain notifications in orange or red. Notifications in orange are hints that alert you to certain ways to enhance the look of your webinar. Notifications in red indicate settings that are usually part of a webinar's configuration. For a first time user, we recommend following these hints and viewing their effect on the webinar and/or registration page.
Webinar status
A webinar always has a status that determines what the participants will see in the frontend. It is always visible in the top right corner of your screen. There are four main statuses:
- Live: the frontend displays the live stream player.
- On-Demand: the frontend displays the Video on-Demand (VoD) player. This allows participants to see a recorded or uploaded video, which allows pausing and seeking.
- Cancelled: the frontend displays a helper page with the message that the webinar has been canceled.
- Not-Available: the frontend displays a helper page with the message that the webinar is no longer available.
A newly created webinar automatically has the Live status. As administrator, you can change the status through the ‘Change Webinar Status’ dropdown button on the home page.
When the main webinar status is live, its behaviour also depends on the live event status. See below for more info.
Configuring a Webinar
Settings
To start, take a look at the different Settings menus. The ‘General’ settings let you (re)set the webinar title, summary, organizer and start time.
The 'Webinar Layout' menu allows you to further determine the look & feel of the webinar page. Note: you can choose whether or not to use the same colors and images for the webinar and registration page.
When you make a change to the settings, you can immediately see its effect by opening the ‘Actions’ menu and pressing ‘View Webinar Page’. This will cause the frontend webinar page where participants will see the video (after they have registered) to be displayed in another tab.
Tabs / Panels
On large and medium sized screens, the webinar page will have a video player on the right, and a number of tabs on the left. On small screens, the tabs are replaced by sliding panels that appear below the video player.
Via the 'Tabs' menu in the backend, you can determine which tabs are used and how they are configured.
Tabs can be used for various purposes:
- Informational: Text (e.g. HTML5 formatted summary, agenda...), Handouts (e.g. downloadable PDFs), Speakers (name, description and picture of each speaker)
- Interactive: Private Chat with the webinar's moderator(s), Public Chat with all participants, Audience Polls, Survey
- Other: you can use an iFrame to embed 3rd party functionality in a tab (e.g. Slido widget, Wordcloud ...)
Registration
In the submenu Settings you can select the type of registration:
- No Registration: the webinar is publicly accessible. All participants get access to the webinar page. Since participants are unknown, public/private chats and voting are not available.
- One Step Registration: when someone tries to access a webinar for the first time, he is redirected to the registration page. After submitting the registration form, the participant is immediately redirected to the webinar.
- Two Step Registration: when someone tries to access a webinar for the first time, he is redirected to the registration page. After submitting the registration form, the participant receives an email with a unique link for access to the webinar.
- Invitation-only: get access to the webinar via a URL
Select the type of registration, via the dropdown button on the Registration Page, before starting to configure the registration page. The available settings and options depend on the registration type.
Apart from the first and last name and email address, which are required fields, you can fully configure the form controls that are used for registration.
When you make a change to the registration page, you can immediately see its effect by opening the ‘Actions’ menu and pressing ‘View Registration Page’. As a result, the frontend registration page will be displayed in another tab.
You can also let Clevercast send invitation, reminder and follow-up emails for your webinar. The 'Registrants' menu lets you manage registered participants and see the minutes of live and VoD video that have been watched by each of them.
Interaction
Tabs like chat, audience polls and surveys let you add interactive functionality to the webinar. The 'Interaction' and 'Moderate Chat' menus allow for further configuration and management during the webinar. Interactive data can be downloaded afterwards.
To test the interactive features, you can:
- Go to the webinar page in a second browser (register first if necessary). Make sure that you are not logged into the backend when you use the interactive features in the second browser (e.g. public and private chat).
- Open the Moderate Chat in your first browser (where you are logged in as admin) by pressing ‘Moderate Chat’. Moderate Chat lets you see the messages from your first browser and answer them as moderator.
Managing a live webinar
The Live page allows you to manage the different aspect of the live stream.
Before you start
- To manage a live stream, it is important to know about the event status, live stream latency and event flow.
- For multilingual live streams, you should know which broadcast protocol to choose and how to configure your encoder.
- For Translate@Home: you'll need to know about the Real-time Management room for testing and communication with interpreters.
Live streaming guides
Depending on your broadcast protocol, choose one of the following getting started guides.
- Managing a single-language live stream
- Managing a live stream with AI closed captions and speech translations
- Managing a live stream with multiple audio tracks or channels
- Managing a live stream with Translate@Home
- Managing a simulive stream
Important: these guides refer to enterprise plans. For a webinar plan, please skip step 1 ('Creating the event'), since the event is automatically created when you create a webinar. All other steps remain the same.
Manuals for interpreters using T@H
If you have a multilingual plan with Translate@Home, your interpreters should take a look at the Interpreter Manual, which includes the requirements and best practices for using T@H.
Manuals for subtitlers and correctors of closed captions
If you have a multilingual plan with closed captions, manuals are also available for Human Subtitling and AI Speech-to-text Correction.
Publishing to Video on-Demand
Converting a cloud recording
In most cases, a webinar will start out live and may end as Video on-Demand (VoD). Clevercast automatically records the live stream and lets you convert it to VoD. Note that we strongly recommend to always make a local recording of your stream as well (since network issue may result in missing parts or a corrupted cloud recording).
On the VoD Management page, press the ‘Preview and Trim Video’ button to select a start and end point for the Video on-Demand. Then press the ‘Publish’ button to let Clevercast transcode and publish the video resolutions (for adaptive bitrate streaming) on the CDN. This will take some time.
If you leave the ‘Automatically set webinar status to on-demand when the video is published’ option checked, Clevercast will set the webinar status to on-demand when ready. This will automatically make the on-demand webinar available to your participants. If you uncheck this option, the webinar status will remain ‘Live - Ended’ until you manually set it to on-demand (through the Update Webinar Status dropdown on the backend's Home page).
Upload video
You can also upload a video to Clevercast. As long as no video is published, the VoD Management page will let you select a video file on your computer and upload it to the webinar. Since the file must be transcoded to multiple resolutions (for adaptive streaming) and published on the CDN, this will also take some time.